Notifications
Clear all
MODX/MODX+ Series Synthesizers
16
Posts
3
Users
0
Likes
1,389
Views
Topic starter
I'm starting new Cubase/Nuendo project at zero. I don't want to use VST Connect VST3 plugin. And I have interes use only controls and sysex.
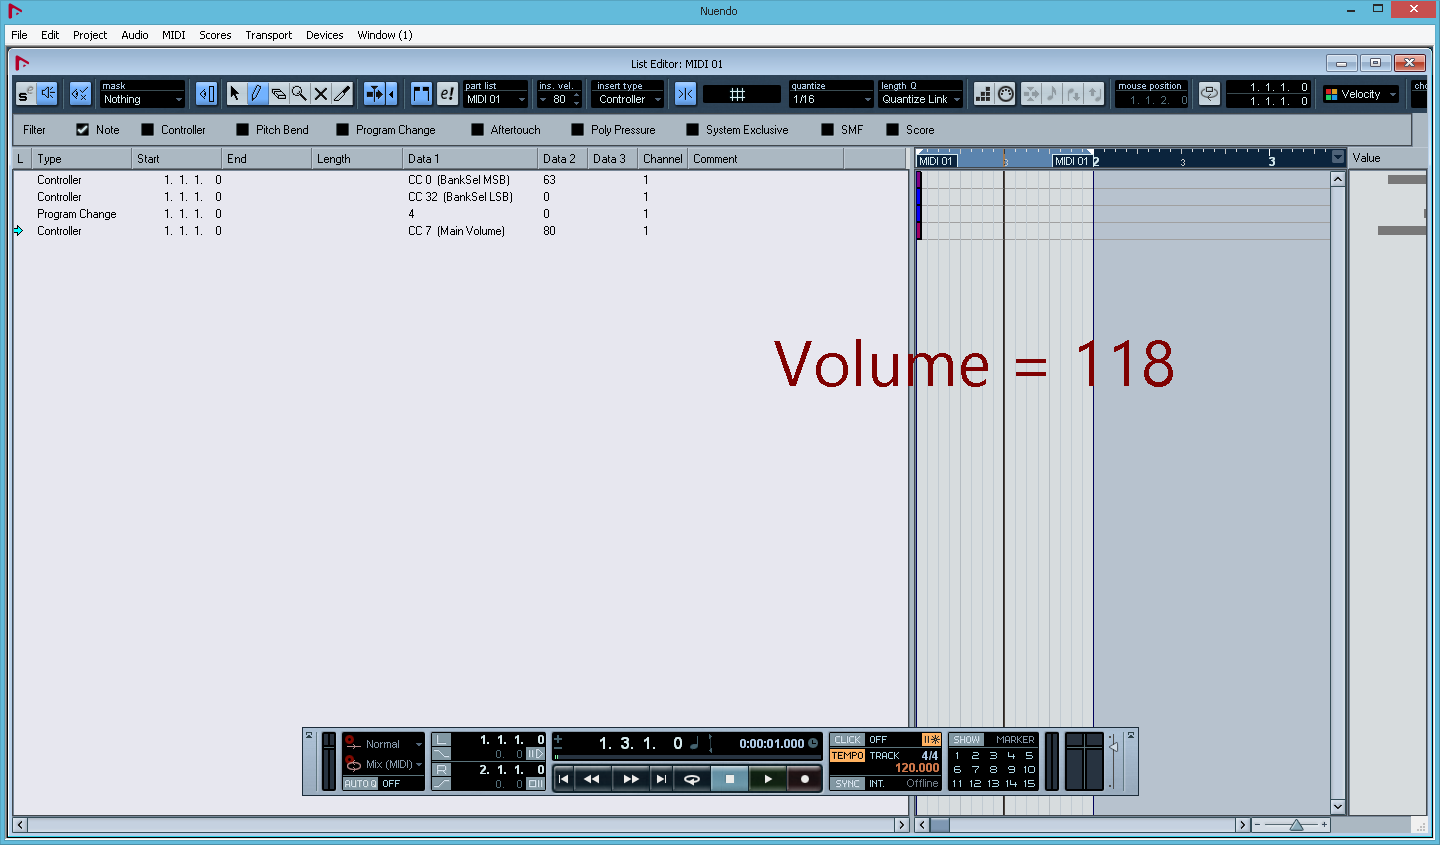
Now I have problem. Why MODX set volume different at any position over start point?
And I would to know some more controls to initialize per track new project.
MIDI I/O Local Control = Off
Quick Setup = I don't understand how to use this. Nothing difference.
?
Please help me with your knowledges
Posted : 28/05/2021 2:05 pm

Change SysEx H/M/L addresss 00/00/00 (one byte) to change the tone generator volume. Which I imagine you are showing is 118 in the picture.
Quick setup does make a difference - each of the buttons on the bottom changes a different set of variables. That's what these buttons do. Ignore the color change(s) of the buttons. They DO NOT indicate the current state of the settings they change. How the buttons change colors is confusing. And if you navigate away from the screen and back - it will always "highlight" Standalone. However, if you pressed some other button then all of the settings are likely still changed the way the other button you pressed changed the settings.
Don't worry about the quick setup buttons for now. If you're going from "scratch" then just stick with Standalone because that would match the settings on power-on (most likely). At least for the system settings. Then there's Performance settings (that are altered by each of the quick setup buttons) and these will vary Performance to Performance. Most all of the Performances from the factory presets are setup matching what "Standalone" would do.
The way you're describing what you're trying to do - you're going to want to send all of the Sysex and MIDI commands to initialize everything "correctly" for whatever you are trying to do. Setting up your own "templates", as such, that are part of Cubase projects that you create.
The Sysex commands are documented in the data list.
You've already mentioned wanting to go against the grain -- which means you're doing this the hard way. So I'm guessing you have a good reason for doing things the hard way. I often do the same - no judgement here.
Posted : 28/05/2021 10:47 pm

MSB 63, LSB 0, PC 4, sent on MIDI Channel 1 will recall the “CFX Stage” as Part 1
“CFX Stage” recalled as you are doing will be recalled with the Volume pre-set at 118. Each Part when recalled comes with a plethora of settings already programmed at the factory by Yamaha’s team of programmers. ,..among them is the volume... which in this case is 118.
If you desire to change it 80, it is highly recommended you do it a couple of clock pulses after it is recalled. Looking at your screenshot, you have all your setup data on the very first clock tick. In such an instance the preprogrammed value will rule.
Simply move you cc7 = 80 message a couple of clock ticks later.
Every time you return to the top of the sequence, the volume will reset to 118 because you are recalling the factory programming and that is where it is STORED (118). Your setting of 80 must be sent at a (slightly) later time.
Since you are not using MODX CONNECT (and are doing it the hard way) you must input your BankSelect and Program Change and other setup data in a Setup Bar (a la General MIDI protocol)... you should leave, a clock tick or two between recalling an instrument to a Part and registering any change to the default settings. And then leave a good 100-300ms of time between your setup configuration and the start of any musical Note data (this is calculated across 16 channels and Parts). In GM protocol, typically, the entire first measure is dedicated as a “Setup Bar” and music begins at Measure 002 — specifically to avoid any timing anomalies. You will find usual a clock tick or two is all that is necessary. (Anything but all at once).
Extra Credit:
The reason you would want to use MODX CONNECT is because it captures your customization of each instrument sound you want to use. Not just Volume, but effect send amounts, Pan position, etc., etc.
It avoids having to use BankSelect MSB/LSB and Program Change data and typing into your DAW all those messages for each and every parameter you wish to alter from the factory stored condition.
MODX once activated, with AUTO SYNC ON, can run silently in the background (without you having to deal with anything but your MODX front panel). No typing required
It will automatically restore every MODX instrument and parameter setting as you desire, instantly, when you next you open this Project.
Offered just FYI
And for the sake of ‘the easier way’.
Extra Extra Credit:
Quick Setup = I don't understand how to use this.
When working with a DAW you often need to make a half dozen or more settings in your Utility area depending on what you are preparing to do. The “Standalone” and the three numbered “Quick Setup” templates, can store your settings for one-touch recall.
It is not necessary to use these (in fact, unless and until you know what they are doing, it is better to learn and make the individual settings. As you note, you have set Local Control = Off — this is a standard operating procedure when recording MIDI data to an external DAW because it allows you to intelligently route the MIDI message Out to the device and on the channel you desire (from within the DAW).
Other settings include Clock Sync, whether Arp data is output via MIDI, or not, Transport control, etc., etc.
When you have developed a workflow (it could be as many as 6 or settings that configure your MODX to your DAW), you can STORE those Settings as a Quick Setup template. Instead of running to four ar five screens configuring things you can capture your configuration so it can be instantly recalled with “one-touch”. The Factory defaults are set for the most common configurations — but these are customizable.
FACTORY DEFAULTS FOR QUICK SETUP #1: MIDI RECORD ON DAW
MIDI I/O = USB
LOCAL CONTROL = Off
ARP MIDI OUT = Off
MIDI SYNC = MIDI
CLOCK OUT = On
REC/TRANS SEQ CONTROL = On/On
CONTROLLER RESET = Reset
GLOBAL ASSIGN (FS/SK/SCENE) = Arp Sw, 95, 92
FACTORY DEFAULTS FOR QUICK SETUP #2: ARP RECORD ON DAW
MIDI I/O = USB
LOCAL CONTROL = Off
ARP MIDI OUT = On
MIDI SYNC = MIDI
CLOCK OUT = On
REC/TRANS SEQ CONTROL = On/On
CONTROLLER RESET = Reset
GLOBAL ASSIGN (FS/SK/SCENE) = Arp Sw, 95, 92
For example, in my personal setup I send Sysex from my Super Knob, and Scene Change buttons, (both are set to “Off” instead of cc95 and 92, respectively) and seldom use the FS as Arp On/Off, so my templates have been customized for my work habits. When I’m ready to work with a DAW, I tap my “Quick Setup” configuration and it makes MY SETTINGS! One button touch rather than the 8 or 10 I would have to make each time.
Posted : 29/05/2021 1:07 am
Topic starter
Thank you Jason! Thanks Bad Mister!
Posted : 29/05/2021 1:35 pm
Topic starter
Change SysEx H/M/L addresss 00/00/00 (one byte) to change the tone generator volume.
00/00/00 What the SysEx?
F7 43 10 7F 1C 07 31 00 24 80 F7 ~ MIDI PARAMETER CHANGE TABLE (PERFORMANCE PART) Volume

If you desire to change it 80, it is highly recommended you do it a couple of clock pulses after it is recalled.
In this example haven't problem with one tick. Yes, I know different time is better choise.
I can leave everything as it is.
But it's not nice when I edit from any time the volume annoyed changes
Only play from start this code are to play correct
Posted : 30/05/2021 4:04 pm
Topic starter
Maybe I should do it differently? First, create a performance for the project and work with it? OK...
// I tried MODX Connect - useless stuff. Loads and saves settings from MODX. This can be saved and loaded by hand directly on the device itself.
Yes! Working with new performance...
1. Init Normal (AWM2)
2. Set preset CFX Stage or CFX PopStudioGrand to part 1
...
3. Set Drums to part 10 (for compatibility with PSR-S Series/XG)
4. Set Bass to part 11 etc
Save a performance and use it per song/project with DAW...
If need resave volume, pan settings again to performance.
--->8---

Something good! Volume stay now! 🙂
Posted : 30/05/2021 5:59 pm
00/00/00 What the SysEx?
See https://www.yamahasynth.com/ask-a-question/how-to-send-sysex-commands-to-montage
Notice how the thread says "TO MONTAGE" at the end. For MODX - you'll have to adjust slightly.
... where you'll see:
1.a) The "" format shows: "F0H 43H 1nH 7FH 1CH 02H ahH amH alH ddH ... ddH F7H"
Change the bolded value to match MODX's model ID which is 07H (7 hex).
When I said H/M/L = 0/0/0, this means ah=0, am=0, al=0. Which are the 3 address bytes to identify which parameter you want to change.
You had previously mentioned already using SysEx - so I didn't spell everything out.
That said - you may not need to do this at all if you're getting the more friendly easier method working for you that leverages tools rather than going through all this trouble.
Posted : 30/05/2021 7:01 pm
Topic starter
How to press button solo via SysEx ?
00 F0 SysEx
01 43 Yamaha ID
02 10 Device Number
03 7F Group ID High
04 1C Group ID Low
05 07 Model ID
06 31
07 00 MIDI CH
08 18 MUTE * --- SOLO # ???
09 00 OFF *
10 F7 EOX
Posted : 18/07/2021 4:07 pm
Topic starter
Address 31 2p 17
Insertion-A Parameter 11 (?)
I'm searching Side Chain Level...
What is MSB/LSB mean here?
No documentation enough.
+24dB -Infinity to jump rundomly!
🙁
Posted : 19/07/2021 9:46 pm
If you want to solo only a single Part - then mute all the rest. You'll send more than one Mute ON message (to all but the solo'd Part) and Mute OFF to the solo'd Part.
That's one way.
If you have 4 Parts and want to solo Part 3, you would send:
H/M/L address 0x31/0x00/0x18 = Data 0x01 (Part 1 Mute ON)
H/M/L address 0x31/0x01/0x18 = Data 0x01 (Part 2 Mute ON)
H/M/L address 0x31/0x02/0x18 = Data 0x00 (Part 3 Mute OFF)
H/M/L address 0x31/0x03/0x18 = Data 0x01 (Part 4 Mute ON)
=======
Address 31 2p 17
Insertion-A Parameter 11 (?)
I'm searching Side Chain Level...
What is MSB/LSB mean here?
No documentation enough.
+24dB -Infinity to jump rundomly!
The address 0x31/0x2p/0x00-0x31,0x43 deal with a Part's InsertionA effect. The letter "p" is replaced with the part number minus 1. If you are dealing with Part 6, then p=5 and the middle address byte would be "0x25". If you are dealing with Part 1 then the middle address byte would be "0x20".
For any given Part, the InsertionA effect can be one of many different effects. Each effect has its own meaning for each parameter number. This is why here the InsertionA parameters are listed generically. Notice the table's first "Description" box tells you: "Refer To The Effect Parameter List".
This means you need to look elsewhere to get the information for each effect.
What Part are you trying to change the Side Chain level for? What is the exact name of that Part's Insertion A effect?
I see you show Insertion-A Parameter 11 in the above. That would only match the effect "VCM Compressor 376" or "Classic Compressor". Is one of these two the Insertion A effect you're working with?
If so ... let me assume you're dealing with "VCM Compressor 376" -- if you're dealing with "Classic Compressor" then this will be helpful. Just use the tables in a similar manner but reference the correct one.
https://usa.yamaha.com/files/download/other_assets/9/1341759/montage_en_dl_j0.pdf
Page 156, Table "[1] VCM Compressor 376" shows parameter 11 is "Side Chain Input Level". The range is from -infinity to 0dB to +24dB. The valid values are from 0 decimal to 127 decimal (0x00-0x7F hex). The last column in the table shows that one should reference parameter table #45 to get documentation on what value represents what dB.
Page 175 shows Table #45 (entitled "Side Chain Input Level" ). Notice a value of 0 is negative infinity. A value of 79 (decimal) is +0.0dB. A value of 127 (decimal) is +24.0dB. All other values between are also shown.
Since this parameter is only one byte - MSB/LSB will need the MSB to be set to 0x00 and LSB set to the table value.
It appears that MSB goes first - so the value would be 0x00 0x00-0x7F (first value 0, 2nd value 0-127). However, it may be in reverse order. This is fairly easy to figure out by setting the InsertionA for a Part to say "VCM Compressor 376", changing the sidechain level to anything other than -infinity, then read MSB/LSB (2 bytes) at address low of 0x17 (offset 17) and see the byte ordering of a bulk dump for these two bytes. One of the two bytes will be zero and the other byte will be non-zero.
If something isn't working correctly, I would swap my interpretation of MSB/LSB.
Posted : 20/07/2021 6:34 am
Topic starter
I am trying to find the correct algorithm of actions. I need to enable sidechain from Cubase/Nuendo via SysEx or CC.
Is it A/B FX buttons are pressed on by default or I need to switch it from SysEx?
What's good compressor for good result for actual or modern Side chain to use?
VCM 376 or Classic? Yes, I see code 80 00, 80 10 etc. (data list)
Whats enough action with SysEx to enable SideChain from DAW?
Posted : 20/07/2021 8:04 am
The best way is probably to scrap Sysex altogether because it's a rather clumsy way to get the job done. Use CC since CC has better tools in a DAW to manipulate. Either use a CC to modulate the Superknob or an assignable knob.
You would then use Superknob and/or Assignable Knob assignments to modulate sidechain. Assignment of either control to the sidechain level is more simplified than building a SysEx to do the job.
I can't tell you which effect is the best to use - that's a matter of personal choice.
Posted : 20/07/2021 4:31 pm
Topic starter
DRUM VOICE KEY
| Address | Size | Data Range (HEX) } Parameter Name | Description |
| 5p kk 06 | 2 | 00 – 1F ; 00 – 7F | Wave Number |
1 – 6347 (User, Library: 1 – 2048)
1st bit6-0 -> bit13-7
2nd bit6-0 -> bit6-0
How to get 4632 in two hex bytes? What it's a formula?
C5 4632 Bd Analog Tight
1st bit6-0 -> bit13-7 --- I cannot to understand. Please, an example?
Some like MSB is multiplier n * 7F
It's like 4632 / 127 = n
Posted : 24/07/2021 1:58 pm
1st byte is MSB. 2nd byte is LSB.
"1st (byte) bit(s)6-0 -->(provide) bits 13-7 (of the wave number)"
"2nd (byte) bit(s)6-0 -->(provide) bits 6-0 (of the wave number)"
If you want to get 4632 decimal into these two bytes, then I would find it easiest to convert to binary and then organize into two groups of 7 bits. Last, convert each of these 7-bit groups into hex (or decimal) values depending on what you're working with.
4632 (decimal) = 0x99A (hex) = 100110011010 (binary)
= 0010011 (MSB) 0011010 (LSB)
= 0x13 (MSB) 0x1A (LSB)
MSB is programmatically arrived at by SHR (shift right) 7. Notated in most languages by ">>7". 0x99A >> 7 = 0x13
Then LSB is arrived at by ANDing with 0x7F. 0x99A & 0x7F = 0x1A
This is all simple stuff. The only "wrinkle" compared to what most people are used to is 7-bit vs. 8-bit values.
The docs actually spell out everything fairly well.
Posted : 24/07/2021 10:51 pm
Topic starter
MIDI Channels is 16 maximally...
Can I use 16 x 3 software ports? 😀
What is MODX1, MODX2, MODX3 ports in Cubase? 😮
Posted : 15/08/2021 11:32 pm
Page 1 / 2
Next
