I've had trouble trying to keep the simplest Superknob parameter when copying parts from one performance to another.
For, example, I have a single part performance string pad. All the Superknob does is changes the volume from 0 to 126 when twisting clockwise.
So, I select that part, hit "copy", then "add" it to another performance.
The string pad shows up, but the Superknob no longer controls the volume of the pad.
So, I try Blake's shortcut of hitting "Shift>Control Assign>" and twisting the Superknob to assign a volume amount. (I saw this trick in one of his firmware update videos)
Unfortunately, I get the "Assignable Knob full." message.
So, I am stuck. Is there an easy way to get the parameters I originally had? OR, how do I free up space so I don't get the "Assignable Knob full" message? I have been watching the tutorial videos, but can't seem to connect the dots. Can you help?
Thank you!
Phil
So, I am stuck. Is there an easy way to get the parameters I originally had?
Yes, there is. Thanks for the question.
First, let me explain why the upper Common/Audio Assignments (including the Super Knob assignments) are not automatically activated when you “merge” Performances. As you have correctly noted, they are temporarily “stripped off” when you initially “merge” a Performance from its previous HOME location and attempt to move its Parts into its new HOME location. (Below we will describe how you can recall that programming so that it fits with your current Common settings).
If you think about it — the Performance you start with is in its original HOME (where all the upper Common Assignments make sense), you touch a “+” to Add (or “Merge”) another Performance. (Referred to as the “Merge Performance”...)
Let’s say you start with “CFX Concert” — a 4-Part Performance. On the HOME you press “+” in Part 5 to “merge” another Performance... say it merges three more Parts. The Super Knob assignments of the “merged Performance” are temporarily “stripped off” because:
What was Part 1 in the Merge Performance is now located in Part 5
What was Part 2 in the Merge Performance is now Part 6, and so on.
All the Assign Knob assignments would now be meaningless if simply copied to the new HOME. They would wind up changing parameters in the Piano... instead of new Parts. If there was a Control Set Assignment “Part 1 Assign 1” in the Merge Performance’s HOME location, that now does not apply in its new HOME...
Also on the upper Common/Audio level of the architecture are the System Effects, the Master Effect and the Master EQ... Because a Performance program can have only one set of System Effects, one Master Effect, and one Master EQ... those that were used in the merged Performance’s previous HOME are not brought along. Any assignment directed at these Effects in the Merge Performance would be totally meaningless in the new HOME (the Effect Type might even be entirely different... so obviously these disappear).
The System Effects are “room acoustics” of the band in their current location. All the members of the band plug into the same mixer and all channels of that mixer have Send controls to the selected Reverb and selected Variation for the current HOME Performance. Which makes sense because System Effects are “shared” effects to recreate the the reverberation and time delays found in the environment in which the band is playing.
But what about all the programming within the Control Set: the Curve selection, the Polarity, the Ratio, etc?
When you merge a Performance, the firmware does NOT just simply paste the settings frivolously on top of the target. It holds those detailed settings until YOU make a decision about where to apply them. Each upper COMMON Control Assign can have 16 Source/Destination Control Sets. If all are already used, you can decide which ones you wish to eliminate or retask. If you have Control Sets available (blank), you can proceed... if you go ahead add a Control Set by touching the “+” to Add a new Destination for your newly merged Parts... you will naturally start by setting the DESTINATION entry to “PART 5 ASSIGN X”
You’ve Added (merged) new Parts to your Performance... you know that Part 1 is now in Part 5. You go to the EDIT > COMMOM/Audio > “Control” > “Control Assign” screen to “+” a Destination (you are telling it where to find the Part). As you tap the Destination “+” box the pop-in menu appears... you select “Part 5” > “Part 5 Assign 1”
If in the Performance you are merging, there was previously something set to “Part 1 Assign 1” - it will show up now already programmed as “Part 5 Assign 1”... the Curve, the Polarity, the Ratio and the Parameter shapers are all immediately recalled. They never went away... they are simply not automatically brought along until YOU review them, and approve them. The are held in the Edit Buffer until YOU make the decision to use them here, in their new HOME.
As you go through this process, you’ll find each of the Control Sets of the Merge Performance sitting there waiting for you.
If you have all of the 8 COMMON Assign Knob engaged, you can decide which Knob to combine the assignment with, it will not automatically stack it on an occupied Knob... you can put it there, manually. It forces YOU to review the assignment.**
In general, when deciding to stack multiple parameter Destinations on an upper Common Assign Knob, you want to consider the direction of that Knob. In general, parameter direction should match the direction the Knob is set to go in. If you have a parameter that is set decrease as the Super Knob is increased should be linked with a Common Assign Knob moving in reverse direction (or you will need to reprogram the Curve, Polarity, Ratio, etc.). If no Common Knobs share the direction you require, you can reverse the direction within the Control Set (Polarity, Ratio).
It’s designed like this to prevent serendipities from occurring. You simply have to decide what you want to assign on the upper COMMON/Audio level of the architecture for each Performance — things on the top level of the architecture apply to all Parts. If and when you add new Parts, those Parts must join the settings of their new HOME.
Audio settings found in the Merge Performance are also NOT brought along... the Audio settings of the current HOME Performance remain.
If the “theory” described above is not clear, please give use the Names of the Performances you are trying to merge and we can get specific.
Hope that helps.
**In previous synths, the Knob assignment would simply activate when Parts were added... and while every once in a while it would do something useful... but mostly it was a disaster. You would wind up inheriting some completely wacky behavior -x and then you’d have to hunt it down to fix it. The method described above is far, far better. It makes you deal with each Control Set by keeping the original work, all you need do is tell it which Part you want to apply it to... it’s like you’re deep scuba diving, and you find a spare tank of air — you don’t have to go all the way back to the surface to begin again (reprogram the Control Set parameters), you just activate it and continue...
In general, you are creating a new Performance when you “merge” Performances... we have an article in the works that highlights how to strip all upper level assignments - so that you can “rebuild” the entire Control Assign Function on that top level. After all it is going to be “Common” to all Parts.
Thank you so much for your detailed response! I understand the concept of the parameters being held in a buffer waiting for me to assign them. You explained that well. Unfortunately, I lost you in the middle of your directions. Perhaps I could get specific?
You said: "You go to the EDIT > COMMOM/Audio > "
Unfortunately, I lost you after "Edit".
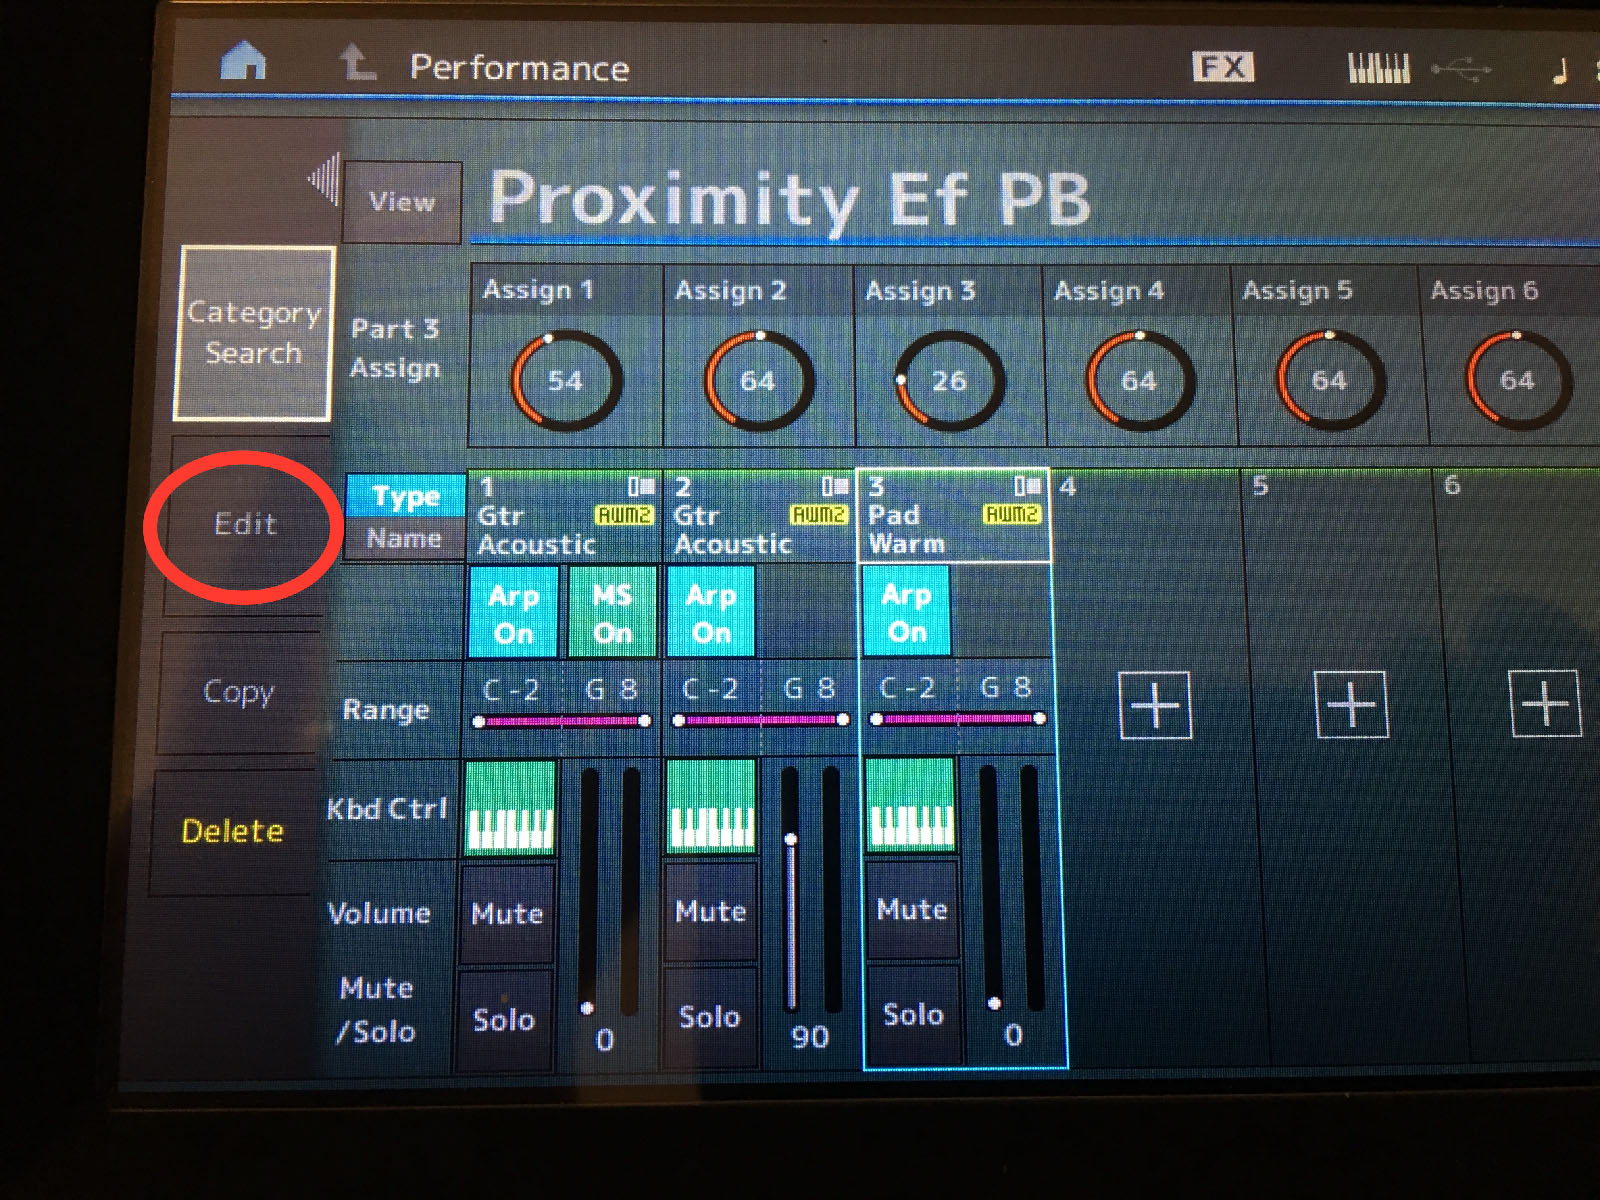
I am trying to control the volume of the pad with the Superknob. Here's what I did: I selected the pad (Part 3) and pressed the Edit button:
Then I get a page that does not have an option for "Common/Audio". (see second pic)
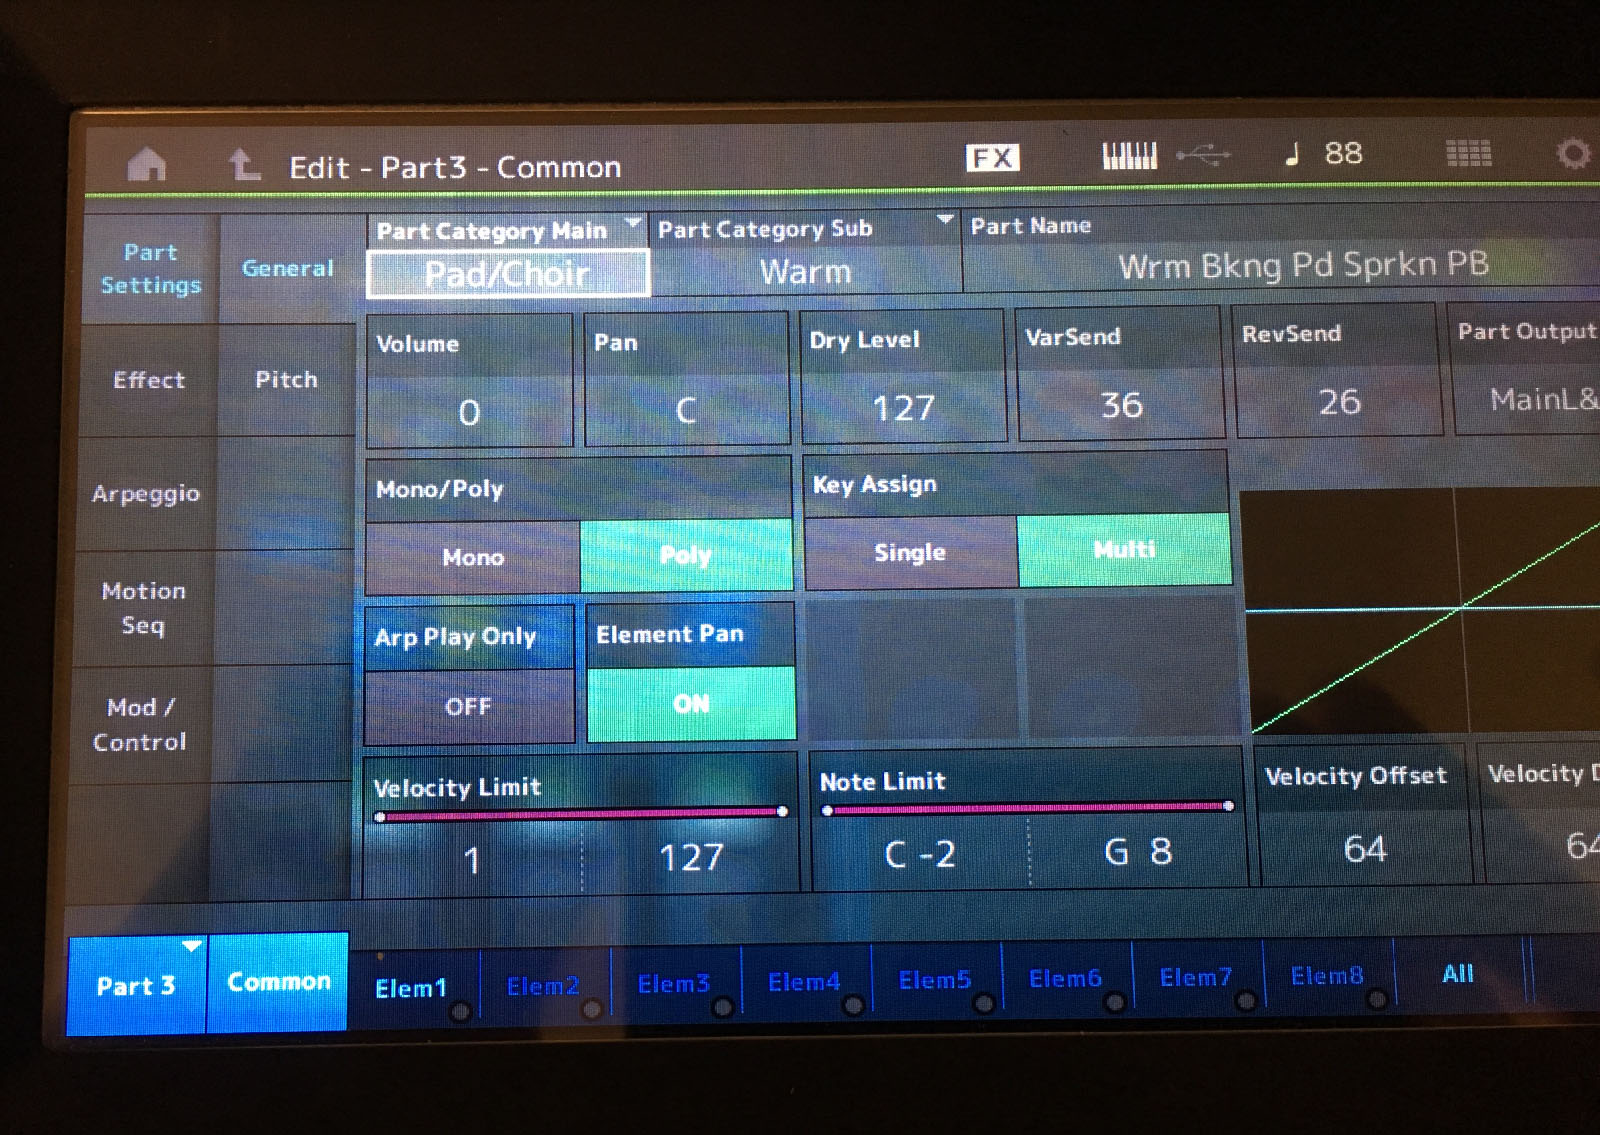
So, I don't know what to press... I do see "Common" at the bottom, but that is not helpful. I guess I am stuck at the very basics, and am a little embarrassed because I have watched some of your videos several times trying to get some of the basic concepts down. Then I get stuck and can't move on to the next video in the series.
I hope I am not being tedious, and missing something obvious, so, I REALLY appreciate your patience.
You mentioned that you would help if I gave the names of the performances. I am trying to merge "Warm Backing Pad" with "Proximity Effect", and would like to control the volume of the pad with the Superknob.''
If I could pay someone who could tutor me in person, I would. Unfortunately, I am probably the only one with a Montage within 100 miles of my home in the boonies.
Thanks again, Phil!
Phil (Bates)
Sorry, I should have been clearer... assume you start from the HOME screen (the cursor highlight is on the Performance Name)
If you then press the [EDIT] button, you arrive at the “EDIT - Common/Audio” level of the architecture.
If you then touch “Control” in the first column, and “Control Assign” in the second column you arrive at the screen where The Common Assign Knobs can be linked to various Destinations... including control over Part Assign Knobs.
I will post back with a roadmap of how to approach this... it is right on target with the article I started... standby.
First, let's explore what is going on in the 2-Part Performance "Proximity Effect"
In audio, the proximity effect explains why the closer you are to a sound source the more lows you hear, the more definition you hear, and the farther away you are the more diffuse the sound, the less sharp it is. The Super Knob is moving EQ parameters, Reverb Send, Send to a Tempo Delay, and bring up Tremolo... the overall effect changes the position of the listener... from close to very far away.
When the Super Knob is at minimum (use an FC7 pedal in the Foot Controller 2 jack to move the Super Knob) the listener is close to the guitar, as you move the Super Knob toward maximum you are moving farther and farther away from the guitar. Proximity Effect. As you move the Super Knob, while on the HOME screen, you will notice that each of the eight Knobs seems to have its own individual movement as far as distance... Some even move in the opposite direction. You are turning up and turning down various parameters simultaneously. When we say the Super Knob is like having multiple hands, this is a good example.
If your goal is to add a Part ("merge" another Part), as mentioned the Super Knob programming goes into a buffer. However, you must look at what is already programmed on that upper Common level of the architecture, and then we can intelligently add a new PART (if there is room) and add its controls or make new ones.
Explore
Let's look at a couple of screens that can help you explore and learn what is going on within the "Proximity Effect" program.
Press [SHIFT] + [HOME] to go to the "Overview" screen
Alternatively, you could touch "Motion Control" > "Overview" from the HOME screen to get here
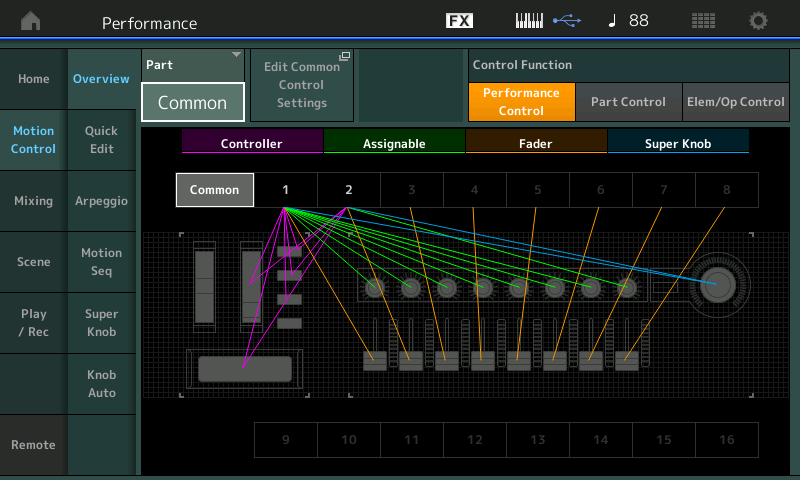
You can hone in on just viewing certain controls... Shown above you can see there are many assignments. You can move a Control to highlight just that connection.
You can choose to view just the Assign Knobs (green) and the Super Knob (blue)
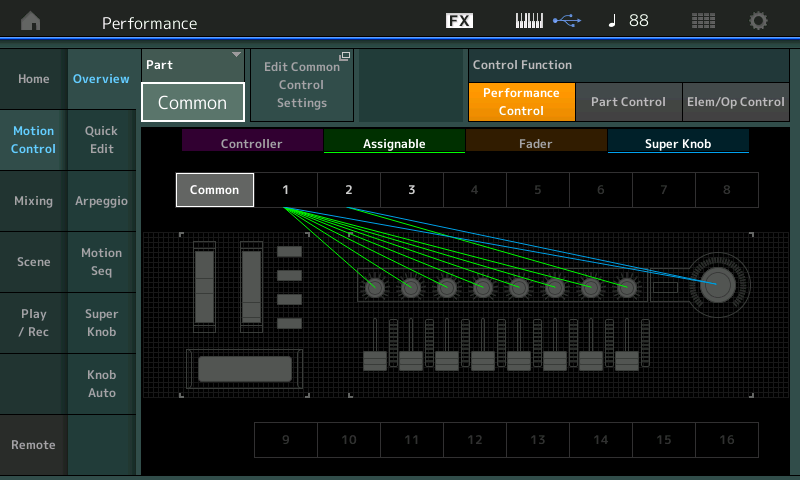
Touch the box that says "Edit Common Control Settings" to take the shortcut to the upper Common/Audio "Control Assign" screen
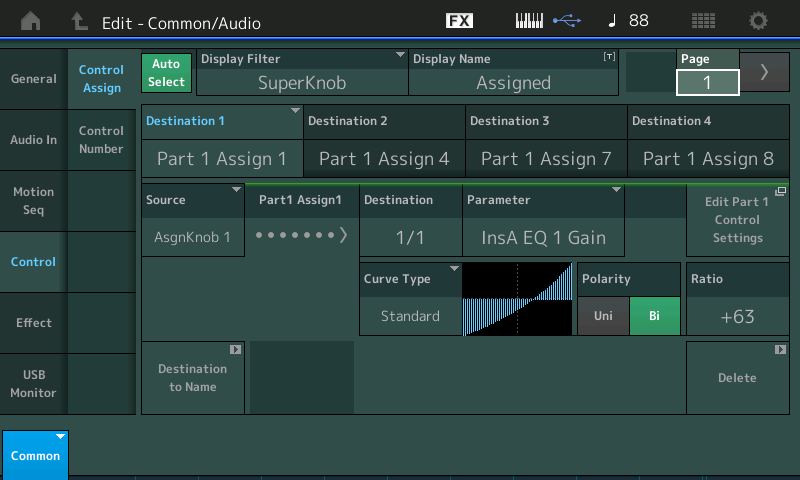
There are 2 PAGES of assignments (8 Destinations) used so far... leaving you 8 more Control Sets you can assign at this level of the architecture...
You can move the cursor highlight to each Destination box to review the assignments... go to PAGE 2 for the second set of four.
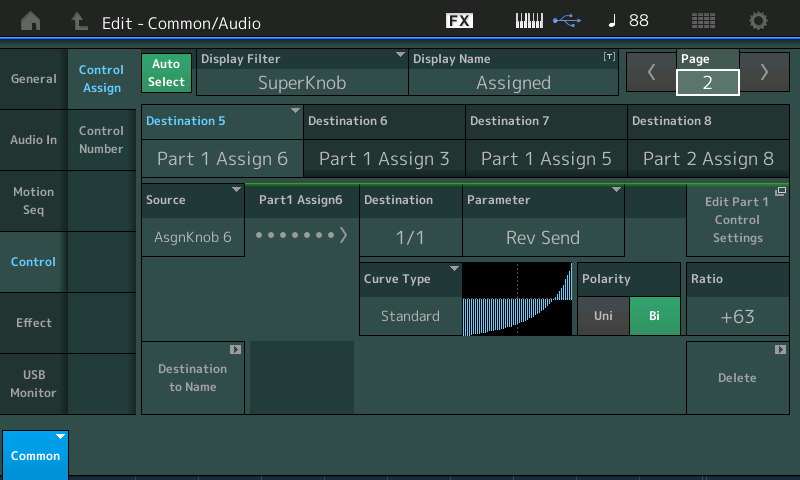
Part 1 parameters are being adjusted by 7 Control Sets, the 8th Set is controlling Part 2
We observed that each Assign Knob moves a differing amount... you can see this by navigating to the Super Knob Link screen.
From the HOME screen, touch "Motion Control" in the first column; touch "Super Knob" in the second column.

Turn the Super Knob... Notice that Common Assign Knob 7 is moving from 0 to 127... If you want to link the VOLUME of the PAD to the Super Knob - this is a candidate for that kind of control.
If you study the "Warm Backing Pad" Performance in its HOME location, you can find out, it has only one thing programmed to the Super Knob (Rev Send), and the PART has only Part Assign1 and Part Assign2 with any assignments... Rev Send and Var Send. respectively. The Part RevSend is linked to the Super Knob (Part 1 Assign 1)
The VarSend is assigned to Part Assign 2 but not linked to anything (Part 1 Assign 2)
Create the Merge
Return to "Proximity Effect"
On the HOME screen you touched "+" to ADD (merge) the Pad sound. When you touch "+" you are taken to the PERFORMANCE MERGE search screen.
Main Category: Pad/Choir > SubCategory: Warm > "Warm Backing Pad".
When you do this it joins the "Proximity Effect" as PART #3.
when it joins - only two of its eight Part Assign Knobs are doing anything...
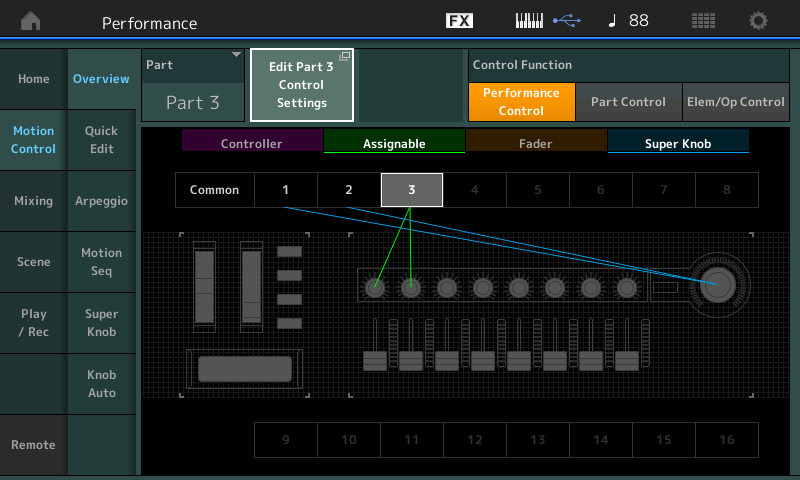
If you wished to assign VOLUME to the SUPER KNOB you would do the following:
Go to the Part 3 "Control Assign" screen...
With "Auto Select" active (green) turn Assign Knob 1 and then Assign Knob 2... Rev Send and Var Send, respectively. They are occupied — it’s not that you can’t simply add another parameter, but until you have to, why not select a Knob not assigned yet
Turn Part 3, Assign Knob 3 - it is empty... it shows a "+" meaning we can ADD a new Control Set... but let's not do it here... just yet.
But let's navigate to the parameter we want to assign to this KNOB... and then use the "learn" function to make the assignment...
Touch "Part Settings" > "General"
Here move the cursor to highlight the "VOLUME" for PART 3 (I see in your screenshot you have set the VOLUME here to 0)
The Volume you set here will be the minimum Volume. If it is 0 then the Super Knob (FC7) will be the control throughout the range 0-127.
Set the VOLUME = 0 and while the cursor highlights this parameter, press [CONTROL ASSIGN]
You will be asked to move the CONTROLLER you wish to assign... move Assign Knob 3 to make the assignment.
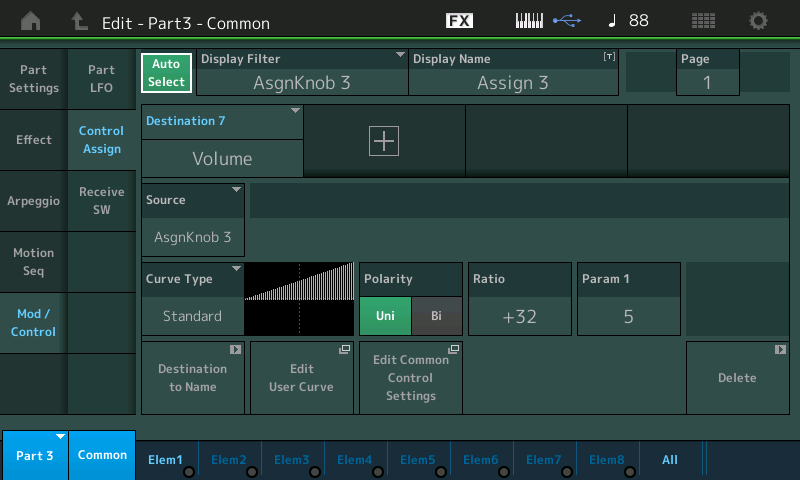
This “learn” function makes the assignment and takes you directly to the screen where you can customize its application.
Part 3 AssignKnob 3 will now control the VOLUME of the Pad sound. This means, that when Part 3 is the *selected* Part, grabbing Assign Knob 3 will Control the volume, minimum 0, through maximum 127
Link it’s movement to a Knob under Super Knob control
Next step is to link the PART Assign Knob movement to a COMMON Assign Knob (that moves when the Super Knob moves)
To now link this with the Super Knob, we link it with any of the upper Common Assign Knobs that move when the Super Knob moves... we already scouted out that on that upper level, Common Assign Knob 7 does the 0 through 127 movement (I am assuming) you want...
Touch the box that says "Edit Common Control Settings" to take the shortcut to the upper COMMON/Audio level...
Here we know Assign Knob 7 is where we want to make the Link...
"Auto Select" is active (green)
Turn Assign Knob 7... It is already controlling "Part 1 Assign 5"; simply touch the "+" to ADD a new Destination to this movement (you can stack parameters on any of the Knobs) we selected it because this Knob is behaving 0-127, therefore, it will work as the Volume control for the Pad.
We want to add "Part 3 Assign 3" which will already be our Volume Control Set.
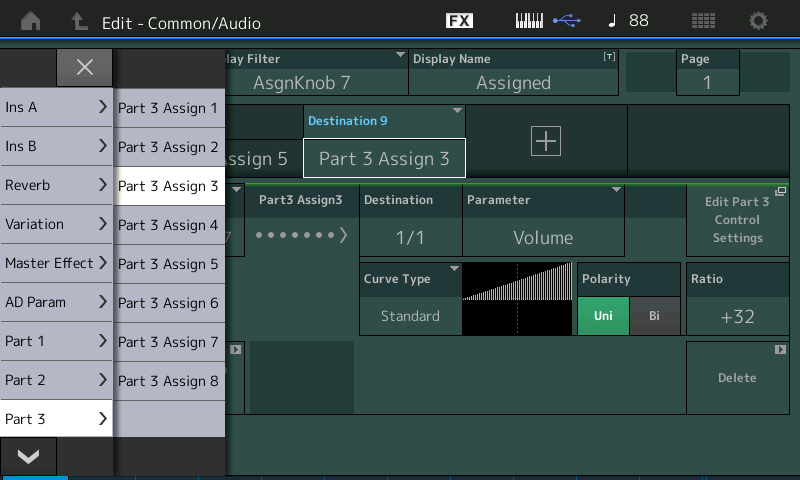
when you touch the "+" to ADD, tap the default parameter and using the Data Dial look for PART 3 > PART 3 ASSIGN 3
(Notice as you pass PART 3 ASSIGN 1 and PART 3 ASSIGN 2 you can see the Rev Send and Var Send options...)
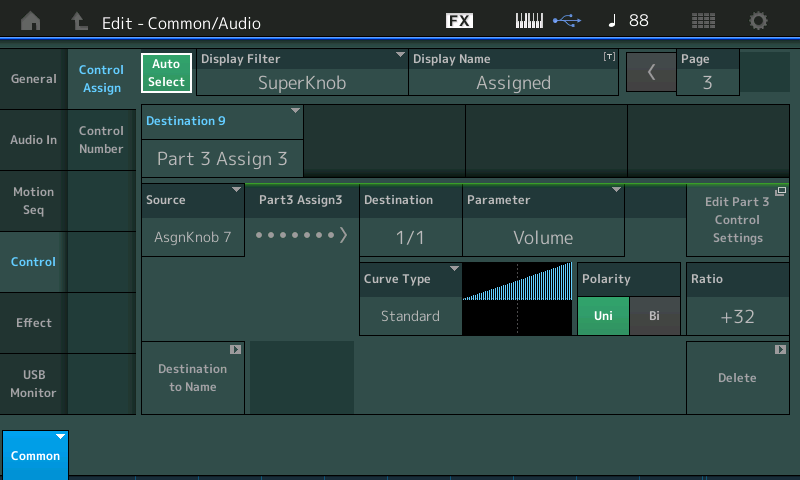
Set it to “Part 3 Assign 3”
Source = Common Assign Knob 7
Destination 9 = Part 3 Assign 3
What this gives you
When on the HOME screen (consider this the upper COMMON) the Performance Name is highlighted.
The Super Knob will change the close/far proximity of the acoustic guitar, as it increases the Pad volume.
If the [ASSIGN] button is lit, the Common Assign Knobs are accessible, turning Common AssignKnob 7 directly, will allow you to independently control the volume of the Pad.
If you move the Super Knob or FC7, the close acoustic guitar is in alone (at minimum) and the guitar is pretty far away by the time the Pad fades in... but if you grab the Common Assign Knob 7 directly, it is possible to mix the Pad in behind the close up acoustic guitar. By grabbing the Assign Knob 7 directly, you have the ability to bring the Pad in at any time.
By the way, Assign Knob 7 is also for bringing the tremolo on Part 1 at the very highest setting for the Knob.
The Super Knob (being like Extra hands) works at any time. No particular button need be lit or activated.
The Common Assign Knobs can be accessed directly independent of the Super Knob, but the [ASSIGN] button must be lit, and the upper COMMON level active. If you *select* a particular Part, the Part Assign Knobs appear 1-8.
Other ways to arrive at the "Common/Audio" section (the Performance-wide "global" parameters for a Performance):
Choice 1) Press [PERFORMANCE] (HOME) button followed by [EDIT] button as previously described
Choice 2) Press [PERFORMANCE] (HOME) to arrive at the home screen, then touch the Performance name at the top portion of the screen in larger font, then select "Edit" from the popup menu
Choice 3) Press [PERFORMANCE] (HOME) then [ENTER] button and touch the "Edit" selection from the popup menu (or press cursor button down then [ENTER] )
Choice 4) Press [SHIFT]+[PERFORMANCE] (HOME) then touch the square "Edit Common Control Settings" which is a "wormhole" to the Mod/Control Control Settings for the Common/Audio (Performance global) section.
Probably other choices and methods (buttons vs touch) to get you there. Early on, I would often forget that these parameters would exist - so I would miss finding where certain things are (where they "live" ) to set them. Followed by an "oh yeah" moment and venture into the Common/Audio section.
Current Yamaha Synthesizers: Montage Classic 7, Motif XF6, S90XS, MO6, EX5R
Wow, I was able to follow your instructions and it worked! Thank you! Not only does this help me get off and running, it helps me understand the theory of what is going on underneath the hood. I'll be practicing these steps with merging other performances so I can get a solid handle on it.
This must have been a significant amount of work to help me, so again, many thanks!
Phil
Well, I don't want to close off this thread quite yet...
Phil, regarding the merged Warm Backing Pad, you said: "If you study the "Warm Backing Pad" Performance in its HOME location, you can find out, it has only one thing programmed to the Super Knob (Rev Send), and the PART has only Part Assign1 and Part Assign2 with any assignments...Rev Send and Var Send. respectively. The Part RevSend is linked to the Super Knob (Part 1 Assign 1)....The VarSend is assigned to Part Assign 2 but not linked to anything (Part 1 Assign 2)"
So, this brings up a few questions:
1. If Warm Backing Pad has RevSend linked to the Super Knob, how is that possible? I thought the Superknob parameter links were disconnected when a performance is merged(?)?
2. You mentioned that both RevSend and VarSend are included. The VarSend is "not linked to anything". Does that mean that the VarSend link was lost during the merge? OR was VarSend merely a placeholder, and thus not intended for use in the Warm Backing Pad? I am just wondering why one was linked and one was not, or even why VarSend was there in the first place.
Thanks,
Phil
1. If Warm Backing Pad has RevSend linked to the Super Knob, how is that possible? I thought the Superknob parameter links were disconnected when a performance is merged(?)?
”If you study the "Warm Backing Pad" Performance in its HOME location...” you will see the Rev Send is linked in that Performance to the Super Knob. On the upper Common/Audio level of the architecture:
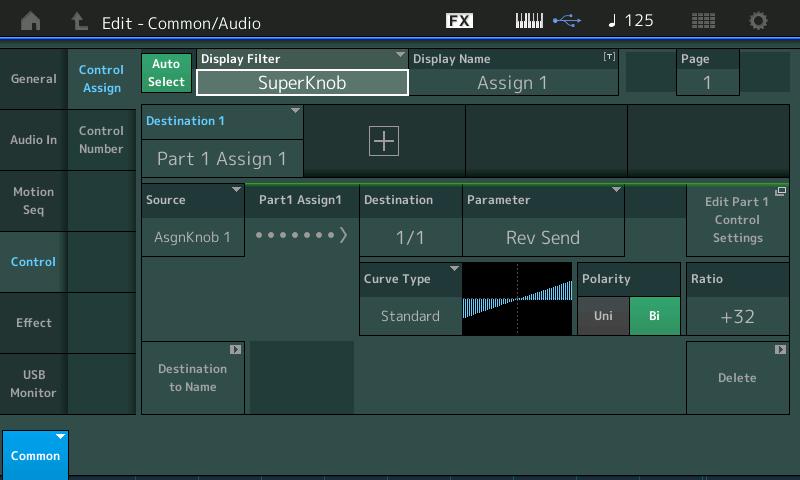
If you *select* Part 1, with the [ASSIGN] button lit, you will see that Assign Knob 1 and Assign Knob 2 are assigned to Send signal to the current Reverb and Variation Effects.
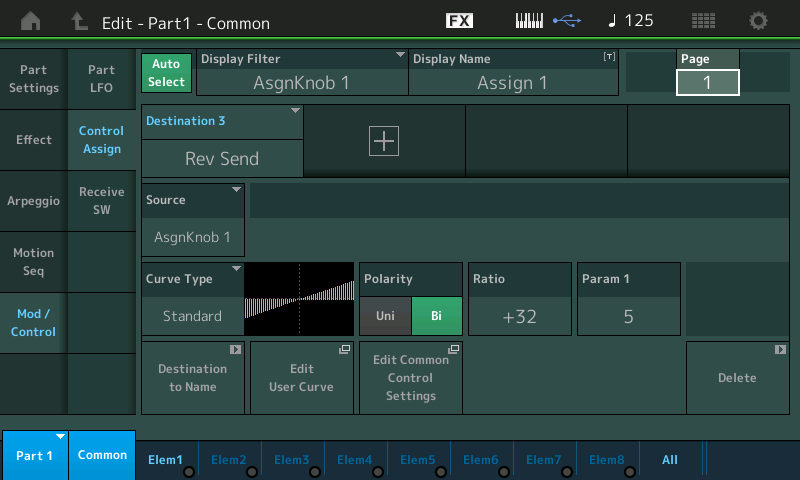

Moving the Super Knob will increase the Reverb Send.
Moving Assign Knob 1, directly, while Part 1 is selected, will increase the Reverb Send
Moving the Assign Knob 2, directly, while Part 1 is selected, will increase the Variation Send
2. You mentioned that both RevSend and VarSend are included. The VarSend is "not linked to anything". Does that mean that the VarSend link was lost during the merge? OR was VarSend merely a placeholder, and thus not intended for use in the Warm Backing Pad? I am just wondering why one was linked and one was not, or even why VarSend was there in the first place.
When first programming the Super Knob, one tends to put everything on the Super Knob... as you start thinking through what you actually need, you discover sometimes you don’t want to link a parameter to the Super Knob.
In “Warm Backing Pad” the performer can increase the Reverb Send as they play (using the FC7 programmed to be Super Knob, this can be done while still playing the Keyboard). The Var Send is Set to be available any time the [ASSIGN] button is lit and Part 1 is *selected*.
In the "Warm Backing Pad" the Rev Send feeds a "Rev-X Hall", once merged to "Proximity Effect" that Rev Send is feeding a "HD Hall"
In the "Warm Back Pad" the Var Sends feeds a "Dual Modulator", once merged to "Proximity Effect" that Var Send is feeding a "Tempo Delay Stereo"
The Sends are still there, the assignment to increase the Send is still there, they feed different Effect Types because the Effect Type belong to the "Proximity Effect" Performance...
If you highlight this parameter "Part 3 Assign 3" -- in your merged program --
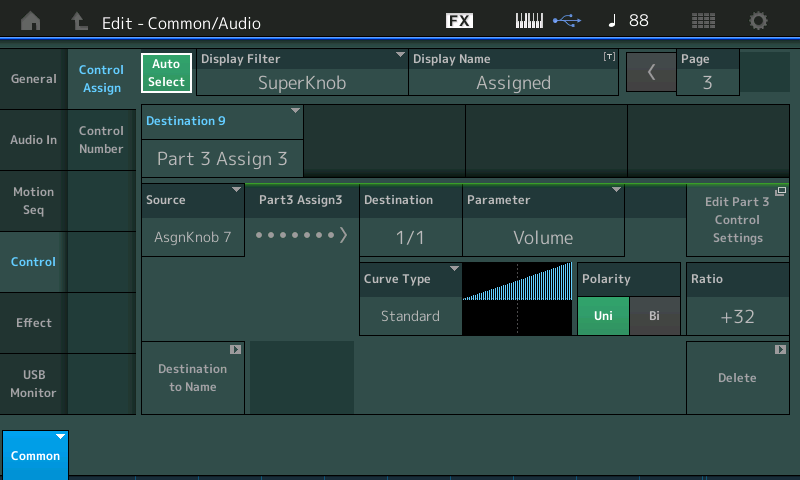
You can use the Data Dial to decrease the assignment to "Part 3 Assign 2" there is the Var Send for Part 3 - assigned to the Super Knob
Use the Data Dial again to decrease the assignment to "Part 3 Assign1" there is the Rev Send for Part 3 - assigned to the Super Knob
Nothing is lost in terms of the Control Sets that make the Assignment - what gets changed is the actual Reverb Type and Variation Type they are sending to will now be inherited from the new HOME (the "Proximity Effect" System Effects). Part 3 will still have its Assign 1 Knob feeding the Rev Send, it will still have its Assign Knob 2 feeding the Variation Send. But you must either *select* the Part to access these Knobs or you have to LINK their movement to an upper Common/Audio level Assign Knob which, you know moves when the Super Knob is moved.
Thanks Phil! I'll digest this and see if I have any more questions.
Very grateful,
Phil
