is there a way for crossfading layers parts in a performances ? for example:
i have two parts in a performance, a cello and a violin, i like to crossfade these two part at C3, cello is lower part and violin upper part. i don't want to split between the two parts as i like a seamless transition between them as it was a single instrument. is there a setting for fading parts ? you can do it maybe in element level, but i don't see it in part level.
Montage 7 classic
Do you mean above C3 Violin is Louder, Cello Quieter, and below C3 vice versa?
Have a look at Edit - Element - Amplitude - Scale
Correct!
This is covered in the following tutorial article — Link: MONTAGifying Motif XF Performances: “Winds and Strings”
the articles shows how a Bassoon is crossfaded with an Oboe.
You can control the output of any Instrument by controlling its”Scale” across the keyboard. You are provided four Key “Break Point”
When the center line (left-to-right) is reached, the Element can reach the programmed output level... normally the Break Points are even across all keys... but there is a crossfade that takes place as described below: this done per Element, and can be expanded to include all Elements of a Part in a Performances counterbalanced with all the Elements in another Part, if you so desire. MONTAGE allows you to add eight oscillators to your instrument by adding a Part. Your control within that Part is at the individual oscillator (Element) — simply apply your “Scaling” to each Element of your Part. Below two Elements make up the Bassoon, and four Elements make up the two Oboes.
From the article....
Two Oboes & Bassoon

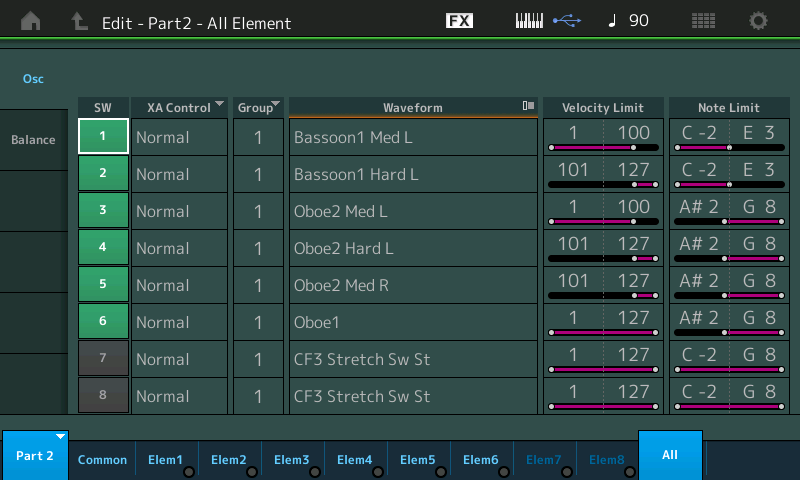
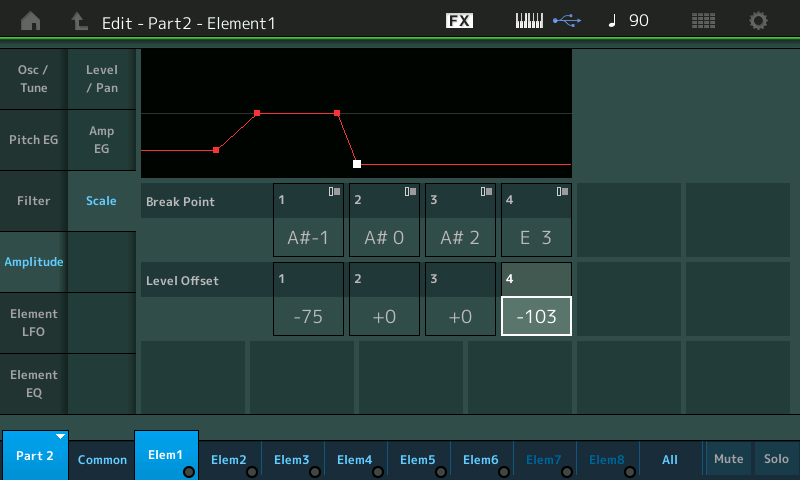
”As you can see, the Bassoon is mapped to the lower region and crosses over into the range of the Oboe. The keys between A#2 and E3 will play both Bassoon and Oboe. This crossfade is handled by the Scaling functions. Scaling has to do with controlling the response across the keyboard, be it to the response for Pitch (Oscillator), for Timbre (Filter) or for Loudness (Amplifier). In this case, it is the Amplitude of the Element that is being controlled. Let take a look at Element 1 the Bassoon responsible for velocities up to 100:

The Break Points show how that at A#2 the Amplitude starts to drop off very rapidly and by the time you reach E3 the Level Offset is way down (-103)
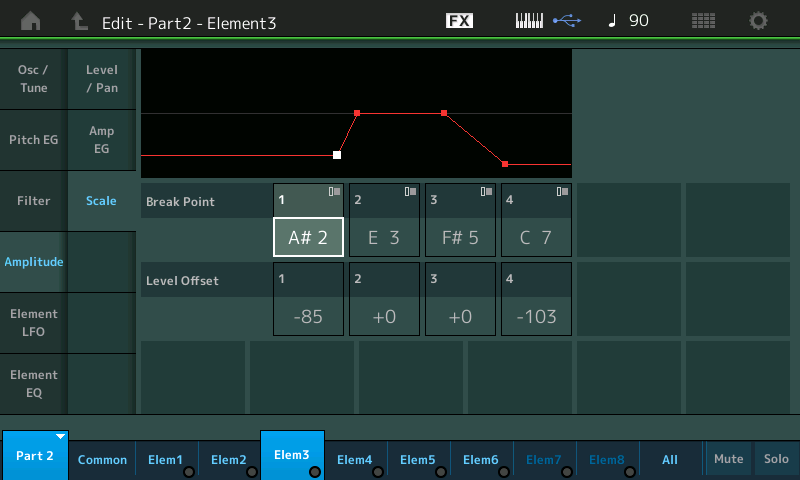
A quick look at the Break Points for the Oboe in Element 3 we can see how the crossfade is taking place:

Here the Oboe in Element 3 takes a rapid rise in Level from A#2 as you move toward E3. Sonically, you can hear the Bassoon tone morph into the Oboe tone. Clearly, B2 is more Bassoon, but clearly D3 is more Oboe!”
thank you. so crossfading have to be set at the element level, you cannot do it for a whole part at once. ok, thanks again.
Montage 7 classic
thank you. so crossfading have to be set at the element level, you cannot do it for a whole part at once. ok, thanks again.
Because a Part, as the example certainly points out, can be more than one instrument, it is much better to have this flexibility at the Element Level. Each Element contains all the building blocks to make a complete multi-sampled instrument so naturally you want to do the scaling at this level of the architecture. Each Element is the equivalent of all the components you’d find in an analog synth: Oscillator ~ Filter ~ Amplitude, each has its own LFO, its own EQ, its own everything. So naturally scaling is done at this level — it provides more flexibility. An AWM2 Part is like 8 complete synth engines, 8 oscillators, 8 filters, 8 amplitude EGs, 8 LFOs, 8 routings to the Insert Effects, etc., etc., etc.
At the Part level of the architecture you can set a Note Limit (split point) that defines where the Part will sound. Crossfading one oscillator to another (or even all Oscillators to a complete set of other Oscillators) is handled at the Oscillator/Element level of programming the engine.
This includes crossfading between Oscillators (Elements) via Velocity, as well. You can setup Velocity to “overlap” in a similar fashion — so that as you approach the Velocity Limits set for your Element you can have a smooth transition rather than an abrupt change.
Of course, this is at the Osc/Element level of the architecture — this is where it is most useful / flexible.
The cold / abrupt change is handled at the Part level, the fine tuning of the crossfade is done at the Element level... hope that helps.
--Because a Part, as the example certainly points out, can be more than one instrument, it is much better to have this flexibility at the Element Level.
that's ok, of coarse this implementation at element level is necessary but for example in my case where i want to crossfade the solo violin AF with the solo cello AF, i have to rewrite these two patches, an implementation layering/crossfading at the performance level will have be a much more straight way to accomplish this task.
all my best
Montage 7 classic
A surprise was waiting me in the part setting elements of the 1st violin AF1, there is already a full crossfade setting with cello and viola, just had to enable all elements. but what i don't understand is that when i mute element 1 and 2, witch are violin AF1, still we can heard this violin, like the mute have no effect? i don't need that for my performance but i am curious.
Montage 7 classic
After you muted the elements - did you exit out of the Part edit? When I press [PERFORMANCE] (HOME) or go back to the top-level through some other means, all of my element mutes are switched off.
If you want something to stick - use the element on/off switches or use element levels.
Current Yamaha Synthesizers: Montage Classic 7, Motif XF6, S90XS, MO6, EX5R
Something I found useful when building Multi-Element Parts or Multi-Part related performances....
Setting things like Scaling, or EGs etc for every element can be tiresome.
Instead, I have started to do this...
First, you need to know exactly which Waveforms you are going to use, and any Basic Panning, Level or Fine Tuning settings.
To do this (its usually a preset Part or Performance) I Store it as a User File, with "Reference" in the file name. I Store again, and rename with "Edit" in the filename.
On the EDIT file, I edit ELEMENT 1 ONLY parameters that will be common for all elements in the Part... example:- Scale, PEG, AEG, FEG or any other time consuming settings.
I then use SHIFT-EDIT to copy Element 1 to all other elements (element 2 thru 8 or whatever you are using).
Then for each element I change the waveform sample (Category Search) back to what it was originally (Saw Up, Saw Down, Violin1 etc).
Finally, I adjust the Pan, Level, Tuning for each element back to what it was originally.
This is a lot quicker than adjusting Scale and EG parameters for each element. You can make slight real time adjustments from then on to each element's EG, Scale etc
You can expand this method by Copying whole Parts (SHIFT-EDIT) and following a similar process.
Tip: while conducting operation above, it is useful to SWITCH OFF all the other elements, except the one you are editing. This includes elements in other Parts. Just remember to switch them back on again for making final adjustments to the whole Performance.
thanks Antony for the tips, that's good.
concerning the muting element, Jason, i was staying in the edit element window. but today, mute is working, i have no idea of what happend. the ready made cross-fading hidden in the 1st violin AF1 is exactly what i wanted to achieve, a full range quartet like sound, very expressive, i am not sure there are equivalent in another performances dedicated to this kind in the montage, my rapid survey did not find an equivalent that sound so good for my need, but why these hidden programmatic? anyway, i dreamed it, montage did it.
Montage 7 classic
