Notifications
Clear all
MONTAGE Series Synthesizers
19
Posts
3
Users
0
Likes
3,674
Views
Topic starter
Hi!
I'm a first time Yamaha owner (owned only Korg and Roland instruments until now), so I'm not very familiar with Yamaha's work flow. Please bear with me.
My problem is this:
When I want to record and playback Yamaha's own performances with my Cubase DAW, I get strange midi loop back effects. I have turned local control off and the quick mode MIDI rec on DAW is on. If I play the CFX + FM EP sound and try playing it on midi channel 1 with my Montage, it produces a midi loop back effect (the flanger kind of effect). What's even weirder, the loopback exists even if I play back the recorded phrase! And if I play the sound with an external keyboard (like my old Roland D-20), there is no loop back when recording/playing back.
So why does Montage produce this effect when I play the CFX-piano sound through it's own keyboard, but the Roland plays it ok as an external controller? What am I missing here? The manual doesn't answer this.
If I turn Multi I/O to single mode, everything is okay. So this happens only in multi mode.
Any help is appreciated!
Kind regards to all
Kim
Posted : 10/07/2016 10:20 am

When you are in MIDI I/O mode = Multi, you want to create a MIDI Track in Cubase with the MIDI channel = "Any". Literally, "Any"
This will allow Cubase to output the MIDI data on the incoming Channel. Rather than forcing the five MIDI channels you are transmitting on from being forced to a single channel. MIDI events always include the channel number when it is generated, say you play middle C at a velocity of 100: that's a Note-On (9n), where "9" says Note-On, "n" would be the channel, 0-F (1-16). If on channel 1
90 3C 64 translates to Note-on channel 1, note 3C (60) is middle C, velocity 64 (100).
The channel setting set in the DAW actually rechannelizes the data going Out via MIDI, setting it to "Any" will allow you the data to go Out on the channel it is originally generated on... which in the case of CFX + FM EP would be channels 1-5 since this Performance will transmit on five channels.
Hope that explains your mystery - by setting the Out Channel to 1, you are forcing (rechannelizing) all the data onto one MIDI channel. If you've decided that MIDI I/O mode = multi is what you want to use, set the Out Channel to "ANY".
Posted : 10/07/2016 10:48 am
Topic starter
Thank you for the quick reply! And on a Sunday! :O
This answer made me wonder one thing though:
If I use MIDI channel=any, how do I add instruments to other parts then? If I wanted to add a drum kit for example, ticked on "+" on part 6, choose the kit and wanted to play that separately from the piano, how do I do that?
Because now if I use MIDI=any, it plays drums+piano (awful mess) and if I turn MIDI=channel 6 on the drum part, I hear MIDI looping again.
Posted : 10/07/2016 11:26 am
If I use MIDI channel=any, how do I add instruments to other parts then? If I wanted to add a drum kit for example, ticked on "+" on part 6, choose the kit and wanted to play that separately from the piano, how do I do that?
let's make sure you are setup properly to record MIDI data.
Press [UTILITY]
Touch "Settings" > "Quick Setup" > select Set #1 = MIDI REC on DAW
This will turn Local Control Off and make the other critical settings for recording Midi to the DAW
In Cubase set a single MIDI Track, set to "any"
***Do not use the KBD CTRL icons on your additional Parts; once you've completed recording the CFX + FM EP simply select your drum kit in Part 6. No KBD CTRL icon. This will allow you to only play the drums, which you will be transmitting on channel 6. Because your Cubase Track is set to "any" you don't even need to open a new track... Just continue to record (you can divide the data out later when you are ready to edit it). Each new Part you select will transmit Out on its corresponding MIDI channel. And Cubase will record it and echo it back on its incoming channel.
Takes a minute to get your head around this but try it, let us know.
Later: After you have completed your MIDI recording you can use the Cubase MIDI function DISSOLVE PART by MIDI channel to view your data on separate tracks.
Posted : 10/07/2016 12:27 pm
Topic starter
I appreciate the help! I'm getting slowly the hang of it... The keyboard control was key here.
Parts 1-8 are working fine thanks to your advice. So to be sure:
How do I control the parts 9-16 using multi instruments? Adding a single instrument is no problem but I noticed when I add multi instruments on those parts, the keyboard control icon is missing. So when I want to play a multipart instrument, I need to assign individual MIDI channels to those parts on my DAW to make them play simultaneously? Am I over complicating things or is there another way?
Posted : 11/07/2016 3:18 pm
How do I control the parts 9-16 using multi instruments?
If you wish to use KBD CONTROL to play a multi Part Montage sound, following what you state you know, you would place that sound starting from Part 1. Make sense? This will allow you to use the remaining Parts as individual Parts as you would on any multi-timbral synthesizer.
If you are recording to an external DAW, and you come to a point where you wish to use another multi-Part Montage program, render your first recording as audio, thus freeing you to utilize your full Montage. You can do so very quickly by playing the MIDI data back from the DAW, assign the Parts to USB audio outputs and simply record your first multi-Part to audio tracks. The Montage features 32 audio bus outputs via USB.
From your Multi Part Performance
Press [[EDIT]
Press [PART SELECT 1/1] to view Part 1 parameters
Press the lower [COMMON] button
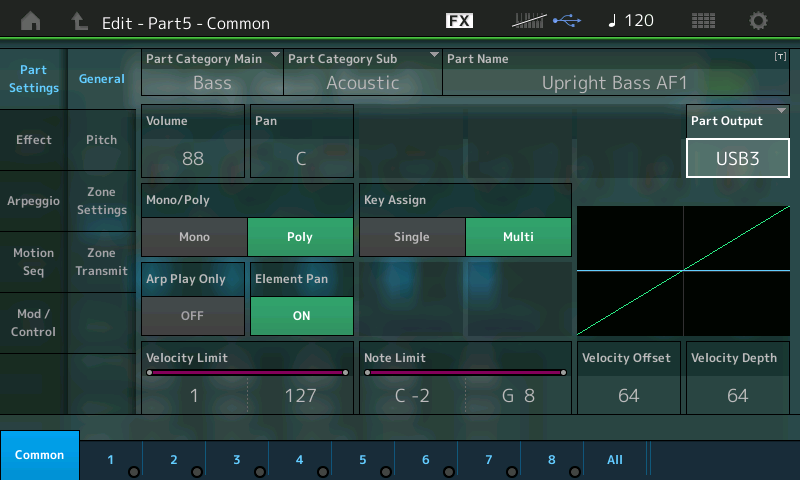
Touch "Part Settings" > "General"
Here you can set the "Part Output" to either USB Stereo (odd/even) pair, or USB Mono, as you require.
Alternatively, you can set the "Part Output" on the [COMMON] > "Effects" > "Routing" page.
The Part goes to the assigned Output including the 3-band EQ, the two Insertion Effects, and the 2-band EQ. This assignable out is pre the System Effects, Master Effects and the Master EQ.
Once you've rendered your Multi Part Performance as audio, you can mute the MIDI data, use the audio rendering to continue your Project. You've now freed up your Montage for mor multi Part work.
Posted : 11/07/2016 5:01 pm
Topic starter
Ah yes, this is where my workflow needs to be changed in the future, regarding Montage. Always liked to do the midi stuff first, be sure that every instrument play nicely with one another, THEN change MIDI into audio tracks for that last mixing and effecting. With an instrument like Roland's Integra 7 that's really straight forward, but I like the Montage's multi sounds really much. Like the CFX grand piano with it's all subtle nuances and tones, it just feels alive. Too bad it hogs so many parts, but c'est la vie...
Posted : 11/07/2016 8:37 pm
It "hogs so many parts" so that it can reproduce all those subtleties and nuances!
Hopefully, when the VST/AU utility becomes available the workflow will be even smoother...
Posted : 11/07/2016 8:41 pm
Topic starter
Oh, and I'm using the Montage through USB MIDI only, no audio. For audio I use my RME Fireface 400 UC. Too bad you can not use two audio interfaces inside a DAW like the RME and Montage... if you somehow CAN, please let me know!
Posted : 11/07/2016 8:41 pm
Too bad you can not use two audio interfaces inside a DAW like the RME and Montage... if you somehow CAN, please let me know!
Surely, you can. First, you don't have to use two audio interfaces simultaneously unless you actually need to record through both simultaneously. Professional software DAWs like Cubase Pro 8 allows you to "hot swap" drivers mid session, without powering down of closing your session. This means that in a typical project you are recording your music tracks first, and then overdubbing vocals, or live instrument tracks. When laying down the basic tracks with Montage use its outstanding 32-audio bus outputs to get the basic tracks recorded. Then "hot swap" drivers and use your boutique interface to overdub your other musical parts. Very common.
However, that said, if you actually need to simultaneously record your Montage and whatever through your RME, then hopefully, you have a Macintosh computer. Mac let's you build what is called an Aggregate audio device that allows multiple audio interfaces to work simultaneously. It takes about two minutes to setup and configure your system. But this is certainly possible. But should only be done if you need to simultaneously record via two audio interfaces.
Posted : 11/07/2016 10:01 pm
Topic starter
PC is my work horse, unfortunately. Going to turn over to Mac at some point though. I'll try the hot swapping, although the RME is going to be my number one audio interface. I've got many virtual instruments in my projects, so that restricts the use of Montage somewhat. Thanks for the help, hope I can contribute in the future by answering questions of newbies like myself 🙂
Posted : 12/07/2016 7:25 pm
Kim wrote:
PC is my work horse, unfortunately. Going to turn over to Mac at some point though. I'll try the hot swapping, although the RME is going to be my number one audio interface. I've got many virtual instruments in my projects, so that restricts the use of Montage somewhat. Thanks for the help, hope I can contribute in the future by answering questions of newbies like myself 🙂
Just so we are clear, you can use all your virtual instruments with the Yamaha Steinberg USB driver. The driver is responsible for audio into and out of the computer. If you are plugging a 48V phantom power microphone perhaps a good reason to use a different audio interface. But so you know, the Montage driver will handle all audio both into and out from your computer, including all of your virtual instruments. It works at sample rates up to 192 kHz.
Posted : 13/07/2016 1:10 am
Hi All,
I have been trying to get 'my head around' this but its not working out well for me. I use Cubase 8.5 full version and lets say for example I program a 4 bar string progression in Cubase using the Montage midi data. The Montage is set up as 'MIDI Rec on DAW'. I have the Cubase Inspector set to 'All MIDI Inputs and Chanel set to 'Any'.
I am happy with the progression so now I would like to exercise the Montage's multimbrality function and so I think I'll add a bass line underneath the strings.
I go to the performance page and press (+) on one of the free 'Part Assign' to add the bass. For simplicity lets say that I have chosen a bass is comprised of one element.
I then run into problems. When I try to add another part to the performance the Montage is set up so that it will play the additional part /instrument to the same midi pattern that I have programmed. Great if you want to thicken a sound and add dimension but frustrating if you want to play a different musical phrase.
I have read Bad Mister's instructions and so understood them to mean that in the performance page I should turn off the 'Kbd Ctrl' for the new part selected (the bass I had added). When i do this I am unable to play the bass with the keys as no sound is produced.
Where am I going wrong ?
The last question I have is how do I bounce the midi to audio when i am happy with a part played. I have read that I need to route the midi to the USB out but I don't know how to do this. Please could it be explained to an absolute layman like myself ?
Thanks
Posted : 15/07/2016 11:22 am
Where am I going wrong ?
You have select the individual PART you are adding.
You laid down the Strings using KBD CTRL. Once you've finished you can turn the KBD CTRL icons Off, if that is what is confusing you.
You added a Bass, KBD CTRL should be OFF on the bass - (you've said you've done that) so we assume your cursor is still highlighting the Bass Part, that's all that is required to have it play, and for you to overdub it.
On the right front panel use the [PART SELECT] buttons to select your bass.
Once you've recorded your Parts as MIDI, you can check your performing by playing it back.
You don't tell us how you envision recording as audio.
Do you want each Part on its own audio track?
Do you want to record everything as a stereo audio mix?
Do you want to record the Strings as a stereo track and the Bass as a mono track?
Routing Parts to audio takes place on a per PART basis.
Press [EDIT]
Press the [PART SELECT] button corresponding to the PART you wish to route
Select the lower [COMMON] button or touch the "Common" box lower left corner of the screen
Touch "Part Settings" > "General" > find the PART OUTPUT parameter. Touch this box to see the options.
"Main L&R" will allow you to record the Part as a stereo mix... All Parts initially default to the PART OUTPUT = Main L&R (main stereo output)
"Stereo USB" will allow you to select one of fifteen pairs of USB Output buses. touch the PART OUTPUT box to view the options:

"Mono USB" will allow you to select one of thirty individual USB bus Outputs.
Whichever you select, you need to create a stereo and/or mono INPUT to Receive the data.
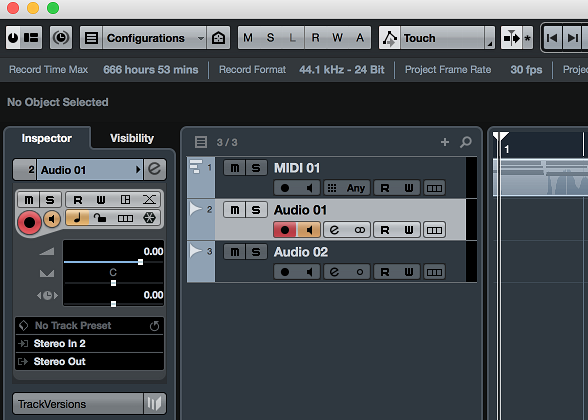
In Cubase, go to DEVICES > VST CONNECTS > select the INPUT tab.
Create a corresponding input for each routing you use. Below I've added a STEREO AUDIO INPUT and have assigned it to USB1&2
I also created a MONO AUDIO INPUT and have assigned it to USB 3

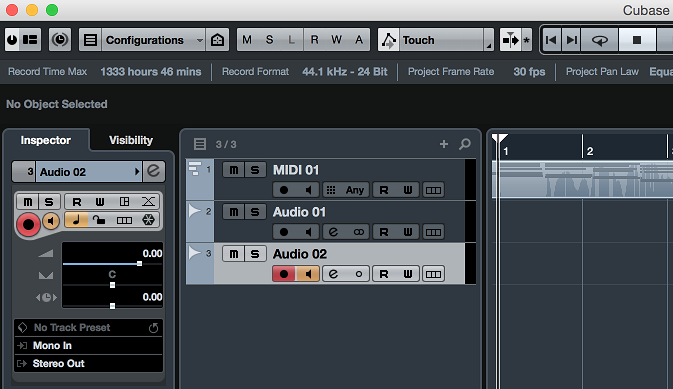
Finally, in Cubase, create new Audio Tracks to record this data. Here's and example;
Say your used a four PART String sound and you wish to combine this to a discreet stereo track, and record the Bass PART to a single Mono Track.
Navigate to the PART OUTPUT parameter and set it to "USB STEREO" > "USB1&2" for each of the String Parts (Part 1, Part 2, Part 3 and Part 4).
Navigate to the PART OUTPUT parameter for the bass on PART 5 and set it to "USB MONO" > "USB 3"
Create the Cubase VST Connection Inputs - a "stereo" input set to "USB 1&2" and a "mono" input set to "USB 3"
Create a Single Stereo Audio Track for the Strings
Create a Single Mono Audio Track for the Bass.
You can assign the Audio track Input on the Track Inspector
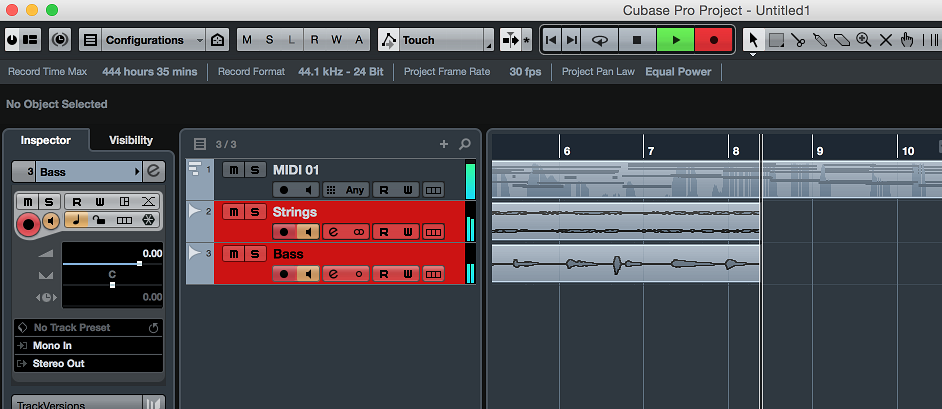
You can place both tracks in record and render your performance as audio tracks.
Posted : 16/07/2016 9:33 pm
Thanks very much for the reply Bad Mister and in particular how to render the midi to audio.
I don't think I have explained he first question well.
This morning I fired up the Montage with the determination that I should be able to play the instrument in its multitimbral glory on this traditional day of sanctity.
I lay down the initial midi part (CFX+ fm). I'm happy. There are an additional 3 available parts I can assign. I assign an acoustic piano which fills the additional 3 parts. My problem is that now every other part I assign in the performance plays the initial midi data intended for the CFX paino. If as suggested I switch off 'Kbd Ctrl' on either the current part (accoustic paino) that I am playing or the first assigned instrument (CFX) then no sounds are heard. They are in effect muted and when I switch 'Kbd Ctrl' back on both instruments follow the original midi pattern I had played.
I think it may be some problem in my setup. Is there an option on the Montage that could mean the individual parts are not treated like separate instruments and instead are automatically combined to create single performances. If so I guess I'm asking how do I turn that off. I think I'm having routing issues.
Appreciate all the help
Posted : 17/07/2016 9:57 am
Page 1 / 2
Next
