I thought I knew my Montage but here's something I can't fix because I guess I just don't understand...perf "Rd 78 Brite Tremolo", a two voice performance - my sliders 1 & 2 should be able to control the volume in the normal way. Slider 2 appears to control the 2nd voice as expected but slider 1 has no affect on the volume of voice 1. When I move the physical sliders 1 & 2, I see the volume decreasing in the mixer. The actual volume output however, doesn't change in voice 1 but works as expected on voice 2. What am I missing?
Jared
On Part 1, the Assign 1 knob is assigned to volume. It's acting as a final volume offset. The volume slider is therefore being affected (overridden) by this offset.
Wouldn't it be great if there was an extra vertical line next to the volume slider to indicate such an offset?
I've previously wished there could be a mode where the instrument would display values as their final offset value and change the color to make it obvious the value is not programmed but offset. This would go for all values.
So yes, I see value in displaying offset information for volume and everything else. Expect pushback of why this is not needed.
Current Yamaha Synthesizers: Montage Classic 7, Motif XF6, S90XS, MO6, EX5R
Rd 78 Brite Tremolo
I thought I knew my Montage but here's something I can't fix because I guess I just don't understand...perf "Rd 78 Brite Tremolo", a two voice performance - my sliders 1 & 2 should be able to control the volume in the normal way. Slider 2 appears to control the 2nd voice as expected but slider 1 has no affect on the volume of voice 1. When I move the physical sliders 1 & 2, I see the volume decreasing in the mixer. The actual volume output however, doesn't change in voice 1 but works as expected on voice 2. What am I missing?
Jared
Hi Jared,
Here’s what you’re missing... when Part Volume is additionally assigned to an Assignable Controller, you will notice that the Slider may have no, or only partial influence over the output level of that Part. The degree to which it controls the Volume is up to the programmer (and is set within the Part's Control Set). There are times when you want to have a particular balance between Parts when the program is initially recalled... you may wish to change that balance in real time as you play/perform.
In such an instance, think of the sliders as an engineer’s mixing tool, as opposed to a real time performing control. Make that distinction because the Sliders don’t allow you to continue playing with both hands while adjusting the balance between Parts... the Sliders make swelling the volume of one of the Part’s impossible while playing with both hands... but because in this Motion Control Synthesis Engine you can assign multiple controls to the same Destination parameter, you can use another controller to either partially, or fully, control the Part's output level.
"How much" the assigned Part Volume controller is influencing the output is programmable by you within the Control Set using the Curve, Polarity, Ratio and Parameter (shaper). You can determine if that amount of control is just a small specific amount or you can bias the entire range from the minimum to the maximum output allowed.
The intelligent control over performing volume is a big area in the MONTAGE/MODX engine. When addressing multiple Parts, if you use Standard MIDI controls like cc7 or cc11 you’re going to be limited to how the output level behaves.
Concerning to “Rd 78 Brite Tremolo”
The two Parts of “Rd 78 Brite Tremolo” are recreating a 1978 Rhodes... the body of the sound in Part 1, the mechanical noise component in Part 2.
Each of those Parts has a Part Assign Knob set to be an additional controller assigned to Part Volume.
If you wish to release the Assignment, which will return control over Output level to the Part Slider, you simply need to navigate to the Part’s Control Assign and tap the “Delete” box within the Control Set.
In each, Part Assign Knob 1 is set to control Part Volume shown below:
From the HOME screen, select PART 1
Press [EDIT] > touch “Mod/Control” > “Control Assign”
Activate the “Auto Select” (green) > turn AsgnKnob1
The Part 1 Assign Knob 1 is set to reduce the Part Volume
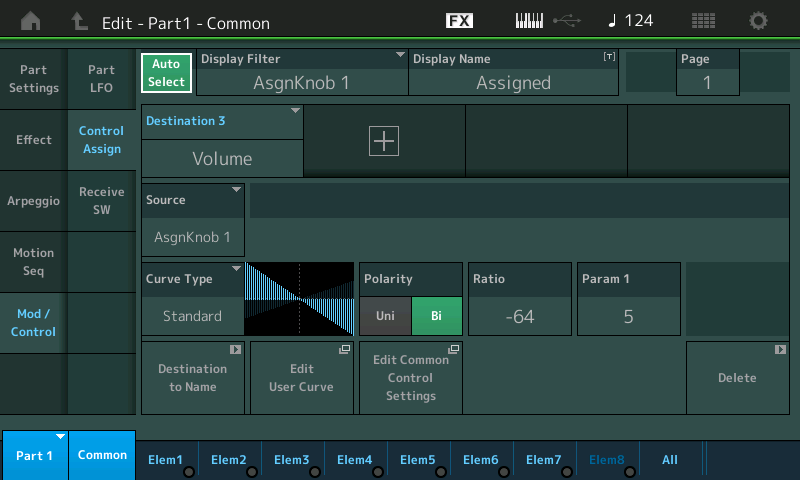
The Polarity is Bi-directional... meaning the stored value can be increased and decreased, above and below that starting point. The Ratio being set at maximum range (-64) but extending in the negative direction, this means that the position of the Assign 1 Knob will determine the output level of the body of the Rhodes, allowing you to reduce it as you turn the Part 1 Assign Knob 1 clockwise.
Select PART 1 so that the PART 1 Assign Knobs are showing:
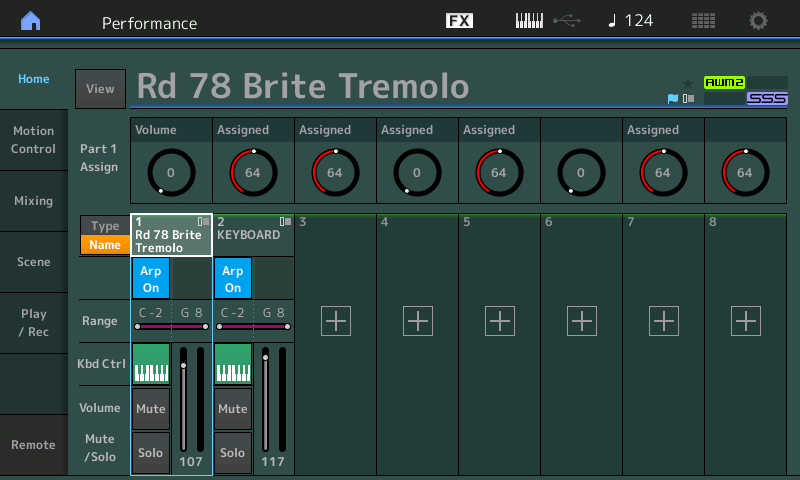
I've named the Assign Knob "Volume" - as you turn it up the Rhodes body is turned down. Try it!
Note: In the lower right corner of the Control Set screen you can "Delete" the assignment - this will return control of the Part Volume (in this case) to the Sliders.
Select PART 2
The Part 2 Assign Knob 1 is set to increase the Part Volume. With Part 2 selected turn Assign Knob 1... you are increasing the mechanical noise.
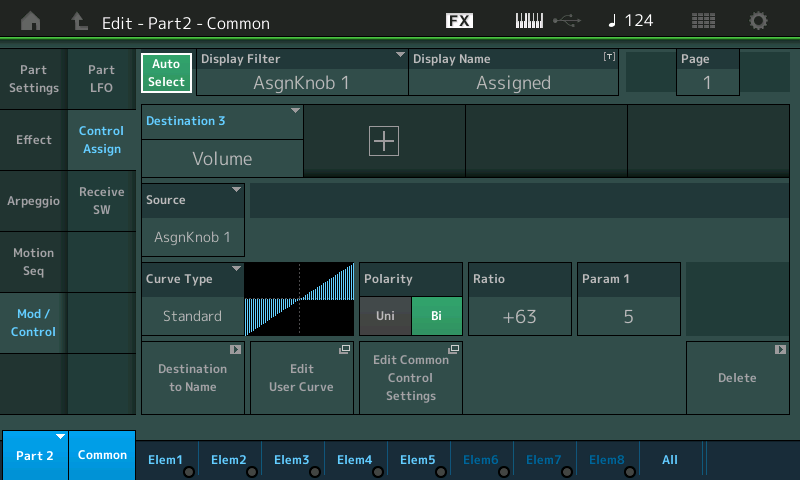
The Polarity is Bi-directional... meaning the stored value can be increased and decreased, above and below that starting point. The Ratio being set at maximum range but extending in the positive, this means that the position of the Assign 1 Knob will determine the output level of the mechanical noise, allowing you to increase it as you turn the Knob clockwise.
If you tap the box that says "Edit Common Control Settings" you will be taken to the upper level of the architecture where Part Assign Knobs are linked to Common Assign Knobs and the Super Knob
Super Knob
On the upper Common/Audio level of the architecture, the Part Volume of Part 2 is linked to the Super Knob’s Assign Knob 1.
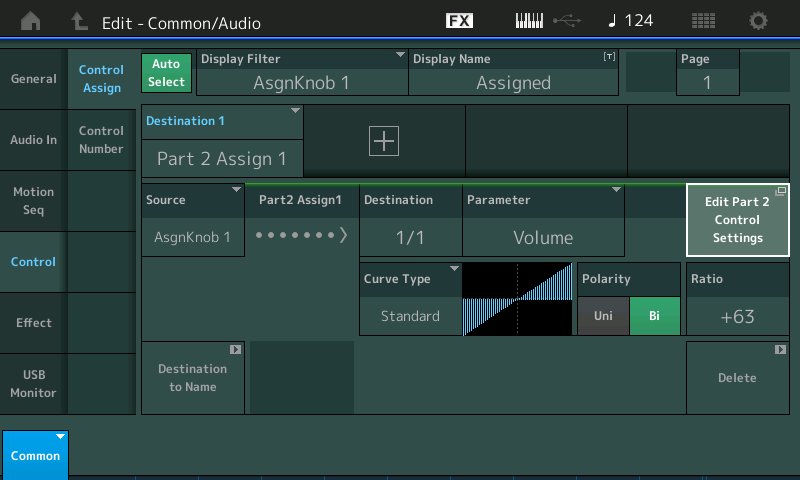
On the upper Common/Audio level of the architecture the 8 Common Assign Knobs can be linked to the movement of the Super Knob... you can view how this Super Knob link is made by navigating to the Motion Control > Super Knob screen:
From the HOME screen, touch "Motion Control" > "Super Knob"
Here you can see that Common Assign Knob 1 is set to go from a minimum (green) of 0 to a maximum (blue) of 68.
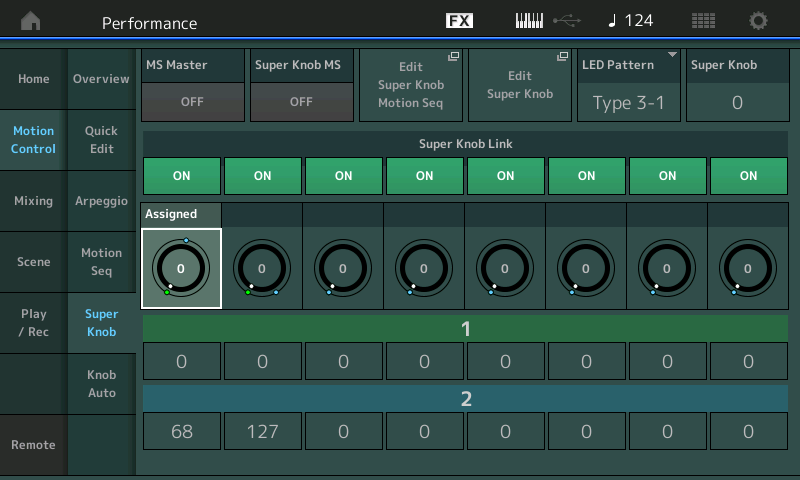
The result of this is that turning up the Super Knob adds more mechanical noise component to the sound — you are meant to add to taste. Only Part 2's Assign Knob 1 is linked to the Super Knob...Therefore turning the Super Knob will have the effect of controlling the amount of mechanical noise component that is heard.
Extra Credit:
You can see with this system it is possible to have real time control over the balance of items you are playing... the Super Knob can be moved with an FC7 pedal assigned to that function (Foot Controller can be set to Super Knob). In a situation where Part 2 was a String sound or a Pad, you would have the ability to adjust "how much" of that sound is mixed with the Rhodes (body) sound in real time as you play.
The value you set for Slider for Part 2 will be the maximum setting for how loud the mechanical noise component will get. For example, the position that you set the Slider for Part 2 will determine the maximum loudness for that PART when you turn the Super Knob to maximum. Solo PART 2 and work with just the Super Knob and Slider 2.
If Slider 2 is set about halfway up, then that will be the maximum amount of mechanical noise you will be able to mix in... Super Knob at max.
