Notifications
Clear all
Topic starter
I think I figured out how to save a .wav file with a performance but I can't seem to figure out how to trigger it on and off using keyboard keys. Can someone point me to the appropriate place in the docs?
Thanks.
Posted : 29/03/2017 1:16 am

In order for Montage to playback data in a .wav file it must convert it to a Montage Waveform.
We need just a little more information on the nature of the audio. You can place it in an AWM2 Drum Kit or in a Normal Part. What do you want this audio to do?
Montage has the ability to play an audio clip from a Drum Key
Advanced mapping for "Normal" AWM2 is not available on-board.
Posted : 29/03/2017 11:36 am
Topic starter
I'd like to be able to save a recording of a song with a performance and allow it to play at will when the performance is selected. This would be used to allow the band to hear the original recording before or during our playing of it.
Posted : 29/03/2017 7:02 pm

Although I wouldn't accomplish original song reference like you've asked for, I'm not going to offer alternatives and just stick to what you've asked for ...
If you record sections of the song (I'm suggesting this because you may want to reference just starting from the outro, or verse, or chorus, or some solo section, etc), you could assign various sections to different drum keys within your user performance. I would probably map the drums an octave lower and use bottom notes of the drum range so they are not available to me until I press the "Octave -" button. Then there would be no chance to play the recording during a performance since the notes mapped to the recordings would be out of range until pressing "Octave -".
Since "one shot" drum key playback of wav or aiff files is possible to program on-board, this can be done without additional software.
Here is one link with some nuts and bolts: https://www.yamahasynth.com/forum/sampling-on-montage-how-do-i-assign-a-sample-to-a-key-for-triggering#reply-8598
It also contains hints on using drum keys to play back long samples - which your use case would involve.
Posted : 29/03/2017 11:59 pm
Topic starter
Thanks, that helps a lot. Perhaps I should explain further what exactly I'm trying to do. I'm not trying to add any additional audio for the purpose of enhancing the performance, rather I just want a convenient way of referencing and playing the original of the cover tune were playing so we can listen prior to playing it ourselves. When you just load a .wav file for playback and then save the performance it doesn't save that .wav as well so I was looking for a way to save a particular one with each performance. Does that make sense?
Perhaps there's a better way. I was doing this with my Tyros 5 as it saves a song file as part of a registration and I could play that back at any point for reference by just pressing Play.
Posted : 30/03/2017 10:24 am

Hi Stu,
Stu wrote:
I was looking for a way to save a particular one with each performance.
If your performance parts are not maxed out, then you can add an Init Drum part and assign the .wav file to a single key on the keyboard as Jason suggested. Probably the easiest way. (And then assign another (silent) key in the drum part to stop the playback if required).
Alternatively, to avoid filling up your performances (and User area) with unnecessary large .wav files, you could just have all of the tracks you want to play on your USB stick and just load them from there by:
1) Press Play button to enter appropriate section (or on touch screen press Home then "Play/Rec")
2) Select Audio
3) Click on the box called "Audio name"
4) Click on Load
5) Select your track from USB (it loads very fast...)
6) Press play.
Saving the tracks in your performances will eat up space in your User area (and/or Library area). Using this alternative method keeps your onboard Montage space free for creative sounds and utilises the USB storage for playback of auxiliary audio files. It also enables you the option of skipping to different parts of the song to play back if required.
Side note: I would love to be able to leave this "Play/Rec" screen when recording or playing back audio/MIDI. This is a big feature request!...
Joe
Posted : 30/03/2017 11:10 am
@Stu
When I responded I understood exactly what you were after. Since during rehearsal, the song isn't always going to be practiced from the very beginning of the tune - I suggested breaking up the tune and over several keys so you could have the intro always on "C", next section always on "C#" ... and so on so you could quickly "fast forward" to another section by pressing the correct key and not have to wait for the song to play all the way to say the outro before you could listen to that as a reference. You could make the keys part of a group so playing the next key stops playback of the previous one - like hi-hat it made for the "close" hihat to stop the open.
I'm not sure if you can edit that (group) property - but if you can, that's how to do it for the optimum use.
I was suggesting to place the notes out of range because supposedly you would use this same performance to play the tune on the keyboard - so I was suggesting to place the notes out of range during normal performance to prevent unintentionally starting playback of the original recording during the gig.
... and since you're starting to get alternative suggestions - I'll throw my preferred way to get at what you're after. The downside (and why i wouldn't do it the way you're wanting to do) is, as mentioned, how you'll eat up resources. Instead, I'd hook up a dedicated device to the A/D input such as a portable recorder (something that is today's equivalent of a "walkman" ). I have lots of choices here - Sandisk MP3 player, Zoom H4 recorder, my cellphone. Something I can USB-connect to the computer to transfer the digital copies would be best (for me) so I would use the zoom or my cellphone. The phone I always have - so convenience may win over quality. The Zoom would probably have higher quality with a few outputs to choose from (line and phones). And I could probably use the Zoom to record rehearsals - although the phone may still win since the interface can be customized and I can probably find an app that makes playing audio files much easier than the interface on the Zoom. I wouldn't personally see instant recall as saving me much time - since it doesn't take long to click on the right audio file using a cell phone. With USB connectivity to the computer, keeping the songs up to date on the phone is simple - and it is also an internet connected device - so I could pay for new tunes as the band wants to update in real-time and update the file list on the phone. Certainly youtube is there for use as well.
Posted : 30/03/2017 12:44 pm
Stu wrote:
Thanks, that helps a lot. Perhaps I should explain further what exactly I'm trying to do. I'm not trying to add any additional audio for the purpose of enhancing the performance, rather I just want a convenient way of referencing and playing the original of the cover tune were playing so we can listen prior to playing it ourselves. When you just load a .wav file for playback and then save the performance it doesn't save that .wav as well so I was looking for a way to save a particular one with each performance. Does that make sense?
I recommend you place the audio into a Drum Kit Part, assigned to middle "C" for ease of access. You can Load the .wav directly to middle "C"
Here's an example of what I mean:
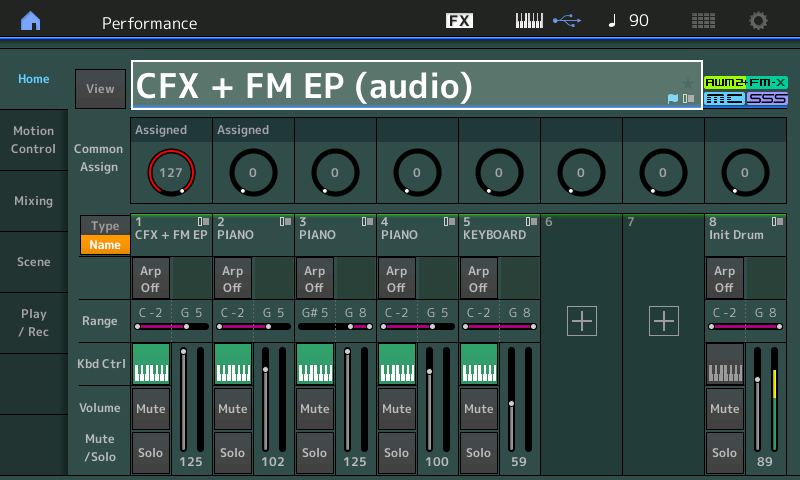
Let's say the Performance you start with is "CFX + FM EP"
From the Home screen touch the "+" in Part 8 to Add an INIT Drum Kit Part here.
You can load one or more audio clips to this Drum Kit Part... placing one per Key
It doesn't matter which Drum Kit, we are using a Drum Kit Part because Kits have the ability to play audio continuously - the envelope can be set so the sound "holds" until silence. I recommend the INIT because you will not inherit anything strange.
With a kit assigned to Part 8
Select Part 8
Deactivate KBD CTRL (grey) This will allow you to select PART 8 when you want to control Play or Stop of the audio... Yet leave the entire keyboard free to play, unrestricted, when you want to play the "CFX + FM EP"
Press [EDIT]
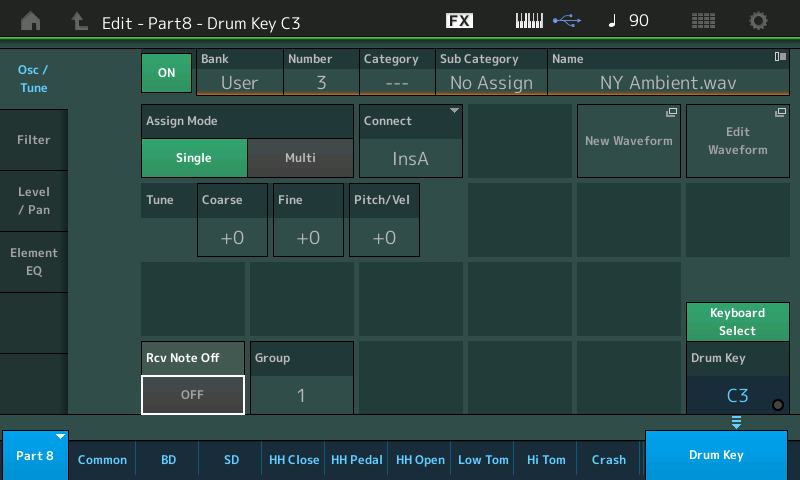
In the lower right corner activate the "Drum Key" function (blue) and just above it activate "Keyboard Select" (green)
touch Middle "C" recalling its data
Touch the box "New Waveform"
You will be taken to the "Audio File" Load screen for wav data
Locate and load your audio to the Key.
you will be returned to the Drum Key screen
Deactivate "Rev Note Off" OFF (grey) this allows drum and percussion sounds to play their full length without having to keep you finger on the Key.
Set "Group" = 1
Set "Assign Mode" = Single (important) this allows only once instance of your audio to play at a time. Your screen should appear similar to this:
Also placing the Key in what is called an "Alternate Group" (only one sound from a group can sound at a time) this way you can designate an adjacent Key as a "stop playback Key". Place C#3 in the same Alternate Group (Group 1), but make the level 0. So it acts as a silent "Stop" Key.
This also will allow you to place several audio clips in a Drum kit on several Keys... And starting one will instantly replace the other.
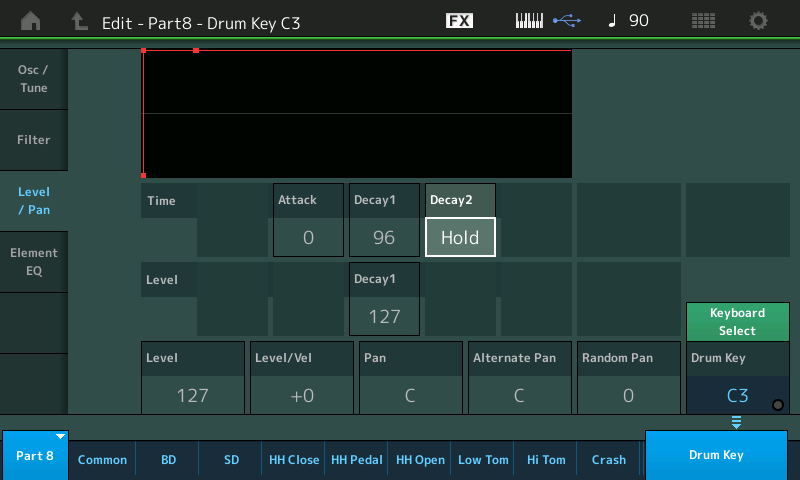
Now you can set the LEVEL and other settings. Set Amplitude Envelope so the Decay is set to "Hold" (allowing the audio to play with having to hold the Key. Here's how:
Touch "Level/Pan"
Set the TIME parameter: DECAY 2 = HOLD
The reasons I am recommending this are:
_ You can simply set Part 8 so that KBD CTRL is inactive (greyed). This means you have to select Part 8 to start or stop the audio.
Select Part 8 touch C to start.
Then touch any of the following: [COMMON] or [HOME] or any of the Part Select buttons 1-5 to return to being able to play the "CFX + FM EP" normally.
You"ll have FADER #8 to control playback Volume of the audio clip even as you play the "CFX + FM EP".
When you wish to stop audio, either pull down Fader 8 or select Part 8 and touch C#3 (your silent "stop" Key)
When finished Rename and Store your Performance to the USER Bank
The drawbacks: if it is a long clip, being a sample, it will play from the top every time.
You may want to break the audio into several shorter .wav (intro.wav, verse.wav, chorus.wav, etc.) loading each to the Keys starting at C... This way if you want the band to just to work on the end Section - you don't wind up waiting for the entire clip to play just to get to the Ending. (Dividing the .wav into segments can be your "fast forward") or at least allow you to concentrate on different sections, on demand.
Perhaps there's a better way. I was doing this with my Tyros 5 as it saves a song file as part of a registration and I could play that back at any point for reference by just pressing Play.
A handheld playback device like a Yamaha PockeTrak or an iPhone/iPad would be two elegant solutions.
The iOS device can be connected directly to the Montage (using a USB cable and a Lightning-to-USB adapter) and will play audio through the Montage audio system. A separate handheld player can be connected to the A/D Input and play through the Montage.
The advantage here is convenience of finding locate points. A device like the PockeTrak you can place markers at the various musical sections and literally jump to the marker when required. An iOS device you can slide your finger to advance to the spot you want to hear.
Another advantage is if you plug the audio of the playback device to the Montage A/D input, your Montage can derive tempo from it for Arps, Motion Sequences, Effects, etc.
Hope that helps.
Posted : 30/03/2017 12:48 pm
Topic starter
Phil,
Thanks for taking the time to lay this all out for me.
Stuart.
Posted : 01/04/2017 10:37 pm
Topic starter
I forgot to thank both Joe and Jason as well for their excellent suggestions. Thank you both!
Posted : 03/04/2017 12:32 pm
Stu wrote:
Thanks, that helps a lot. Perhaps I should explain further what exactly I'm trying to do. I'm not trying to add any additional audio for the purpose of enhancing the performance, rather I just want a convenient way of referencing and playing the original of the cover tune were playing so we can listen prior to playing it ourselves. When you just load a .wav file for playback and then save the performance it doesn't save that .wav as well so I was looking for a way to save a particular one with each performance. Does that make sense?
I recommend you place the audio into a Drum Kit Part, assigned to middle "C" for ease of access. You can Load the .wav directly to middle "C"
Here's an example of what I mean:
Let's say the Performance you start with is "CFX + FM EP"
From the Home screen touch the "+" in Part 8 to Add an INIT Drum Kit Part here.
You can load one or more audio clips to this Drum Kit Part... placing one per Key
It doesn't matter which Drum Kit, we are using a Drum Kit Part because Kits have the ability to play audio continuously - the envelope can be set so the sound "holds" until silence. I recommend the INIT because you will not inherit anything strange.With a kit assigned to Part 8
Select Part 8
Deactivate KBD CTRL (grey) This will allow you to select PART 8 when you want to control Play or Stop of the audio... Yet leave the entire keyboard free to play, unrestricted, when you want to play the "CFX + FM EP"Press [EDIT]
In the lower right corner activate the "Drum Key" function (blue) and just above it activate "Keyboard Select" (green)
touch Middle "C" recalling its dataTouch the box "New Waveform"
You will be taken to the "Audio File" Load screen for wav data
Locate and load your audio to the Key.you will be returned to the Drum Key screen
Deactivate "Rev Note Off" OFF (grey) this allows drum and percussion sounds to play their full length without having to keep you finger on the Key.
Set "Group" = 1
Set "Assign Mode" = Single (important) this allows only once instance of your audio to play at a time. Your screen should appear similar to this:
Also placing the Key in what is called an "Alternate Group" (only one sound from a group can sound at a time) this way you can designate an adjacent Key as a "stop playback Key". Place C#3 in the same Alternate Group (Group 1), but make the level 0. So it acts as a silent "Stop" Key.
This also will allow you to place several audio clips in a Drum kit on several Keys... And starting one will instantly replace the other.Now you can set the LEVEL and other settings. Set Amplitude Envelope so the Decay is set to "Hold" (allowing the audio to play with having to hold the Key. Here's how:
Touch "Level/Pan"
Set the TIME parameter: DECAY 2 = HOLD
The reasons I am recommending this are:
_ You can simply set Part 8 so that KBD CTRL is inactive (greyed). This means you have to select Part 8 to start or stop the audio.
Select Part 8 touch C to start.
Then touch any of the following: [COMMON] or [HOME] or any of the Part Select buttons 1-5 to return to being able to play the "CFX + FM EP" normally.
You"ll have FADER #8 to control playback Volume of the audio clip even as you play the "CFX + FM EP".
When you wish to stop audio, either pull down Fader 8 or select Part 8 and touch C#3 (your silent "stop" Key)When finished Rename and Store your Performance to the USER Bank
The drawbacks: if it is a long clip, being a sample, it will play from the top every time.
You may want to break the audio into several shorter .wav (intro.wav, verse.wav, chorus.wav, etc.) loading each to the Keys starting at C... This way if you want the band to just to work on the end Section - you don't wind up waiting for the entire clip to play just to get to the Ending. (Dividing the .wav into segments can be your "fast forward") or at least allow you to concentrate on different sections, on demand.Perhaps there's a better way. I was doing this with my Tyros 5 as it saves a song file as part of a registration and I could play that back at any point for reference by just pressing Play.
A handheld playback device like a Yamaha PockeTrak or an iPhone/iPad would be two elegant solutions.
The iOS device can be connected directly to the Montage (using a USB cable and a Lightning-to-USB adapter) and will play audio through the Montage audio system. A separate handheld player can be connected to the A/D Input and play through the Montage.The advantage here is convenience of finding locate points. A device like the PockeTrak you can place markers at the various musical sections and literally jump to the marker when required. An iOS device you can slide your finger to advance to the spot you want to hear.
Another advantage is if you plug the audio of the playback device to the Montage A/D input, your Montage can derive tempo from it for Arps, Motion Sequences, Effects, etc.Hope that helps.


Hello, I tried the setup recommended above, but ran into two issues:
1. When the Kbd Ctrl is deactivated, the wav file can't be triggered to play. Are you saying to deactivate it after the wav file is playing to allow in order to "leave the entire keyboard free to play, unrestricted, when you want to play the "CFX + FM EP""?
2. If Kbd Ctrl is activated, each time middle "C" is pressed, the wav file begins playing again from the beginning. Is there a way to make the wave file play to its entirety even if middle "C" is pressed more than once?
Thanks!
Posted : 06/05/2018 3:08 pm
1. If you want the local keyboard to trigger the audio playback, don't disable keyboard control and don't use PARTs 9-16 unless you're OK with having to first SELECT the PART where your audio sample ("wav file" ) is. If you're OK with having to SELECT the PART first - then keyboard control can be OFF for the "wav file" PART. There are other implications which may make this unfavorable.
If you wanted to make the wav "difficult" to play (so you don't accidentally hit the button) -- I wouldn't use keyboard control for this. I would map the trigger key lower than the keys on the physical keyboard and press the OCTAVE - button to "reveal" the key I mapped the WAV file to then press OCTAVE + to "hide" this key again.
2. No, you can't play a sample from different places on different key presses. Use the previous suggestion to split up the sample into different sections so you have to press more than one key to play the whole original sample. Say you have a beginning middle and end. Sometimes you want to start from the beginning. Sometimes from the middle. Sometimes from the end. Sometimes the whole sample. Split the original sample into 3 different segments resulting in 3 different samples that when played one after each other will be the same as the original sample. Map the "C" piano key to the 1st segment (sample). Map the "C#" key to the 2nd segment (sample). Map the "D" key to the 3rd segment sample). When you want to play the same thing as the original sample - press the "C" key - wait for the right moment - then press the C# key - wait for the right moment - then press the "D" key. You could also have an arpeggio do this at the right times if you setup an arpeggio to press the "C" then "C#" then "D" keys in sequence with correct timing. Following #1 - you could map the arpeggio trigger to a a different key that is also outside of the "normal" range of your keyboard requiring use of the "OCTAVE-" button. And you can map the arpeggio to perhaps the "D#" key.
Note - if you did still want to do the "more than once" press request. If this suits you better -- you can create an XA group with a "Cycle" and setup your different sample segments as different elements. The problem with this is that you cannot force the cycle to just play the middle -- or just play the end. It will go around in a round-robin order (not random access).
Posted : 06/05/2018 3:33 pm
Thanks Jason for the quick response and all of the detailed information. I'll have to try the mapping of keys lower than the physical keyboard, and use the Octave buttons to reveal and hide the mapped key, as you described. I didn't know this was possible.
My goal is to create a backing track and have it play either from the beginning to the end of the song, or in segments.
I'm exploring the best methods to use for a backing track. Using an audio file is one option. Another, is using and arpeggio for different sections of the song. If I used an arpeggio, I would probably use a "Fixed" covert type arpeggio for each section. Dividing the arp into sections would be necessary because of the 16 note limitation in an arpeggio phrase.
I can see advantages and disadvantages to using each method. Btw - I found Bad Mister's Montage articles on arpeggios to be really helpful in learning about how to use and configure them.
I will do some more experimenting.
Thanks again!
Posted : 06/05/2018 8:27 pm
Bad Mister
"In order for Montage to playback data in a .wav file it must convert it to a Montage Waveform."
Can you briefly explain how I do this? My samples are mainly one shot drum his WAV.
Posted : 07/05/2018 7:59 pm
Watch this: https://www.youtube.com/watch?v=JXASiv3YfSE
It walks you through loading a WAV from USB into a drum PART. The process automatically converts the WAV file to a Yamaha-format Waveform.
In use, it seems like Montage "plays" WAV files (or AIFF). But behind the curtains, Montage first converts this WAV or AIFF to a Yamaha-format Waveform. "Waveform" and WAV are not the same thing - so your wrist may be slapped by a ruler if you interchange the terms.
Posted : 07/05/2018 8:51 pm
Page 1 / 2
Next
