Notifications
Clear all

Topic starter
I've asked this question before when on the Montage 8, but now I am on the M8x and the answers I got before aren't working. I feel like I am almost understanding the relationship between Assign Knobs and the Superknob, but I am not yet there.
Here is the issue: I like the pad on "CFX & Pad & Sub", but I wish the pad started at zero volume on the Superknob (counter-clockwise position). So I tried changing the volume to zero on Part 2, then pressing Control Assign, then nudging the Superknob, but that didn't work. When that particular method doesn't work I get lost. Any help?
Thank you,
-Phil
Posted : 24/06/2024 11:57 pm
I feel like I am almost understanding the relationship between Assign Knobs and the Superknob
You might consider lying down until that 'feeling' goes away - LOL! Nah - this one isn't as bad as all that.
First the requisite article/doc references for other users that may not be as advanced as you
The master list of 'Mastering Montage' articles and videos
https://yamahasynth.com/learn/montage-series-synthesizers/mastering-montage-article-series/
The 'Montage 1' is for the Super Knob
https://yamahasynth.com/learn/montage-series-synthesizers/mastering-montage-1-super-knob/
The 'Montage 8' is for the part assignable knobs
Assign a parameter to a part assignable knob and then assign that knob to one of the super knob assignable knobs.
The Super Knob can be assigned at the overall top level . . .
The Super Knob can also be simultaneously assigned to control specific parameters within a PART by linking the PART’s ASSIGNABLE KNOBS to one of the Super Knob’s Assignable Knobs
You need that second part above
I wish the pad started at zero volume on the Superknob (counter-clockwise position). So I tried changing the volume to zero on Part 2, then pressing Control Assign, then nudging the Superknob, but that didn't work.
The super knob can NOT control a part/subpart parameter directly - it can only manipulate a part assignable knob.
To control a part parameter, or the parameter of a component (e.g. an element) in the part you need to:
1. assign the parameter to one of the parts assignable knobs.
2. link that part assignable knobs to one of the Super Knob's Assignable Knobs.
The super knob can turn any or all of its assignable knobs and each of those can then turn any of all of any part's assignable knobs.
If you examine the control assignments for part 2 you will see that AsgnKnob 1 and 2 are already being used. So select knob 3 as the source and part volume as the destination.
If you examine the super knob assignments you will see that its AsgnKnob 1,2,3 & 4 are already being used. So select 'Part 2 Assign 3 as the destination and AsgnKnob 5 as the source to link the new part knob to the superknob without disturbing the other assignments.
You still need to set the initial volume to 0 for part 2 and make sure the curve and parameters follow the envelope profile you want the volume to have.
May I make a suggestion? Test the process using an INIT Normal (AWM2) perf to start with. That will let you try different things to get a sense of how it works and also ensures you don't accidentally change something in your real performance.
Posted : 25/06/2024 12:58 am

Check for a few things:
1) Make sure there's a free common level assignable knobs. Free up one.
2) Make sure Part 2 has a free assignable knobs. Free one.
3) Make sure Part 2 control assigns does not already have volume as a destination. If so, delete it.
By "free" I mean not assigned to something already.
Since you're dealing with a Performance that's already been designed by someone else - you never know if the Performance already used up all of the resources you would need to have the automatic control assign work.
If all of that is good then you may have to check the curve for volume destination in Part 2 assigned to an assignable knob and ensure the curve polarity and shape makes sense relative to the volume parameter (setting used when offset is 0).
Current Yamaha Synthesizers: Montage Classic 7, Motif XF6, S90XS, MO6, EX5R
Posted : 25/06/2024 4:26 am
Topic starter
Toby,
Thank you so much for your help. So I went to Part 2 Volume and turned it to zero. Then I selected Control Assign and wiggled Knob 3 to assign the Volume to that Knob which it did. If I knew how to insert a screen image here, I would have.
Then I made the source AsgnKnob 5 like you said and I got a screen like the attached image. When I changed the Source, it went and changed the Display Filter from Knob 3 to Knob 5 and didn't assign anything to the Super Knob. I attached the screen image below. Can you help and tell me what I did wrong?
Thank you,
Phil
Posted : 25/06/2024 10:32 pm
Can you help and tell me what I did wrong?
Look at the top left corner of your image - you are editing 'Part 2 Common'
Parts do NOT have a super knob.
You have to make super knob assignments from the performance common area.
The meaning of 'AsgnKnob 1' (or 2-8) depends on whether you are at performance level or part level
'AsgnKnob1' means SuperKnob knob 1 at the performance level but means Part knob 1 at the part level. Easy to get them confused.
This is what I said earlier
If you examine the super knob assignments you will see that its AsgnKnob 1,2,3 & 4 are already being used. So select 'Part 2 Assign 3 as the destination and AsgnKnob 5 as the source to link the new part knob to the superknob without disturbing the other assignments.
Those super knob assignments are at the performance level. Notice how I said to specify the destination as 'Part 2 Assign 3' - you have to provide both the part number (1-16) and the knob number (1-8) for that part.
Again I would refer you to the suggestion I made earlier to do these things on an INIT performance until you get a sense for how things work.
That 'wiggling' you are doing is also confusing you. Don't use 'Auto Select' until you have time to do simple tests to see how it affects things. When it is ON it can change things without you being aware of it.
Do things MANUALLY so you know EXACTLY what is being changed. Select the appropriate filter from the drop down. Then select the appropriate source and destination from the drop downs.
That accomplishes several things:
1. The drop downs will show you EVERYTHING that is valid for you to choose from.
2. it prevents parameters from changing automatically when you might not notice they have changed.
3. it reinforces the hierarchy as described in the Super Knob 'Mastering the Montage' article I referenced.
performance - 1 super knob, 8 common knobs
part - each of the 16 parts has 8 part knobs available
Don't give up - keep posting questions when you have issues. You just need to work through them all one at a time.
Posted : 25/06/2024 11:11 pm
Topic starter
Toby,
I worked on this for most of the evening. I was able to make the INIT file work as I wanted, making the Super Knob to control volume. But as for the above performance, I tried multiple combinations and couldn't get it to work. I did progress to making Knob 5 to control the Volume perfectly (I celebrated the small victory), but I couldn't get the Super Knob to control Knob 5. I attached a screen shot of this. I would appreciate any more help you can provide and thank you for your patience.
I will be flying out of town for the weekend tomorrow, but hope to work on this again on Monday. I must be close, but not sure where I am going wrong.
Phil
Posted : 26/06/2024 4:21 am
but I couldn't get the Super Knob to control Knob 5.
Works for me. Likely doesn't work for you because you didn't set the upper limit for super knob 5 to 1023 - this perf has it at zero.
1. load the performance fresh - make sure you select a DIFFERENT performance first and then the CFX & Pad & Sub
2. watch the sub display and the knobs under it while you twirl the super knob
3. notice that ONLY KNOBS 1-4 show any activity
4. the knobs under the sub display
5. select Motion Control - Super Knob from the performance home
6. watch the screen while you twirl the super knob
7. notice that KNOB 5 shows no activity
8. notice that the limits for knob 5 are BOTH ZERO
9. change the bottom limit to 1023
10. watch the screen while you twirl the super knob
11. notice that knob 5 now shows activity and so does the sub display and its knob 5
12. load the INIT Normal (AWM2) performance
13. select Motion Control - Super Knob
14. notice that ALL KNOBS have upper limits of 1023 by default
15. notice also that ALL KNOBS have their Super Knob Link switch set to ON
Whoever designed this performance set the upper limit for knobs 5-8 to zero. If you check the other two INIT performances you will find that the super knob automatically is linked to all 8 common knobs and all 8 have the full range of 0 - 1023.
This is just another one of those BEWARE OF PRESET experiences discussed in a previous thread. Just because a component/feature isn't used in a preset does NOT mean it's parameters have any default or known value.
For whatever reason whoever designed this preset INTENTIONALLY changed the high value of knobs 5-8 to zero. Notice that they didn't, but could have, set the Super Knob Link to OFF for those knobs. Who knows why they left them on but set the range to 0-0.
Don't blame yourself for missing this - I didn't think to check it myself when you first reported the problem.
This is the type of 'gotcha' you have to ALWAYS be on the lookout for no matter how experienced you are.
FYI - don't forget that you still need to set the part volume to 0
Please post if this solves the problem. And thanks for doing the test with the INIT Normal - that provided validation that you were on the right track.
In your other thread I suggested, when you get time, you read the thread Jason provided the control image for. It has step-by-step instructions for doing the above and seeing what common and part knobs are being used. It is chock full of valuable reference material you won't find anywhere else.
Jason is one of the top experts on this, and other synths, so you may find his replies in other instrument forums (e.g. modx) helpful.
Posted : 26/06/2024 4:58 am

When usually this happen it is always because
— the super knob is not assigned to the knob
—the knob are not set to full range
—there are already volume assigned by a controller
Montage 7 classic
Posted : 26/06/2024 6:02 am
When usually this happen it is always because
Yep - those are the things that determine whether a knob and parameter will actually be controlled.
Then you have to deal with HOW the parameters value will change when the knob is used. For that you need to take the specified curve, ratio and curve parameter value into account as well as the Uni or Bi directional parameter.
There can be trouble brewing at every twist and turn - especially when dealing with unknown and undocumented presets.
Posted : 26/06/2024 6:16 am
but now I am on the M8x
Did you notice, Phil, differences between the aftertouch mechanics of the montage classic and the Montage Mx8? Is the coarse so tiny as well or it is slightly better?
Montage 7 classic
Posted : 26/06/2024 6:21 am
There can be trouble brewing at every twist and turn
And sometime it is just because the assign button next to the supers knob is off  it have happen to me few time.
Montage 7 classic
Posted : 27/06/2024 7:15 am
https://manual.yamaha.com/mi/synth/montage_m/en/om02screenparameters0050.html#link04 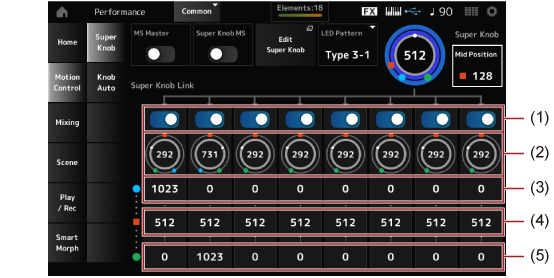
Make sure 5th knob's link is on
Make sure 5th knob's blue dot row (aka "value left" ) is set to 0
Make sure 5th knob's green dot row (aka "value right" ) is set to 1023
Middle value for 5th knob (red square row) can be set to 512
Current Yamaha Synthesizers: Montage Classic 7, Motif XF6, S90XS, MO6, EX5R
Posted : 27/06/2024 8:01 am
https://manual.yamaha.com/mi/synth/montage_m/en/om02screenparameters0050.html#link04
Make sure 5th knob's link is on
Make sure 5th knob's blue dot row (aka "value left" ) is set to 0
Make sure 5th knob's green dot row (aka "value right" ) is set to 1023
Middle value for 5th knob (red square row) can be set to 512
there is a middle value, now! Middle value, for what purpose ?
Montage 7 classic
Posted : 28/06/2024 10:38 am
This is directly from the manual in the area linked previously:
Assignable Knob 1–8 Value MidShows the value of the assignable knobs (Knobs 1–8) when the Super Knob Value is set to Mid Position.
This parameter is not available when the Mid Position is Off.Settings: 0–1023
All of the values right left and mid are worded the same way starting with "shows the value". I think the wording is a tad confusing because I would rather it say "sets the value" so it's clear that these are editable.
But anyhow to elaborate, I take it the mid value lets half of the travel of Superknob spin assignable knobs at one rate and the other half of travel spin it at another rate in order to reach the mid point when super knob is at its mid point.
I'd have to experiment with this to be sure exactly how it works.
Current Yamaha Synthesizers: Montage Classic 7, Motif XF6, S90XS, MO6, EX5R
Posted : 28/06/2024 7:30 pm
But anyhow to elaborate, I take it the mid value lets half of the travel of Superknob spin assignable knobs at one rate and the other half of travel spin it at another rate in order to reach the mid point when super knob is at its mid point.
I created a new thread to provide the details but what you above is essentially correct. Just a minor point being that it isn't 'half of the travel of Superknob spin' but rather the portion below and the portion above since 'mid point' isn't really limited to the 'middle' of the travel - it could be set to any valid value.
But whatever the super knob 'Mid' value is it scales the common knob travel so that ALL mid points are reached at the same time.
Each of the two ranges (one above Super Knob mid, the other below) can also be either ascending or descending.
Posted : 28/06/2024 7:40 pm
Page 1 / 2
Next
