I became a new MODX8 owner. I’ve already made a song with the new Pattern Sequencer and I would have a question about that!
Is there any way I can completely turn down the volume on all 16 tracks or on a designated track at a designated point within the Sequencer? I thought the way songs are usually muted at the end. I've already done this with the Motif XF. There, from a designated beat of the song, it was possible to set the continuous mute to 0. This muted the entire instrument, which later had to be turned back to 127 in Utility mode. It can be used to increase or decrease the volume, everything is up to the setting. Is there a similar or different way to do this in MODX? The point would be to be able to mute the Sequencer recording at the end and have it recorded by Sequencer as well. Possibly Super Knob or other option. If so, how do I set it up?
Adjusting Overall Volume
Background
The Motif-series and the MO-series workstation synths had a Sequencer Job called “Create Continuous Data” which allowed you to create Fades (both in and out) using the MIDI Universal Volume (Parameter Change) message. You set a Start and End Point and you could even determine the shape of the fade... and the Sequencer Job generated the messages.
This “Sysex” message would adjust the master Volume of the entire instrument (normally set in [UTILITY] at 127). This Master Volume is the main Volume for the entire instrument and is normally reset to 127 when a GM RESET message is detected... or as you noted you could manually reset it to 127.
This same kind of thing can be accomplished on the MONTAGE/MODX using its massive Controller matrix. As is true in most things, there is no one-way to accomplish this... I have experimented with a few... Here are two methods... as I explain, I like the second one better (and it’s easier).
Motion Control Synthesis Engine Method 1
The Assign Knob/Super Knob system is designed for multiple Part control. So when I first got the MONTAGE I set about seeing just how much and what kind of things I could control with the Super Knob (anticipating the tons of questions that would undoubtedly appear).
I’ve found that the Super Knob has the same affect on one as any new toy, you want to see how much it will do and you want to use it on everything. I was no different. Assigning “Part Volume” control for each of the 16 Parts to one of its Assign Knob... then assign control to the upper Common level of the architecture.
Each Part has its own 8 Part Assign Knobs. You’ll need to dedicate one Knob from each Part to do its own Part Volume.
Then you can link those 16 Part Assign Knobs to one of the Super Knob’s 8 Common Assign Knobs. This Common Assign Knob can be used as the overall Performance’s Volume because it is actually controlling the 16 individual Part’s “Part Volumes”. And it does so musically... in other words, your mix proportions will remain in tact.
This works extremely well. However, the downside, if there is one, it is a lot of programming and there are bound to be many, many control reassignment choices to be made. While assigning the control over Volume for a Part or two, in a Performance is no big deal, however, it gets to be one when you have to do this for all 16 Parts.
And in considering doing a tutorial on this specifically, I think it is wiser to do one on the basics of assigning things. Because there are so many different control assignments that you will be inheriting... many individual instrument sounds already have Part Volume assigned, and those will need to be reprogrammed so as not to cause conflicts.
So I found answering the question “Can you control all 16 Parts of a Performance, simultaneously, with the Super Knob? To a simple, “Yes, you can! Your mileage will vary.” — Yes, it can, but I was looking for something with less reprogramming every time I want to do a fade.
Method 2
Necessity, being the mother of invention... I set out looking for another (simpler and better) way. I liked the real-time control the AssignKnob/SuperKnob system afforded me, but all the analyzing, evaluating, assigning and reassigning; not to mention the length of the explanation, and clumsy reset afterwards... was a bit much.
All Parts go through the Master Effect, and since the Common Assign Knobs and Super Knob system can address the Master Effects parameters, all I needed to find was an appropriate Master Effect Type that would allow me to control the Level in real-time. One could write a book on the array of Effects you find in these synths! (Having engineered is some of the top recording studios on the planet, I constantly have to pinch myself — the luxury of breaking out a dozen boutique EQ, and Compressors is just mind-boggling!)
Tech Effects Types
Having done a similar thing with dance mixes, assigning the Super Knob to vary the entire mix... I selected the “Isolator” as the Master Effect. This “DJ-Effect” divides the signal into three frequency bands (Lows, Mids, Highs), where you can apply a Filter to completely drop out a frequency band. You can remove all the Lows, and then drop,them back in at the appropriate point in the musical frenzy (it’s an old DJ trick but we’ll just update it to control Lows, Mids, and Highs, by assigning a Common Assign Knob linked to the Super Knob.
Master Effect = Isolator
The “Isolator” assigned as the Performance Master FX, can be used for instantaneous change in the EQ/Level of the Performance.. you basically can dropout an entire frequency band... commonly used in house-music to either dropout highs, or dropout lows, or dropout the mid frequencies, etc. Use as a “snapshot” (Quick Change) by activating the Master FX On/Off. Or you could assign the Low, Mid and/or High Level parameters to Assign Knobs — allowing you to smoothly fade the Volume of the entire mix.
However, I have discovered it makes the perfect Master Effect to facilitate a documentable musical fade. You do so by assigning each of the three Freq Band’s “LEVEL” to the Super Knob, you can use this Master Effect as your Master Volume
To assign any of the parameters to Assign Knobs... Assigning the "Isolator" as the Master FX:
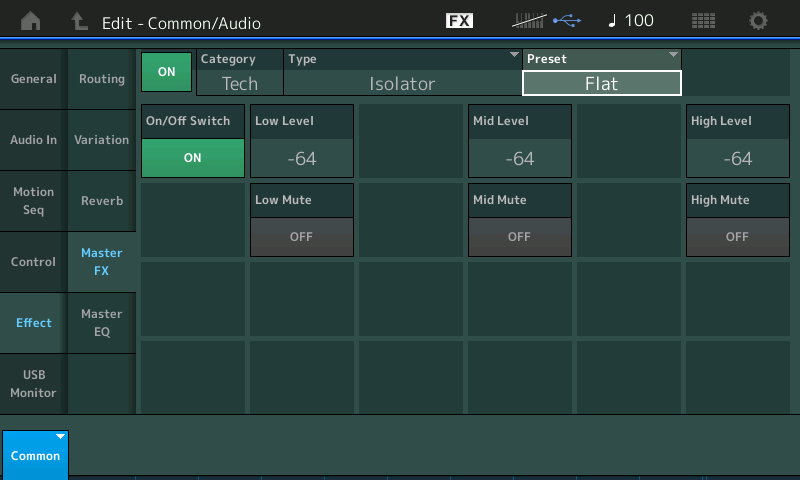
From HOME > Press [EDIT] > touch "Effect" > "Master FX" > Set TYPE = Category "Tech" > “Isolator“.
Select the Preset = FLAT

Set Master Effect = On
Set the Low Level = -64
Set the Mid Level = -64
Set the High Level = -64
By setting the start Level of all three Frequency Bands at minimum, no sound will be allowed when the Knob is at minimum.
Move the Cursor around the screen - as you highlight an assignable parameter the [CONTROL ASSIGN] button glows.
You can highlight a LEVEL or a MUTE parameter depending on what you wish to control.
_LEVEL will allow continuous change of volume -- works like a dimmer switch
_MUTE, of course, will be a conventional light-switch type On/Off control
To affect a Fade Outs like you mentioned, first highlight “Low Level” = -64
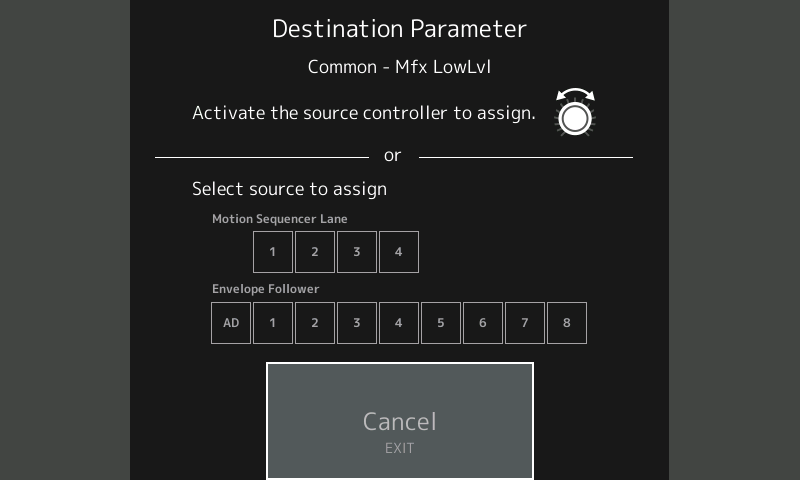
Press [CONTROL ASSIGN]
This recalls a screen that tells you to move the Control you want to apply the change. (It’s a “Learn” feature)

Turn The Super Knob to make the assignment... If you have an Assign Knob available you will be taken to the screen where you can adjust the application of the change.
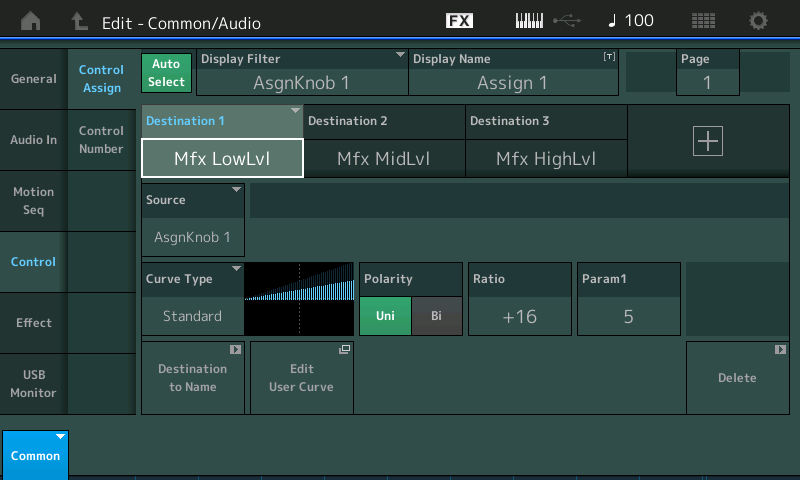
You want to set it so that it works like a Volume Knob, set the Control Assign as follows:

You will want to have each Freq Band set so that the
Curve = Standard; This provides a ramp... the graphic indicates how the Level will change left-to-right as you increase
Polarity = Uni; This provides control to turn up and down, minimum to maximum
Ratio = +16; This sets the maximum output level - you do not want to go higher than +16 (This will equal normal Performance Volume).
Param1 = 5; This gives the ramp its shape
Repeat for “Mid Level” and “High Level”.
You can return to the Isolator Effect by simply tapping “Effect” in column 1 of the screen.
Highlight “Mid Level” = -64
Press [CONTROL ASSIGN]
Move the Super Knob to make the assignment... and so on.
You can Assign these to the same Common Assign Knob (this way you can operate all frequency bands simultaneously with the single Knob).
You can make each “Source” = Assign Knob 1, You do this by recalling the Destination, and then touching the “Source” box - make each “AsgnKnob 1”
This way one Knob will Control the Fade.... movement of the Knob can be recorded to your sequence. Be sure to enable System Exclusive in your DAW, if using one. You can move the Common Assign Knob 1 or the Super Knob... they are linked, by default.
Finishing Touches
Set the Super Knob to maximum - this will be your normal playback level.
STORE the Performance with the Super Knob at maximum
Warning: the Isolator is a Boost/Cut device. Be careful, use your ears for quality of sound. Boosting a frequency range too much can distort the system (no, let’s make that, “boosting will eventually distort the system”. The recommended settings I’ve made will get you back to unity gain and allow you smooth change between maximum output and zero output. I have recommended Ratio = +16 which is the level equivalent to the signal were it not going through the “Isolator”.
The position of the Super Knob will now control the overall Volume of your Performance.
EXTRA CREDIT:
Assigning the three Frequency Bands of the Isolator to the Assign Knob system allows us to smoothly fade the master level output of the entire Performance because all Parts travel through the Master Effects. If while assigned like this you also wish to have MUTE/unMUTE available, use the “Knob Position” buttons located on either side of the Super Knob. The “Knob Position 1” button defaults to 0 (minimum) while “Knob Position 2” defaults to 127 (maximum).
Thank you for your help Bad Mister! 😀 😀 😀 😀
