I am having a hard time figuring out how to assign an FC7 foot pedal to control the overall volume of all 16 parts of a Performance. I believe the "Performance Volume" setting in the Master Mixing section will accomplish what I need as it determines the output level of the entire Performance. Does anyone know how to map the FC7 to this control?
The default setting for foot controller 1 (FC1) is for FC1 to map to CC#11. CC#11 should control the overall volume (all PARTs together). So if you plug your FC7 into the FC1 (foot controller 1) port - then the standard configuration should handle this for you assuming you didn't change the default programming of FC1's CC number (which is 11).
Foot Controller 2 (FC2) defaults to superknob. If you wanted to use FC2, leave the assignment to superknob, and still control the overall volume - then you'd have to offset every PART volume using assignable knobs that point to each PART's assignable knobs that, in turn, point to PART volume and will offset all PARTs to 0. Probably a bipolar standard curve for each so they can be additive and subtract. But that's a lot more work than just using CC11.
Current Yamaha Synthesizers: Montage Classic 7, Motif XF6, S90XS, MO6, EX5R
I am having a hard time figuring out how to assign an FC7 foot pedal to control the overall volume of all 16 parts of a Performance. I believe the "Performance Volume" setting in the Master Mixing section will accomplish what I need as it determines the output level of the entire Performance. Does anyone know how to map the FC7 to this control?
By definition, CC messages (whether cc7 or cc11) are Channel messages and will not be able to control all 16 Parts (Performance Volume). CC7 is main Channel Volume and is used on a per channel basis to set the Volume of a Part, while CC11 is Expression which works within the limits set by cc7 on the currently selected Channel.
When playing a MULTI PART Performance where several of the Parts are “linked” by KBD CTRL, each Part has its own individual Part Volume (slider). If you use a pedal set to cc7 all “linked” Parts will jump to the same value and move up or down together (but only the 'linked" Parts). If however, you use a pedal set to cc11 all “linked” Parts move up and down in level together but maintain their proportional relationship.
If you are working with a sequence setup where there are non-linked Part (KBD CTRL is inactive) cc7 and cc11 will only affect those unlinked Parts if you *select* the Part, directly. So cc7 and cc11 are Channel specific messages and will not let you control the Volume of all 16 Parts together because you likely are using more than a single channel in your Performance.
What you can do
METHOD 1: Set each of the Parts so that one of the 16 Control Sets has a “Part Volume” linked to a Part Assign Knob that is linked to Super Knob position. This will allow you to control all sixteen Parts together with an FC7 Pedal plugged into Foot Controller 2. That is one solution (as mentioned above). However, there are other ways that don’t involve so much work, and certainly don't involve editing each Part individually. But the Super Knob (being super) could do the job across all 16 Parts. This would use all 16 Control Set “Source/Destinations” on the upper Common/Audio level of the architecture.
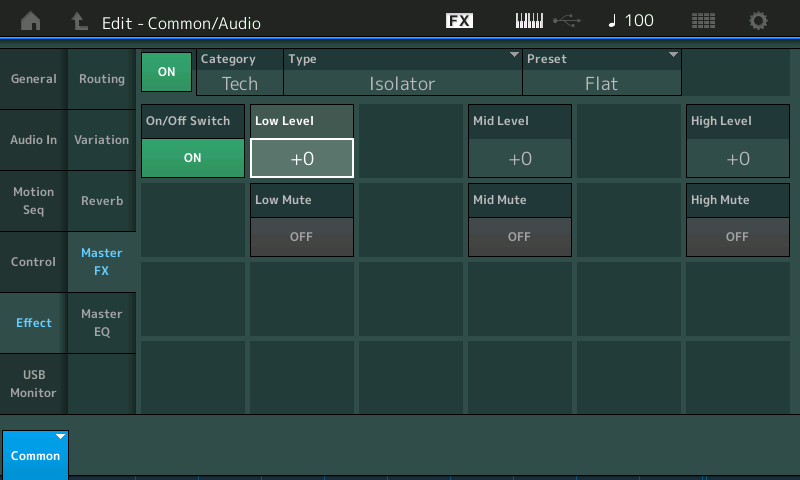
METHOD 2: Setup a Master Effect — since all Signal travels through the Master Effect, controlling the Output Level here will mean setting up control within just the one processor. I’ve found the Effect Type “Isolator” works extremely well for this type of thing. The “Isolator” is a 3-Band Filter allowing independent Volume control over 3 Frequency areas, Low Level, Mid Level, and High Level.
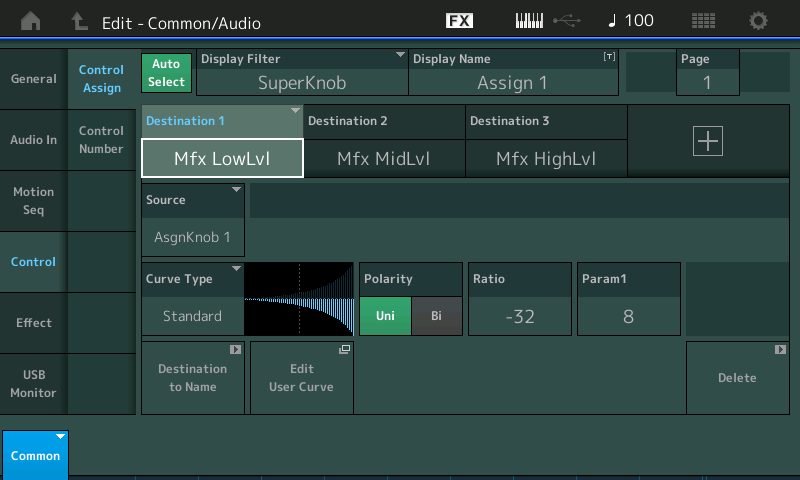
On the upper COMMON level of the architecture, you’ll assign a Common Assign Knob to Control MfxLow, MfxMid, and MfxHigh Levels... you can use a single Knob or Assign each frequency band its own (depending on how you want to make control for this available). You can adjust the “Curve” and shape it’s application with “Param 1”.
Shown below you can see I’m turning down all three frequency bands as Common Assign Knob1 is increased.
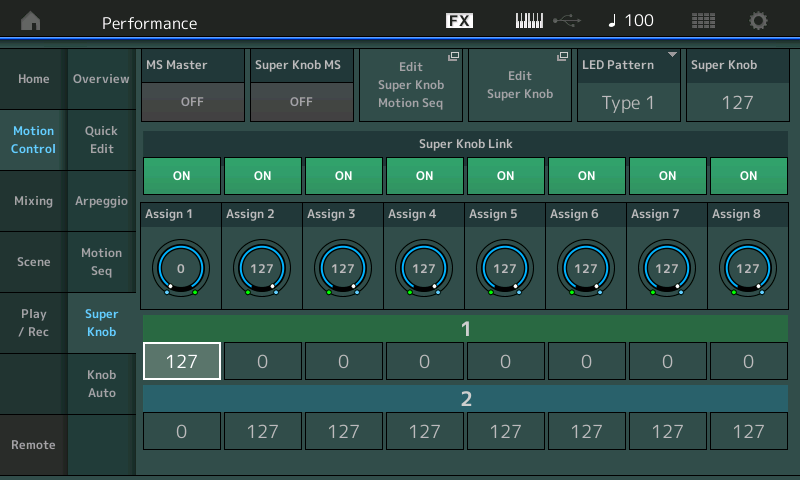
Common Assign Knob 1 is linked to the Super Knob, the Super Knob can be linked to your FC7 Pedal. You can decide if you you want the toe down position to be maximum Volume or heel down to be maximum Volume (you do so by reversing the direction of the Super Knob Values.
Step-by-Step Details:
From the HOME screen
Press [EDIT]
Touch “Effects” > “Master FX”
Touch the "Type" box to see the menu of Effect Types
Select “Tech” > “Isolator”
Turn the Master FX switch ON
Turn the Isolator's "On/Off Switch" = On
Move the Cursor to highlight the “Low Level” parameter

[CONTROL ASSIGN] button glows indicating this is an assignable parameter
Press it to activate the “quick assign” feature...
Move an Assign Knob to make the assignment (in my example Assign Knob 1 was empty)
You are automatically taken to the Control Assign screen

I am using the following settings:
Curve = Standard
Polarity = Uni
Ratio = -32
Param1 = 8
Touch “Effect” to return to the Master FX screen and repeat for the “Mid Level”, and then for “High Level” ranges.
I also assigned them to Common Assign Knob 1 (you can assign each to its own if you want that kind of Frequency related control, but a single Assign Knob is all that is really necessary for this purpose - reducing the entire volume of all 16 Parts together)
Shown below is the Super Knob Values for Common Assign Knob 1 reversed so that heel down is minimum and toe down is maximum (your preference)
HOME > tap "Motion Control" > "Super Knob"

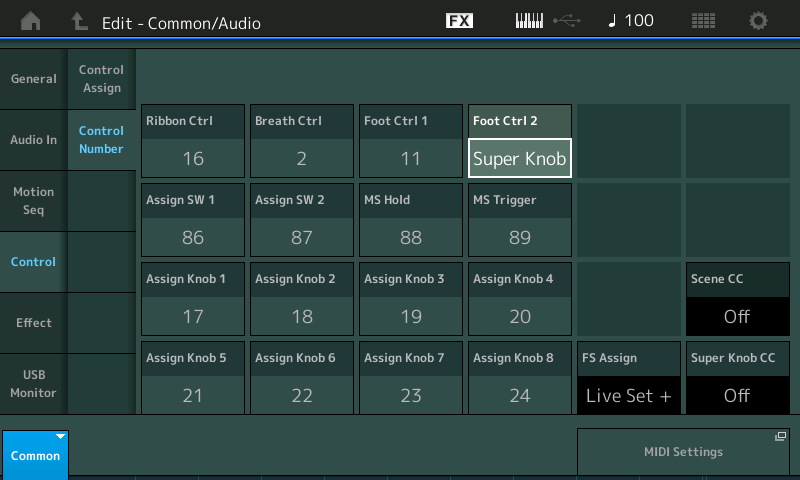
Use the FC7 pedal plugged into Foot Controller 2 jack and make sure the "Foot Ctrl 2" = Super Knob
(If you have but one FC7 and normally you plug it into the Foot Ctrl 1 jack, you can reprogram the Foot Ctrl 1 = Super Knob for this Performance).
To program your Foot Controller jack per Performance, press [EDIT] then on the upper Common/Audio level of the architecture
Tap "Control" > "Control Number" > Make sure Foot Ctrl 2 = Super Knob

Press [STORE]
Anytime you make a change to a Performance store it to your internal memory
Name your new Performance
Tap "DONE"
Extra Credit:
In the example above I use the same Curve, Polarity, Ratio and Parameter1 (shape) for each frequency range. As you may realize, each frequency range could be independently shaped. When you do this you can create different aural illusions as the sound fades away. For example, when listening to band playing outdoors, if they are marching away, you will perceive the change differently by frequency. As the band goes off in the distance the high frequencies fade more quickly, as soon as the more directional instruments pass by, highs drop off rapidly, certainly more so than the low frequencies. A change to the Mid range, where we naturally hear best, causes the biggest difference in perceived volume when it moves, and the highs disappear slightly faster than the low frequencies. When you have a good set of monitors things like this and the placement of things in the stereo field can clearly be heard/felt/experienced by the listener. Combined with the fade-out shaping, differences in reverberation can add to the illusion of sound moving within a given environment. There is a difference in changing Reverb Send amount, versus changing the amount of Reverb Time. Staying aware of what sounds remain sharpe, focused and what changes as distance is applied.
Fade outs can be simply turning everything down, or you can create an illusion of distance increasing as the overall sound level decreases. This is where sound designing crosses with mix engineering.
Just FYI: The Isolator is an Effect most often used in various kinds of dance music and similar electronic music genres. A kind of so-called “DJ-Effect” because it is broadly applied to the entire mix... typically, the DJ would remove all signal going to the Sub-woofers by applying a filter to all frequencies below a certain point... then dramatically punching it back in at a critical moment to help drive crowd. It divides the signal by frequency range, like a multi-band compressor but simply works to boost/cut those ranges. Careful. Cuidado. Use with care... but as you can see, it can be put to other uses as well.
Rather than programming controller pedals, performances and the like can I just use a passive Ernie Ball pedal to globally control the volume on the modx? When gigging I really need master volume control at all times and prefer it to be done with a pedal. Will this work? I realize it’s inelegant but my. Ord allowed me to globally control volume with an FC-7 expression pedal through the organ swell jack. I haven’t found a similar option with MODX
That will work - but only for the keyboard controlled parts.
Rather than programming controller pedals, performances and the like can I just use a passive Ernie Ball pedal to globally control the volume on the modx?
The Modx, like the Montage, doesn't have a canned solution for controlling all 16 parts since parts 9-16 can't have keyboard control enabled.
But the pedal will work automatically for all parts 1-8 that have keyboard control enabled as described in the earlier replies.
As Bad Mister explained you need to configure control assignments in order to handle the non-keyboard parts.
That will work - but only for the keyboard controlled parts.
Rather than programming controller pedals, performances and the like can I just use a passive Ernie Ball pedal to globally control the volume on the modx?
The Modx, like the Montage, doesn't have a canned solution for controlling all 16 parts since parts 9-16 can't have keyboard control enabled.
But the pedal will work automatically for all parts 1-8 that have keyboard control enabled as described in t
