Notifications
Clear all
MONTAGE Series Synthesizers
12
Posts
3
Users
0
Likes
1,633
Views
Topic starter
Hi
I have watched the youtube tutorials with Phil back to back many times but I still have two problems rendering to Audio.
First on is that often the audio tracks have nothing on them. Secondly, after creating the requisite number of audio tracks, setting them to record all after setting up the outputs in the montage and creating all the buses with matching USB settings, all of the audio tracks contain the same audio, that is they all have all of the midi tracks rendered into them instead of each individual midi track.
The first problem is intermittent and I don't think I have altered any settings to cause this.
The second problem has always been the same. I have followed the instructions as on the tutorial video but on that, Phil's audio channels refelect the individual MIDI tracks. I hope I have explained this adequately. Your advice would be gratefully received. Thanks.
Posted : 20/02/2017 9:08 pm

Hi Stuart,
We can probably best help you if you can tell us what you are dealing with... how many MIDI Tracks, what instruments, and how you want your data transferred to audio. You should know there is no one way to do this.
You might record the drums to a Stereo audio track, or you might take separate outs for kick and snare... or maybe each drum sound to its own audio track. There are many options....
Start by describing your track layout and what you want the audio track layout to be.
Posted : 20/02/2017 9:17 pm
Topic starter
Thanks for your prompt response.
I have five instrument s on MIDI tracks. I want simply to render them as audio tracks following the procedure as your instructional video.
My ultimate intention is to develop the project further to ultimately produce a master copy. This is an exercise to gain proficiency ... I m a beginner on MIDI and on the Montage as you may have guessed! The only thing on which I am seeking some guidance is to resolve the main issue I have which is that the audio tracks do not reflect the different instruments but each one contains all the instruments so I have five identical but unusable audio tracks that I would have eventually taken to the next production step. The attached jpg might help.
I do not intend to separate the contents of the midi tracks eg drums etc.
So the question is really ...Why, when I follow the video procedures do I get a different and unsatisfactory result and does my result suggest an error that I am making?
Thanks for your help.
Posted : 21/02/2017 6:24 pm
In order to get the results you got you did not route the Parts to individual USB OUTPUTS. It looks like they all are set to "Main L&R"... you need to re-route the signal to different Outputs.
You can do this manually or you can have Montage do this for you.
Since I believing in teaching someone to fish rather than handing them a fish...
From your Performance Home screen:
Press [PART SELECT 1]
Press [EDIT]
In the lower left of the screen touch "Common" to view Part 1 parameters
Touch "Part Settings" > "General"
Here find the PART OUTPUT parameter.
Set Part 1 to "USB1&2"
In the lower left corner select Part 2
Set the Part Output = "USB3&4"
Select Part 3
Set the Part Output = "USB5&6"
and so on...
You can have the Montage automatically make Part Output settings by selecting the QUICK SETUP option "Audio Rec on DAW"
In Cubase you must have an INPUT for each of these stereo pairings.
Go to DEVICES > VST CONNECTIONS > INPUTS tab
Use the ADD BUS function to create a Stereo Input for each USB pair you routed Out from the Montage.
Posted : 22/02/2017 4:24 pm
Topic starter
Hi again.
I had reset all the outputs on the Montage as directed on the video and as confirmed by you. This may seem odd, but having done it again with all the correct settings, I checked back and found all had reverted to Main L&R with no intentional input from me. So I am sure that you are right.
Now, I have redone it with all the settings ... double checked! ... correct. On recording the audio channels I now get a straight line. Checked back and all the settings are still showing correctly as you had instructed. The audio channels are empty.
So, with all at Main L&R, I get everything on each audio channel but with output settings correct, and matching the input settings on the buses on the VST connections page, I get no recording on the audio channels. I have tried all permutations of M and S and monitoring but to no avail. I realise that there may be other ways of doing what I want but being pedantic I just want to be able to successfully achieve the result as you did it on the video. By the way, I am using Cubase AI 8 that came with the Montage. Thanks for your patience.
Posted : 26/02/2017 1:20 pm
Sorry, I'm not exactly sure which video clip you are watching (I shoot so many). So referring to it doesn't help me. I'm placed in front of many video cameras and don't always get to see the edited versions... But the routine is the same. Try a simple step-by-step:
Try a simple routing situation with just a single MIDI TRACK, routed to a single Part
Get the Cubase MIDI Track routed back to the Montage so that it is playing back.
I recorded a few measures using "S700 for Montage" solo Piano....
Quick Setup = MIDI Rec On DAW
I record a couple of choruses of something and set it to CYCLE during playback...
During playback, change the QUICK SETUP to "Audio Rec on DAW". This turns Direct Monitor Off and should interrupt the audio playback. We are doing this so you can follow the signal path... You should still see the MIDI activity going on in Cubase as it outputs MIDI data to the Montage... but we have interrupted the return of AUDIO from the Montage...
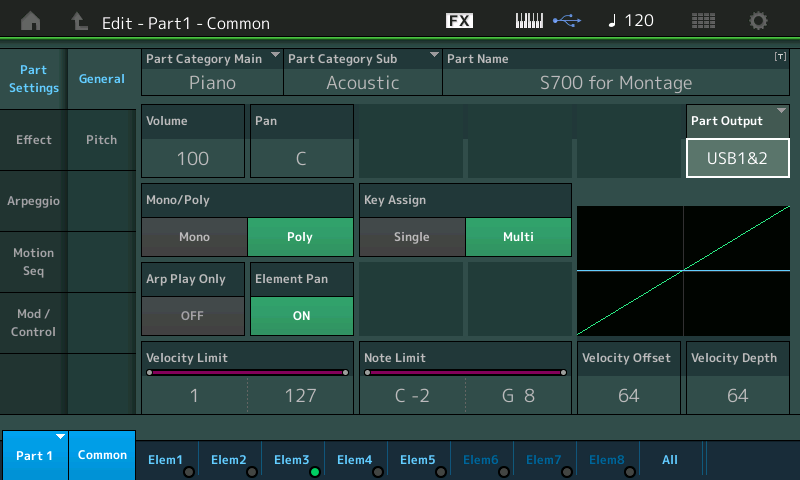
Edit the Part, sending its PART OUTPUT = USB1&2... Here's how:
Press [EXIT] to leave Utility and return to your Performance
Press [EDIT]
Press [PART SELECT 1]
The lower COMMON button is lit
Touch "Part Settings" > "General"
Set Part Output = USB1&2 (shown below)
In Cubase go to DEVICES > VST CONNECTIONS > INPUTS > click "ADD BUS" > add a new Stereo bus for Montage USB 1 and 2 (shown below)
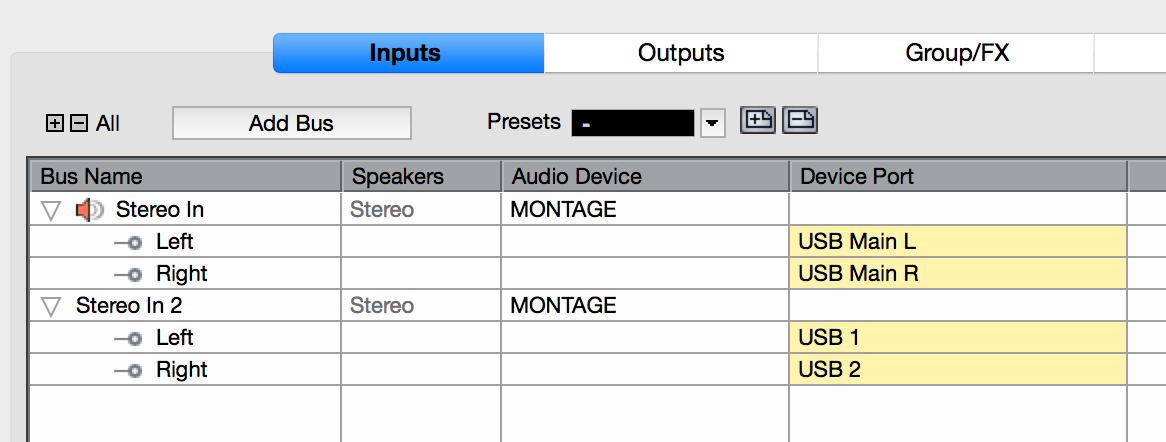
If a stereo bus already exists, notice the new one you have added is given a name plus a number. See I've added "STEREO IN 2" assigned to receive INPUT from the Montage USB1&2
Return to the main Track view screen in Cubase;
Create a Stereo Track with the Input set to the "Stereo Input 2" (The one with the name and number).
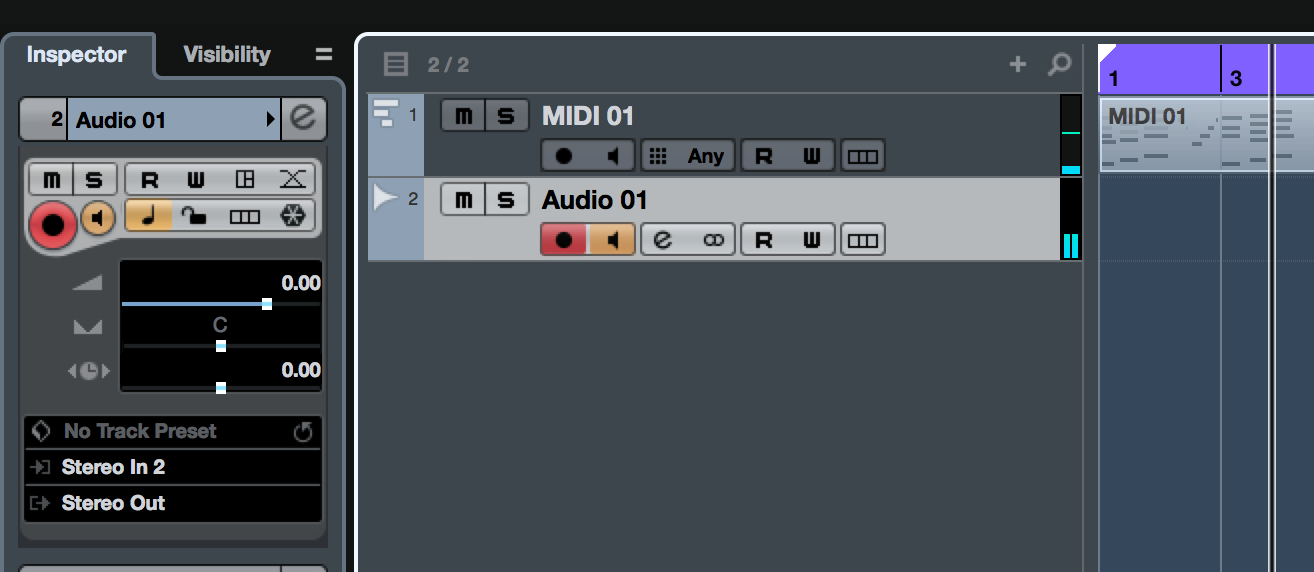
Activate the red RECORD READY button, and the tan MONITOR SPEAKER button... You should see Track's the meter indicating stereo audio (two segments) the arriving audio. If no meter, no audio. Recording in this situation you will print audio to the track. And because DIRECT MONITOR is OFF, you are only hearing one stream of audio - that which is recorded to the computer.
Let us know.
Posted : 27/02/2017 4:03 pm
Topic starter
HI Phil
So far so good! I have followed your instructions and have recorded an audio track from the one single track after setting up the computer and Montage.
On a copy of the project on which this was done, I tried to see what would happen with two tracks. Not successful using your instructions for one track.
I look forward to the answer to that as and when you have time.
Thanks for everything so far.
Regards.
PS The you tube video I have been studying is as per the link below. This is video 5. Audio from Midi is covered in 5 and 6.
Posted : 05/03/2017 10:30 pm
On a copy of the project on which this was done, I tried to see what would happen with two tracks. Not successful using your instructions for one track.
When you say "two tracks" - I'm a little puzzled at what you mean. You can record as many tracks as you require. Simultaneously, if you wish. Perhaps an explanation will help:
There are 32 bus outputs from the Montage to the computer. By default, all PARTS are routed to the MainL&R (the very first two outputs). You can, as your musical needs require, route PARTS to Outputs. These Outputs are labeled: Main L&R, then USB 1 - USB 30. (32 total).
The only difference between the Main L&R and the USB Outputs is the Main L&R outputs pass through the SYSTEM Effects, the Master Effect and the Master EQ on their way to the computer. The USB outputs are "direct outputs" and go to the computer after the INSERTION EFFECTS but before the System Effects, the Master Effect and the Master EQ
The USB1-30 can be configured in odd/even pairs (1&2, 3&4, 11&12, like that) or they can be used as individual sends (1, 2, 3, etc). You decide whether you want to record the PART in stereo or you would rather isolate it on its own mono track. A Normal PART can be routed as mono or stereo. Remember PARTS have their own two Insertion Effect which in many cases may be stereo, so to maintain the stereo of the PART you would route it Out on a Stereo pair when recording it as Audio. However, for example, a B3 organ is a mono sound, but it utilizes the (stereo) Rotary Speaker Type as one of its Insertion Effects... if you wish to maintain the "rotation" in the Rotary Speaker Effect it would be wise to record this PART to a Stereo Track - route it out on as Audio on a stereo pair.
When you are working with a Drum Kit PART: Each Drum KEY can be routed to an individual bus output. If you require a separate output on the KICK Drum, you can set that from within the Drum Kit PART. If you have four toms you might assign them to the same stereo pair to maintain the panning that happens when there is a tom fill. The Hihat Closed, Pedal and Open can be routed to single mono send... This busing system is very flexible. It's called a 'bus' because one or more passengers (audio signals) can ride it from point A to point B along a specific route and be delivered to their assigned destination... This flexibility really allows for detailed processing and production.
All audio buses can be activated simultaneously. And you can record all the PARTS to individual Audio tracks simultaneously and discreetly according to your routing setup.
Because you have recorded PARTs as MIDI first, you are going to be playing back the MIDI Parts >> the Montage will generate the Audio >> which will follow on a PART-by-PART basis the "PART OUTPUT" assignment that you configure within your PERFORMANCE.
Like any multi-track recording studio, the Outputs of the source are routed to the Inputs of the Recorder. Its the same situation. So not only can you do two, but you can do as many as you require. Take your time experiment as you are doing - on a copy of your Project. (There are no tears when you mess up on a copy!!!)
Because you are using MIDI, you do not have to record EVERYTHING at once. You can, but really you do not have to. Take multiple passes - concentrate on different segments. MIDI clock ensures that each playback will be synchronized and your data can be routed as is convenient for you. If (and when) you opt to do individual DRUM OUTPUT assignments, you might do one complete pass to just render the DRUMS to individual Audio Tracks. I've had a single MIDI Track of Drums turn into as many as 13 or 14 Tracks of audio - your mileage will vary on what the Project is focusing on. You many never need to do this but its nice to know you can!!!
You would EDIT the one Drum PART so that each KEY is routed as you desire... to any of the 32 Output buses... You set the overall "PART OUTPUT" = "Drum". This will allow each KEY to travel as you have assigned from within the KIT.
HINT: When setting up to record multiple Montage PARTs simultaneously... you are still going to be setting up the routing one at a time. Follow the signal flow - its a good work habit.
Start at the PART >> Make an assignment for PART 1 >> Decide how you need to record this >> analyze the INSERT Effect situation >> set the PART OUTPUT.
Go to Cubase > DEVICES > DEVICE SETUP > VST CONNECTIONS > INPUT tab... make sure you have an INPUT to receive this Montage assignment. A Stereo Input to match a Stereo Output assignment, a Mono Input to match a Mono Output assignment.
Final step: Create a Cubase Track to receive audio from the Montage Output and Cubase Input you just created. Again matching Stereo/Stereo or Mono/Mono as necessary.
Rinse and repeat...
Posted : 09/03/2017 8:12 pm
Topic starter
Hi Phil
Wow! A lot in there. Thanks for all the info. I'm slowly working through and applying it. I'm sure I'll get it it eventually.
So here goes ....
Thanks again.
Stuart
Posted : 16/03/2017 10:37 pm

Maybe he has the Montage set to the 192k audio out option, which will change the possible output options via USB to two pairs, and this may not be lining up with the outputs he anticipates using. Doubtful, but just a thought.
Posted : 17/03/2017 4:02 pm
Each PART (and each Drum within a Drum Kit Part) can be routed to any of Montage's Outputs. If we limit our discussion to the digital USB record Outputs, there are 32: Main L&R, plus USB 1-30.
The only difference between "Main L&R" and any of the "USB 1-30", is the Main Outs go through the System Reverb and Variation Effects, Master Effect, and Master EQ.
Press [EDIT] > press [PART SELECT X] to select the Part
In the screen touch "Common" > "Part Settings" > "General" > find "Part Output"
In order to apply VST EFFECTS to data playing back as MIDI requires a specific routing scenario between your MIDI device and the DAW. This is exactly what Steinberg developed and introduced back in 1996 when they introduced Virtual Studio Technology... what we commonly refer to as VST.
It is basically a routing scheme that allows for external devices to be used within the DAW environment. This included third party softsynths and effects that worked as "plugins" and it included external hardware, both Effect processors and synthesizer's.
In general, MIDI recorded on the DAW is routed to the "external" program (be it a plugin running on the computer or an actual external device connected via cabling), that device generates "virtual" audio. Considered "Virtual" because you are not printing the audio, you setup to monitor the audio, in a "what-you-hear-is-what-you-will-get" once you Export Audio Mixdown (render actual audio).
Setting up such advanced routing for external effects and external hardware can be easily done with Cubase Pro 9, as it includes the VST CONNECTIONS options for setting up such audio returns. "External Fx" and "External Instrument"
The audio from the device (be it a soft synth plugin or external synth) must arrive via the special VST routing - audio arrives at the convenient VST Audio Lane, and a VST Automation Lane is created to document control over the virtual audio. Audio returned to the DAW in this manner can be processed by any VST plugin effects you may have installed.
In this VST routing situation, you would not Monitor DIRECT, but post (after) the DAW processing... so you can hear it.
Are you using Cubase Pro 9?
Posted : 17/03/2017 4:19 pm
Unfortunately, the routing required to deliver external audio at a "virtual" audio input is not implemented for Montage in Cubase AI. But that shouldn't be a problem because with Montage's audio routing flexibility, you can develop a different workflow- one where rendering your MIDI data to audio tracks becomes an integrated part of your routine. Once you have your data as audio you can of course, process it with plugins. (keep your Montage MIDI Tracks in a muted Folder, as your safeties, in case you need to fix something).
The External Instrument routing function (found in Cubase Pro 9) allows for using plugin effects in the DAW on the audio returning from the Montage. This means you can process your Montage sound before printing audio. It's one of the many advantages of the full Pro version!
But if you can't go Pro 9, the work flow of recording MIDI*, then rendering audio by playing back the MIDI to Montage while assigning each Part to its discreet USB audio Output, then put those MIDI Tracks in a folder and mute them. You'll only need them to fix something. Now you've got all your Montage Parts as separate audio tracks, ready to process further with your computer-based plugins. It's not a bad workflow.
Pro 9 would let you do the same thing with the "virtual" audio routing... and you would click "Freeze" the MIDI data (fancy term for automatically creating the temporary audio files and Muting the MIDI Tracks). The result is the same: you get to reuse your hardware! For more Parts, more tracks, etc., etc. with VST routing, because you've 'frozen' your data, you can open another instance of the VSTi for more tracking.
Posted : 17/03/2017 9:40 pm
