
I am so happy to finally share the details of MONTAGE M with you! It’s been such a wonderful experience playing and exploring this instrument. New sounds, improved control, refined workflow…there is so much to love in MONTAGE M. Here are some of the cool things I’ve discovered.
MONTAGE M: MONTAGE Evolved
Models
Like the original MONTAGE, MONTAGE M comes in three models: The 61-key MONTAGE M6, 76-key MONTAGE M7 and the 88-key MONTAGE M8x. Both the MONTAGE M6 and M7 feature the fast and expressive FSX semi weighted action, a favorite of synthesists and keyboardists. MONTAGE M8x features an all-new action called GEX. The “x” in MONTAGE M8x signifies polyphonic aftertouch allowing individual modulation of held notes with pressure. Check out the three MONTAGE M models below:

User Interface
If you are familiar with the original MONTAGE, you’ll be happy with many of the updates. Here are seven big UI upgrades:
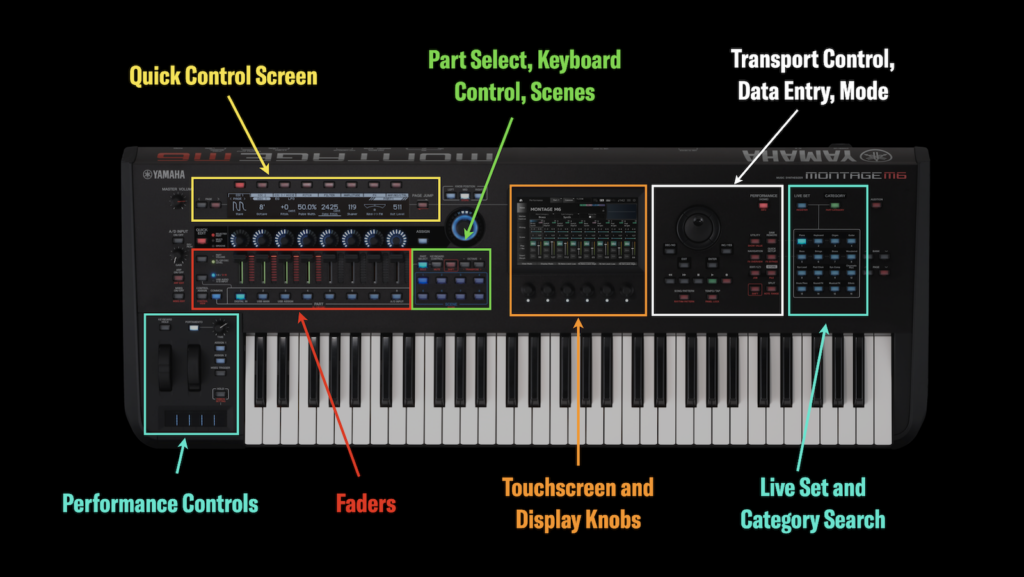
- Quick Control Screen: This 512 x 64 LCD screen makes quick Performance editing a breeze. Each of the 8 knobs corresponds to parameters in the screen, and the 8 buttons located directly above the screen allow you to select different tabs. To the left of the screen the [PAGE < >] buttons select secondary parameters. To the right is the [PAGE JUMP] button. This moves parameters in the Quick Edit LCD over to the main Touchscreen for deeper edits.
- Performance Controls: As with the original MONTAGE, Pitch bend and Modulation wheels, [ASSIGN 1/2] and [MSEQ TRIGGER] buttons are located here, but MONTAGE M adds a few cool controls. The [PORTAMENTO] button with time knob is now conveniently located here. You’ll also note the redesigned backlit Ribbon control with 5 segments and a [HOLD] button. And the new [KEYBOARD HOLD] is very cool. Press this button and any chord you play is sustained until the next chord is played. Unlike the sustain pedal, the sustained chord immediately stops as soon the next chord is struck. It’s great for playing clean, connected pads or backing comps.
- Faders: The faders have both a 10 segment LED level indicator and a backlit strip. Press the [PART VOLUME] button to the left of the faders and the LED strip is backlit in blue. A second press of the button selects [EL/OP/OSC LEVEL] and the LED strips turn green. You can then change Element (AWM2), Operator (FM-X) or Oscillator (AN-X) levels within the Part. Pressing the button directly below gives you access to Parts 1-8, 9-16 (with the [SHIFT] button), or USB audio and A/D input levels. The LED strip turns red when selecting [USB AUDIO A/D INPUT]. This is cool as it gives you an at-a-glance indication of different levels (blue for Part levels, green for Element/Operator/Oscillator levels within Parts, red for incoming audio levels).
- Part Select, Keyboard Control, Scenes: These buttons have been relocated and improved. The [PART SELECT] button illuminates in blue for direct selection of Parts right below the faders. Next to this button is [KEYBOARD CONTROL]. This button changes the buttons to green and allows you to turn keyboard control on/off. You can still select keyboard control in the in the touchscreen, but having direct access with physical buttons streamlines live playing. You can easily engage parts for adding layers and changing sounds seamlessly within a single Performance. Pressing the [SHIFT] button changes these buttons to [MUTE] and [SOLO]. Directly below are the eight [SCENE] buttons allowing to recall different parameters within a Performance.
- Touchscreen and Display Knobs: Graphics in the Touchscreen are easier to see, and the response time is much faster. But the coolest addition are six Display Knobs located directly below the touchscreen. These knobs have a white LED indicator below when they are active. Depending on where you are at in a Performance the knob functions change. Display knobs greatly improve overall editing and navigation.
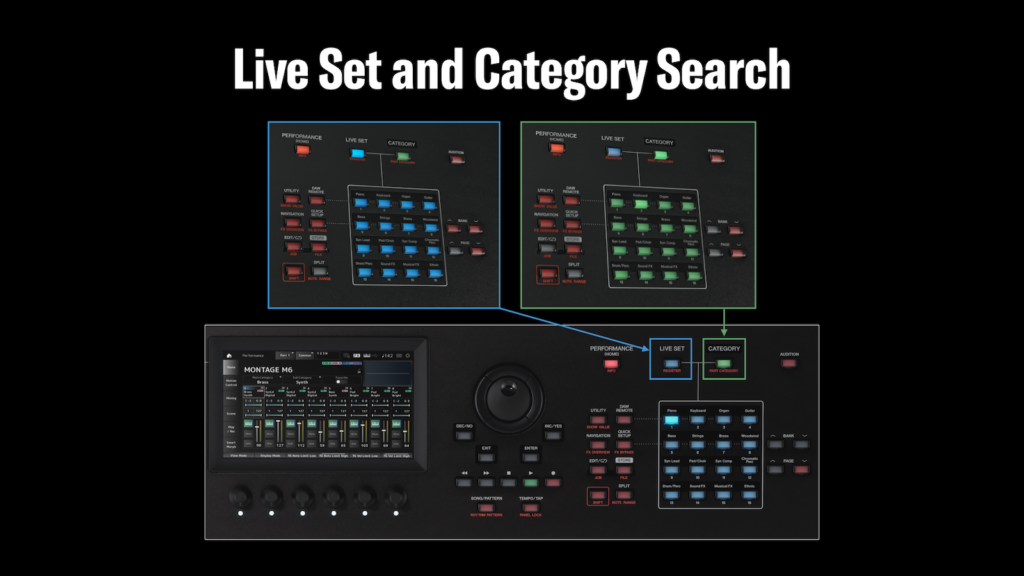
- Live Set and Category Search: Press the [LIVE SET] button to access the Preset and User Live Sets. You’ll notice this button changes the LED color to blue along with the 16 buttons below and the Live Set appears in the Touchscreen. You can select Performances with the panel buttons or directly in the Touchscreen. Pressing the [CATEGORY SEARCH] button changes the LED color to green along with the 16 panel buttons and Performance Category Search appears in the Touchscreen. Notice that the 16 main categories are printed above the panel buttons.
- Transport Control, Data Entry and Mode: Transport and data entry controls are consolidated to the right of the Touchscreen. The [SONG/PATTERN] button takes you directly to the Performance Pattern Sequencer for Pattern, Song and Audio recording, and directly to the right is the [TEMPO/TAP] button for tap tempo control. To the right of the Transport and Data Entry control are the different modes like [UTILITY], [EDIT], [STORE], [QUICK EDIT] and a few new buttons that the original MONTAGE did not have. New is a direct [DAW REMOTE] buttons, direct [SPLIT] button and a second [SHIFT] buttons to access secondary functions. Finally, there is a new [NAVIGATION] button I’ll cover in greater detail below.
The design of MONTAGE M makes common tasks easy to access, includes great usability for live players and streamlines access to deeper editing. The speed of operation has improved, too. The system is snappy, the overall look of parameters in the Touchscreen is cleaner and clearer and the new Quick Edit screen gives you better access to hands on editing. If you are coming from the original MONTAGE, you’ll appreciate MONTAGE M redesigned UI. But most importantly you’ll definitely appreciate the vast improvement in sound.
In this article I’ll show you MONTAGE M features that captivated me.
New Sounds
MONTAGE M features significant improvements over the original MONTAGE synthesis architecture. The biggest additions:
- A new synthesis engine called AN-X.
- A massive expansion of AWM2 elements within a single Part, from 8 to 128.
- An increase in total polyphony from 256 to 400 notes:
- 128 for AWM2 Preset Wave
- 128 for AWM2 User Wave
- 128 for FM-X
- 16 for AN-X
- Twice the preset wave content, from 5.67 Gb in MONTAGE to 9.97 Gb in MONTAGE M.
- More than twice user wave memory, from 1.75 Gb in MONTAGE to 3.8 Gb in MONTAGE M
- An increase of available Library locations, from 8 to 16.
- VCM Rotary effect and “pull out” drawbar behavior on Organ Performances.
- Pure Analog Circuit 2 improved digital to analog conversion.
Let’s start with a closer look at the AN-X virtual analog engine.
Exploring AN-X
AN-X is a brand-new synth engine delivering authentic analog sound, control, and behavior. An AN-X Part features the following sound components:
- Three oscillator types with five waveform choices (Saw1, Saw2, Square, Triangle and Sine) and Noise Generator with Part Amplitude Envelope Generator (AEG) and Low Frequency Oscillator (LFO)
- Oscillator types 1,2 and 3 each have AEG, Pulse Width Modulation, Oscillator Self Sync and LFO
- Two filters with 10 filter types to choose from with Filter EG:
- Four Low Pass Filters: LPF24, LPF18, LPF12, LPF6
- Four High Pass Filters: HPF24, HPF18, HPF12, HPF6
- Two Band Pass Filters: BPF12, BPF6
- Ring Modulation
- Analog style Frequency Modulation
- Wave Shaper
- Voltage Drive and Aging settings to simulate vintage behavior.
AN-X is certainly capable of recreating vintage synth sounds. But that’s only part the story. AN-X has a very unique, engaging and highly expressive quality that goes beyond what you’d expect. Check it out:
The user interface has been greatly streamlined and makes editing a breeze. Let’s look at a Single Part AN-X Performance called “One Of Those PAT”. This is a cool pad sound set up for polyphonic aftertouch (hence the “PAT” in the name). You can find this Performance in the Preset Live Set Bank, Page One, “Best of MONTAGE M 1”. Here’s what this Performance sounds like:
AN-X and Quick Edit Control
In the audio example above you can probably hear that that I recorded parameter changes while playing. This is a big part of the MONTAGE M experience: Fast and easy access to sound shaping parameters. Much of this is due to the new Quick Edit functionality. Look at the Quick Edit graphic below:
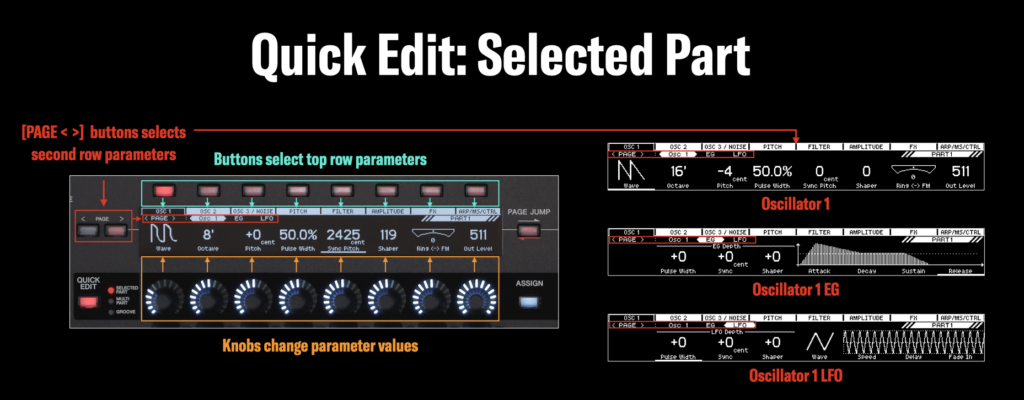
You have 8 buttons (highlighted in light blue) to access each of the components of this AN-X Part:
- Oscillator (OSC) 1: Parameters related to Oscillator 1
- OSC 2: Parameters related to Oscillator 2
- OSC 3: Parameters related to Oscillator 3. This also includes the noise generator.
- PITCH: Parameters related to pitch like note shift, detune, pitch bend range, pitch EG and LFO.
- FILTER: Parameters related to the two filters like filter type, cutoff, resonance, filter EG, LFO and drive.
- AMPLITUDE: Parameters related to amplitude like overall level, drive and EG
- FX: Parameters related to Insertion FX A, B and Part EQ
- ARP/MS/CTRL: Parameters related to Arps, Play FX, Motion Sequencer, Control Sets, Polyphonic Aftertouch and Poly/Mono settings.
The 8 knobs below always relate to the parameter appearing directly above (highlighted in orange). Finally, you have the [PAGE < >] buttons highlighted in red. The [PAGE < >] buttons access parameters in the second row. The image above shows OSC 1 parameters like waveform, EG and LFO.
Page Jump
The Quick Edit control is one of the best aspects of MONTAGE M. It greatly streamlines real time control of a selected Part. But there’s more! Check out the PAGE JUMP button located directly to the right of the Quick Edit display. Let’s say I’m playing this sound and I press button 5 to access the filter settings. I can certainly control cutoff and resonance, FEG, LFO, etc., but I can’t see it all at the same time in the Quick Edit screen. That is why the [PAGE JUMP] button exists: Pressing this button moves whatever is in the Quick Edit screen over to a more detailed view in the main Touchscreen:
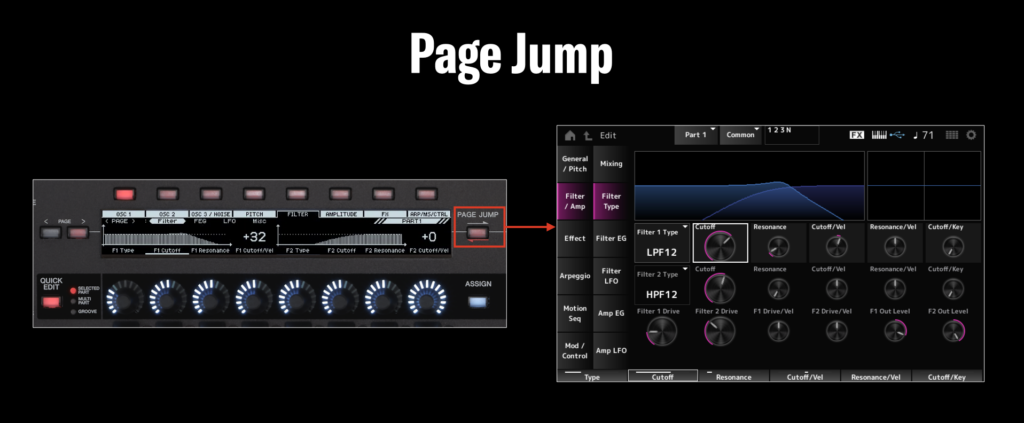
Before I pressed [PAGE JUMP] I was adjusting the Cutoff of Filter 1. Notice that in the Touchscreen that Cutoff is also selected. Any change I make in either place is simultaneously reflected in both screens. You can go the other way, too. For example, say I changed the the Hi Gain of the Part EQ in the Touchscreen and I’d like to move the EQ view over to the Quick Edit screen. See the red arrow on the front panel directly below the [PAGE JUMP] button pointing towards the Quick Edit screen? This means if you press and hold the [SHIFT] button and then press [PAGE JUMP], the information displayed in the Touchscreen appears in the Quick Edit screen:
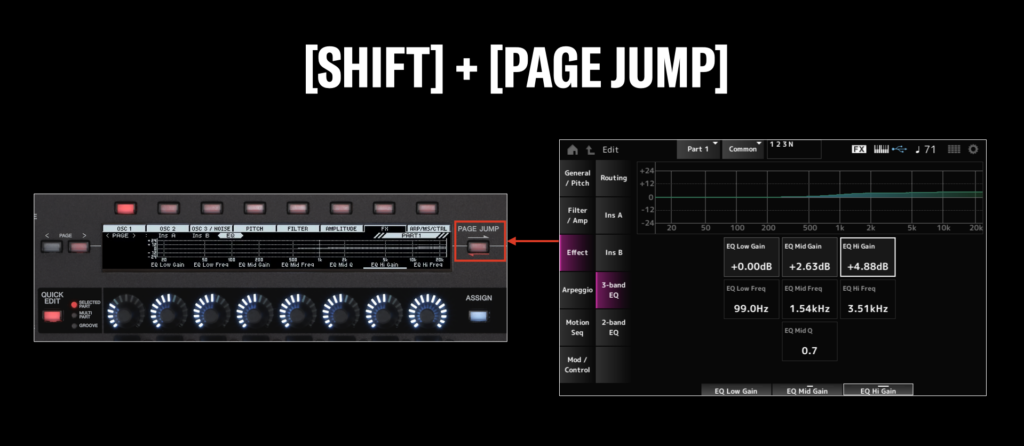
This easy movement back and forth between the Quick Edit screen and the Touchscreen is one example of streamlined editing in MONTAGE M.
Navigation
Another great feature is the [NAVIGATION] button. You’ll find it in mode area underneath the [UTILITY] button. The image below shows how to access the Navigation Part 1 view screen of the Preset Performance “One Of Those PAT”:
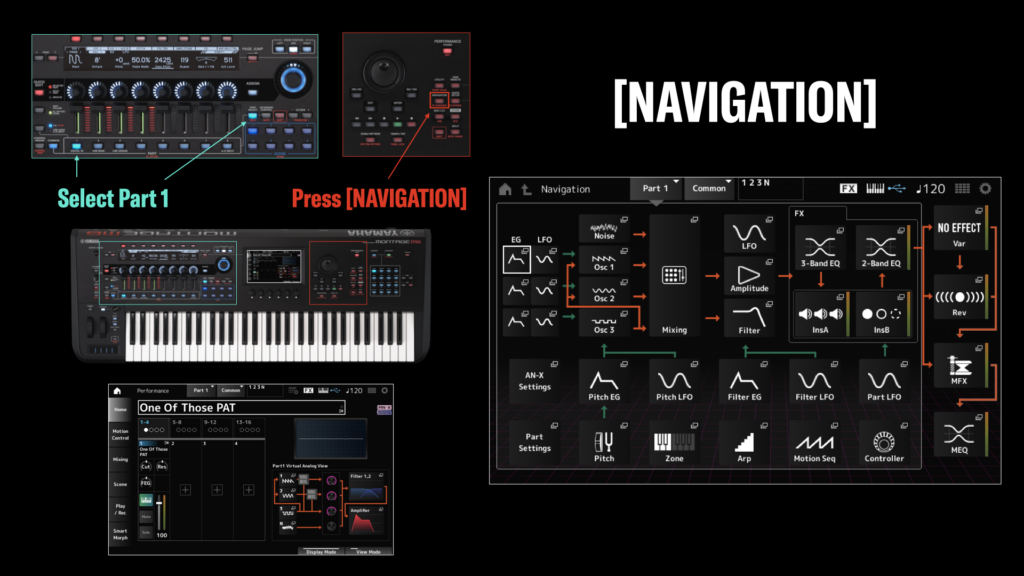
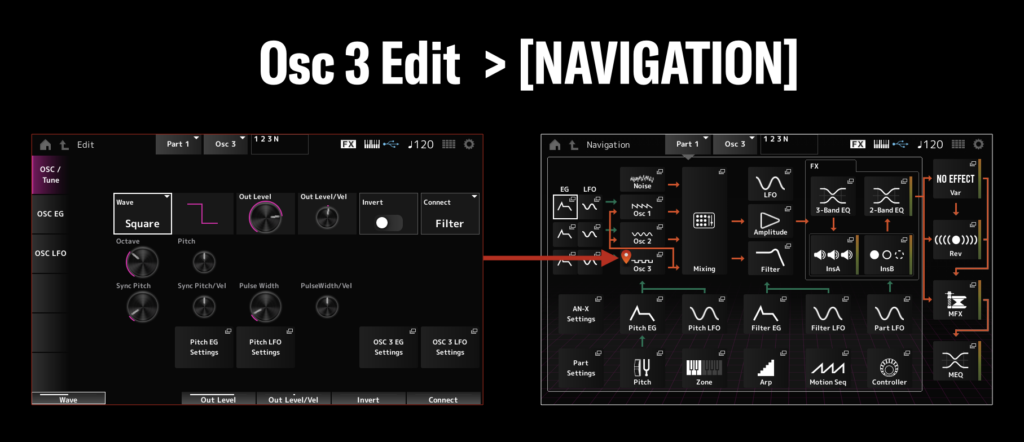
The Navigation screen appears on the right in the image above, and what a screen it is! What you see is an overview of the components of an AN-X Part: Oscillators, LFO, EGs, Effects, EQ, etc. And each of these components is selectable (note the small pop-out boxes in the upper right of each component). When you touch a component box you’ll jump directly there for further editing. For example, if you touch “Osc 3” in the Navigation screen I’ll jump right to the Osc 3 edit screen. To return to the main Navigation screen, just press [NAVIGATION] again. The same screen reappears with one small change: The Osc 3 component box is now marked with a red icon informing me of what I just edited.
The Navigation feature truly streamlines editing in MONTAGE M.
Display Knobs
Another standout design update are the six display knobs. They change function depending on the mode you are in, and you can see their assignments in many of the screen captures in this article. Here’s how they function in a few of the edit screens of our Performance “One of Those PAT”:
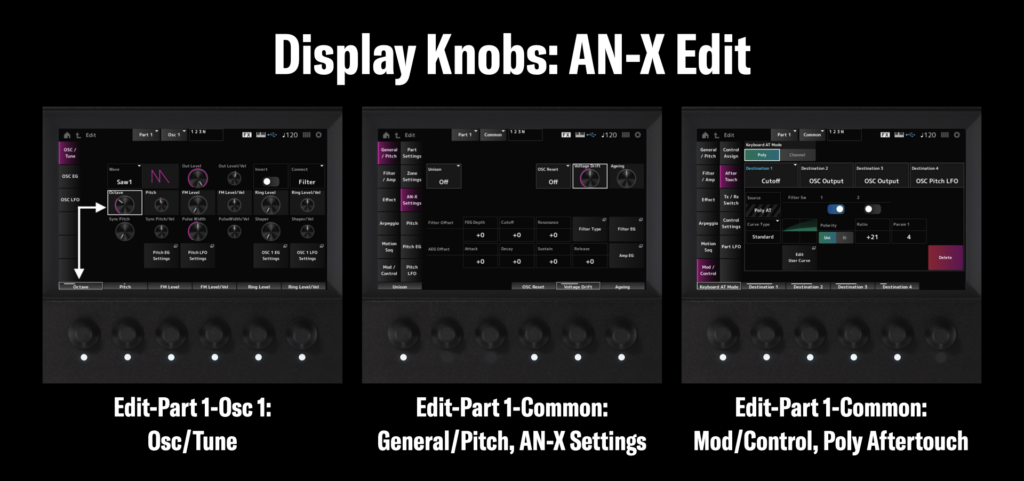
In each of the above edit screens the function of the Display Knobs changes. Selected parameters both in the Touchscreen and above the knob are delineated by white boxes (note the arrows I added in the first image on the left). When a knob has a function assigned, LED lamps also illuminate below the knobs.
AWM2
The AWM2 engine features two major updates. Before getting into it I’d like to quickly describe AWM2, how it works and why it’s cool.
AWM2 is a subtractive, sample-based synth engine that’s used for recreating acoustic and electronic instruments you can name (If you’d like to learn more, check out the “Subtractive 101” article series here) . Things like acoustic and electric pianos and guitars, solo and ensemble strings, brass and woodwinds, drums, percussion…all these instrument types can be effectively recreated using AWM2. An AWM2 Part is created using building blocks called Elements. Elements contain a sampled waveform (acoustic pianos, guitars, basses, strings, brass, drums, synth sounds, special effects, etc.), and each Element has its own tuning, pan position, velocity and key range limit, pitch envelope, filter type and envelope, amplitude envelope, EQ and LFO. Each element is a component of the sound, and multiple elements can be combined to create a playable sound.
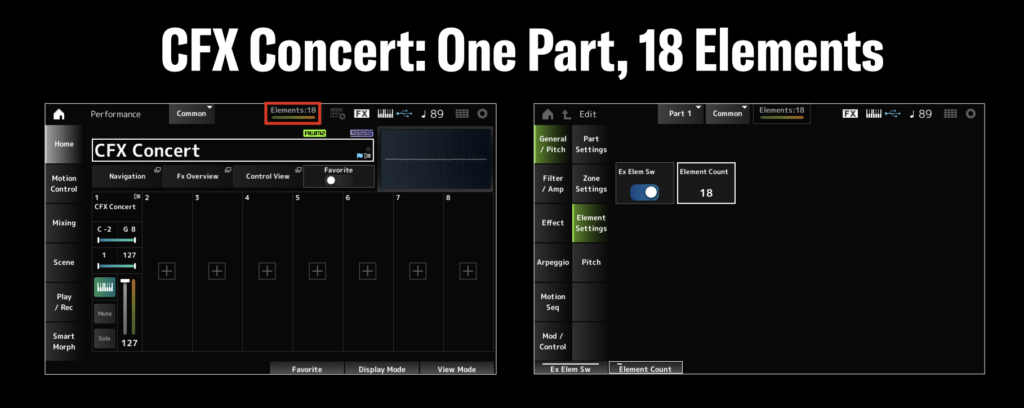
In the original MONTAGE an AWM2 Part could have up to eight Elements. That’s enough to create many, many expressive and playable sounds. But MONTAGE M dramatically increases the power of AWM2 by offering up to 128 Elements per Part. This dramatically improves the expressiveness and playability of sounds and optimizes how those sounds can be realized. Here’s the perfect example. Below is my favorite all-around grand piano Performance, “CFX Concert”. In the original MONTAGE, CFX Concert is comprised of four Parts to make it so dynamic and expressive, and there are a total of 18 elements across each Part. In MONTAGE M all those elements can be assigned to a single Part. You’ll see the Element count in the center of the screen highlighted by the red box. On the right is the Extra Element Switch (Ex Elem Sw). This is found in Edit/Part 1/Common: General/Pitch, Element Settings:
The magnitude of this update is waiting to be realized. There is so much sound design potential in this new AWM2 engine, and there are lots of great new AWM2 Performances in MONTAGE M. Here are some of my favorites:
400 Note Polyphony, Preset and User Memory and Category Search
The original MONTAGE featured 256 note polyphony, 128 polyphony for AWM2 and 128 for FM-X. MONTAGE M is capable of 400 notes of polyphony across its three engines. Here is how polyphony is structured in MONTAGE M:
- 128 notes for AWM2 Preset Waveform Parts
- 128 notes for AWM2 User Waveform Parts
- 128 notes for FM-X Parts
- 16 notes for AN-X Parts
With this additional polyphony comes more Preset and User memory. Both are essentially doubled in MONTAGE M, with 9.97 Gb of Preset Wave Memory (up from 5.67 GB in the original MONTAGE) and 3.8 Gb of User Wave Memory (up from 1.75 Gb).
There are many new Performances that use this new Preset Wave content in MONTAGE M. Fortunately all of it is easy to find in the redesigned Category Search feature. Check out the right side of the front panel. When you press the [LIVE SET] button the 16 LED buttons turn blue. Pressing [CATEGORY] turns the buttons green. Check it out:
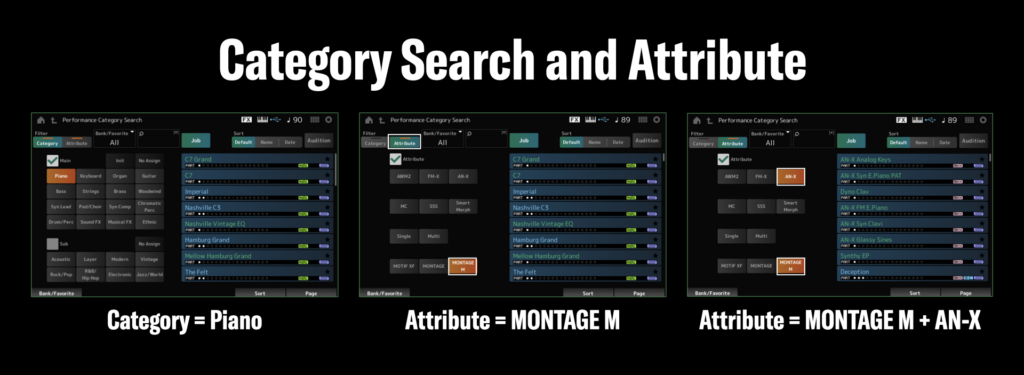
Category Search has been optimized in MONTAGE M. You can search by Category and Subcategory, but when you select “Attribute” you can further refine your search and look at only new MONTAGE M Performances, AN-X, AWM2, FM-X and more. Check it out below:
MONTAGE M8x: GEX and Polyphonic Aftertouch
Before I wrap up this article, I have to say a few words about MONTAGE M8x, GEX action and Polyphonic Aftertouch.
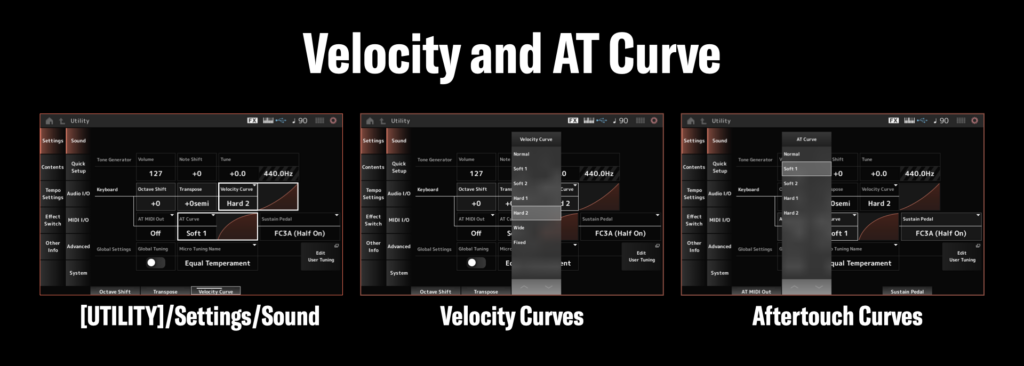
GEX is an all-new action with research and development roots in our hybrid piano world. It is a balanced action with synthetic ivory and textured ebony, and the mechanism itself uses a continuous electromagnetic induction sensor. Key repetition is fast, precise, exceptionally expressive, and comfortable. It is the best feeling weighted synthesizer action I’ve ever played. There are more velocity curves available in MONTAGE M to customize key response to different playing types. And the “x” in M8x signifies polyphonic aftertouch, allowing you to individually modulate held notes with each finger. You can set the aftertouch curve to your playing type, too. Check it out:
There is so much more to check out in MONTAGE M. This article is only the beginning! Check back right here on Yamahasynth.com for more MONTAGE M focused Tech Talks, videos, articles and more.