Adding Voice Libraries to Cubase as VST PRESETS

Tagged Under
Adding Voice Libraries to Cubase as VST PRESETS
“Motif XF Editor VST“
If you have purchased Voice Libraries or if you have created your own custom Voices, you may wish to have access to these sounds when working in Cubase without having to find the particular file which may be on any number of separate USB sticks. And without having to use the FILE LOAD routine every time you simply want to audition a VOICE. There must be a way you can have total access to your data! You can add your favorite sounds to the VST SOUND Browser function within Cubase as “VST PRESET”. You can keep a copy of every VOICE and every MIXING setup (including Mixing Voices) as accessible data via Cubase. And this includes Voices that may access custom Waveform and Sample data on your optional FLASH BOARDS. This is a powerful example of the integration of your hardware with your software.
VST SOUND – you may have noticed a small “cube” icon at the top of the Motif XF Editor VST. This is your “quick access” button to a Sound Browser that will allow you to search for a specific Voice (or as we will see later, an entire MIXING program). You can access your sounds by selecting LOAD PRESET… (more on this as we go…)
THEORY OF OPERATION: In Cubase you have the full-featured MediaBay and Sound Browser, which allows you not only to search for synthesizer Voices, but for all types of media (be they MIDI files, audio clips, loops, video clips, full Projects, effect presets, etc.). However, even in the entry level Cubase AI you can get a very useful introduction to this powerful functionality. What we will learn here is not only is this a great way to organize your individual Voices but it is a great tool for backing up and storing entire Libraries, and Mixing setups. Although you can search your entire computer for all types of relevant music/video related data, in this case we will be interested in the SOUND BROWSER to organize and make available our Motif XF sounds. As the name implies, the Sound Browser will limit the context of our search to synthesizer sounds, specifically Motif XF sounds. Let’s start with individual Voices.
This means that any VOICE can be easily searched for and found and recalled. You actually are keeping a version of that Voice data on your computer, and Cubase will “know” where to go to find it. It will be searchable by Category, Sub Category and/or by name. Even if you only remember a portion of the name you can do a TEXT SEARCH and all relevant data will be shown. The item when found will be bulked to the VOICE Edit Buffer of the Motif XF – where you can experience the VOICE with its full compliment of processing and offset programming. If you decide you wish to use this VOICE or would like to hold it, simply STORE it to a location in your Normal USER 1-4 Banks. By moving the data to the VOICE mode Edit Buffer you can fully access the Voice data and switch between several Voices in the same category… ideal for auditioning.
The Sound Browser is already populated with the entire Motif XF factory Library – these were installed when you installed the “Yamaha Motif XF Editor Standalone/VST” on your computer. The data for every Voice was sent to a special VST3 FOLDER on your computer. We will show you how to add your own data to this librarian function. As an example in this article I will use the DCP VOICE LIBRARIES: “Vintage Keys” – You can use any Library that you wish to import into the Sound Browser. After playing through the sounds I decide that these are sounds I would like to have quick access to at all times when I’m working in Cubase. So I can import the entire library (128 Voices) into Cubase’s VST Sound Browser and then I do not have to worry about finding this particular file, on any number of drives and I don’t have to worry about loading individual Voices from a File. When I want a sound, I can have Cubase search for it, I click on it and it is sent to my Motif XF just as fast as System Exclusive messages can fly! Too cool! In this fashion I can audition dozens of Voices from the Edit Buffer of the instrument and when I make a selection I can transfer it in seconds to the current internal Library.
How to get started
First, this function is launched from the Motif XF Editor VST. In the upper left corner of the Editor VST you will see the VST SOUND cube icon. This is where you click and select “LOAD PRESET…” to open the convenient Browser & Filters window (shown below).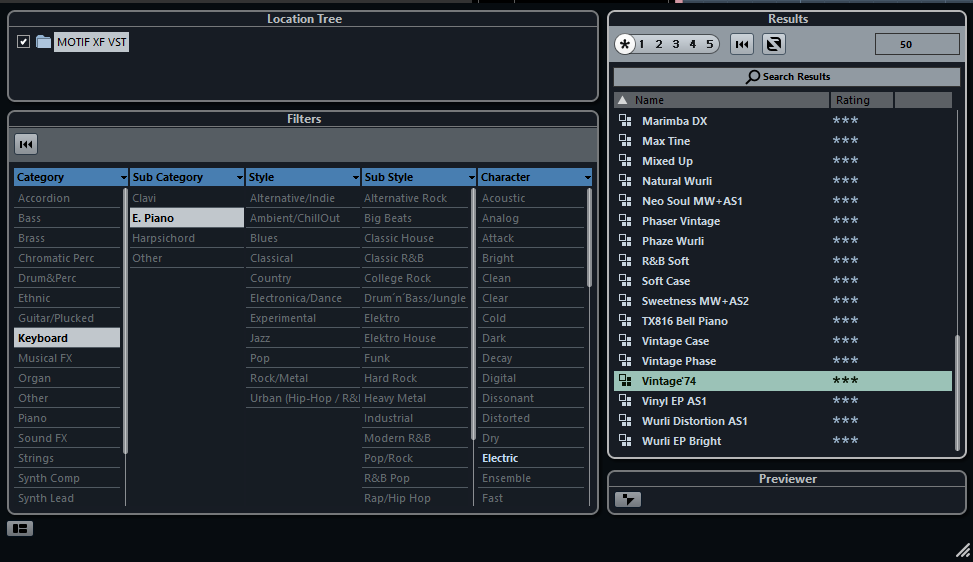
In the extreme lower left corner, click on the icon and you can set the attributes of what you will be viewing: “Location Tree”, “Filter” and “Previewer”, make sure all are selected – you should get a view similar to one above. With a Folder that is your Motif XF VST. Currently it contains all of the Voice data from your basic Motif XF Library. Above you can see how the CATEGORY: Keyboard > SUB-CATEGORY: E.Piano > (Character: Electric) > RESULT: “Vintage’74” is selected. Clicking on the Voice will send it to the Motif XF and select [VOICE] mode on the hardware. You can play it (Audition) it directly from here. Try it to get a feel for what happens. Naturally, it finds the VOICE because these represent the PRESET and USER VOICES in the default Library. As we will soon see, the Voice does not have to be currently in the Motif XF – you will be able to audition any of your Voices whether they are loaded into the Motif XF at the time or not. We should mention, this is accomplished through the Editor bulking the Voice data to the hardware’s Voice Edit Buffer. In the Edit Buffer you can play it, explore it, edit it further, and if you wish to use it – STORE it to the hardware. If you do not STORE it, moving away discards it. So this is the ultimate way to Audition Voices – and this is the use case. If you have a client or you, yourself, are looking for an appropriate Electric Piano sound for a Project you are working on, gaining access to scores of electric pianos now is at your finger tips. Over time you will undoubtedly amass quite a large selection of Electric Piano Voices, from various Libraries and from edits and tweaks you have made yourself – all your Voices, no matter the original source, in one place, instantly acessible!
We will be adding the DCP “Vintage Keys” VOICE Library to this browser so we can easily search for them. The right hand side of this window is the RESULTS area… you see a magnifying glass and “Search Results” option at the top – this where you can click and then type in the name or a part of a name to have the browser search for the Voice data. Just above the Search Results line you see a return symbol (like a REWIND icon) to clear the text search and restore the full currently selected listing. On the left hand side of this window is the LOCATION TREE and the FILTERS areas… again you see a return symbol (like a REWIND icon) if a specific Category is selected your Search will only be in that Category, if you wish to search the entire Motif XF data base, hit the REWIND icon to reset the FILTERS to search the entire data base.
Of course, the left hand side lets you narrow the search by Main Category and Sub Categories.
Troubleshooting: When adding new items to the data base you will need to refresh the listings, you do so by unchecking the Motif XF VST folder, at which point you will be asked if you want to KEEP, REMOVE or CANCEL; Select “Keep”. Click and place a CHECK by the Folder. By unchecking and then rechecking the folder (which will turn RED) Cubase will search its CONTENT folders for your Motif XF VST Voice data. And this will refresh your listings. NOTE: If the Browser closes after you uncheck the Folder, relaunch the VST SOUND Cube… and recheck the Folder. This action causes Cubase to re-scan the VST3 Folder and automatically updates your Sound Browser.
Okay, for our example lets add the DCP “Vintage Keys” Library to the data base (If you don’t have this particular Library, you can use any Voice Library you wish to import as VST PRESETS).
Open CUBASE normally.
- Launch the Motif XF Editor VST
- You do so by going to DEVICES > VST INSTRUMENTS > in the “Instrument Rack” click and select > EXTERNAL > Motif XF VST
- You will be asked to create a MIDI Track – do so. The Editor will open and come ONLINE
- Click on the word “ONLINE” to temporarily take the EDITOR “OFFLINE”
- On the Editor VST’s toolbar go to FILE > IMPORT
- Click on the OPEN FOLDER icon and direct it to the “VINTAGE KEYS” data (X3A)
- You can change the TYPE of File (extension) that you are looking for (context sensitive) – the default is an EDITOR file (.X3E), change to File Type = (.X3A)
- Open the file.
The IMPORT window shows the FILE’s data on the left.
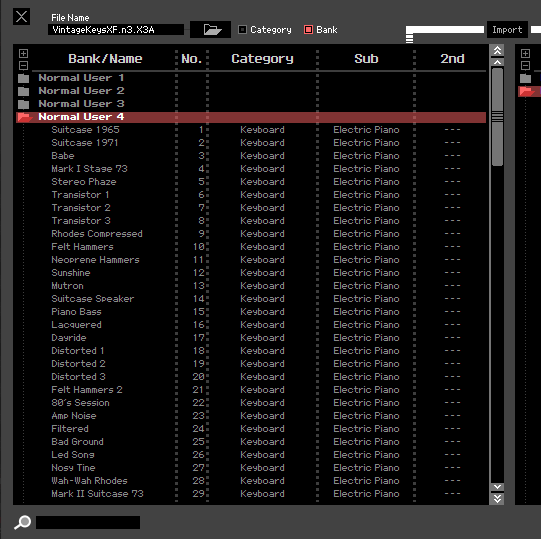
On the top line next to the Open Folder you can select to view the data in this FILE by Voice Category or by Bank number. You will want to view by “BANK” so that you can select the NORMAL USER 4 Folder (this is where the 128 sounds reside in this particular Library). On the right side you can set a target locaton to which you will “IMPORT” the Voice data. By moving the data from the FILE into the EDITOR VST we are virutally loading the data to a Motif XF. It is from here that we can transfer the parameters for each Voice into the VST PRESETS folder on our computers. On the right side select the internal Bank you wish to target, shown below NORMAL USER 2 is set as the target…
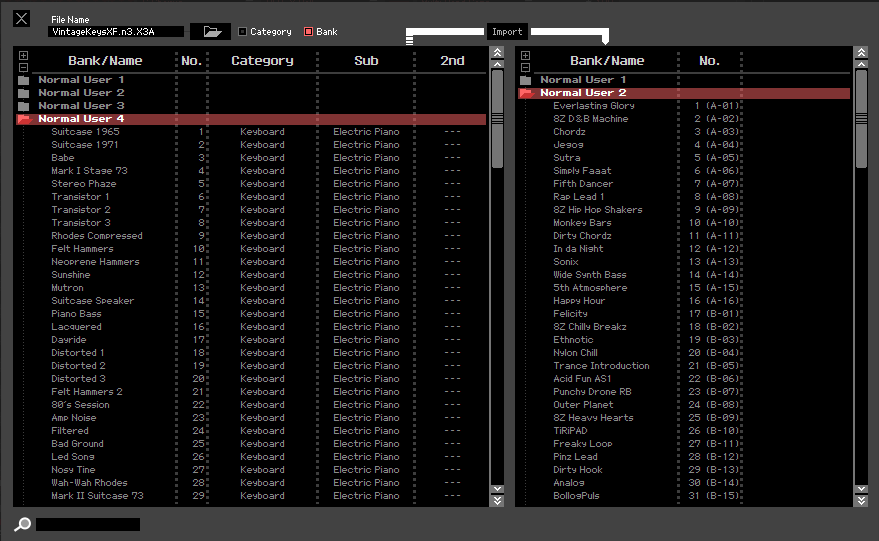
If you click on IMPORT this will transfer the Voice data of the Normal User 4 bank from the FILE to the Normal User 2 bank of the EDITOR. If you are ONLINE when you do this, the sounds will actually load to your Motif XF, if you do this while you are temporarily OFFLINE (w/dot), the library will simply load to the Editor. It makes no difference to this process… You can audition the data one at a time from the EDITOR. Just FYI
Next, return to the main EDITOR screen.
Click on the Voice Name for PART 1 to bring over the VOICE LIBRARY overlay
Select “Normal User 2” (shown below) and highlight the first sound in this Bank, which should now read: “Suitcase 1965”
At this point you could RIGHT CLICK on that VOICE and select “Save VST Preset” – which would write this one VOICE to the Sound Browser. That is how you can select a single Voice; you could select any number of non-contiguous individual Voices by CTRL clicking, or you can SHIFT-CLICK to capture a contiguous range. What we will do is use the SHIFT-CLICK option to select all 128 Voices in the Normal User 2 Folder:
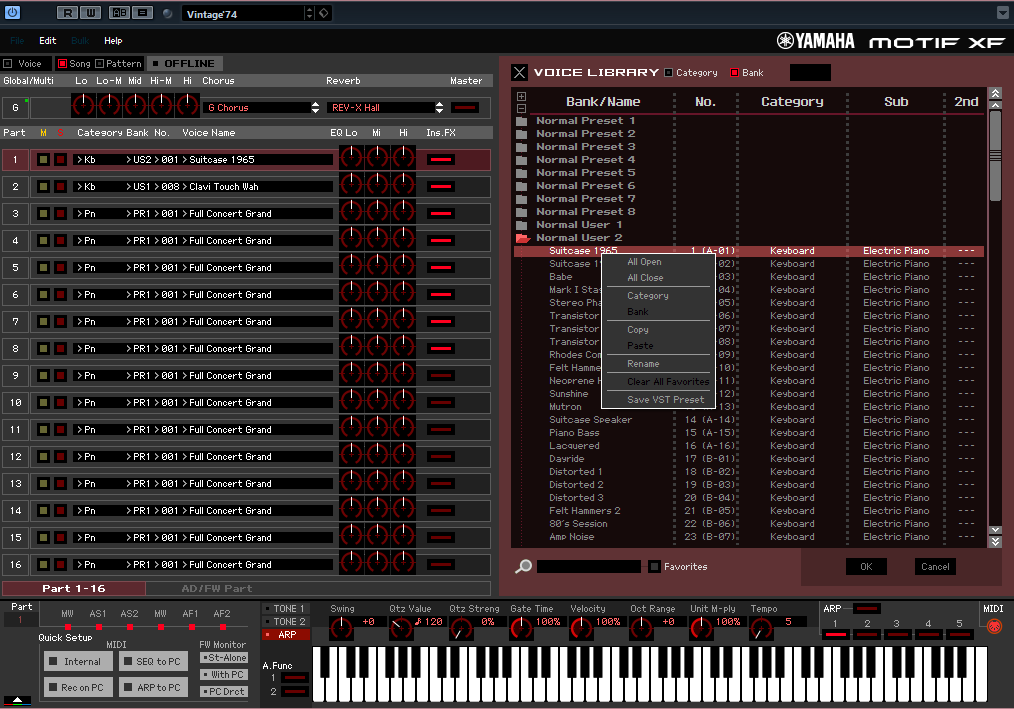
Import all 128 Vintage Keys Voices to Cubase as VST PRESETS. Here’s how:
In the screen shot above you can see that “Suitcase 1965” is highlighted
In the column on the far right is a ruler that we can drag down to see the list of 128 sounds… drag that down so you can see the last sound in the “Normal User 2” list.
While holding [SHIFT] click on Voice 128 “Clockwork Orange”
This will select all 128 Voices in the list. (Shown below)
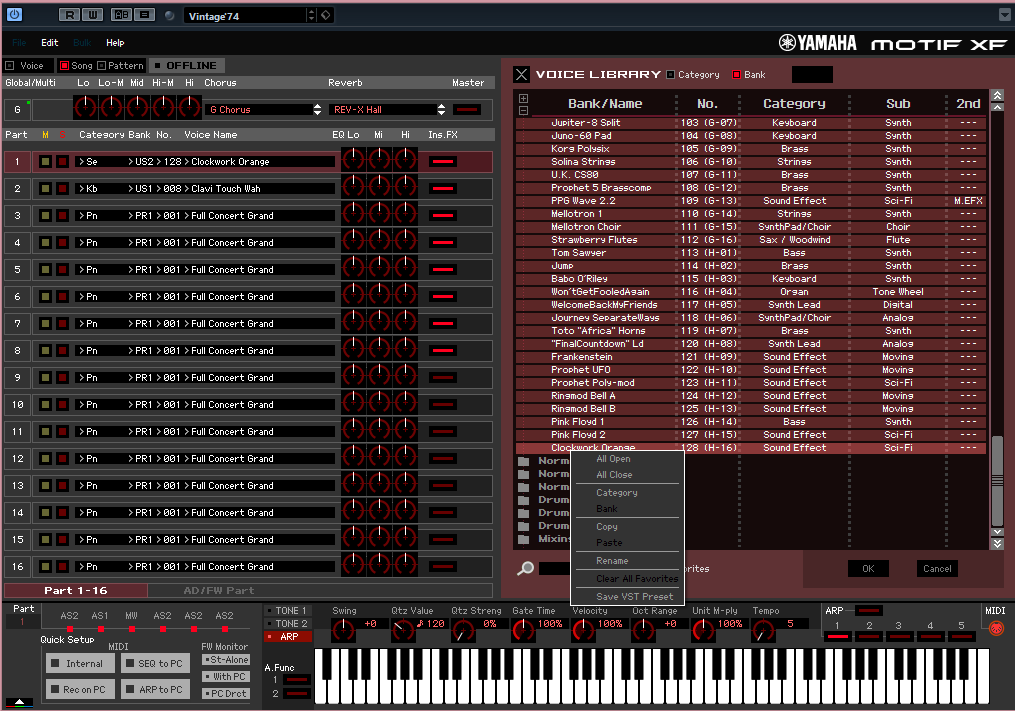
Now you can Right Click and select the “SAVE VST PRESET” option.
This will take all 128 Vintage Keys Voices and copy them to Cubase AI’s MediaBay/Sound Browser and allow you to access these Voices via the VST SOUND cube icon – “Load Preset…”
In order for them to show up in the Librarian we will need to REFRESH it by rescaning the Folder for the newly added data.
Again: You do so by unchecking the Motif XF VST folder in the Browser & Filter area (if you do not see the folder make sure that the “SHOW LOCATION” radio button is pressed).
You will be asked if you want to KEEP, REMOVE or CANCEL… Select “KEEP”
Now, recheck the Motif XF VST folder
It will briefly turn RED while it searches for and updates your listings
You can now search through your Motif XF sounds by Category, Sub Category, or simply click on “SEARCH RESULTS” and type in any portion of the name to access any of your sounds.
Shown below, I have typed in “Suitcase” in the Search Results area, immediately any Voice containing the word Suitcase will appear…
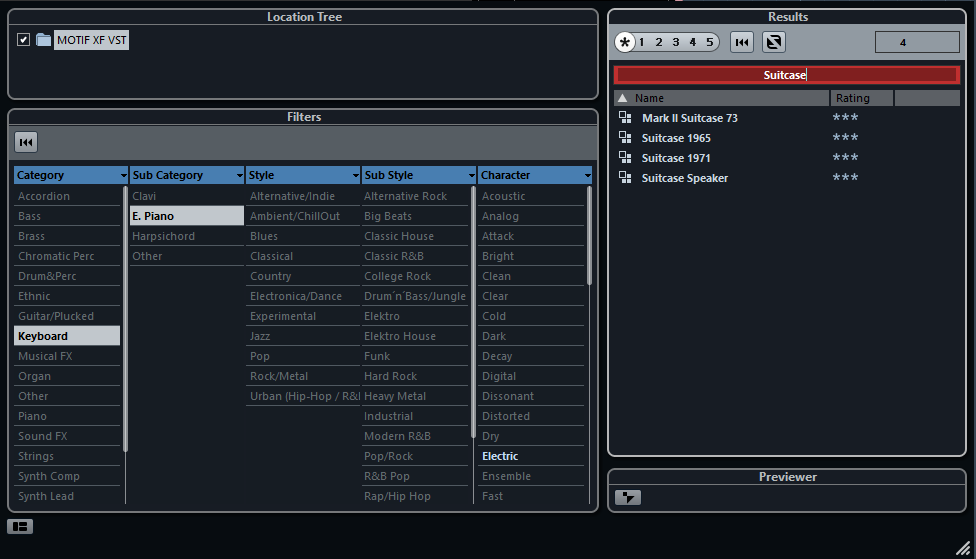
I then click on “Suitcase 65” and in a few seconds, the data will be bulked to the hardware. Below you can see that “Suitacse 1965” has been added to the VST SOUND search… and the Voice is recalled in the Motif XF in VOICE mode.
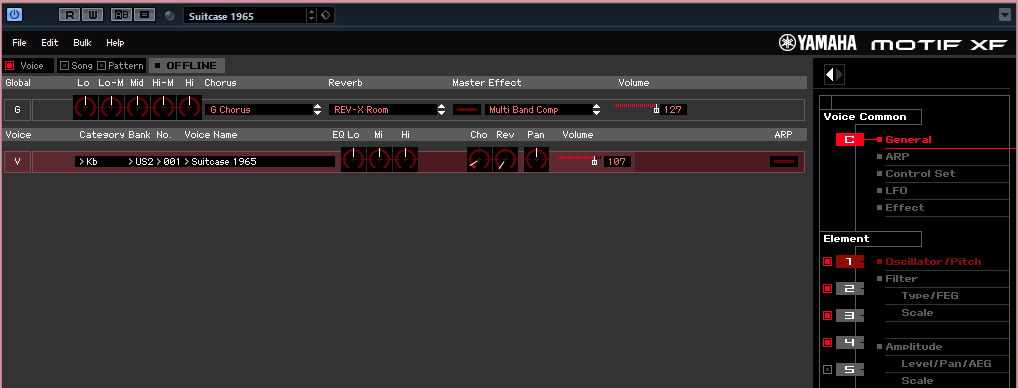
It is actually sitting in the Motif XF Edit Buffer – you have not overwritten anything just yet – you are in a position where you can fully audition the Voice, even tweak it. If you think it is one you want access to for this project you STORE it and access it in through the MIXER view for your SONG or PATTERN. The Editor allows you to audition the Voice in the VOICE mode EDIT BUFFER, and when you decide on the VOICE you can either immediately audition another, or you can STORE the Voice to an internal USER location in the hardware. When you return to your SONG or PATTERN you can access this Voice through your MIXING setup. The beautiful thing is you are assembling Voices for just this Project and they will always be associated with this Project. Plus you can have access to your entire collection of Motif XF Voices!
Summary: In actual use, you can see how for each Cubase Project you have 512 Normal USER VOICE locations for data and 32 USER Drum Kits, per Project. As you audition Voices from your entire Library of acquired sounds, you can select as many as 512 Normal/32 Kit to Store within this single Project. This is probably more than enough. In real world situations, you may wind up with a good dozen or more that you will always want to associate with this Project – mainly because you tweaked them specifically in ways that make sense for THIS particular Project. When you Save your Cubase Project (.CPR) File, all your Motif XF settings are saved by the Motif XF VST, and it can be set to restore not only the Current MIXING setup, but every VOICE you might have possibly considered using on this Project. This is why that AUTO SYNC SETTING Option for restoring “VOICE” exists – in case you have assembled a group of VOICES you want to associate with this PROJECT – and don’t want to rehunt for them. Each Motif XF VST setup can contain your current 16 PART setup, of course, but also all 512 Normal User Voices and 32 User Drum Kits that you think are relevant to this Project!
POWER USER PLUS:
Creating and Accessing your Entire Voice Library Using Cubase VST Sound Browser
This portion of the article will be of particular interest to those of you who have started to amass a fair number of Voices (both with and without custom Waveforms and Samples)*.
* Waveforms and Samples refer to the Motif XF and the MOXF expansion Flash Board(s).
Theory of Operation: A basic understanding of the Voice architecture of your synthesizer will help you make maximum use of this article and the Cubase MediaBay with its extremely elegant organizing functions.
Both the Motif XF and the MOXF share a WAVE ROM that contains some 3,977 Preset Waveforms. Just how many Voice Libraries can you create accessing these 3,977 Waveforms? It is an unlimited number. Because each library will reference the Preset Wave ROM that does not go anywhere and is always in place. In other words, I could use the same Waveform data to construct many, many Voices. Voice data is stored in the USER Voice mode Bank locations on board the instrument. In the first portion of the article we were working with the DCP “Vintage Keys” Voice Library which is new Voices constructed entirely using the built-in Preset Wave ROM.
You will soon have more Voices than can be loaded into the internal XF at one time. How can you best manage them and have quick access to them all? If you are like most users you have either several small thumb drives with various Libraries on them or you have one big drive with all your various Library files on them. Different versions and combinations in various files on a variety of different thumb drives… Finding that one particular Wurli Electric piano sound or that special Guitar tweak you edited six weeks ago on that other Project, …this might take you hours to find – as you go hunting through all those various Files on your drive. This gets old very quickly. And what if they are Voices that require Waveform and Sample data from your Flash Board? Do you have to hunt through all that data and then deal with targeting Waveforms and Samples? Making sure they are all in the right locations!!!
This will give you a better way!
How about a method that would keep all your Voices (whether they use custom samples or not), accessible, quickly and organized as you require? That is what is on tap with the Cubase MediaBay/Sound Browser function and your EDITOR VST.
Now I’ve mentioned a couple of times that access is quick, easy and will work for both Voices that access the internal Wave ROM and Voices that access your Flash Boards! No waiting for sampled data to load – we are talking access measured in seconds, not minutes. What you want to do is start treating your FLASH BOARDS as an extension of the internal Wave ROM. This will be very important to make this all work.
Waveforms on your FLASH BOARD cannot be overwritten by mistake, they cannot be overwritten, period. You have to either DELETE them or FORMAT the entire BOARD. Install data to your Flash Board so that Waveforms you deem “keepers” have a ‘permanent’ Waveform position on your Flash Board. Say the first sound you came across and wanted to “keep” was the beautiful sample set from the old “Yamaha S90 ES” – this is the S700 acoustic piano data. The S700 is a $250,000 handcrafted Yamaha acoustic grand. It was a three Waveform (270 Sample) set that was issued as a free download. Once you’ve decided that Voices made from this data is something that you want to keep available, install the three Waveforms in Waveforms 0001, 0002 and 0003 of your Flash Board in Slot 1. There will never be a reason to move these Waveforms from those locations on your Flash Board. And this means any Voices, any edits you make to Voices based on this data will ‘know’ where to look to find the Waveform data.
For clarity’s sake we will refer to an ALL data file that is saved “with samples” as your “backup archive”. It represents not only the Library data you purchased/created, but where specifically YOU have placed that data on YOUR Flash Board. Please realize that because Waveforms and the Samples they organize are not overwritten by the process of installing them to FLASH, your installation is likely different from the original FILE. This is why it is imperative to make a “backup archive” file whenever you add new data to your FLASH BOARD. New data is added to the END of your Waveform list. So even if you wind up with several “backup archive” files the list looks the same with the new stuff added to the end of the list! So if the first Waveforms you add to your FLASH BOARD happen to be the S700 Waveforms, when you add the CP1 Library, its Waveforms will follow the S700’s. The S700 as we mentioned has 3 Waveforms (0001, 0002, and 0003), then you add the CP1 Library which may add 8 Waveforms to your list, they will occupy 0004 – 0011. Your new backup archive will have the CP1 Waveform added to the S700 Waveforms, and so on.
Just as with the Preset Wave ROM, each Waveform has a permanent numbered location in your achive file. This way all of the Libraries that access that data will “know” where to look for the Waveforms that allow it to play correctly. The general rule I’m suggesting you follow is this:
RULE 1: Once you deem a Waveform ‘a keeper’ always restore it to the same number location – so that your Voice data will always know where the data is kept.
If you do this, then you can simply bulk the VOICE data from the computer to your USER Voice banks and the Voice data will properly find its target. But, come on, can your really do this? What if you need to audition a Library that is bigger than given SDRAM? Meaning you will have to FORMAT your FLASH BOARD to even try it out, right? Yes, correct. Some library is bound to come along that is too big for the 128MB of SDRAM, and will require that you install data to your FLASH BOARD. Like say the Chick Corea Mark V Rhodes data … Which takes up more than 400MB. Specialty (Mega) Libraries like the Corea Rhodes sound need to be installed to FLASH in order to audition them. Auditioning a new set of data does not necessarily negate what I’m suggesting. I’m talking about data you are going to want to keep accessible is the data you BACKUP in your personal ALL data file. SO every file that you personally make as a BACKUP will install YOUR data back to the locations just as you configured them.
If you are diligent about making backup files, remember Waveforms on your FLASH BOARD cannot be overwritten by mistake (nor can they be overwritten on purpose) – they cannot be overwritten, period. You have to either DELETE them or FORMAT the BOARD. So attempting to LOAD the Corea Rhodes will simply add its five Waveforms to the end of the list, if you still have room on the Flash Board. The Corea Rhodes features 12 velocity layers per note and is a meticulous recreation of a single instrument. If you decide to remove it you can simply DELETE the five Waveforms. If you decide to keep it as a part of your custom Wave set – simply install them on your Flash Board and make a backup File of the data. The File will include “where” you have installed the Waveforms. Even if you have to DELETE ALL or FORMAT your board, to audition a Library, it is not an issue, because after you have worked with the big library, you can DELETE ALL or FORMAT the Board again and restore your personal “backup archive” and everything is as it was. If you are a studio with outside clients you will want to label your Flash Boards and keep them organized in the same factidious way you would your client’s Projects. Anyway we’ll come back and discuss this auditioning function a bit later in the article.
HOW IT WORKS; WHAT YOU’LL NEED:
The Motif XF Editor Standalone/VST or the MOXF Editor Standalone/VST – depending on which instrument you own. Each synthesizer will work with its own Editor VST – the functions are similar, but each Editor is specific to its product.
The Editor runs as an integrated part of the Cubase software. You launch it inside of Cubase by going to DEVICES > VST INSTRUMENTS > External > then select either “MOTIF XF VST” or the “MOXF VST” (depending on which product you own).
Once launched, you will be asked to create a MIDI Track to begin recording data assigned to be routed through the VST interface. One of the first things I will show you is how to use the VST graphic interface to create your own DEFAULT setup.
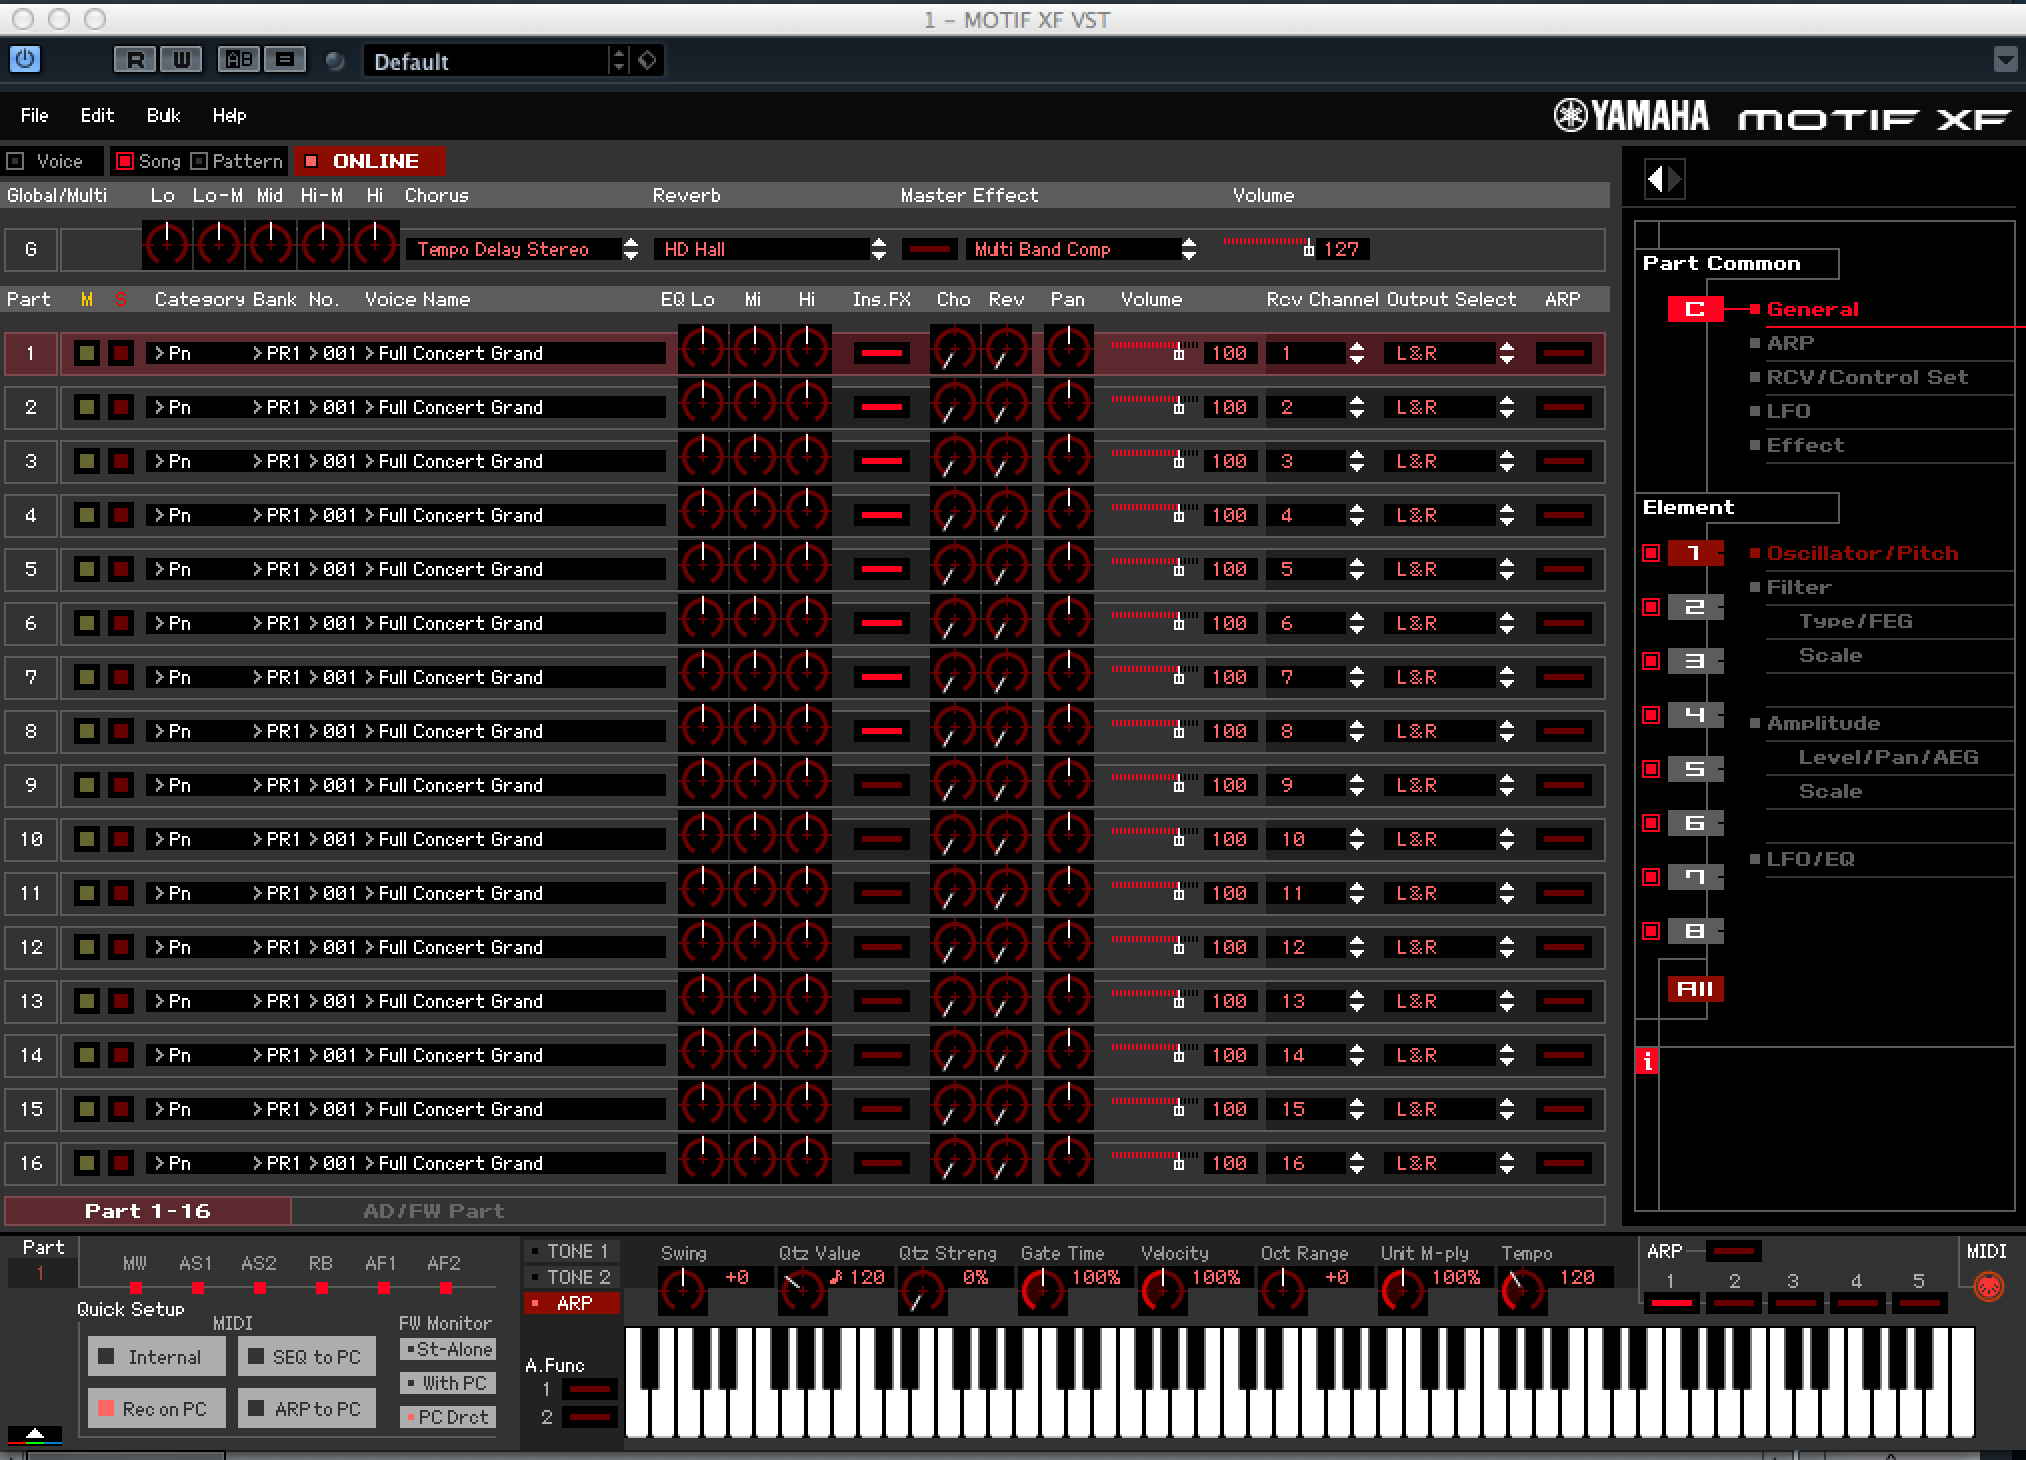
A close look at the Editor VST above (Motif XF) will show you my specific Default setup… this may be different from how yours looks when you first open the Editor.
What I did was set the SYSTEM EFFECTS that I want to use as the starting point for a Project. I’ve opted for the “Tempo Delay Stereo” and the new “HD Hall” as my default System Effects, the “Multi Band Compressor” as the Master FX. Basically, as an old school recording engineer, my preference is to have the mixing console completely “zeroed out”: 0 Send to both the Chorus Block and the Reverb Block, each Volume set to 100, Pan to Center, etc. This initial setting will apply every time I open my Motif XF VST as a VST inside a Cubase Project. Instead of using the ones provided by the Extensions, you can customize this initial condition. (Highly recommended once you are an experienced user and know your own habits).
You will also notice on the right side of each of the 16 PARTS I have opted to set the OUTPUT SELECT parameter to “L&R” – the main outputs. Even though my Motif XF is outfitted with the FW16E (FireWire Expansion board) I set my default OUTPUTS to the Main L&R Outputs. I make routing decisions to the FW buses as necessary within the workflow of each Project. My default setup allows me to work from a starting place that is comfortable for me. (And that is what this is all about, anyway).
Once you have the basic setup as you like, click on the “sound cube” at the top of the Editor, and select “Save as Default Preset“
Now when you launch the VST Editor – it will send this default setup to your instrument. Rather than using one of the provided templates, you have just created your own.
When you installed the Editor VST – it populated your Cubase MediaBay/Sound Browser with the entire set of PRESETS that come with the Motif XF or MOXF. What we learned in the first portion of this article is that you can add to this population of Voices by transferring Voices from the Editor into the system. These can be Voices that you create, that you have edited, or Libraries that you have purchased, or downloaded. They all can be stored as “VST PRESETS” into the Cubase MediaBay > Sound Browser. You can SAVE individual VOICES as VST PRESETS and/or you can SAVE entire MIXING setups (Pattern or Song setups) as VST PRESETS. This is awesome and very elegant.
If you work alone or you are a studio with outside clients, how great would it be to find your sounds all located in one place. The best thing that computers do is organize – and this is organization for all your data, in one place quickly accessible!
In order to SAVE an individual VOICE as a VST PRESET you do so from the instrument’s internal USER Bank or from the Instrument side of the IMPORT window. Any Voice or Bank of individual VOICES can be Saved as “VST PRESETS”. Say you purchased a Library with 128 VOICE that loaded into BANK X, you can take the entire BANK of 128 and transfer them to as VST PRESETS. This will allow you to access them at a single click of the mouse.
Additionally, you can also create a 16 PART MIX setup (including your custom MIXING VOICES) and save it as a multi-timbral VST PRESET. This allows you to recall entire Mix setups; every setting, every tweak to every Voice, every Effect and how it is applied… as a VST PRESET. This would be great for complex setups that need to be recalled en masse. You can make your own Folders and Sub-Folders within the MediaBay.
What you cannot do and why: You cannot save a single VOICE from a “MIXING VOICE” location directly to the SOUND BROWSER via the VST PRESET routine… single VOICES must be transferred into the Sound Browser from the internal USER VOICE bank locations of the Editor. I state this here so that it is on the record. A “MIXING VOICE” is one that is edited and stored “locally” to the SONG or PATTERN MIXING in which you create it. This was developed as the Motif-series sound engine matured. In use, sometimes you need to alter something deep about a VOICE for a particular Project or composition. Say you want to change the INSERT EFFECT on a Voice for the music you are doing. Rather than overwrite one of the internal USER Bank locations, you can customize the VOICE, right there, within the current MIXING setup and store that new edit with the data of the SONG or PATTERN. This means when you load the SONG or PATTERN individually, you don’t have to worry about if you have the correct USER Bank loaded into memory. The MIXING VOICE guarantees each Voice is the correct one for this project. If you have not encountered this yet, not to worry. MIXING VOICES are one of those advanced features that you only appreciate when it saves you from many headaches.
MIXING VOICES can be transferred to the VST PRESET only as a part of an entire MIXING program. This is due to where the instrument keeps the data in its internal filing structure (the Mixing Voice is stored with the Mix, not in normal USER locations). But this is not an issue, because once you have transferrred any of your individual VOICES to the MediaBay using the SOUND BROSWER to find them is as elegant as can be. MIXING VOICES can be STORED temporarily in a NORMAL USER VOICE location in the EDITOR and then transferred to the Sound Browser as an individual VST PRESET. Or in actual use you’ll find that it is as quick and easy to recall an entire mix as it is a single Voice… And because it is recalled in the Edit Buffer you will not need to overwrite what you’re currently working on.
Bad Mister Highly Recommends: If it is a purchased library, you can select a single Voice, a dozen Voices, sixteen Voices, or even 128 Voices (a Bank) and transfer them all. If they are your own custom Edits, we highly recommend you name them giving them a new unique name (you can add your initials if you started with a PRESET VOICE or whatever system you develop for yourself)… The part of organization that requires you, is this renaming of the data. It is when trying to find it later you really appreciate the fact that you took the time to name it properly.
Say you edit the FULL CONCERT GRAND and wish to store it to the MediaBay, it would be wise to rename it because the Preset version is already in memory, you might want to add your initials or rename it entirely before SAVING it as a VST PRESET. Make sense?
Extra Credit Question: What if you wind up with different “backup archives” where the Waveforms are not always in the same locations, can you still use the Sound Browser? Well yes, you will want to invest the time to create FOLDERS within the MediaBay function (please see the online documents within Cubase for details about further customization of the MediaBay/Sound Browser). You will want to specifically name the Folders for use with a particular “backup archive”. Yes, it is an additional level of organization, but not a problem to implement quickly and easily. The Motif XF VST Voices you create with that Waveform List will all be kept in a particular FOLDER named for that archive. You can use the FILTERS function in the Browser to restrict your search to the specfic Folder(s). This way you’ll be assured that your Voices will always find the location of the Waveforms and Samples they use to sound properly.
Keep Reading
© 2024 Yamaha Corporation of America and Yamaha Corporation. All rights reserved. Terms of Use | Privacy Policy | Contact Us