Creating the Loop Kit Data
Tagged Under
RESAMPLE SETUP: How it was done:
In the previous tutorial “Working with Audio Loops in Drum Kits” we used an example with 8 audio loops. This portion will show how you can take your Pattern data and turn them into audio clips. RESAMPLING is used to record audio (sample) data created by and/or arriving at the available inputs on your XF.
From PATTERN mode
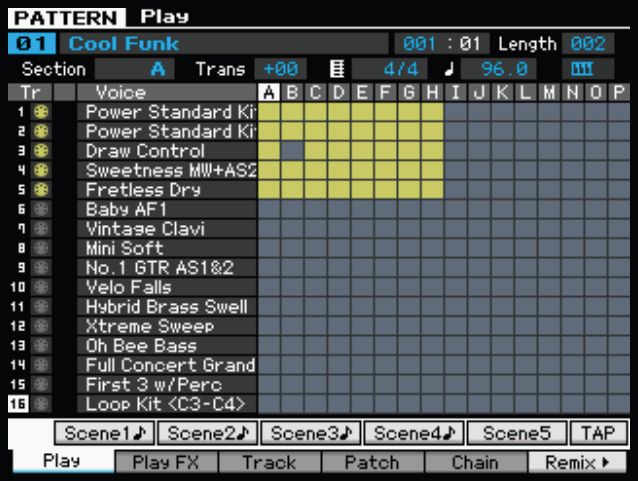
• Press [INTEGRATED SAMPLING]
You arrive at the Sample Select screen. This is considered the ‘home base’ screen while in sampling. You can branch out from here to EDIT, or perform a JOB, or to look at KEYBANK assignments, or even go from here to RECORD (sample). See the article on “Integrated Sampling Sequencer” for details. The only parameter you can select on the Sample Select screen is to select a target WAVEFORM. A blank WAVEFORM will have a number but dashes instead of a name, for example: Waveform 0009: ————
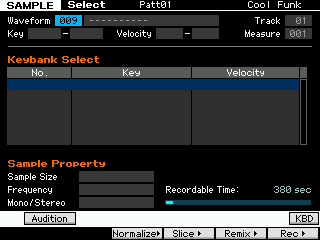
• Select a blank Waveform
• Press [F6] REC
You now arrive at the Sample Record screen.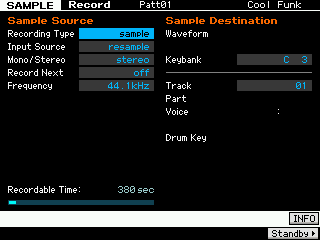 Here you setup the SAMPLE SOURCE and SAMPLE DESTINATION parameters.
Sample Source
Recording Type = sample
Input Source = resample
Stereo/Mono = stereo
Record Next = off
Frequency = 44.1kHz
Sample Destination
Waveform
Keybank = C3
Track: 01-16 you can select any track… For this example set the TRACK = 01 to illustrate that you can target any track, even if it currently contains data.
By setting the Recording Type to “sample” we will be creating a sample but not creating a MIDI Note-on event to trigger its playback. When the sample is created it will simply be added to the available sample waveforms on the USER Waveform list. Our plan is to place this sample into a DRUM KIT. Remember by placing it in a Drum Kit Voice we gain the advantage of all the VOICE mode parameters that frame a sample Voice (Envelopes, Filters, processing, etc.). And as mentioned there are specific tools in the Drum Kit Voice that are perfect for framing an audio clip like a PATTERN Section looping. Not only does this reduce the load on polyphony (you might be using hundreds of note-on events in your 16 Track Section, Resampling them reduces the note-on event count to 1), but you can use this data in a Performance.
Alternatively, you could set the Recording Type to “sample+note”. What “sample+note” does is it creates not only the sample, which is added to the Waveform list, but it additionally creates a NOTE-ON event for the sequencer to automatically trigger playback of the audio clip. Remember we are not recording audio to a track. We are placing audio into a sample Voice that then requires a note-on event to play (like all samples in the XF). The Integrated Sampling Sequencer will automatically create a note-on event that is based precisely on your PUNCH IN Measure and with a duration (Gate Time) that will hold it until the PUNCH OUT point. However, for our tutorial this is NOT what you want to do – but we mention it because it opens the door to world of possibilities you may want to explore at another time. Using “sample+note” generates MIDI data – for this tutorial we are only interested in creating the audio data – which we will assemble in a Drum Kit Voice. We do not want to generate NOTE-ON data (particularly if you have all 16 tracks filled). Resampling can be done even if all 16 tracks have information, if and only if you set the RECORDING TYPE = ‘sample’ (never “sample+note”). If you use “sample+note” you must dedicate a track for the created MIDI data and the new USER Sample Voice.
Because we are in a Sequencer Mode (Pattern) we are offered the Destination of TRACK. If (and only if) you are sampling in VOICE mode or PERFORMANCE mode would you be able to sample directly into a Drum Kit. This would be ideal if you were sampling from a source like a CD player or MP3 device (we’ll cover that later).
• Press [F6] STANDBY
The upper portion of the screen will review your Waveform, Track and Measure target. The Settings made here on the STANDBY screen are as follows:
Record Monitor – this is your listening volume and does not affect the recording level. Set to taste.
Record Gain – this is your gain control for increasing or decreasing the re-sample audio level. This is critical to your recording. Settings are –12dB, -6dB, 0dB, +6dB and +12dB. The object is to get a good reading on the meter at right. Please notice that the meter is not layed out equally like a ruler. The values are actually closer together (finer) as you near the top of the meter. You want the meter to be in motion. You have too much level if you do not see the meter fall back – as long as you have movement and do not hear clipping you are most likely fine. Use both your eyes and your ears. (Believe your ears). Remember also the individual CS (Control Sliders) on the XF mixer also influence the overall level on your meters. Create a good musical balance (mix) and then use the Record Gain parameter to finalize the overall level. (By the way – the main Volume fader has NO EFFECT on record level. Why, you ask? Because resampling is done in the digital domain and the main Volume slider is decidedly analog.)
Play SECTION [A] – set the Record Gain.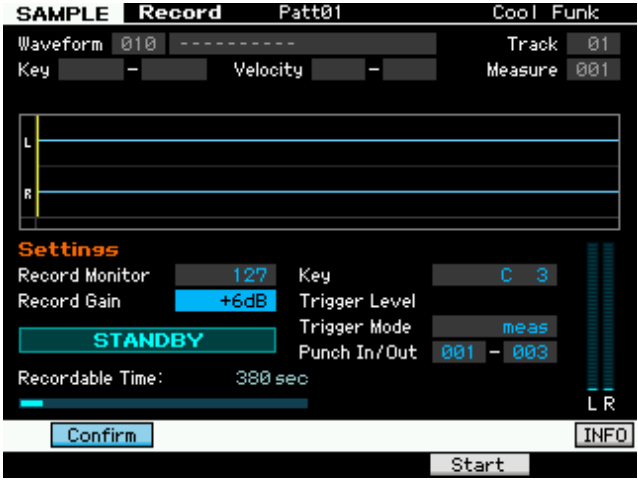 Key – C3, middle “C” on the Yamaha keyboard.
Trigger Mode – Set to Measure. The Measures setting will allow us to set an automatic Punch in and Punch out point
Punch In/Out – set this to start at measure 001 and end at the maximum you can set it. The OUT point will be determined by the Length of the current Section… if your Section is 002 measures in length, the punch In/Out would be 001-003. The OUT Point is always at the top of the next measure.
You are ready to arm the sampler. Make sure you’re at the TOP (measure is shown in the upper right corner) of the Pattern.
• Press [F5] START
The sampler will arm and “WAITING” will appear. It is waiting for you to start the sequencer – at which point playback and sampling will begin.
• Press PLAY on the XF transport to begin playback and sampling
The waveform will be drawn as it samples and it will STOP automatically at the punch out point.
“FINISHED” will appear.
• Press the [SF1] AUDITION button to verify that you have recorded audio.
The playback will be quite a bit quieter than the SOURCE, particularly if you had the RECORD MONITOR at 127. This is not a reflection of anything but that you are now listening back to the sample and are no longer listening to the SOURCE. If you recorded with proper meter level, your sample will be fine.
• Press [ENTER] to fix
“Fix” here means to affix it to the USER SAMPLE WAVEFORM list (to keep it).
If you are happy with your sample (there is no distortion and you are confident that the meter was maximized without clipping) then press ENTER.
Next we will return to the main [PATTERN] screen and take a look at the assignment that was done. On track 1 the Integrated Sampling Sequencer will have temporarily assigned the WAVEFORM to your MIX. This is so you can access it from within the PATTERN.
• Press MIXING
You will see that a special User Sample VOICE BANK is selected “SP” and Voice NUMBER “xxx” is assigned to the MIXING PART. However, for this tutorial we are going to eventually place this sample waveform in a DRUM KIT so we are not concerned about having it assigned permanently to our MIX. And this is very important to understand. Since our goal is to assemble the eight audio clips to a drum kit – we do not need to assign the User Sample Voice “SP-xxx” to this MIXING setup. To REFRESH your mix (return it to the state is was before you resampled) do the following: press [PATTERN] to return to the main screen…
• Press the [PROGRAM] button (upper right front panel)
• Press the button [1]-[16] that will recall this PATTERN.
For example, if you were using PATTERN 01 you would press button [1] while [PROGRAM] is lit. Pattern numbers 1-64 correspond to [A][1] ~ [D][16]
This will restore your original Voices to their PARTS in your MIX. The “SP:xxx” Voice still exists; it simply is not assigned to a TRACK (remember we are going to place it in a DRUM KIT Voice).
Why this is tricky (and important) is that we are not finished sampling – we need to resample the other seven Sections. And we are only ‘borrowing’ a Track to temporarily house our waveforms until we build our drum kit. This can be tricky if you have data on all 16 Tracks you do not want to permanently change the VOICE that is assigned to the track that we are borrowing. Remember re-sampling can still be done even if you have data on all 16 Tracks! We are only creating an audio sample – we are not creating any new MIDI data. We are going to simply add the audio clip to our list of USER WAVEFORMS and when we finish sampling we will construct our DRUM KIT with those Waveforms. The MIDI data on the Track is unchanged – we only want to use the audio – this is why selected RECORDING TYPE = “SAMPLE”. No new MIDI data is created; only the audio clip.
• Press the [TRACK] button (Track Select) and then select the next SECTION, (Section [B])
• Return to [INTEGRATED SAMPLING]
• On the Sample Select screen target the next empty (for example, Waveform ———–)
• Press [F6] REC
• Press [F6] STANDBY (make sure the Punch Out measure is set to the maximum value)
• Press [F5] START
• Press PLAY on the XF transport to begin playback and sampling
• Press [ENTER] to fix
• Press [PATTERN]
• Press [PROGRAM]
Press the button [1]-[16] that will recall this PATTERN – and restore your original MIX of instruments.
Rinse and repeat for each Section in turn.
Waveforms to the DRUM KIT VOICE
Once I resampled the Pattern Section data from the sequencer to eight USER SAMPLE Waveforms, next I assembled them to eight notes of a USER DRUM KIT. This was done by calling up USER DRUM 001(A01) and initializing an octave of keys (13 total) C3~C4. Eight of the keys would hold the audio clips (loops) and five of the keys would act as OFF buttons. I called up User Drum Kit 001(A01)
• Press [JOB]
• Press [F1] INIT
The “VOICE Job – Initialize” pop-up window appears. Uncheck the box that says “ALL PARAMETERS” (unless you want to do all 73 keys). What I did was select individual Keys to initialize. What initializing does is basically set the Voice to a default drum sound. In a normal Voice when you perform the initialize Job, it places a piano wave in one Element. Here the initialize Job will place a snare drum on the Key – all other parameters are reset to a neutral (but workable) condition.
In turn I initialized C3, C#3, D3, D#3, E3, F3, F#3, G3, G#3, A3, A#3, B3 and C4
Each KEY was then edited as shown in the beginning of the article, by assigning the USER Bank Waveform to the KEY in question and editing the Oscillator page parameters and Amplitude Envelope to respond as we would like for audio clips. The Alternate Group assignments allow us to immediately substitute one audio clip with another without having to have multiple clips playing simultaneously (which can be interesting but requires pin-point timing). We also assigned empty waveforms to the Alternate Group to act as OFF triggers.
Samplers and Musical Inspiration – thinking outside the box!
This is the kind of Key trigger programming that is done with the Yamaha DTX electronic drum kits which also feature sampling – where, as you can imagine, a drummer has no control over duration other than triggering a note-on event. If you are playing an electronic drum kit triggering looping audio clip samples you need to assign a drum PAD to end the playback of audio. Over the years I have worked extensively with electronic drum wizard Tony Verderosa on this type of triggering. The main reason the XF has a sampler and not just a digital audio recorder (Yamaha knows what a linear recorder is, trust us, we do) but a sampler simply is an extremely creative musical tool when it comes to adding new dimensions and exciting external sound objects to your compositions.
The tutorial here is very “inside” in terms of its conventional use. But nothing says you have to do anything like what I’ve shown here. Let YOUR imagination run wild. It is a sampler after all, and what you sample and trigger is up to you. If you have a few moments visit http://www.tonyverderosa.com and take a look/listen around his site at the video clips. Maybe you’ve seen his Twix commercial… Basically Tony has a hybrid kit (part Yamaha acoustic/part Yamaha electronic) triggering samples from drum pads. Some are traditional drum and percussion sounds but some are vocals, keyboards, and other found sound objects. Everything Tony does is done without sequencers!!! It is all played live. The DTXtremeIII kit features Motif-level sounds and feature/function set including the sampler – so much of what you see is very possible with your Motif XF… of course, we do not recommend you hit your keyboard with sticks!
Keep Reading
© 2025 Yamaha Corporation of America and Yamaha Corporation. All rights reserved. Terms of Use | Privacy Policy | Contact Us