MONTAGifying MOTIF: “Chilln’ Keys”
We know that it is the MOTIF XF Library that forms the core of the MONTAGE sound set. All 1354 MOTIF XF VOICES appear as Single PART MONTAGE Performances. Additionally, most of the 7881 Motif XF Arpeggio Phrases can be found among the 10,000 MONTAGE Arpeggios – therefore it is possible to recreate almost any of the 4-Part Performances found in the MOTIF XF! This type of basic Performances are a great way to “jump start” your own original composition – we will use this setup to learn about the PERFORMANCE RECORDER. By “merging” the identical four Single programs into a MONTAGE Performance, and assigning the same Arpeggio Phrases, we can recreate the XF Performance, “Chillin’ Keys.” We will use this basic Performance – a combination of four MOTIF XF Voices – to explore and experiment with more advanced Control Assignments and possibilities. It’s what we like to call “MONTAGification. Let’s get started:
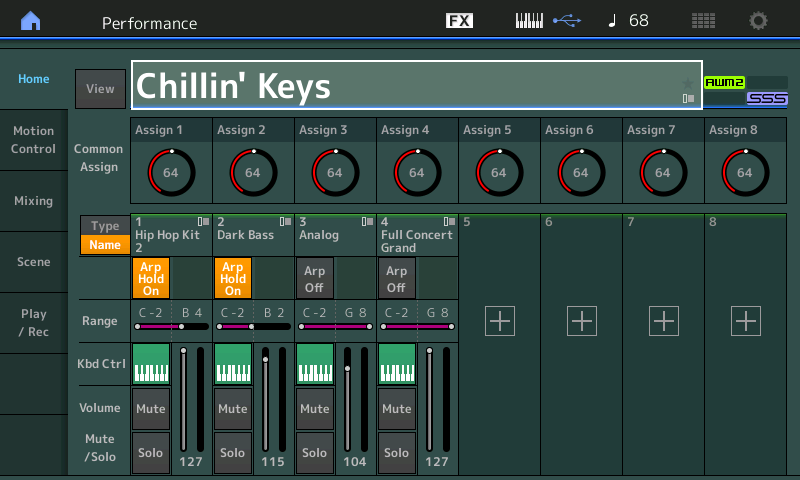
PART 1: Hip Hop Kit 2 (Arp)
PART 2: Dark Bass (Arp)
PART 3: Analog
PART 4: Full Concert Grand
Similar to the “Piano Electro,” this four PART PERFORMANCE features Drums and Bass under Arpeggiator control, while PARTS 3&4 are a layered Pad across all keys for direct keyboard play. Let’s begin by exploring the assignments within each PART. Again since this was previously in the Motif XF, we can anticipate that each PART has a maximum of six Control Sets (Source/Destination) assignments, and a maximum of two PART Assign Knobs activated. We have plenty of room to add to these assignments – with sixteen Control Set Source/Destinations per PART and eight PART Assign Knobs per PART. And as you will see, you can really branch out from here in any directions you desire. If this series of articles is to be helpful beyond just providing some nostalgia, it will help you get into programming by expanding upon the data provided – learning to substitute and customize is a great way to begin to harness the power of MONTAGE for your own creations.
Find the MONTAGE CONNECT .X7B Bulk File download found at the bottom of this article.
Press [SHIFT] + [PERFORMANCE (HOME)] to see the “Overview” screen (Alternative: Touch “Motion Control” > “Overview”):
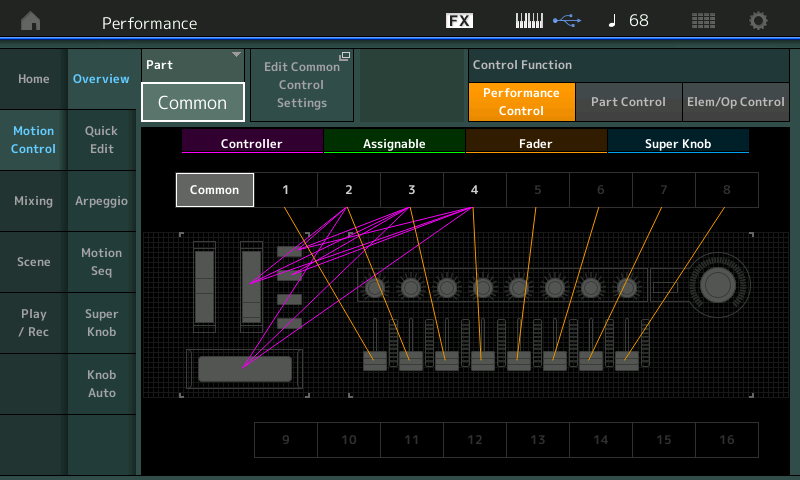
Here we can see that 4 PARTS are active. Each of the PARTS existed as an individual Motif XF VOICE and they are found in the Factory Preset Bank as Single (green) Part Performances. Shown above “COMMON” is selected, we can see that the MW and Ribbon are addressing parameter in PARTS 2, 3 and 4. And there is some relationship between PARTS 2, 3 and 4 and the Assign 1/2 Switches. Notice when COMMON is selected, the Faders are per PART. We can also see that there is no Assignable Knob activity on this level, nor has the Super Knob been engaged. (The Motif XF did not have the ability to address multiple PART Assign Knobs simultaneously, nor did it have a Super Knob).
We will explore the Control Sets below – here is a quick overview of what is being controlled:
Ribbon – assigned to control Cutoff Frequency of the PART 2 (Bass), and assigned to control Resonance of PART 3 (Pad)
MW – assigned to E.LFO PMD (vibrato) for the Bass in PART 2, opens the Cutoff Frequency of the filters in the Pad in PART 3, sends the Piano to the Var Effect (Tempo Cross Delay)
AsSw1 – reduces the mid-range of the Bass in PART 2 significantly, adds a small boost to the Cutoff of the Pad in PART 3, sends the Piano to the back of the room with Reverb
AsSw2 – reduces the AEG Release of both the PART 2 (Pad) and PART 3 (Piano).
These Controllers are active at all times – it does not matter whether you have “COMMON” selected or you have selected an individual PART for direct control. These Controllers are always active to do as assigned.
If you change the OVERVIEW to view “PART 1”, we get a slightly different picture and can view how each PART relates to the controllers:
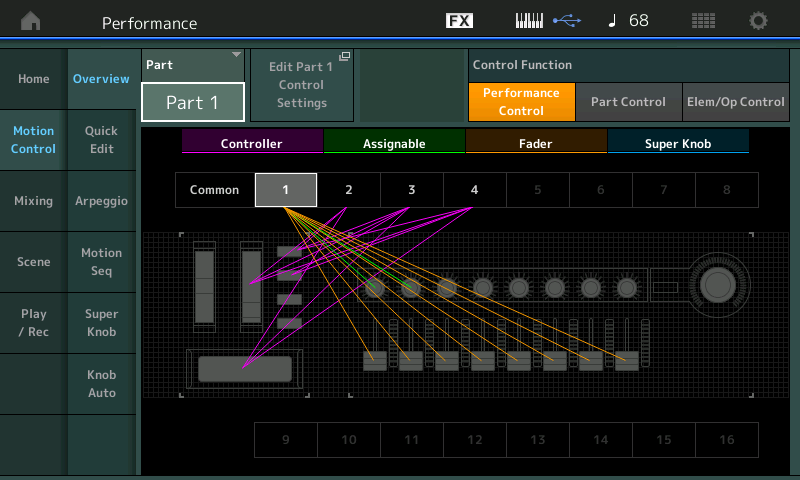
When you select an individual PART (PART 1 is shown above), the Faders automatically become Element/Operator Level controls within the selected PART. Notice how all of the eight Faders (tan) point to PART 1 – this will be true whether or not the Elements or Operators are populated. Additionally, by selecting “PART 1” we can see that its ASSIGNABLE KNOBS 1 and 2 (green) are activated. These Knobs will only be active when the [ASSIGN] button (next to the Super Knob) is lit and the PART in question is selected.
Touch the shortcut box “Edit Part 1 Control Setting”.
This will take you directly to PART 1’s Control Assign screen.
Make sure “Auto Select” is active (green) and the [ASSIGN] button is lit.
Touch Assign Knob 1: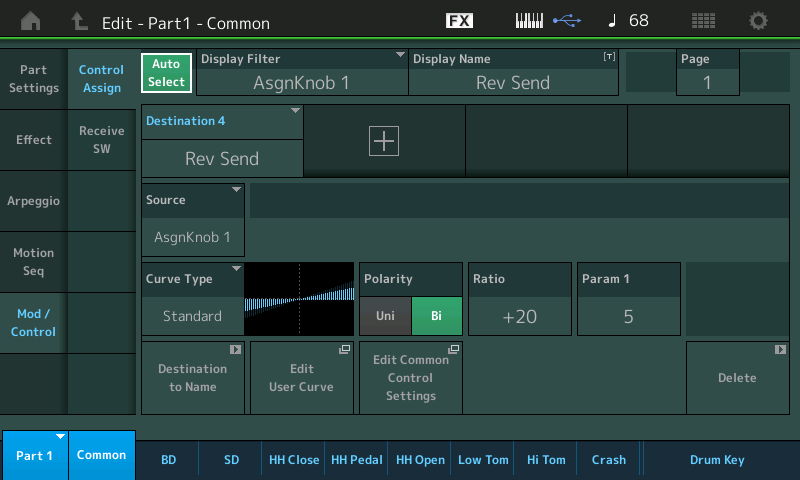
You can press the [SOLO] button to isolate the Drums and hear the assigned controls applied as you turn them up and back.
You will discover that Assign Knob 1 is set to Rev Send, Assign Knob 2 is set to Var Send – this gives you access to these System Sends for the Drum Kit. The Assign Knobs are set for Bi-directional Polarity, meaning the Knob will increase and decrease the current (stored) amount of SEND from the 12 o’clock position of the Knob. This means the overall REV SEND for the Drums is set on the mixer, that is considered the “stored” value, and will be recalled when the Assign Knob is at the 12 o’clock position. You will be able to increase or decrease it from that stored value. Returing the knob to 12 o’clock returns the Send to the stored value. We should mention that within a Drum Kit only the individual Drums with SEND amounts are affected by the REV SEND amount value. If for example, an individual Drum has no SEND to the Reverb – or is set to a value of 0 – it will not be affected by the overall REV SEND change. Only those individual Drums with individual Send amount values will be affected.
The Reverb is “Rev-X Hall”, the Variation is “Tempo Cross Delay.” When you want to adjust the Reverb Send amount of the Drums you naturally press [PART SELECT 1] and the PART Assign Knobs are recalled for PART 1.
When on the HOME screen, if you press [PART SELECT 1] you will see the Assign Knob nicknames appear: Rev Send and Var Send above Knob icons 1 and 2. I have given the PART 1 Assign Knobs “nicknames”: Rev Send and Var Send – naming the Knobs can help you when performing. In the screenshot above simply touch “Destination to Name” to set the Destination 4 name as the “Display Name.” This way when you select PART 1 you can see that Rev Send and Var Send are assigned to the first two Knobs: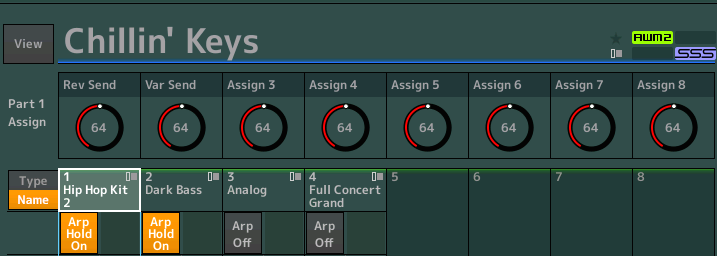
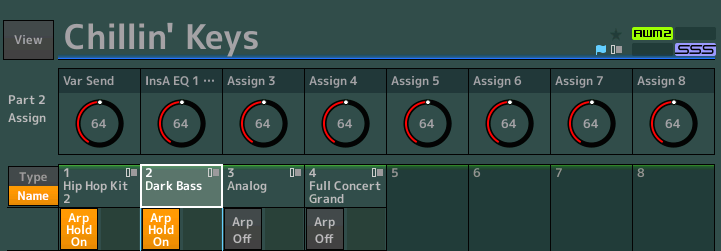
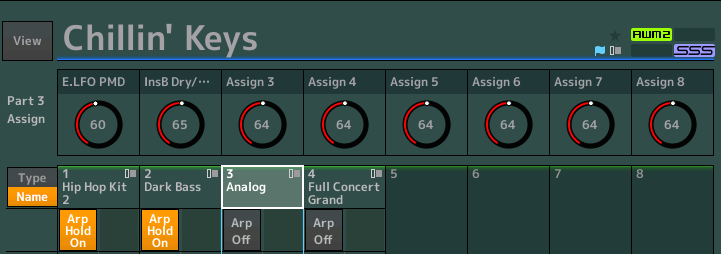
PART 3 is the “Analog” pad sound – a very Oberheim Sawtooth sound. Assign Knob 1 is doing Element LFO Pitch Modulation Depth (E.LFO PMD) or vibrato, while Assign Knob 2 is the Dry/Wet Balance of the Insertion B (another Tempo Cross Delay). Below we will work with this sound to learn how to explore and expand on the real time control over this particular layer:
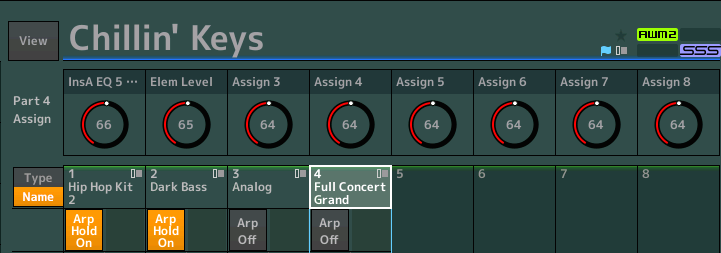
Making Changes
Before we begin making changes, I want to call your attention to the fact that each PART of a MONTAGE Performance is like a Motif XF and each PART has its own relationship with the physical Controllers. You will want to verify that a physical Controller is active (On) for a PART. Just because a Controller is assigned in the Source/Destination “Control Assign” screen or elsewhere in the synth engine, does not guarantee that you get result. If the PART’s “Receive Switch” is not active, there will be no change. You‘ll find the Receive SW screen just below the Control Assign screen:
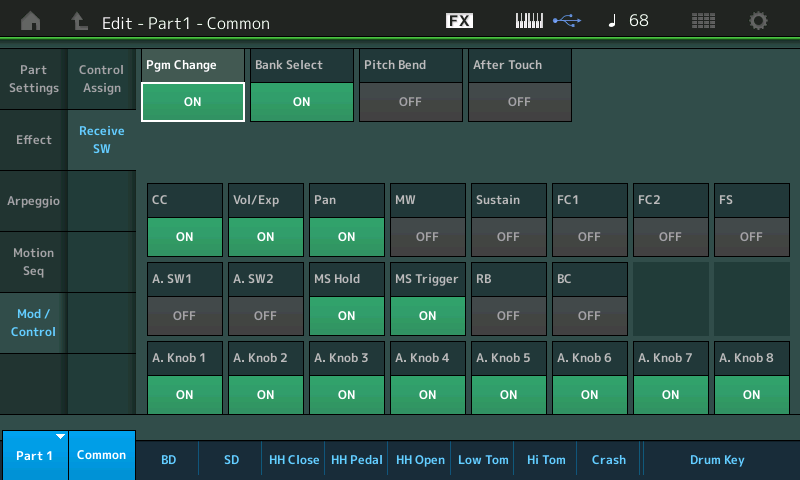
Above Part 1’s ”Mod/Control” > “Receive SW” screen is shown. This is why the Drum Kit (and Bass Parts) do not Pitch Bend when you move the PB Wheel but your direct play sounds do Pitch Bend. View each Part’s “Receive Switch” Settings, in turn, by selecting the PART and recalling its configuration. When combining (Merging) PARTS into your PERFORMANCE, you may wish to change which PARTs respond to which Controllers. For example, it might be a normal thing to have the MW do vibrato on a Single sound, but when placed in combination with others you may wish to defeat the MW. This is how you accomplish this feat.
Remember: always to check whether a Part is set to Receive the Control message you are set to send.
You can use these former Motif XF Performances as templates to build your own custom MONTAGE Performances. You can start by changing what is assigned. I highly recommend you explore the CONTROL ASSIGN screens using the “AUTO SELECT” so that you get an idea what is already assigned. If you assign CUTOFF to a Control it is better to be aware of what else may also be controlling CUTOFF. If you program without knowledge of previous assignments, you may wind up fighting against another Control.
By highlighting the “DISPLAY FILTER” parameter you can step through and view each Controller to see what is assigned on a per Part basis. You can set the ”Display Filter” to “All” to view everything that is assigned in the Part – a maximum of 16 Control Sets, four items per screen, four potential screens.
For example, the “Analog” Pad sound in PART 3, has the Filter CUTOFF on the MW* and on AsSW1. Although the Control Assign screen shows the CUTOFF assigned to the MW, if you check the “Receive SW” settings for PART 3 you can activate or deactivate the reception of the different physical Controllers.
*Note: In the download version of this Performance I’ve activated the MW and AfterTouch for the Analog Pad in Part 3… although not active in the original Motif XF version, I did so here so we can experiment with filter movement.
Play the “Analog” Pad sound in PART 3 and become familiar with what is already being done. The MW opens the filter (RATIO = +10 determines how much movement) see screenshot below. The ASSIGN SWITCH 1 instantly adds a bit more to it (RATIO = +3). The ASSIGN 1 and 2 Knobs are vibrato and Dry/Wet balance to the Delay, respectively. 100% Wet removes the Dry signal entirely and all you hear are the Tempo Delays.
Let’s experiment with changing the Controller in charge of opening the filter.
To navigate to the Control Assign:
[SHIFT] + [PERFORMANCE (HOME)] to go to the OVERVIEW screen
Select “PART 3”
Touch the box “Edit Part 3 Control Settings”
Move the MW:
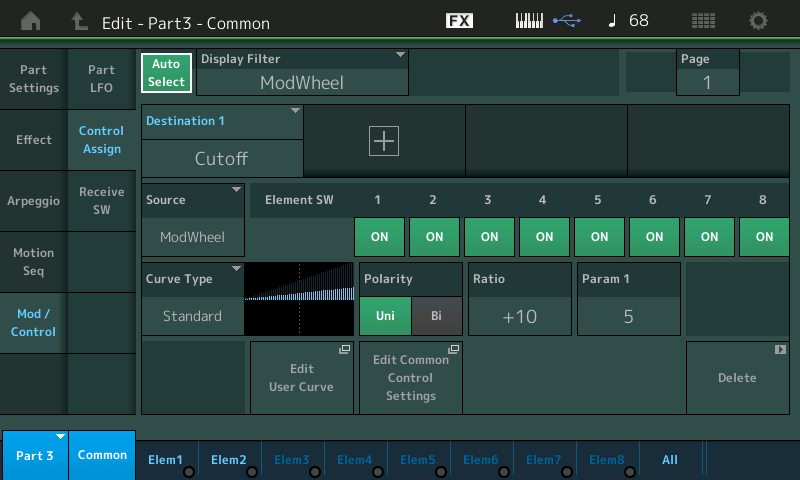
If you would like to try another Controller you would touch the box labeled “Source” to see a list of options: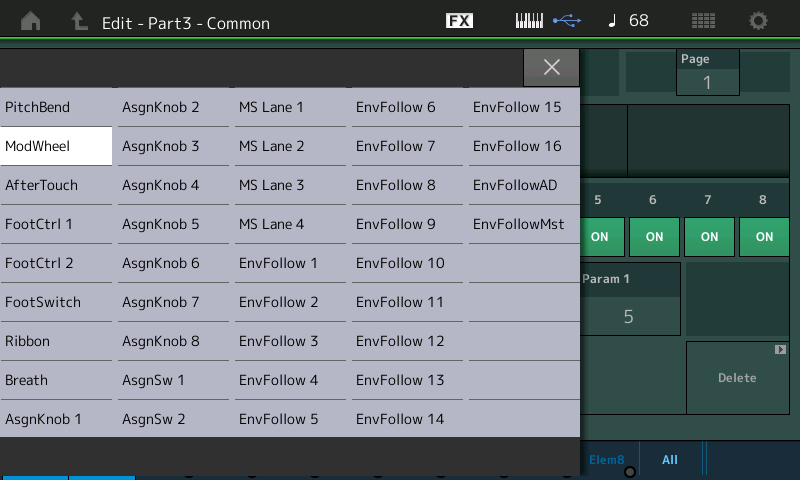
To grasp what is on offer here: You can basically assign the movement of the CUTOFF Frequency to any of the listed Control options. Some will make more sense than others. For example, obviously, the PitchBend Wheel is often used for its named purpose, so unless you want assign that function along with Cutoff (or unassign Pitch+/-), assigning Cutoff control here will also involve pitch change. Try “AfterTouch” – the pressure applied to the keys can be used to open the filter. If you select “FootCtrl 1” recognize that it defaults to Expression so again, perhaps not a wise choice without reprogramming the FC1. If you select “FootCtrl 2” recognize that it is currently assigned to Super Knob duties so techically you do not have an assignable Foot Controller 2. Most are fairly self-explanatory, but “MS Lane 1-4” and those involving the “Envelope Follower” maybe new to you.
MS Lane 1 – Selecting this as a Control will allow you to create an automated movement (a Motion Sequence) to raise and lower the Cutoff Frequency. To get a feel for how to get started with this area:
Select “MS Lane 1” as SOURCE, and press [ENTER] and try the following experiment:
Touch the shortcut box that appears, top center, “Edit Motion Sequencer”. This will whisk you directly to the PART 3 – Common > Motion Seq > Lane screen
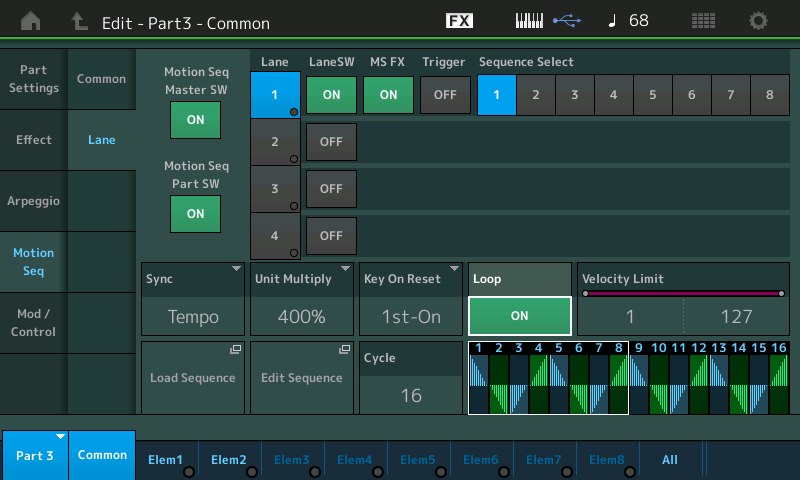
Turn the “Motion Seq Master SW” = ON
Activate LANE 1 by turning “LaneSW” = ON
We can setup movement that SYNCs to the TEMPO; we can subdivide it so that a peak appears at regular intevals; and we can set it to begin when we first touch the keys; and have it Loop.
While you can draw your own custom USER Shapes using the FADERs, you can also recall from a set of PRESET Motion Sequences.
Let’s see how to apply a PRESET MOTION SEQ:
Touch the box “Load Sequence” > Select the “PRESET” folder and find “Big Triangle 4” – one of the PRESETs.
Selecting “Big Triangle 4” will return you to LANE screen (below)
Set the SYNC, UNIT MULTIPLY, KEY ON RESET and LOOP as shown below:
Touch the box that says “Edit Sequence” to drop into details on the Preset Sequence… you can intensify the movment by increasing the AMPLITUDE from 64 towards 127. By adjusting the Prm1 setting you can change the focus of the change – below you can see that we have shaped the change “Prm1 = 8” and the “AMPLITUDE” is increased to “112”:
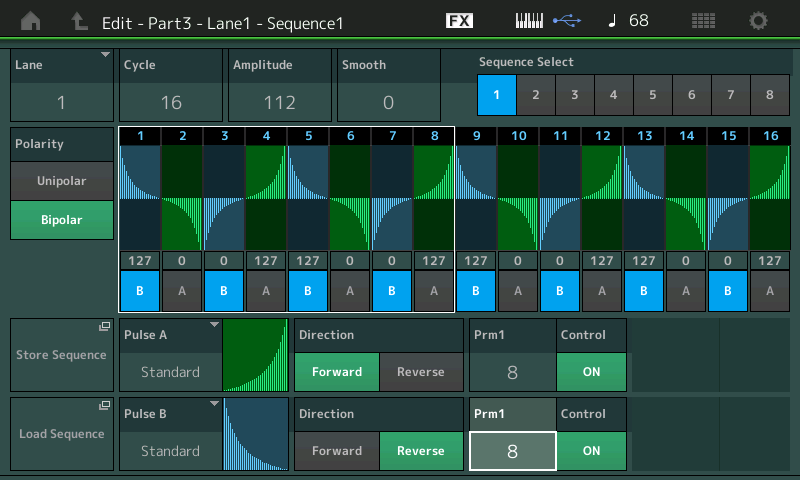
Just an example: The Cutoff pulse reaches maximum at the top of every measure (every four beats). We get this because the 400% Unit Multiply, and 16 CYCLE steps makes each Step a quarter note.
Use the FADERS to adjust the amplitude of each individual Step 1-8 or select 9-16 to have the FADERS control those amplitudes.
Press [EXIT] to return to the “Lane” screen… then touch “Control Assign” to return to the Source/Destination screen.
Envelope Follower
Say you want the Drum groove to influence the Analog Pad sound. The loudness shape of the drums can be used to influence the CUTOFF of the Pad sound. Let’s ADD another SOURCE/DESTINATION set.
Touch the DESTINATION box with the “+” to ADD a new SOURCE/DESTINATION Control Set. DESTINATION 7 will appear…
Touch the default parameter that appears “InsA LfoSpd” and see the options page
Select “Element” > “Cutoff” then [ENTER]
We are going to have a second controller working with Cutoff.
Touch the SOURCE box and change the SOURCE = “EnvFollow1”.
This will make the Drums the Source of the “envelope” and will set PART 3’s Filter to “follow” its shape.
Set the Polarity to “Bi”
Set the Ratio to “+10”:
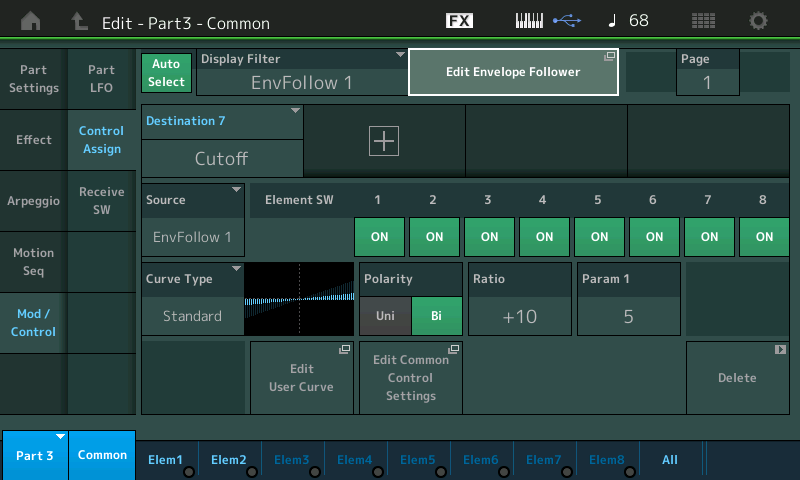
Once you set the SOURCE = EnvFollow 1, a shortcut box appears near the top center “Edit Envelope Follower” – this will take you directly to the screen where you can set the GAIN, ATTACK and RELEASE for the shape of the envelope. Since we are using a percussive source you will want a rather quick Attack and short Release – set to taste:
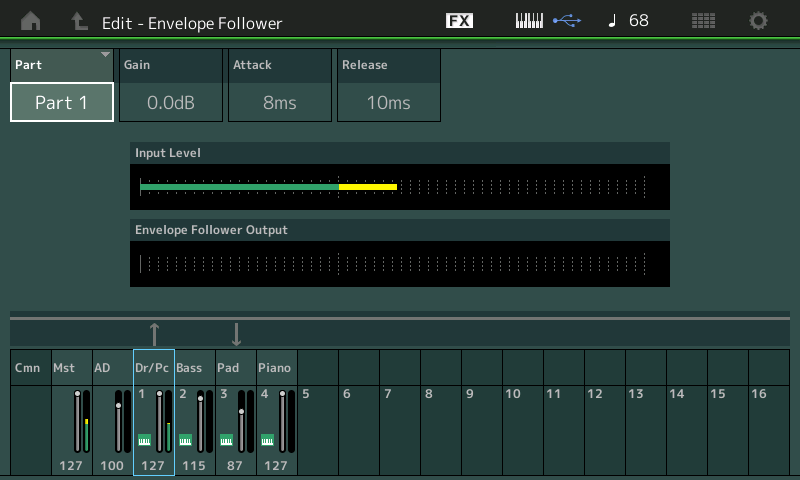
In the screenshot above you can see the Dr/Pc (the Drum/Percussion PART is the Source, and the Pad is the Destination. The Drums create the “Envelope” for the Pad to “Follow”.
These Motif XF Performances prove to be great launching grounds, because there is much you can change and there is much room to add to what has already been programmed. It might be useful to give an example of exactly how building a PERFORMANCE is not only sound designing but a part of composing music with your instrument. Not all compositions come in a flash of lightning – some times I need to construct it by making things interact – I often start buidling on top of a drum groove. I might build a musical Section (as one would in PATTERN mode on the Motif XF, for example).
I either select one of the 3200 drum grooves in the ARP area or I create my own drum arp. The Performance includes my chordal instruments, a Drum groove and sometimes can include a simple Bass line to help outline the Chord Progression, this Chillin’ Keys is just such a PERFORMANCE. I might try out different Chord Progressions, sometimes building 4 or 8 measures at a time. Sometimes longer Sections – it depends. As an example, say I use Chillin’ Keys to build an 8 Measure groove as my “A” Section. For now I will just go with this basic feel and tempo (but recognize I could swap out any of the Arps and sounds at any time – make adjustments to timing and feel of the Arps, etc., etc.). My goal here is to setup an 8 Measure “A” Section – Purpose: to work out melodic ideas over the top of this looping groove. I have found a very expressive (FM-X) lead synth sound to go over the top of this and I will ultimately “ADD” this as PART 5.
PERFORMANCE RECORD: In Use
* I put eight measures of my Chord Progression in the MONTAGE Performance Recorder.
* I rename the SONG “Section A” _ you do so by touching the Song Name box to recall the pop-in menu.
* I set the LOOP ON and set the Loop Start 001:01 and the Loop End 009:01 to create the 8 measure looping section.
* Touch the box to “Store Song & Perf Settings”.
I can now return to the HOME screen:
Deactivate the KBD CTRL icons on PARTS 1, 2, 3 and 4. They are already recorded, and I only need these to playback now.
Touch the “+” in PART 5 to ADD (merge) a new PART – the Performance Merge Search screen appears: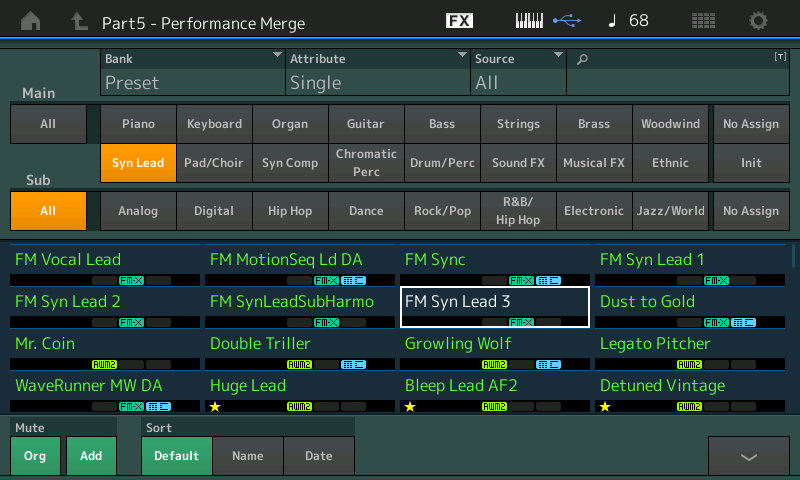
I’m ready to work out melodic ideas for this Section… If I get something I like… By deactivating the KBD CTRL icons on PARTS 1-4, I can now overdub a scratch melodic idea with Part 5 – to help construct my Section “A”.
Each time you recall a PERFORMANCE you may notice the SONG increments to a new Song location. To reload a Song you’ve already recorded, simply touch the Song Title box, a pop-in menu with the “Load” option appears.
The data is STORED in the MONTAGE. [UTILITY] > “Contents” > “Data Utility” > “Songs Folder” as “Section A”.
It is this SONG FOLDER that is visible from MONTAGE CONNECT via the USB connection. Below, you can see that “Section A” appears along with other items I’m working on currently – I can literally Drag ‘n’ Drop this “Section A” icon directly into my computer DAW (Cubase) and I can have it automatically split the data to separate MIDI Tracks by Channels, that will automatically line up with what is in my current MONTAGE PERFORMANCE. Now I can expand on my basic idea: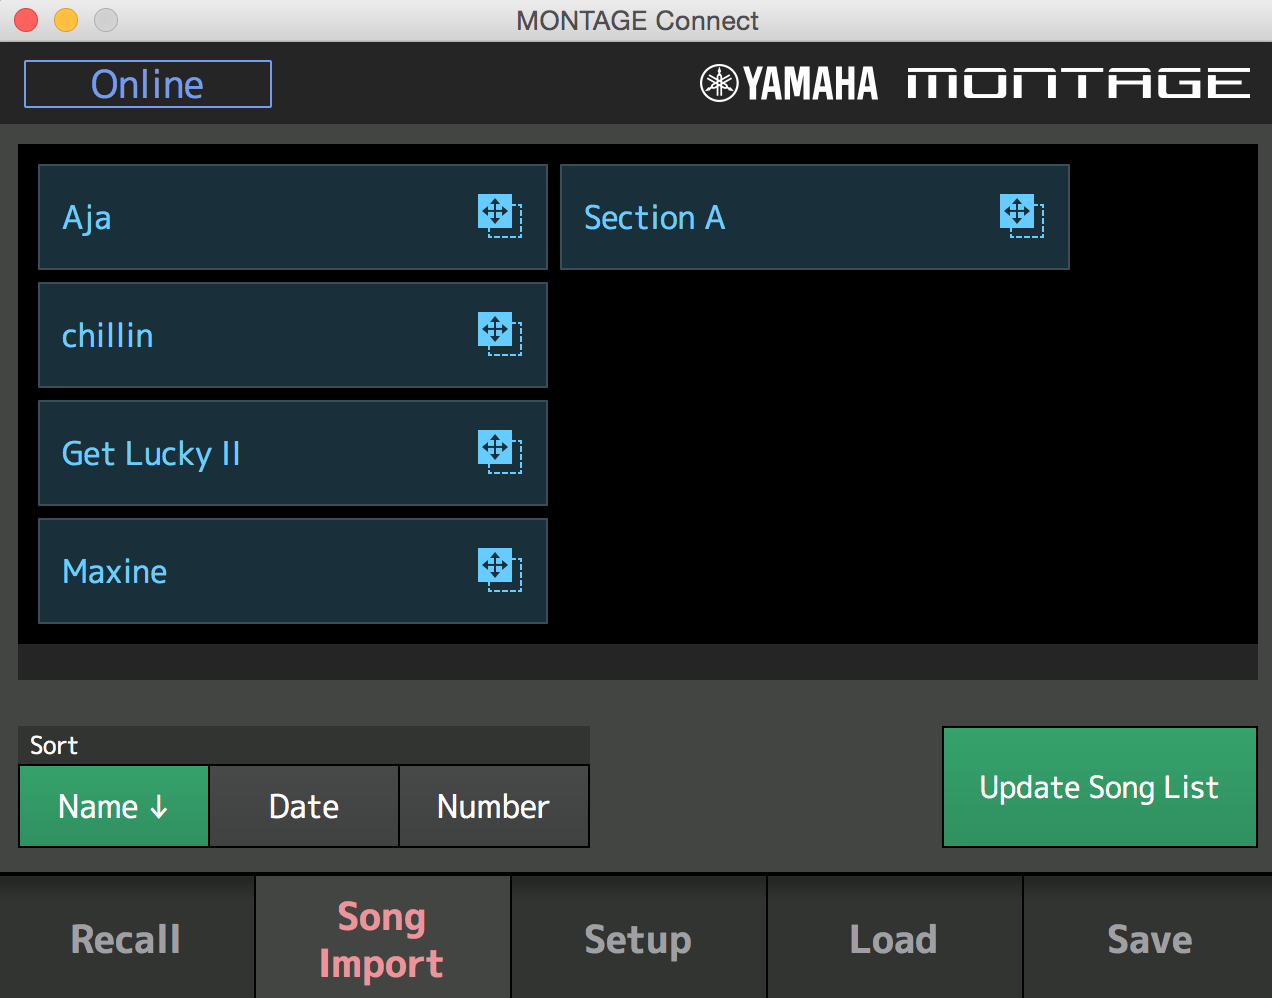
Often I decide to keep or replace some or all of the template idea. Often I use a very simple Bass ARP just to outline the Chords. I will erase and then overdub a proper Bass line of my own in the DAW. The purpose of the Performance creation was to get my basic idea for the MAIN “A” SECTION into something I could shape into a full composition. Often I store this as a Performance SCENE 1, and I start to work on the “B” Section which I capture in SCENE 2, and so on. You, of course, can design your own workflow, decide what works best for you. Substitute different instruments, substitute different Arps, select a different Tempo…but the thing is: get going! The thing is to start creating and recognize one of the principal reasons to record as MIDI first is so you can CHANGE YOUR MIND.
Want to share your experiences about this lesson? Join the conversation on the Forum here.
Looking to learn more? Check out the “Piano Electro” lesson here – and stay tuned for more to come!
Download here: Chillin_Keys.X7B
Keep Reading
© 2025 Yamaha Corporation of America and Yamaha Corporation. All rights reserved. Terms of Use | Privacy Policy | Contact Us