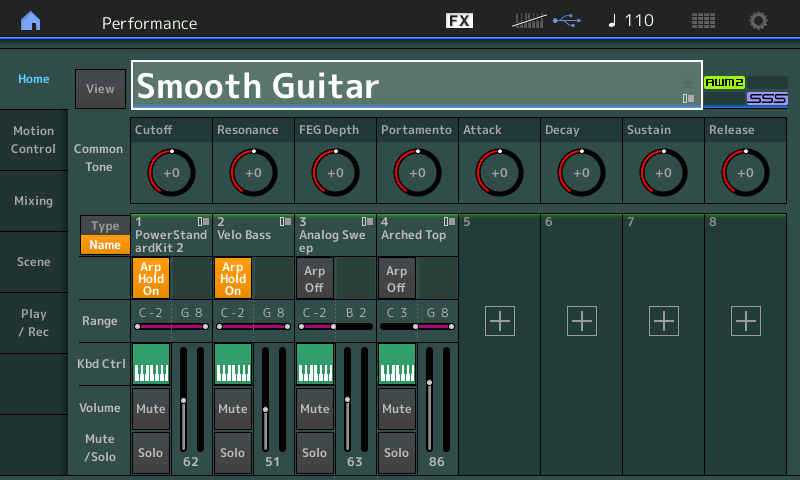
This Performance features Drums and Bass under arpeggio control, an analog sweep pad sound that will outline your left-hand chords, while you play lead with a right-hand Arched Top Jazz Guitar. Typically, the root of your left hand chord will define the root for the bass-line, however, there are some hidden (“Easter Eggs”) chord recognition tricks to be found.
We will use this PERFORMANCE to learn about some of the options you have for customization. Again whether or not this type of groove is your thing, we invite you to follow along and find out about the concepts being discussed. Then you can apply them to whatever type of music you are putting together.
Initially, play with this Performance as is, follow along with this article and on the second time through seek to make your own choices and use what you have learned to customize the data you select.
To start: Please adjust the TEMPO. This is one of the first things you may want to try when recalling a PERFORMANCE. Listening to it at a different tempo can generate new ideas – same as starting in a different key from those to which you normally gravitate can force you to begin with a different approach. Besides we are looking for inspiration – challenge yourself. I’ve slowed the tempo to 105. This will let us better get a feel for this basic 16th note groove.
To adjust the tempo: Simply touch the TEMPO setting on the top line of the screen and use the DATA DIAL to dial the Tempo down to 105.
Alternate Method: Press [UTILITY] > “Tempo Settings”.
Press [EXIT] to return to the PERFORMANCE.
This time we’ll take a look at just how much we can manipulate what is on offer. The Analog Sweep (pad) in PART 3 (C-2 through B2) will need to be played (voiced) so that the bass line can be determined. The Bass will typically look at the root note of the chord (not necessarily the lowest note, but it can determine the root of most major, minor, dominant, diminished, and augmented chord voicings).
We’ll start our exploration with the Drums. We want to point out the conservative Volume settings for the four PARTS: 62-51-63 and 86, respectively. This is done purposefully so you can add instruments and play a lead on top without struggling to be heard. Sound level, like most things will when combined, add up; the more sounds playing at once, the more the total level. If you fill the entire dynamic range with just one instrument, you’ll have no room to add others to the mix.
Play a chord in the region below middle “C” and get the Drums and Bass going. The idea here is to use the left hand area to construct chord changes for the right hand lead.
Let’s MUTE the Bass. You can do so by touching the [PART MUTE 2] button (row 2) right front panel. It’s light will dim indicating it is currently muted: the MUTE icon appears on PART 2 in the screen.
• Raise the first FADER so that the Drums are set to about 90.
About FADER movement: The Faders will need to be moved so that they “hook” the red light marker that indicates the actual current setting (62). Because the FADERS are not motorized, they may not initially reflect the current value. It is necessary to move the FADER so that it “hooks” (engages) the stored value (62), and once it does, the FADER is then “live” from that moment on. If the Fader is all the way down, you will need to move it up through the setting of “62” before it becomes “live”; if the Fader is all the way up, you will need to move it down through “62” before the Fader becomes “live”.
PART 1: Power Standard Kit 2
• Press [PART SELECT 1]
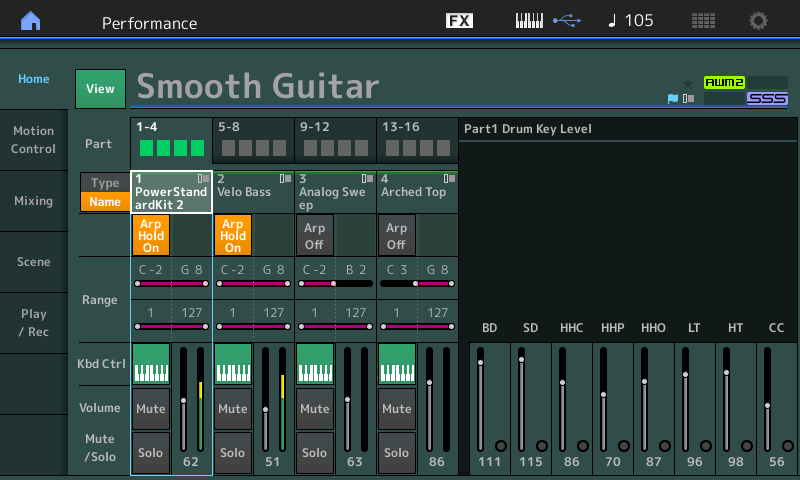
By pressing the PART SELECT button, the FADERS now become Element Levels for 8 drum Elements. The Drum Kits in MONTAGE have 73 Elements but the Faders here will control the following 8 Keys, which are the principal Drums in a typical Drum Kit:
– BD = C1
– SD = D1
– HH Close = F#1 (Closed)
– HH Pedal = G#1 (Pedal)
– HH Open = A#1 (Open)
– Low Tom = A1
– Hi Tom = D2
– Crash = C#2

Shown above is the HOME (View) screen with PART 1 selected… You can see the DRUM KEY LEVELs of the Key Mapped Drums. (You can toggle the HOME view between viewing the KNOBS and this screen).
Extra Credit: This drum key mapping information can come in handy, particularly, if you are creating your own drum grooves for MONTAGE Arpeggios. For example, there are usually drum creation tools in most DAWs, when opting to create your own data you may want to use this basic Key Map for your created data. (We should mention that not all Drum Arps use this Map). If you use your DAW to create your Drum grooves, you can export them as .MID files to a USB Stick and then load them to the MONTAGE SONG area. You can convert these from the MONTAGE Song quickly to USER ARPEGGIOS which can then be selected as Arpeggios for your own PERFORMANCEs. By using these Drum Key assignments, you will be able to use the PART Element FADERS to control the principal drums sounds. (This just adds another bit of real time control and while it is not all 73 Drums it does represent the core of the Drum Kit). Each Drum can be individually set as to its volume within the EDIT architecture, but having the principal drums conveniently setup on Faders can be very helpful when mixing In “Live” situations.
Hint: when generating your own Drum data recognizing that you can adjust (via offset) the Velocity of the Phrase can help you build more convincing and flexible drum grooves.
While not all Drum Arps in the MONTAGE use the principal Key mapping, you can make use of it in data that you create yourself. When Editing Drum PARTS you can put any Drum sound on any KEY. You can easily EXCHANGE KEY assignments within a Drum Kit, even between Kits. Any Drum can be assigned to any KEY. But the KEY MAP for the Fader uses those listed above.
MIX
ARP 1 (associated with SCENE 1) has BD, SD, HH Close and HH Open. Using the FADERs (1, 2, 3 and 5), create a mix for these four sounds. Move the FADERS so that you have all of them “live” – set them at minimum, then start to set a mix.
I suggest starting with the HH Close and HH Open. Set these so that you can hear them, then bring in the Kick (BD) and Snare (SD) to create a balanced drum groove. Try to avoid the situation where you have everything at maximum. You want to ensure that the Hihats can be heard. The idea is to mix – to leave room for accents.
In other words, if all your snare drum and kick drum hits are at maximum (127) you will not be able to create an accented hit. But if you get the listener accustomed to a lower volume level, the accent can still have its desired effect: “to surprise” the listener with a sudden burst of engery. If everything is max at all time you leave no room for dynamics.
In general, a good rule of thumb is to leave room – because the level of your entire mix is cumulative. Don’t use the entire dynamic range for your drums.
We want to call your attention to the upper [COMMON] button:
• Press [COMMON] – The green LED “PART 1-8” located just to the left of the FADERS, lights – the FADERS revert to PART Volumes. FADER 1 will now control the entire Drum Kit, as PART 1
• Press [PART SELECT 1] just to the right of the upper COMMON button and the FADERS now become the 8 select principal Drums of the Kit. The green LED next to “ELEMENT/OPERATOR” lights.
Get used to the fact that you can easily adjust the volume of the overall Kit by simply pressing [COMMON], and then you can drop in and edit the individual Elements of the Drum Kit when you select the PART ([PART SELECT]).
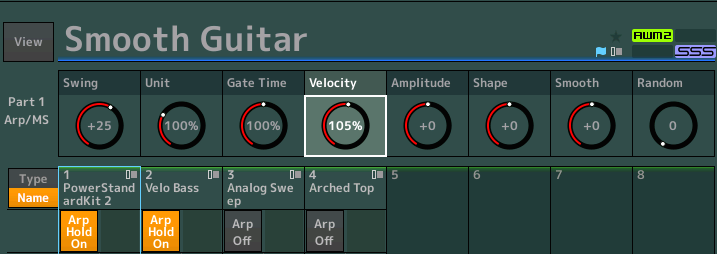
With PART 1 selected, Press the KNOB FUNCTION button for the “ARP/MS” row. The screen will show the “PART 1 Arp/MS” Assign Knobs: Swing, Unit, Gate Time, Velocity, (which affect the Arpeggios) and Amplitude, Shape, Smooth, Random (which affect the Motion sequences).

The first four parameters directly affect the currently playing ARPEGGIO. With KNOB 4 (Velocity) you can lower and raise the Velocity – 100% is normal – meaning it will playback exactly what was recorded. Velocity is different from Volume (although related). Changing just the Volume level will not change the sample that is being accessed, however, changing the Velocity certainly will – particularly if the samples are set to particular Velocity ranges. You will observe immediately different snare drums can be heard at different velocities. There are actually five different Snare Drum samples in the Waveform assigned to Note “D1”: “Sd PowerB 1-5St”. Increasing the Velocity from 100% to 101% is enough to switch the arp phrase from accessing a different Snare (which has a more pronounced ‘snap’). This Velocity is affecting all Drum data so you will also observe changes in the Hihats, as well. Depending on the Drum Kit there will be different Velocity mapping within the Kit.
Swing – in order to make MIDI data ‘swing’ we need to understand how it goes about documenting NOTE data. In general, a MIDI sequencer may have a resolution of, for example, 480 pulses per quarter note. This means it divides each quarter note into 480 equal parts. Each note you play must land on one of these 480 note-timing locations. Swing is about how it divides the timing of the data. Let’s use either eighth note swing and sixteenth note swing as examples. We know that a quarter note (480) is made up of two eighth notes (240+240) – in strict timing, each is given 50% of the time value. In making something swing you would give more of the % time to the first segment and shorten the time allowed for the second segment. For eighth note swing the “and” (upbeat) would be delayed slightly – and a sixteenth note swing would delay the even numbered 16ths. The tempo remains the same but the timing stress is shifted. As musicians we count 4/4 time as follows:
Counting as quarter notes: 1 2 3 4
Counting as eight notes: 1 + 2 + 3 + 4 +
Counting as sixteenth notes: 1 e + a 2 e + a 3 e + a 4 e + a
Swing 16th would delay the “e” and the “a”. When we say “delay”, we are talking about how instead of the Hihat Closed landing on clock pulses 120 pulses apart:
Beat 1: Clock 000
Beat 1: Clock 120
Beat 1: Clock 240
Beat 1: Clock 360
It would shift the even numbered steps late:
Beat 1: Clock 000
Beat 1: Clock 139
Beat 1: Clock 240
Beat 1: Clock 379
The number of clock ticks is less important than how it “feels” – how it sounds to your ears, how it literally feels musically.
We can think of this by imagining an individual walking walking in time. Straight time is like a march – equal value and weight given to both the left foot and the right foot – you are marching. Swing time is more like a “cool walk” – where the first step is elongated and the second is shortened. You are still walking at tempo, still covering the same distance, but one has a dip-in-the-hip, a bit of glide-in-the-stride… that’s Swing: the law of falling behind and catching up. It can be described in many ways, but it really comes down to when it “feels right, it is right”.
Unit – The term is short for “Unit Multiply” – and deals with how the Arpeggio phrase will Reference the tempo. 100% means the phrase will play normally – a setting of 50% means the phrase will play using half the allotted time (double time); and, a setting of 200% means the phrase will take twice as long to play through (cut time). You can offset an ARP Phrase to turn this around and give it an entirely different feel.
Gate Time – The term “gate” refers to a device that is on when open and off when closed. And refers to the duration of Note data. Most Drum Elements are set to NOT Receive Note-Off and this will cause them to ignore changes in the Gate Time parameter. We will use this more effectively on “normal” (non-Drum) musical sounds.
Play FX = Feel:
Lets play a bit with what are referred to as the ARPEGGIO PLAY FX. These can change subtlely or radically how the drum groove feels. And significantly, these are accessible for real time manipulation via these dedicated Knob functions, and can be captured in “snapshot” memory (SCENEs)… you can use these Scenes to recall different ‘feels’ in real-time. We will setup a couple of different settings so we can compare (A/B) the difference.
Try the following: Create an initial SCENE 1 by capturing the PART 1 ARP/MS settings: Swing = +0, Unit = 100% and Velocity = 100%
• Press [SHIFT] + [SCENE 1]
The screen briefly reads “Scene Stored.” By storing the original setting as SCENE 1 we can always return to the original feel of the Performance. And it will allow us to easily compare – the feel
Next:
Increase the “Swing” value for PART 1 to +25 and set the Velocity to 105%:

Press [SHIFT] + [SCENE 2] to document this change into the second Scene.
Now you can do a bit of A/B comparison. Remember the “swing” is being applied to the Hihat Closed which is doing a basic 16th note pattern. This is a very fundamental funk groove (think Earth Wind and Fire, Daft Punk, What You Won’t Do for Love, . . . etc).
You can drop in to edit even deeper into the basic “feel” of this arpegigo phrase by navigating to the PART’s Arpeggio page:
• Press [EDIT]
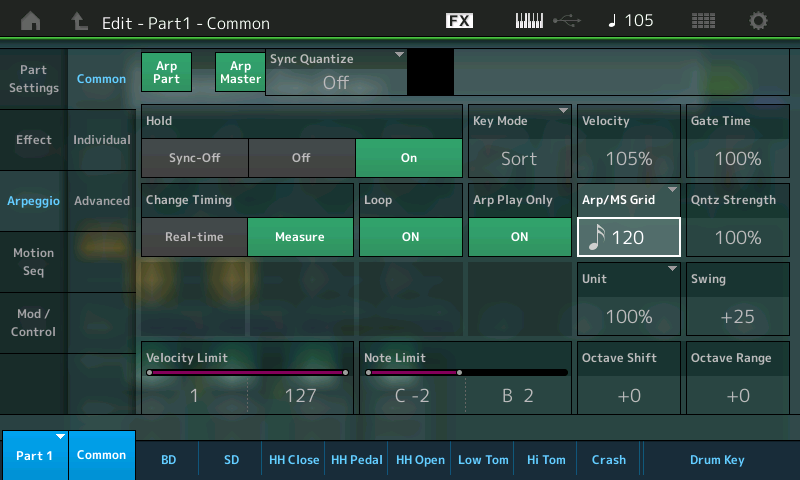
With the lower [COMMON] selected, touch “Arpeggio” > “Common”:

It is on this screen where you can see the parameters controlling the Drum Arp Phrase. In the screenshot above, the highlight sits on the “ARP/MS Grid” which is set to a sixteenth note (120 clock pulses). You can vary the “Quantize Strength” – when set to 100% you can use the ARP GRID to requantize the arp. It is possible to go from straight time to an all out shuffle by manipulating these parameters. The “Quantize Strength” can be less strict with great effect, remember it is how if feels, more than the number setting. For now with Drums you want to work with VELOCITY, ARP/MS GRID, QUANTIZE STRENGTH, SWING.
With “Quantize Strength” at 100% and the “ARP/MS” Grid at “120” (16th), we are quantizing the arp data to a 16th Note, then we are clock-shifting the even numbered 16th notes late in the beat to create a “swing” feel.
Make a Shuffle by setting the “Quantize Strength” to 100% and the “ARP/MX Grid” at “160” (eighth note triplet), Swing should start at +0.
Experiment. Set to taste. With these four parameters you can change much about any arpeggio phrase.
PART 2: Velo Bass
Return to the HOME screen.
UnMUTE the Bass and work with the Bass and the Drum phrases.
Store SCENE 1 with no change to the Bass (other than it is now active).
But for setting up SCENE 2:
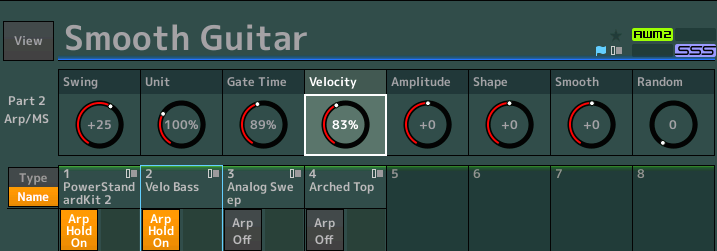
Try setting the “Swing” = +25; “Gate Time” to 89% and the “Velocity” to 83% – This changes the note to a shorter, but phatter sound. The Velocity change goes from one sampled layer to another by reducing the velocity. (Always remember to try negative as well as positive – break the habit of thinking all change occurs by increasing – a lot of magic happens when you decrease!):

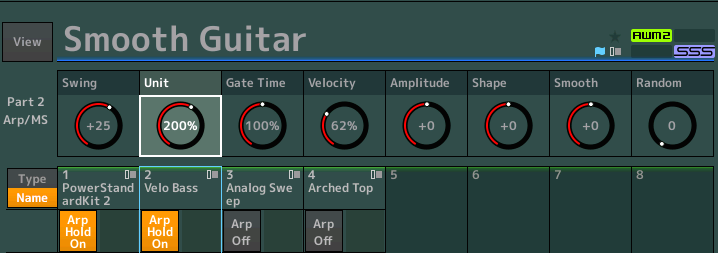
For SCENE 3, start with settings of SCENE 2 but change the “Unit” = 200%, “Gate Time” to 100%, and the “Velocity” = 62%
The UNIT MULTIPLY can change the feel of bass line to a held tone “on the one”. Do not worry if the sync falls apart as you change the UNIT parameter – this is not something you want to change while an arp is playing. It is a setting you want to make and then RECALL via the SCENE button. Doing so will mean it will immediately change from 4/4 to cut-time at the measure line. Try it – press [STOP] and then work the SCENE buttons:

PART 3: Analog Sweep
The Analog Sweep is raised an octave so that it can be split to your left hand and yet work as your chords. We mentioned that here the chord can also determine the note that the bass is going to be playing. Although the Analog Pad is not using an arpeggio (you are playing it direct) you are only able to play it below the middle “C” split point.
PART 4: Arched Top
This hollow body Jazz Guitar sound uses the AsSW1 (for pitch scoop) and AsSW2 (for Wes Montgomery type octaves).
Adding ARPEGGIOS
Lets ADD (“+”) a rhythm guitar to our band at PART 5.
From the HOME screen.
Touch the “+” in PART 5 to ADD (merge) a new PART to our PERFORMANCE.
Bank = Preset
Attribute = Single
Search: Mega 1coil Clean
What we will do is assign an ARP Phrase to this PART:
– Press [EDIT]
– Touch “Arpeggio” > “Individual”
– Touch the NAME area of the ARP 1 Phrase to see the pop-in menu
– Touch “Number”
– Type in “1802”
– Touch “Done”
“[Mg]MB_16Bt Med_C”
Mega Guitar Arp. Main B Section, 16th Note Medium Tempo
While in the “Arpeggio” area:
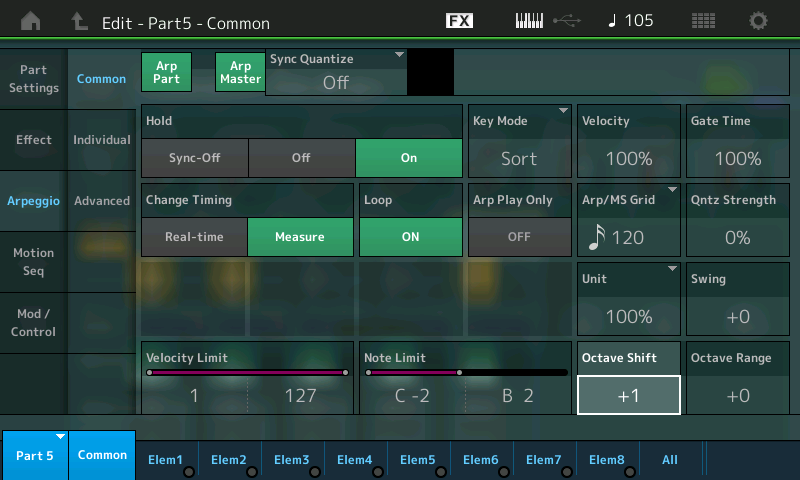
– Touch “Common” to view the PART ARP parameters
– Set “Octave Shift” = +1
– Set the “Note Limit” to C-2 ~ B2
The Note Limit here will set the region of KEYS that will be able to give chord information to the PART 5 Arpeggiator:

Adjust the “Velocity” – increment both negative and positive. In order to know what will result, you will have to try it. Take your time.
Adjust the “Gate Time”.
Adjust the “Swing”.
When adding this new member to the band, think about placement on the ‘stage’ – not every one needs to be standing at stage center. Work with Pan… by panning the rhythm guitar slightly to the left or right will give it a place on the virtual ‘stage’. Experiment with Velocity, Gate Time, Quantize Strength, Swing.
Try it out for yourself!
Questions/comments? Join the conversation on the Forum here.
And stay tuned – more to come!
Download here: Smooth_Guitar.X7B
