Gain staging is a term you may have encountered from time to time, since it applies to both live performance and recording … and it also plays an important role when crafting sounds in synthesizers.
But what does it mean, exactly, and how do you do it right? This article will take you through the basics and describe best practices for applying correct gain staging both onstage and in the studio, and when creating synth voices too.
What Is Gain Staging?
Let’s begin by defining the word “gain.” Many people think that gain is the same as level (or the more old-fashioned term “volume”), but technically that’s not quite accurate. Gain and level are actually two sides of the same coin. Gain refers to the strength of a signal coming into a device, while level refers to the strength of the signal leaving a device. In other words, gain denotes input signal, while level denotes output signal.
A “stage” refers to any point where you can control the input gain or output level of a device. Examples of audio “devices” include microphone preamplifiers, powered speakers (or power amplifiers that drive speakers), outboard signal processors, plug-ins, and, perhaps most importantly, the inputs, faders and buses of a mixing console—be they real or virtual, as in a DAW (Digital Audio Workstation). You’ll find a complete list of gain stages at the end of this article.
“Gain staging” is simply the process of managing input gains and output levels. To make everything sound as good as possible, you have to achieve the right balance between all of these. Correct gain staging ensures that your music will be free of excess noise and distortion, while improper gain staging can result in a sound that’s lifeless, muddy, or hard to hear.
I like to think of gain staging this way: Imagine you’re really, really thirsty so you go into the kitchen and grab a big water glass—one that holds 12 ounces of liquid. Since you’re parched, you want to fill that glass as much as possible … but by the same token you don’t want to waste your favorite beverage by over-filling it, either.
Let’s say you pour in 4 ounces of something icy cold. That leaves 8 ounces of unused space. Kind of a waste, isn’t it? But let’s say you open a 16-ounce bottle of your favorite brew or soft drink and try to pour it all into that glass. Those extra 4 ounces will spill over onto the table. Another big waste!
Ideally, you want to fill that 12-ounce glass with exactly 12 ounces of liquid. Maximum thirst-quenching, and no waste whatsoever! That’s the equivalent of proper gain-staging.
To take this analogy a step further, let’s go back to the first scenario, where you pour in just 4 ounces of liquid. In audio terms, you can think of that as the equivalent of signal—a term used to denote the music you’re performing, recording or creating. The rest of the wasted space in the glass—in this case, 8 ounces of nothing but dry, undrinkable air—would, in audio terms, be equivalent to noise.
In the audio world, noise is any unwanted sound in your signal, whether it’s coming from the low-level hum and hiss inherent to electronic circuitry or because an onstage microphone is too far from the vocalist or instrument it’s trying to pick up. And noise is something you hear all too clearly when you crank things up way too loud. That’s because every gain stage has the potential to not only introduce noise but to amplify it as well. Proper gain staging allows you to minimize noise by introducing it as little as possible—just as filling a water glass all the way to the top minimizes wasted space.
The bottom line is this: The more signal you have, the less noise you have, just as the more liquid you have in a glass, the less air there will be filling the rest. Now that we have that analogy in mind, let’s move on to define some basic terminology.
Signal-To-Noise Ratio
Signal-to-noise ratio (sometimes shortened as simply “S/N”) refers to the proportion of signal relative to the proportion of noise. The higher the signal-to-noise ratio, the lower and less noticeable the noise is—and obviously, that’s a good thing. Proper gain staging allows you to achieve the best S/N. By attempting to obtain the loudest sounds possible at each stage without overloading, you can achieve an ideal gain structure.
Headroom
Headroom was a term first invented by automobile manufacturers to literally describe how much room there was between the top of a driver’s head and the roof of the car. The more headroom, the taller the driver the car could comfortably accommodate. If the driver’s height exceeded the car’s headroom, it would make for a very uncomfortable ride, plus they’d likely bump their head with every pothole they encountered.
In audio, headroom refers to the difference between the average signal level and the maximum level that can be achieved without overload—in other words, the safety margin between clean sound and distortion. To go back to our analogy, you can think of our drinking glass as having 12 ounces of headroom. If you pour just a couple of ounces of water into the glass, you’re a long way from exceeding its headroom, though you really aren’t making the most of it either. But if you pour in 10 ounces of water, the glass will be rather full, and you’ll still have some room left over (i.e., some extra headroom) in case you decide to top it up later.
Clipping
Of course, you can’t fit 13 ounces of water into a 12-ounce drinking glass. If you try to do so, you’ll be exceeding its headroom, and a full ounce of water is going to come spilling out. If this were audio signal, such overload would result in a very unpleasant phenomenon called clipping.
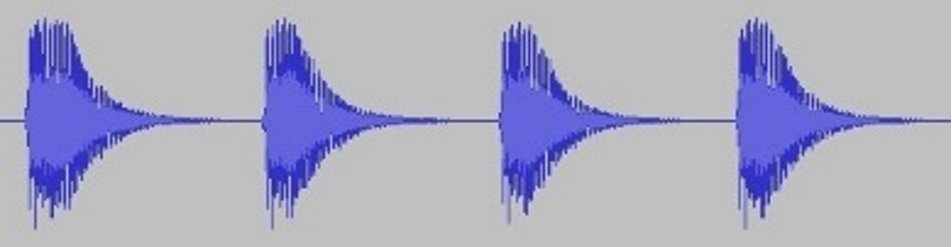
If there’s sufficient headroom and good gain staging, the peaks of a sound’s waveform reflect harmonic complexity, as shown in this illustration of four piano notes recorded at proper levels:
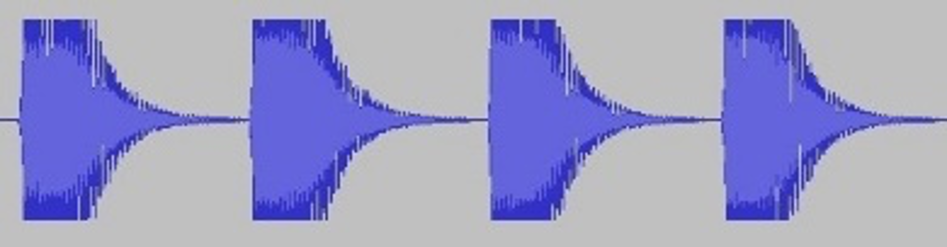
If, however, there’s insufficient headroom and the sound is clipped, the peaks of the waveform are literally cut off, as shown in this illustration of the same four piano notes recorded at overload levels:
Not only are you losing some of the resolution of your music, but, as you can hear from this audio clip, taking its place is a nasty distortion that sounds like fingernails scraping a chalkboard, or worse. This is something to be avoided at all costs … and that’s a big part of why proper gain staging is so important.
The Importance of Metering
Fortunately, there’s a great tool for avoiding clipping and achieving correct gain staging: metering. Whether they’re measuring output levels (which is very common) or input gains (less common), meters provide a straightforward graphical representation of volume levels at every stage.
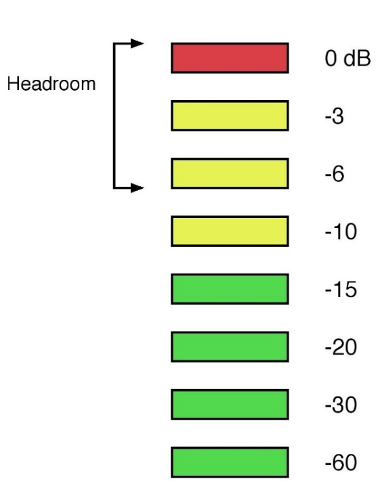
Most meters in use today (as found on both live sound devices such as mixers, signal processors and power amps, as well as in recording Digital Audio Workstation software and plug-ins) use this intuitive color coding system:
- Green indicates the presence of signal
- Yellow indicates that levels are getting close to clipping
- Red (sometimes labeled “Peak”) indicates clipping
So-called “ladder” meters provide multiple green and yellow signal strength indicators, as shown below.
The goal here is to get as many greens lighting as often as possible, with the very loudest sounds causing just one or two yellows to be triggered. Ideally, you never want to see red LEDs lighting, although in certain circumstances—if, for example, the signal being metered is not too peaky (that is, if it doesn’t have too many spikes)—the world won’t end if you see them light up momentarily every now and then. Just make sure it’s momentary—any more than that and you’re certainly introducing overload and some degree of clipping, even if it isn’t obvious to the ear.
Some audio devices—particularly less expensive ones—don’t provide multi-ladder metering. Instead, they’ll offer a single LED capable of lighting green or red (in some cases, yellow too) in response to the strength of the signal. In that case, best practice to adjust the device’s gain or level control until the LED blinks red briefly, and then back it off by about 15 percent.
Signal Flow
In order to do good gain staging, it’s helpful to have an understanding of signal flow. This is simply the order in which various devices are chained together. (For that reason, the entire collection of such devices is generally referred to as a signal chain.)
The first stage in a signal chain is always the sound source—for example, the keyboard you’re playing, or a vocalist singing. From there, the signal flows into various other devices. If you’re performing, it would be routed to a channel input on a mixing console; if you’re recording, it would be routed to an audio interface, which converts the signal from analog to digital; from there, it’s sent to a virtual channel in your DAW. (In either application, microphone signals would first be routed to external or internal mic preamps—more about this shortly.)
The audio signal then moves on from the channel or track output to various signal processing devices or plug-ins, and finally to the master channel or bus. The output of the master channel/bus is sent to a power amplifier, and then on to loudspeakers or headphones so you can hear (“monitor”) it. There are also usually other mechanisms (such as PFL, short for “Pre-Fade Listen,” and AFL, short for “After-Fade Listen”) that allow you to hear the signal prior to the master channel/bus. You can also use various auxiliary (“aux”) sends to route signal to signal processors and/or plug-ins such as reverbs, delays, etc. (more about these shortly), and there are typically ways to monitor those sends and/or their “return” signals.
Unity Gain
As we’ve seen, a typical signal chain provides you with many different gain stages. In most cases, a good level to aim for at each stage is unity gain, which means that the device is neither attenuating (cutting) nor boosting the signal and is therefore having minimal effect on volume … though it still may be having a significant effect on the quality of the sound. It’s easy to find out if a device is at unity gain: simply turn it on and off and listen (or check your metering) to determine if the volume changes. If it doesn’t, the device is at unity gain; if it does, you might want to consider adjusting its input or output control. (It’s worth noting that gain reduction devices such as compressors—see below—normally receive signal from channel or bus inserts. These are simply “breaks” in the signal path that always route signal at unity gain.)
Gain Staging for Live Performance
To illustrate best practice for gain staging in live performance, let’s suppose you’re a keyboardist performing onstage with a synthesizer or stage keyboard, and that you do a little singing too. Let’s suppose also that your PA system consists of a mixing console and a pair of powered speakers.
The goal here is to allow your audience to hear you (and your fellow bandmembers) as clearly as possible. As longtime Blue Oyster Cult soundman Steve La Cerra writes in his excellent Yamaha Music “Tools of the Trade” blog column entitled Everything You Need to Know About Gain Staging, “when gain staging is set properly, you can get every last decibel out of your PA system, with minimal noise and maximum clarity.”
To ensure that you don’t blow everyone’s heads off during sound check, start by setting your powered speakers at a conservative level, at around 50%. After you get the best mix you can (peaking at around 0 dB on the master bus), you can then bring up the level controls on the speakers until you reach your desired volume.
Next, you need to make sure that you plug your gear into the correct jacks. Mixers provide a variety of inputs to accommodate both microphone and line-level signals. (Sometimes there are direct inputs for instruments, too.) Line-level signals (which typically come from things like outboard effects, computers and CD players) are much stronger than microphone signals, so mic inputs incorporate a preamp that raises that weak signal up to line level. (Instrument level falls between mic and line level.) If you plug a keyboard into a mic input, you’re probably going to overload the input, resulting in distortion even when the channel’s input gain control (sometimes called “trim”) is turned all the way down.
So begin by plugging good quality cables into your keyboard’s stereo outputs—not its mono output. This is important to obtain the best sound, since the voices in these instruments were originally sampled in stereo. If your mixing console has dedicated instrument inputs, plug the other end of the cable into a pair of those; if not, connect the cables to a couple of DI (“Direct Inject”) boxes. These are designed specifically to raise instrument levels to line levels. Using good quality cabling, connect the line-level outputs of those boxes to a pair of line-level inputs on your console. Start by setting your keyboard’s master output control to roughly 60%. This gives you plenty of leeway if you need to raise or lower its volume as you get further into the gain staging process.
A good way to begin setting levels is to put each channel, one at a time, into PFL (Pre-Fade Listen, which allows the main output meter to show the level of that one channel before its fader) then adjust that channel’s input/trim knob while watching the meter. It’s important to leave a bit of headroom, of course; La Cerra recommends that you set things up so that all instrument and vocal signals read roughly -6 dB most of the time. If you set the gain on a vocal mic to read 0 dB when a singer is at average volume, for example, the signal may distort when they get loud.
What if you turn a channel’s input/trim control down all the way and the meter is still at “0”? In that case, look for a Pad switch on the channel and use it. This lowers the sensitivity of the input to reduce the chances of a signal overloading it, thus reducing the possibility of distortion. Some microphones have their own built-in pads to allow them to be used on loud sources like kick drums or guitar amps. They’re actually preferable to channel pad switches because the microphone’s internal circuit is the initial “gain stage.” If you’ve overloaded the microphone, you’ll get distortion even when the input level reads well below 0 dB. Be aware, however, that pad switches (on both microphones and channel inputs) have a tendency to decrease the signal-to-noise ratio, so try to avoid using them unless necessary.
A very important part of gain staging in live performance is setting fader levels. Ideally, all the faders on your mixing console (including the master bus) should be somewhere near unity gain—that is, at 0 dB (there are clear markings to indicate this). That’s because, the closer you get to the bottom of a fader, the less resolution you have. At near bottom, one tiny movement could change the volume by 10 dB or more, whereas if the fader is around 0 dB, that same tiny movement might just change volume by a quarter dB or so, giving you much more control as you mix. In addition, if you have a channel fader way down, chances for distortion are much higher since you’ll need to compensate by turning its input/trim control way up.
Although few live sound mixing consoles provide detailed channel metering, most include indicators on each channel (usually an LED labeled Peak, Clip, or OL) to signal when an incoming peak crosses a threshold just below clipping. One good way of achieving proper gain staging is to turn up each channel’s input/trim control until that indicator light flashes at the loudest peaks, and then back down the gain by about -15dB. This will ensure a strong signal, while providing a buffer of extra headroom to prevent clipping. From there, you can use the channel faders to attenuate volumes, thus reducing noise as you mix rather than boosting it.
If you’re applying EQ, be aware that each frequency band is its own gain stage. Any bands at 0 dB are at unity gain and therefore won’t affect overall headroom or noise floor. But once you start cutting or boosting bands, the gain staging will be altered. In general, cutting is better than boosting since it won’t overload the gain structure, and, as a bonus, will also decrease any noise in the selected frequency band. If you do need to boost any bands, be careful not to apply too much or you run the risk of introducing distortion.
And while compression (a technique that reduces the gap between the softest and loudest part of a signal) is a great way to bring up the average loudness of an instrument or microphone, the unfortunate fact is that the more you compress a signal, the more you need to use a control called makeup gain to restore the level, which in turn raises its noise floor. So be conservative when it comes to using that control—the idea is to restore the sound back to its original level, and no more.
As mentioned previously, effects (which normally receive signal via auxiliary sends) present another challenge for proper gain staging. Reverbs or delays can quickly build up a significant volume increase, and many modulation effects such as phasing and flanging sweep a peak boost that can drive a channel into distortion if you aren’t careful. Also be sure to set all aux sends carefully so they don’t overload the effects devices.
Last but not least, if your mixing console offers highpass filters on its channel strips (most do), use them whenever possible. These handy switches cut out low-frequency information that you probably don’t want to hear anyway—things like stage rumble coming from mic stands as performers are stomping around, as well as handling noise and wind. By judiciously filtering out the low frequencies from signals that don’t need extended bass (i.e., virtually everything except kick drum and bass), you can cut a good deal of noise out of your system.
Gain Staging for Recording
Most of the live performance gain staging advice we’ve presented applies during recording, with a few significant differences.
First of all, the signal from your keyboard and/or microphone will be connected to an audio interface instead of a live sound mixing console. This is simply a device that serves as the bridge between your mixer and computer. It typically provides a number of mic, line and/or instrument inputs, built-in mic preamps (for the microphone inputs), and outputs that can feed headphones and/or external powered speakers (or a power amp). For example, here’s the front panel of a Steinberg UR-44C audio interface:

In addition to these analog inputs and outputs, audio interfaces also provide a digital connection to your computer, most usually via USB or Thunderbolt. This is what allows you to bring signal in and out of your DAW software. Internal analog-to-digital converters (“A/D converters”) take the electrical signal coming from your instrument or microphone and convert it into a stream of numbers that your DAW can understand. After you finish blending and processing those digital signals in the software, internal digital-to-analog converters (“D/A converters”) do the reverse, changing those streams of numbers back into electrical signal that you can hear in connected headphones or speakers.
As you can see from the picture above, each input (in this case, four of them) has its own input gain control, which is equivalent to the input/trim control found on each channel of a mixing console. Most DAWs also provide software emulations of input controls, but the hardware controls on the audio interface come first, and their setting is critical to correct gain staging. Fortunately, they can be set in exactly the same way as the ones on live sound mixing consoles.
Another key difference is that, most of the time, you’ll be using software signal processing plug-ins during recording, as opposed to the kinds of hardware signal processors typically used during live performance. Most plug-ins have their own output level control and many also offer an input gain control. These need to be set carefully, the same way as you would with a hardware signal processor.
Especially when working with plug-ins, one important reason for gain staging is to ensure that the devices in your signal chain are actually improving your sound. Bring them in and out repeatedly (this is usually best accomplished with a mute switch) to ensure that this is the case, and also to check for unity gain and any areas where overload distortion may be creeping in. Here, as with live performance, metering is critical! The good news is that most DAWs offer comprehensive built-in metering, often with many more choices than you’ll find on most live sound consoles. In addition, they typically provide dedicated meter plug-ins that can be inserted wherever you like in the signal chain, allowing you to easily set appropriate levels at every point.
Last but not least, remember this caveat, especially when mixing: To the human ear, louder always sounds better. For that reason, keep your monitoring levels moderate and make sure your gain staging is correctly set. It’s okay to pump the volume up every once in awhile, but never at the expense of introducing overload or distortion.
Gain Staging When Creating Synth Sounds
Gain staging, of course, is just as critical when doing synthesizer programming as it is when you’re performing or recording. As mentioned previously, it’s important that you always monitor your synthesizers and stage keyboards in stereo, not mono. That’s because the samples that make up the sounds you’re tweaking were almost certainly created in stereo originally.
An important part of gain staging during synth programming is to set your instrument’s main output level (sometimes labeled “master volume”) so that it is neither too weak (which can yield a poor signal-to-noise ratio) nor too strong (which can induce distortion). A good starting point is roughly 60% of maximum—this should give you adequate headroom for most situations.
If you’re monitoring over headphones, check to see if your instrument offers a separate headphone output; if not, the main output level/master volume control probably determines signal strength. Bear in mind that all headphones are not created equal; due to something called impedance, some may sound a lot louder than others even when your instrument is set to the same volume level. Listen carefully to make sure that no distortion is creeping in at the listening levels you use—if it is, you may need a different set of cans. If you’re monitoring over speakers, you’ll need to set their input gain (or that of the amplifier powering them) appropriately too, using metering when available to check that you’re not overloading them.
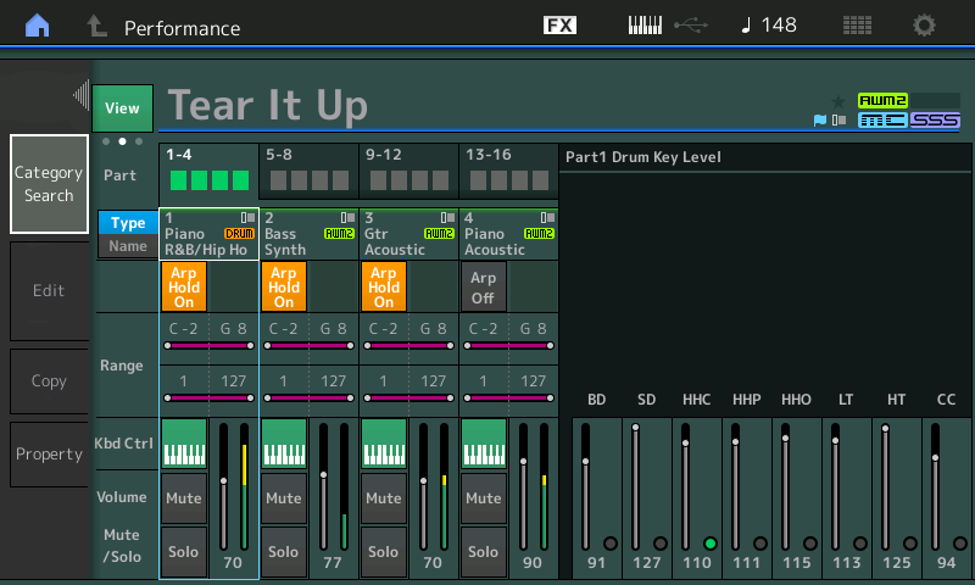
Some synths (for example, Yamaha MONTAGE and MODX) offer internal mixers—complete with metering—where, as shown below, you can control and monitor the relative levels of parts and/or individual drum sounds as you blend them together.
Even those synthesizers that don’t offer a full-fledged internal mixer will likely provide numerous internal gain stages such as reverb sends and returns, A/D (analog-to-digital) inputs (these allow you to plug in an external mic or line-level source) and the like. The same caveats that apply to signal processing (especially when applying EQ) during live performance and recording apply here: Improper gain staging at any of these points can result in a weak, or worse yet, overloaded and distorted signal. Refer to your instrument’s owners manual for specific details as to how to access these various inputs and outputs, and always check them carefully as you craft your sounds.
List of Gain Stages
Depending upon the gear you’re using and whether you’re using your synthesizer or stage piano in live performance, for recording, or are simply tweaking sounds, these are some of the gain stages you may encounter:
- Microphone pad switches (if present)
- Microphone preamplifier input gain/output level
- Synthesizer or stage keyboard internal module input gains, including effects processors
- Synthesizer or stage keyboard internal mixer controls
- Electronic instrument output level
- Audio interface input gain/output level
- Mixer channel input/trim gain controls
- Mixer channel faders
- Aux sends and returns
- Outboard signal processor or signal processing plug-in input gains
- Mixer bus faders
- Mixer master bus output level
- Powered speaker or power amplifier input gain
Setting appropriate levels at each stage is the key to ensuring that you wind up with the best quality sound possible, so keep close tabs on those inputs, outputs and meters. Your ears will thank you for it!
For more information about live sound, check out the “Tools of the Trade” postings on the Yamaha Music blog.
For more information about live sound, check out the “Recording Basics” postings on the Yamaha Music blog.
For more information about synthesizer programming go here.