I like to use an expression pedal to dynamically adjust the volume of certain parts, e.g. gradually bringing in strings and pads on parts 2-3, while the volume of the piano and drums on parts 1 and 4 remains unchanged. I can achieve this by setting FC1 to OFF for parts 1 and 4 (Parts – Common – Mod/Control). However, if I do this I can no longer adjust the volume of parts 1 and 4 using the part sliders, even though Vol/Exp is set to ON.
How do I control a part’s volume using the sliders, while excluding this part from expression pedal changes?
A: Don't Assign Part 1 - 4 Volume control to anything. This means dredging through whatever Assign controls are already programmed for Parts 1 - 4, finding and deleting the ones that have "Part Volume" as their destination/target.
Thank you Antony, but I'm afraid I don't understand how this answers my question. I would like to use the sliders as faders for adjusting the relative volume of parts (parts balance), while using the FC-7 pedal to dynamically control the volume (accents) of certain parts (e.g. in jazz style organ playing). How do I achieve this by not assigning parts volume control?
You have to decide which Parts you want to control with the Expression Pedal and which parts you want to control with Sliders.
Each Part has to be either Expression Pedal (Control Assign) or Fader/Slider. It can't be both. It is Slider by Factory Default (no Assigns), but bear in mind, if you started with a Factory Preset Performance, it will likely have "Control Assigns" and it is also likely that Part Volume will be included in those Assigns.
Also remember there are up to 8 Parts per Performance. Each Part's volume can be controlled relative to the other Parts.
But there are also up to 8 Elements (waveforms) per Part (AWM2). And each Element's Volume can be controlled relative to the other Elements in that Part. A good example of this is an Organ where each Element is a different footage and the Sliders can act like Organ Draw Bars.
Back your initial query. Lets say you created an Ensemble Performance.... Horns, Cellos and Violins. Each Part is a different "accompaniment" Section (Part 1 Horns, Part 2 Cellos, Part 3 Violins). Then lets say you wanted a Violin Solo in the Middle of the song. You could add/make a Part 4 "Solo Violin". You keep Parts 1, 2 and 3 on Sliders so you can keep them constantly in balance (adjusting for venue acoustics for example, or just general effect). However, you would likely put Part 4 Volume on an Assign Control/Expression Pedal. Then when the solo happens, you floor the expression pedal and the Solo Violin comes in louder over the accompanying Parts 1, 2 & 3. Lift off the pedal and fade out the Solo Violin to silence/muted.
You could also set up clever Cross Fades between Parts, but you need to be pretty clued up on how to use Control Assign Curves and Ratios, Motion Control/Sequence Curves along with the Super Knob. Bedtime reading... get stuck into the Reference Manual, because its a lot more complex than anyone could write here.
But for illustration, the end Result would allow you to use the Super Knob as a rotary "Emphasis Selector". For example at 7 Oclock, all is equal, at 9 Oclock Horns are Emphasised, at 11 Oclock Horns & Violins, 12 Oclock Violins only, 2 Oclock Cellos and Horns, 3 Oclock Violin Solo, 5 Oclock Violins and Cellos, Horns Silent. It would require the use of User Curves, I can tell you that much. That's what I would call "Super User" knowledge. I still haven't got round to figuring it all out yet, although I will at some point.
In this case though, you would be sacrificing the Slider functionality for ALL Parts, and effectively handing it over to the Super Knob. But if done properly, you wouldn't need the Sliders, you could do it all from the Super Knob.
Thank you Antony. Though not what I hoped, it's good to know that the volume for each part has to be either Expression Pedal (Control Assign) or Fader/Slider controlled. Your ensemble example provides a feasible solution, so thanks for your help. The Super Know solution sounds very exciting, but as a new MODX user, I better get familiar with the basics first!
@Rob
I like to use an expression pedal to dynamically adjust the volume of certain parts, e.g. gradually bringing in strings and pads on parts 2-3, while the volume of the piano and drums on parts 1 and 4 remains unchanged. I can achieve this by setting FC1 to OFF for parts 1 and 4 (Parts – Common – Mod/Control). However, if I do this I can no longer adjust the volume of parts 1 and 4 using the part sliders, even though Vol/Exp is set to ON.
How do I control a part’s volume using the sliders, while excluding this part from expression pedal changes?
There are several ways to accomplish this…
You can program each Part to behave as you desire. And what you are asking is certainly possible.
I’ll try to post an example you can look at…
Part 1 Acoustic Piano “CFX Stage”
Part 2 Strings “Back Ground”
Part 3 Pad “Poly Synth Pad”
Part 4 Drums “T’s Hip Hop Kit”
Of course you can use whatever programs you wish. I placed these four Single Parts into an “Init Normal AWM2” Performance.
Method using the Super Knob
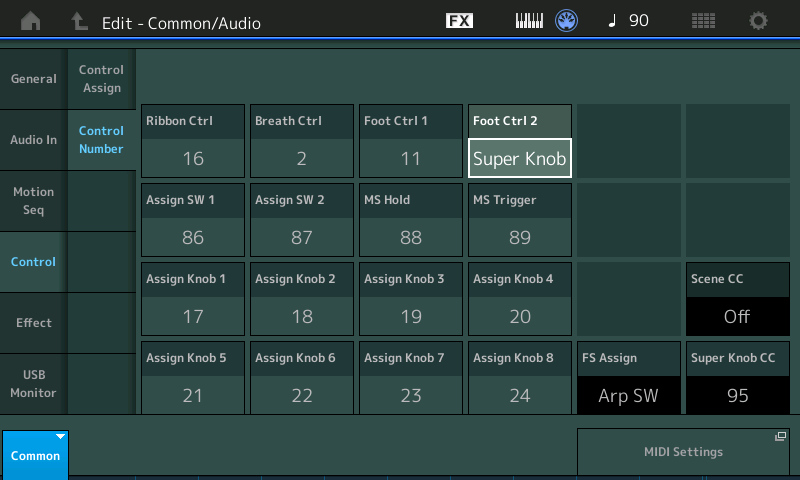
From the HOME screen:
Press [EDIT]
Touch “Control” > “Control Number” > here you can choose what your FC7 is set to send. Foot Ctrl 2 = Super Knob
Make sure your FC7 is set to control Super Knob.
In the attached example you can see the initial Volume settings of the different Parts viewing the on screen sliders:
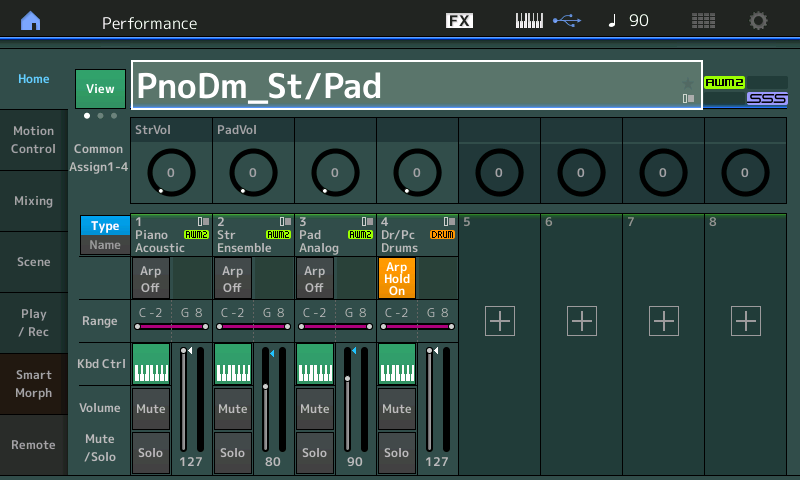
You can see also that COMMON Assign Knobs 1 and 2 are individual Volume Controls for the Strings (StVol) and Pad (PadVol), respectively. And these two Common Assign Knobs are linked to the Super Knob position. As you move the Super Knob you are turning up the Volume of both the Strings and the Pad sound. Or of course you can manually adjust either Knob directly. And of course, the Super Knob is under control of your FC7. Heel down position will reduce the Volumes of the Strings and Pad to nothing, and toe down position of the pedal will give you full volume on the Strings and Pad... The Curve, Polarity, Ratio, and Param1 can be used to shape how the sound change in volume... a setting for “Param 1” higher than 5 will cause a slower rise in volume as you move the Super Knob. A setting less than 5 will cause a more rapid change in volume… see below
Within PART 2 (Strings) the first available Part Assign Knob is Knob 3.
I've added "+" a Destination = Part Volume.
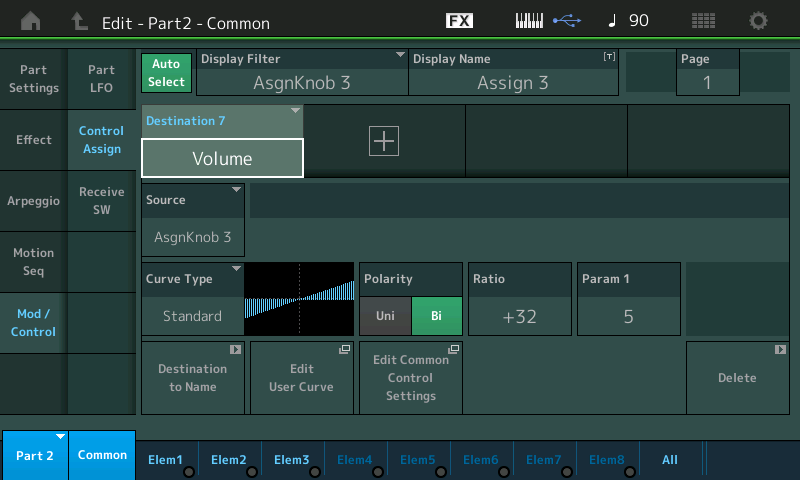
Within Part 3 (Poly Pad) the first available Part Assign Knob is Knob 3
I've "+" added a Destination = Part Volume
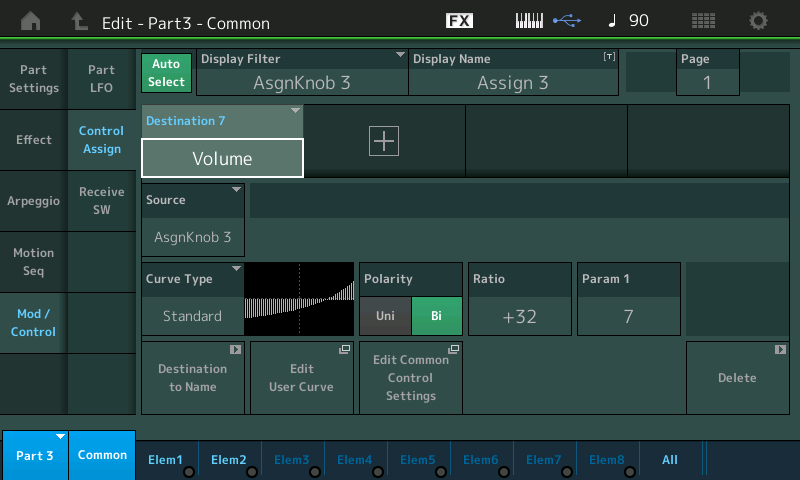
In each of the two PARTS the Curve, Polarity, Ratio, and Param1 have been set so that when the Super Knob is engaged moving clockwise you are increasing the output along the Curve you see. the Piano and Drum Kit do not change Volume (fixed) but you have access to Parts 2 and 3 directly with a dedicated Knob for each, together via the SuperKnob/FC7 pedal, and via the Sliders
Then on the upper Common level (you can get there by tapping the shortcut box "Edit Common Control Settings"
On this upper level of the architecture I've "+" added a Destination for PART 2 ASSIGN 3
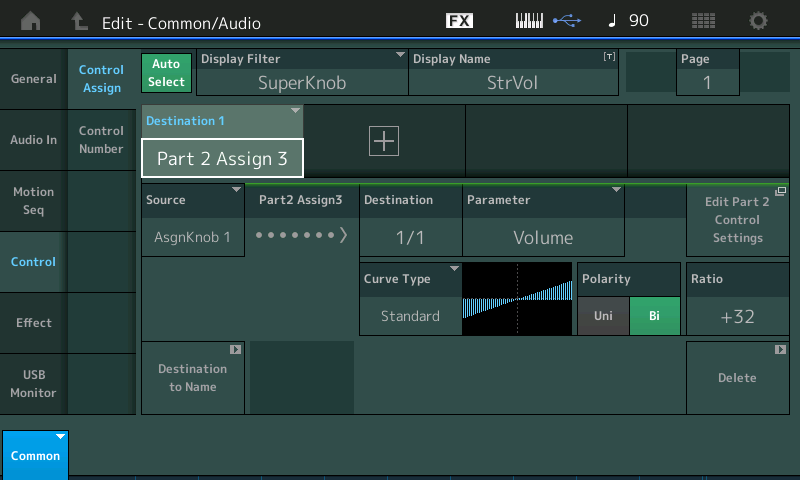
What this does is assign the first available COMMON Assign Knob (Assign Knob 1) to address Part 2's Assign Knob 3... which is string VOLUME
And a Destination for PART 3 ASSIGN 3
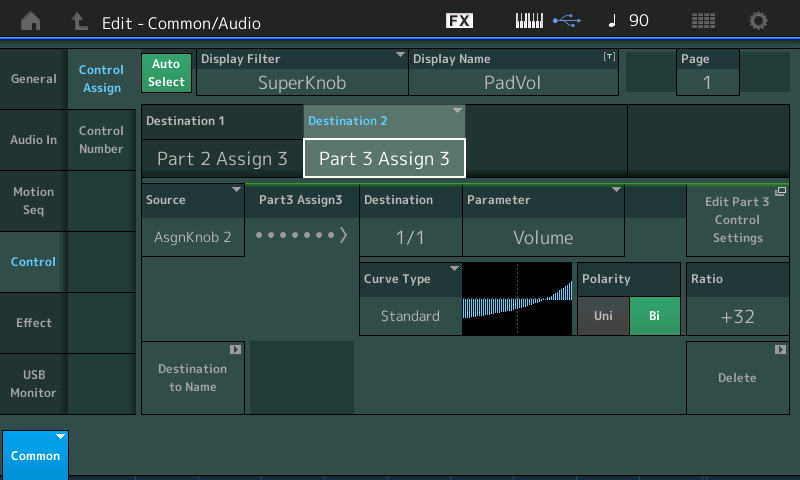
What this does is assign the next available COMMON Assign Knob (Assign Knob 2) to address Part 3's Assign Knob 3... which is pad VOLUME
Attached is a MODX CONNECT PnoDm_StPad.X8B file zipped.
Open with MODX CONNECT - which will send it to your instruments Edit Buffer.
The Alternate Method would be to assign the PART VOLUME of Parts 2 and 3 to a Foot Controller sending CC4, for example.
Thank you so much for your help Bad Mister! I really appreciate it, esp. because getting this right is important to most of my future performance settings, and presumably for others as well.
I’ve tried to apply your method using the Super Knob. This works, which is great! However, there is one problem: strangely the pad and strings volume decreases when moving towards toe down! Can you let me know how to reverse this?
According to the screenshots, the COMMON Assignable Knob 3 controls the relationship of the superknob direction (CW/CCW) to the direction of downstream Part 3's volume.
OPTION 1
One thing you can do is edit the common assignable knob high/low and flip them to reverse the polarity of this knob as controlled by superknob.
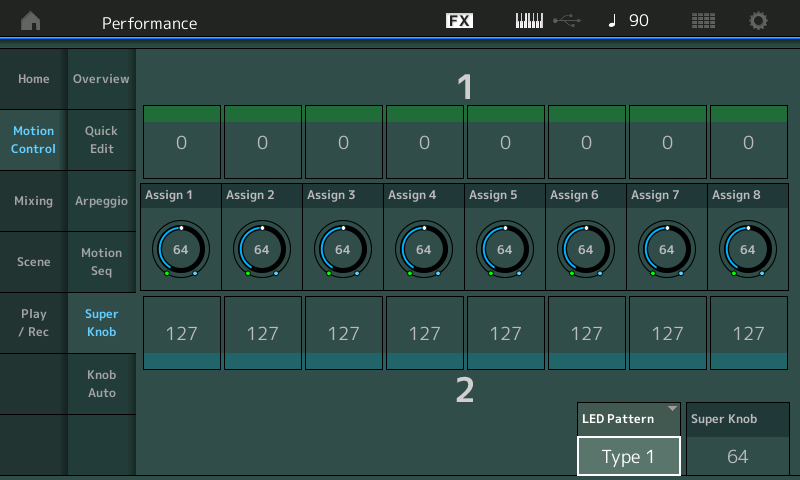
See "assign 3". The green box above assign 3 is one side of the range and blue box below assign 3 is the other end. Flip these values to reverse the polarity (see how assign 1 in this picture has a different polarity than the rest).
As a side note - the above picture is not (necessarily) of the Performance you're working with. It's a generic picture to convey the screen to go to. You can get here by pressing the Performance name on the touchscreen (after [PERFORMANCE] (HOME) ), then choose edit, then navigate to the menus shown.
OPTION 2
Another option is to go to the "Edit - Part3 - Common" screen above (Bad Mister) with a standard curve of ratio +32 and Param 1 of 7. Change the ratio to -32.
Current Yamaha Synthesizers: Montage Classic 7, Motif XF6, S90XS, MO6, EX5R
Thank you so much for your help Bad Mister! I really appreciate it, esp. because getting this right is important to most of my future performance settings, and presumably for others as well.
I’ve tried to apply your method using the Super Knob. This works, which is great! However, there is one problem: strangely the pad and strings volume decreases when moving towards toe down! Can you let me know how to reverse this?
Sorry, not sure what you are working with…
But in general, the RATIO parameter in the Part’s Control Set determines the direction of application. In my example, the +32 means as the Knobs moves clockwise, minimum-to-maximum, the Destination parameter (Part Volume) in increased. By setting the RATIO to a negative value in both Part 2 and 3, you will reverse the direction of application.
Another method would be to leave the Part RATIOs as positive, but reverse the Common Assign Knob that they are linked to.
In my example, Part 2 Assign Knob 3 is set to String Volume and is linked to Common Assign Knob 1
In my example, Part 3 Assign Knob 3 is set to Pad Volume and is linked to Common Assign Knob 2
Shown below are the Common Assign Knobs 1 and 2 reversed -- Green is normally minimum and Blue is maximum, here they are reversed:
From HOME > touch "Motion Control" > "Super Knob"
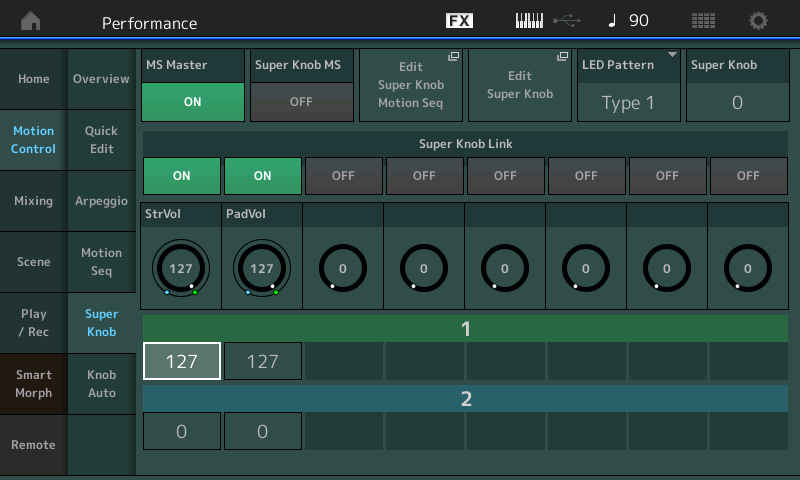
In the upper right corner you can set where you want the Super Knob to start when you initially recall the Performance - this will determine if the Strings and Pad sounding or not.
Thank you all, mission accomplished!!
