Notifications
Clear all
MODX/MODX+ Series Synthesizers
14
Posts
4
Users
0
Likes
1,930
Views
Topic starter
Hi there
I was trying to recreate the repetitive (drone?) mid-bass sound from Blondie's Heart Of Glass - it seems to be used in a lot of songs of that era..
I was playing around with the effects - Slice/Slice Beat and Tempo Flanger/Jet - I may be off the mark in terms of the simplest/best way to do it.
I was wondering if there were any arps that could achieve this sort of thing.
I have come across some arps called slice, filter, gate, etc. however some of them do not seem to have any effect on the part?
Is there reference area explaining how these different arps work?
Posted : 23/08/2020 12:13 pm

They're going to be control ARPs - not note ARPs.
See "some exceptions" portion of: https://www.yamahasynth.com/ask-a-question/arp-on-off-on-i-hear-no-sound
Also discussed here: https://yamahasynth.com/ask-a-question/create-user-arp-for-rhythm-no-matter-how-many-notes-are-pressed
Posted : 23/08/2020 2:21 pm

I have come across some arps called slice, filter, gate, etc. however some of them do not seem to have any effect on the part?
Arp Phrases that are not Note data, are Control data (Expression cc11, Pan cc10, Cutoff cc74, Resonance cc71, As1 cc17, As2 cc18, PB). These Control Arp Phrases make no sound, therefore to use these the Arpeggiator allows your key presses to pass and trigger the Tone Generator directly... then the Control data from the Arp Phrase is applied to the notes you play. For the Control Arp Phrases to work, you must set the Arpeggiator’s Key Mode = Direct.
Here is where the notes you play are heard - because what the Arp Phrase is adding is Control data that is manifest on what you play. You hit a chord, which is heard... the Controller Arp applies the filter sweep, or the pitch bend, or the rhythmic gating Effect, etc., etc. it is this concept of Controller Arp Phrases that is behind the Motion Sequencer. Instead of sequencing notes, the Motion Sequencer sequences parameter control.
There are a couple of Hybrid Key Modes (Sort+Direct, Thru+Direct). These combine Note Arps and Control Arps.
And there are Velocity Zoned Arpeggio Phrases... that work with specific Velocity note-on ranges... allowing certain portions of a Part to play normally and notes above or below a certain range to be arpeggiated.
I was trying to recreate the repetitive (drone?) mid-bass sound from Blondie's Heart Of Glass - it seems to be used in a lot of songs of that era..
You could recreate that sound by setting up the rhythm using an LFO, an Arpeggiator...a note could be retriggered or you could hold a note and have a “gate” open and close in rhythm... yes, a very common ‘synth-thing’ of that era.
Of course, you could attempt to play it, but the automation is an important part of the overall effect. It is more efficient to “hold” a Bass note and let the LFO ‘gate’ the sound. (A ‘gate” allows sound while open and cuts off sound when closed). But as you realize, a repeated note Arpeggio could just as effectively be used. Among the “CTRL/Hybrid” Arp Types you will find many of the ‘classic’ 80’s gated note phrases... you must set the Part’s “Arpeggio” > “Common” > so that “Key Mode” = Direct
Other options include the awesome Effect processing found in the MODX. If you are looking to do exactly what is represented in Blondie ‘Heart of Glass’ — using an Insertion Effect might be overkill... but might also lead you to something in that same vein but that goes into more possibilities (particularly on what happens to the repeats).
The “Beat Repeat” Insertion Effect is worth exploring.
Additionally, the “Motion Sequencer” is an expansion of the “control Arp” Concept — in other words, the Motion Sequencer is like an Arpeggiator for parameter changes. You can design your very own custom changes of any assignable parameter. These parameter movements can be looped (or not), can be linked to and reference the clock tempo, or triggered on-demand.
So very much like you can create your own “note oriented” Arpeggios with the Sequencer, the Motion Control Synthesis Engine allows you to create your own controller movement ‘phrases’ (Motion Sequences) with an extremely wide pallet of parameter destinations. It is very much a programmable Control Arp maker... These parameter movements make no sound of their own, they are applied, in real-time, to the sound of the Part(s) you are directly playing and have assigned to follow its messages.
The 16-Step grid makes programming rhythmic controller movements quick and easy.
You can target specific parts of a sound to respond to the MSeq via the Control Assign matrix.
...
Posted : 23/08/2020 2:51 pm
Topic starter
Thanks Jason and BM!
Looks like I've got some exploring to do!
You could recreate that sound by setting up the rhythm using an LFO, an Arpeggiator...a note could be retriggered or you could hold a note and have a “gate” open and close in rhythm...
When you say using an LFO, is this with the arpeggiator or a separate method? Or maybe both are possible?
I have tried using an initial sound and then working in the element pages to create a gated effect but this is a pure gate and does not give the Flanging (? not sure if this is the effect ?).
Otherwise I can just randomly search in the Cntl/Hybrid Arp section and one day hope I'll find a basic straight sixteenths gate with a sweeping flange like effect overlaid. (Or maybe I should be creating a flanging type bass and then apply the gate to it.)
Also, I am not sure in my reading - can you create/control your own gate using an LFO?
Posted : 24/08/2020 6:03 am
Find a Synth sound you wish to use...
Assign the “Ctrl/Hybrid” Arp phrase named “Slice 16“ — this does just what you need! You drone the note - it creates the gates.
Set Hold = On
Set the KEY MODE = Direct
This will create tempo driven 16th Notes for the repeated note effect.
The filter movement (Cutoff) sounds as if it is done manually but you can automate it using a Motion Sequence to manipulate the Cutoff Frequency of the Elements involved ... or you can assign an LFO to slowly open an close the filter. It sounds manual because it does not consistently open and close... You can experiment with each to see what works best for you.
Posted : 24/08/2020 7:12 pm
Topic starter
Thanks again BM!
This is all new territory for me !
I am wondering if you can set up the arp and Motion Sequencer and then audition it with different Parts - I'll try it out...
Posted : 25/08/2020 4:54 am
Topic starter
Hi BM,
You said
or you can assign an LFO to slowly open an close the filter
however this is my limitation - I don't even know how to do this?
I have also tried using the motion sequencer to the same end, but as yet no success.
Can you point me in the direction of any tutorials re the above?
Posted : 25/08/2020 9:50 am
Ok, no problem. Here’s an idea of how you can put this all together.
Select a Single Part synth sound that is close to what you want to accomplish... or start from scratch by selecting “Init Normal (AWM2)” and select a Synth Waveform you wish to build up from.
Shown below is the process to go about putting this 16th Note “Pulse” together.
I found a Synth Bass sound that is within tweaking range: Preset “Unison”
What makes this ‘within tweaking range’ is the synth tone and the fact that each of the three Oscillators has a Low Pass Filter assigned.
__ I have determined that the movement you hear in the sound is actually Filter Cutoff Frequency changing. And the closer you listen, it can be determined the keyboardist is manually moving that Cutoff Frequency (an LFO would either be in tempo or follow its own tempo consistently, the movement is very ‘human’ ) — the Filter Cutoff Frequency is used to animate that pulsing sound.
__ you can choose any controller that is convenient to do this animation. You’ll want to set it up so that you are moving through a specific range of timbre for this sound. In other words, the minimum and maximum setting is pretty critical.
Because this sound is going to be used in a larger Performance - I will only concern myself with Part parameters (upper level COMMON parameters are best left for when you place this sound into your final “Heart of Glass” Performance). Remember, all the Parts of a Performance must share the upper COMMON Assignments... so deciding what happens there is best left til the end... of at least until you have assembled all the instrument Parts.
Call up “Unison”
Tap the Tempo value on the HOME screen and change it to 116 (or there about).
Touch Part 1 to *select* it
Press [EDIT]
Touch “Mod/Control” > “Control Assign”
Set the “Auto Select” to active (green) — this allows you to move a controller and review what is assigned to it.
Set the “Display Filter” = All
There are four potential PAGES of Control Assignments.
By reviewing the “Destinations” you can discover what things are already assigned. You should review them and eliminate those you are not going to be concerned with:
Destination 1 = E.LFO PMD (Element LFO Pitch Modulation Depth) - the Common musician terminology is “vibrato”. The Source or physical controller is the MW. This allows you to add vibrato while performing. The PMD (Pitch Modulation describes vibrato, Depth is the application/bringing it in. For this particular pulsing sound we definitely do NOT need this assignment.
Tap DELETE in the lower right corner to remove this assignment
Destination 2 = Elem Level - here Part AsgnKnob 1 is controlling the output level of Elements 2 and 3 (not Elem 1) See the Element Switch is OFF for Element 1
FYI - this AsgnKnob is linked to the Super Knob (in fact, it is the only Part Assign Knob linked to the Super Knob)
Destination 3 = InsB EqLoGn (Insertion Effect B Equalizer Low Freq Gain) is assigned to Part AsgnKnob 2. Customize to taste
Destination 4 = Cutoff - here you can see each of the 3 Elements are being effected by this assignment... notice it says the Source (Controller) is Ribbon... you may have noticed that your MODX does not have a Ribbon. We will move this to the MW. Because this sound is not going to need vibrato as a performing control, we can assign the MW to be the control to manipulate the Cutoff Frequency of the Filters
Tap the box “Source” and change the Ribbon to Mod Wheel.

the other settings:
Curve Type = Standard
Polarity = Uni
Ratio = +10
Param 1= 5
Raise the MW to hear the Filter Cutoff Frequency move in response to its position.
MW at minimum should be rounded, and the timbre should get more focused as you raise the MW.
If you wish to get brighter, raise the Ratio (careful, not too much
Use “Param 1” to shape the Curve... lower numbers here make the change happen sooner in the travel of the MW. Higher numbers delay the brighter timbre until you have moved the wheel significantly... set to taste (it’s a matter of how much you wish to engage the wheel.
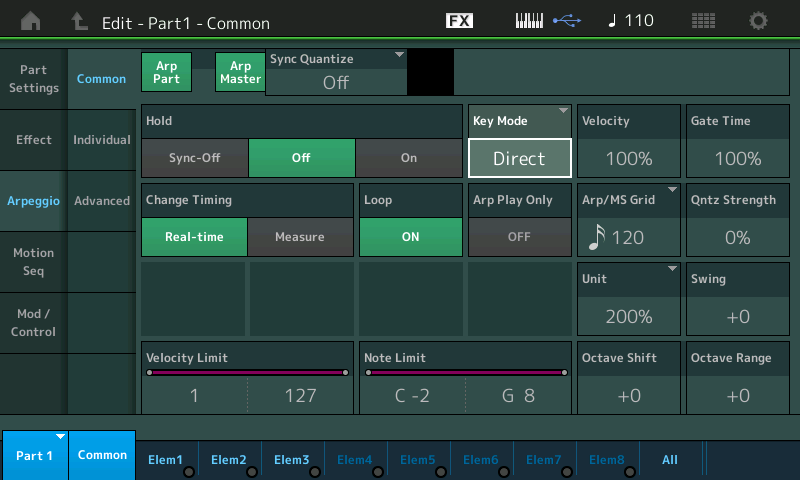
Touch “Arpeggio” > “Common”
Set “Arp Part“ and “Arp Master“ to active (green)
Set the “Key Mode” = Direct

Touch “Individual”
Tap “Arp 1” to see a pop-in menu
Tap “Number”
Enter Arp # = 10121 (Slice 16)
Touch “Done”

NOTES: I selected the MW - but you can select any Controller that fits what you are doing. If you need the MW for a different PART or if you want to automate the Filter Cutoff movement you can choose to use one of the following methods... For example... you can
Say you want to have a Motion Sequence open and close the Cutoff Frequency of the Filters for you...
On the Control Assign screen - recall Destination 4 = Cutoff -- you can do so by moving the MW
Change the SOURCE from MW to "MS Lane1" (Motion Sequence Lane 1) -- you do so by tapping that box to view the pop-in menu, select "MS Lane 1"

Tap the shortcut box "Edit Motion Sequence"

Here I have constructed a simple ramp up and back down... using the PULSE A set to HOLD
"Amplitude" here is how wide the FILTER movement is...

Tweak until you like what you have... Name and store this SINGLE PART Performance to your USER BANK. Name it something like “H of G Pulse”
You can add it to your "Heart of Glass" Performance.
Posted : 25/08/2020 7:16 pm
Find a Synth sound you wish to use...
Assign the “Ctrl/Hybrid” Arp phrase named “Slice 16“ — this does just what you need! You drone the note - it creates the gates.
Set Hold = On
Set the KEY MODE = Direct
This will create tempo driven 16th Notes for the repeated note effect.
Some great information in this thread. I hope I'm not guilty of hijacking but would like to ask a question about the above that I've quoted.
I did this and this works for me but only whilst I hold a key down. I was expecting it to latch the key because I'd set the Arp to Hold but it doesn't. Have I misunderstood this or maybe done something else wrong?
Thanks
Posted : 26/08/2020 7:36 am
Topic starter
Thanks Again BM for your kindness in helping me.
I was a little disappointed that I couldn't work it out by myself, but you gave me the full solution.
I am playing around with this solution with different sounds and settings, so that hopefully the workings of these controllers will become more ingrained in me.
I am still experimenting, and may be wrong - I have been trying to apply this to FM sounds, however it seems that the CUTOFF control does not have the same effect on FM sounds?
Posted : 26/08/2020 9:04 am
You’re quite welcome. You are working it out yourself, by asking a question, you are given some information that basically let’s *you* “connect the dots” - which is what learning is all about. Continue to experiment, that how you solidify what you’ve been shown. There are several new concepts here, but by experimenting you are creating those wrinkles in the brain that allow you to apply what you’ve learned — connecting the dots.
The differences in FM-X and AWM2 are significant. The AWM2 engine has eight independent Oscillator- Filter-Amplitude structures... each Oscillator is samples and each is quite autonomous. In FM-X the eight oscillators are different and often interact to create a sonic result. Those that actually make and output sound are called Carriers, those that modify are called Modulators... these FM oscillators are called Operators, each includes not only the tone source but the Amplitude Generator. Timbre change is created by changing “how much” a Modulator outputs to influence a Carrier... The more it interacts, the brighter and more complex the resulting tone.
In the AWM2 engine every Oscillator has its own Filter. In FM-X engine all Oscillators go through one Filter (the original FM engine had no Filters at all - timbre change was done by manipulation of the Modulator Index (output) applied to those Operators making the sound output. Yamaha added traditional Filter capability to improve FM-X’s ability to emulate analog synthesis engines. Filters change timbre by *removing* harmonics, quite a different paradigm from the DX7-style FM where no filters were provided. Timbre change was all about M:C relationships.
By the time the SY77 came around traditional Filters were added... a “Filter Sweep” is a traditional (Classic) analog synth sound (no acoustic instrument actually performs a Filter Sweep, per se, and changing the Output of Modulator to Carrier just doesn’t result in the same thing). Analog synths we’re famous for having just one Amplitude Generator and just one Filter ... which was shared by all Oscillators... both AWM2 and FM-X expand on the basic model of the analog synth as a entity...
As you’ve noticed in AWM2 you get a choice (Element Switch) that allows you to Opt In or Opt Out on a per Element basis on responding to the Cutoff offset. Because each Element is a synth by itself, you can select which ones are going to be affected.
In FM-X you apply one Filter to the *result* generated by the FM engine. The entire FM-X result passes through that one Filter (if one is applied). If you are hearing no Filter Cutoff change... check to see if a FILTER is even active in the program you have selected.
Notice that in FM-X sounds, the Filter is found on the Common level of the architecture, instead of the individual oscillator level...
Let us know which FM-X sound you are working with — we can introduce you the various ways you can apply harmonic change within FM-X.
FM-X: all Operators go through the one Filter
It makes no sense for FM-X to have a Filter on a Modulator... remember the FM BASICS... A ‘Carrier‘ is the equivalent of the bowed string in the violinist’s hands... you actually *hear* the bow being drawn across the string. The ‘Modulator‘ is the equivalent of the violinist’s left hand which is rhythmically altering the string length (vibrato)... this vibrato is meaningless if the Carrier stops outputting the sound. That is, if the bow stops, the application of the Modulator (vibrato) is meaningless. It is not heard by itself, you only hear the Modulator as it manifests change to the Carrier to which it is linked.
This also answers John question. The Motion Sequencer / Control Arps can be thought of as a kind of Modifier. You cannot hear it by itself, you only hear it as it manifests itself on the sound you are playing directly.
On Control Arps we set the Arpeggio KEY MODE = Direct.
This literally means the Notes we press on the Keyboard become the equivalent of the Carrier (they are carrying the sound we hear), while the Destination parameter you select to be sequenced (applied) is the modifier (Modulator equivalent). You cannot hear the modifier by itself.
“Control Arps” are the same thing as Motion Sequences!
They are similar to Note-oriented Arpeggios but use Parameter Change (Controller movement) instead of NOTE-ONs. Say your Control Arp is doing Expression (cc11) as in the example I gave above (Arp # 10121) = Slice 16... this is cc11 being applied rhythmically.
You cannot hear cc11 by itself. It makes no sound by itself.
I did this and this works for me but only whilst I hold a key down. I was expecting it to latch the key because I'd set the Arp to Hold but it doesn't. Have I misunderstood this or maybe done something else wrong?
Arp Hold would not have the trigger Note-on continue, what holding a Key down does in this case is continue to generate cc11 messages ... the reason you do not hear these messages is they “sound” EXACTLY like silence. You are raising and lowering the volume output but there is nothing on the radio, there is nothing to which to apply the volume change. The volume change is happening!!!
If you were Panning cc10, you would hear nothing — holding down the key, that action causes cc10 messages to be sent, you hear nothing because although the ‘Modulator’ (cc10) is active, you have no Carrier (Synth sound) to apply it to. We’ll say it again for emphasis: the modulator cannot be heard by itself, you hear it as it manifests itself on the carrier.
“Hold 1“ in MIDI = sustain Pedal.
The sustain pedal will manifest itself only on the notes that are sounding in response to YOU hitting the Keys...
It basically takes the place of YOU holding down the Keys physically.
If you want to understand completely how this applies to Arpeggios, think about the Sustain pedal on a synth, (there are no dampers, no felts, no strings are allowed to continue to ring) ... on an electronic product, Sustain = Hold 1, it simply takes the place of YOU hold down the keys physically.
The sustain pedal does not alter the Arp Phrase Notes like it would when YOU play a piano - instead pressing the sustain pedal on an musical Arp Phrase just simply lets it continue to HOLD (run) it does not work as you expect. It will continue to hold the controlling notes YOU pressed - not the notes the Arp is ‘pressing’... It does not influence the notes in the prerecorded Arp Phrase — it does not lift any virtual dampers.
In order for the Notes in the Arp Phrase to sustain (like a piano) you would have needed to record the Arp Phrase with the cc64 in the phrase data.
Applying the sustain pedal, after-the-fact, to a Control Arp simply takes the place of you holding the Keys... the controller data is continued (but applied to nothing... you have a violinist applying to vibrato to string that is not being bowed, you have been turning the Volume Knob up and down on a radio that is not ON.... you’ve been panning a channel on the mixer that is passing no signal.... you have cut down a tree in the proverbial empty forest—there is no one there to hear it.
So how do you get the Slice 16 “Control Arp” to continue — to latch? Answer: step on the Sustain pedal or set the HOLD = ON
You will only hear the data, however, when you additionally “bow the string“... ie, you must press the Keys and provide a Direct sound to which the controller change is applied.
So technically you have latched the “Slice 16” but you can only hear it when it is applied to something ‘carrying’ audio output (sound).
It’s that simple — and that complex!
Questions are the best way to learn... by asking the question you have reached a critical point in the process. Experimenting with the answer leads to the most positive of all results.
Thanks for the questions.
Posted : 26/08/2020 12:17 pm
Thanks for the great replies and thanks to the original poster for allowing me to ask something on his thread 🙂
Posted : 26/08/2020 5:34 pm
Topic starter
Thanks Thrice Mr BM!
You wrote
If you are hearing no Filter Cutoff change... check to see if a FILTER is even active in the program you have selected.
Notice that in FM-X sounds, the Filter is found on the Common level of the architecture, instead of the individual oscillator level...
I am not quite sure how to find the active filter - I go to the "Edit-Common Audio" page, which has a blue box bottom left with Common (not 2 boxes as when you are editing a part) but cannot see how to introduce a filter, or if one may be present?
When I press eg. Destination 1, I cannot find Cutoff under any of the options.
Due to a technical problem - being a malfunctioning sustain pedal, I am restricted to sounds with indefinite release/decay, so I am looking at the "Mowtown Y-Bass" sound for this exercise... (although I realise it is probably easy enough to apply a hold to any sound in the settings somewhere.)
Posted : 27/08/2020 12:29 pm
Here’s what’s happening. What follows is an important key to navigation of the Edit screens.
There are two major levels of the architecture. Performance and Part.
There is a Performance “Edit - Common/Audio” set of screens
And there is a Part “Edit - PartX - Common” set of screens
The first, Performance Common, address the overall Performance — all 16 Parts plus the Audio In Part. The things they all share ‘in common’ include: the Performance Name, the Super Knob, the 8 Common Assign Knobs, the System Effects, the Master Effects, the Master EQ
The latter, Part Common, address the individual synth Part components — the Part has 8 oscillators which all share ‘in common’ : access to the two Part Insertion Effects, the slew of physical controllers PB, MW, FC1/2, AsSw1/2, the 8 Part Assign Knob.
So there are technically speaking two different “Common”. Performance Common and Part Common.
There is one set of Performance Common/Audio screens... there are a set of Part Common screens for each Part active in a program.
The Part can be either sample based, AWM2 or it can be FM-X. The parameters you are looking for is a “Part - Common” parameter within an FM-X Part.
Call up the Performance you are working with...
Press [EDIT]
In the lower left corner you will see “Common”
Tap that to open the pop-up menu

Select “Part 1”
Next to “Part 1” in the lower left corner you’ll see “Common” indicating it is Part 1’s Common parameters.
The top line of the screen will read “Edit - Part1 - Common”
Tap “Pitch/Filter” > “Filter Type”
Here you’ll see that Filter Type = Thru (no assignment)

Basically, there are four different filters: LPF (Low Pass Filter), HPF (High Pass Filter), BPF (Band Pass Filter) and BEF (Band Elimination Filter). For details on Filter Types, see the Synthesizer Parameter Manual PDF document.
Settings: LPF24D, LPF24A, LPF18, LPF18s, LPF12+HPF12, LPF6+HPF12, HPF24D, HPF12, BPF12D, BPFw, BPF6, BEF12, BEF6, DualLPF, DualHPF, DualBPF, DualBEF, LPF12+BPF6, Thru
Select your Filter Type...
Extra Credit
On the sound you have selected, "Mowtown Y-Bass" I highly recommend you DELETE all the Part Control Assignments __ I'm not sure what the assignments are currently supposed to be set to do on this sound - as most of them are programmed to 0 change (?) was this apart of some tutorial? It seems most of 16 Control Assign Destinations are occupied with Control Sets that do absolutely nothing.
I would DELETE them and start making my own "from scratch"
Posted : 27/08/2020 1:51 pm
