Notifications
Clear all
Topic starter
ciao a tutti
sto cercando di capire al meglio il lavoro degli Ass.switches 1,2.
1 - E' possibile usarli per cambiare i preset di un compressore? (per esempio passare da flat a radio speaker in un VCMeq 501?
2 - Se vado in destination vedo diversi ins A e ins B (freq, gain, eq) ma spesso non avverto diversità nel suono.
3 - Ins A param 16, per esempio, senza altre specificazioni, cosa significa, che posso io stesso attribuire un parametro tipo appunto il cambio che vorrei fare al punto 1? (vedi sopra)
grazie, igor
Posted : 06/01/2022 9:21 pm

Hi everyone
I'm trying to better understand the work of Ass.switches 1,2.
1 - Is it possible to use them to change the presets of a compressor? (for example to switch from flat to radio speaker in a VCMeq 501?
2 - If I go to the destination I see different ins A and ins B (freq, gain, eq) but often I don't notice differences in the sound.
3 - Ins A param 16, for example, without other specifications, what does it mean that I can myself assign a parameter such as the change I would like to make at point 1? (see above)
thanks, igor
1) No, the presets are not something assignable to a button. The presets change the individual parameters inside of VCM EQ 501 - and an assignable button can be programmed to alter the individual parameters. You could, therefore, program an assignable button to offset the programmed values to be equivalent of a given effect preset. Note that you can only have 16 destination parameters so you may run out of destinations doing this kind of thing. It may be preferable to have InsA and InsB as VCM EQ 501 then route the insertion effects in parallel then set each of the insertion effects to its own preset (InsA is VCM EQ 501 preset radio and InsB VCM EQ 501 speaker). Say you're only using 4 elements - then you can route these 1st 4 elements to InsA (radio). Copy elements 1-4 to elements 5-8 and then route elements 5-8 to InsB so these elements get the VCM EQ 501 speaker preset. Now your assignable switch can be used as XA control so say elements 1-4 are ON and elements 5-8 are OFF when ASSIGN1 is ON and elements 1-4 are OFF and elements 5-8 are ON when ASSIGN1 is OFF. The assignable switch choses which elements are active which is similar to switching presets. Not very efficient - but a way.
2) Look at the data list to get a more full description of the insertion effect parameters. You need to start be knowing which insertion effect (A and B) is set to which effect. You can learn this by looking at the Routing screen and read the effect name next to each label "A" or "B". Also, make sure the effect is turned on. Make sure the amount of "wetness" for the effect (if available) is high enough to exaggerate the effect enough to hear differences.
3) If Ins A is VCM EQ 501 then parameter 16 is not assigned.
From the data list:
VCM EQ 501
]No. Parameter Range Value Tbl No.
1 EQ1 (LSH) Frequency 31.5Hz – 2.0kHz (12 – 84) 28
2 EQ1 (LSH) Gain -12.0dB – +12.0dB (60 – 300)
3 EQ2 Q 0.50 – 16.00 (0 – 60) 29
4 EQ2 Frequency 50.0 Hz – 20.0kHz (20 – 124) 28
5 EQ2 Gain -18.0dB – +18.0dB (0 – 360)
6 EQ3 Q 0.50 – 16.00 (0 – 60) 29
7 EQ3 Frequency 50.0Hz – 20.0kHz (20 – 124) 28
8 EQ3 Gain -18.0dB – +18.0dB (0 – 360)
9 EQ4 Q 0.50 – 16.00 (0 – 60) 29
10 EQ4 Frequency 50.0Hz – 20.0kHz (20 – 124) 28
11 EQ4 Gain -18.0dB – +18.0dB (0 – 360)
12 EQ5 (HSH) Frequency 500Hz – 20.0kHz (60 – 124) 28
13 EQ5 (HSH) Gain -12.0dB – +12.0dB (60 – 300)
14 Output Level -12.0dB – +12.0dB (60 – 300)
15 —
16 —
Notice parameters 15 and 16 are not used for this effect. Not all parameter positions 1-16 are utilized in all effects. When this is the case, you will see a generic label such as "param 16".
Posted : 06/01/2022 10:18 pm

Not all Insert Effect parameters with a Number can be assigned to a Controller. When you select a parameter, only those parameters that make the [CONTROL ASSIGN] button light (Orange LED) can be assigned.
Posted : 07/01/2022 11:00 am
Topic starter
Grazie ragazzi! In ogni caso, la vedo un po' dura! Diventa abbastanza complicato...
In poche parole, è possibile sapere quante e quali sono le possibilità di usare questi 2 interruttori per alterare in live il suono di un dato strumento?
Posted : 07/01/2022 11:19 am
2 - Se vado in destination vedo diversi ins A e ins B (freq, gain, eq) ma spesso non avverto diversità nel suono.
2 - If I go to the destination I see different ins A and ins B (freq, gain, eq) but often I don't notice differences in the sound.
Complicated yes. See link to attached photo below.
Recommend Starting INIT Normal (AWM2) Preset (Basic piano).
Go to Performance Home, Common/Audio EDIT ->> in General Tab set REV RETURN = 0, and VAR RETURN = 0.
This removes MASTER EFFECTS from the output.
Best Advice. Experiment with only One Insert Effect at a time (set InsB = Thru). Try out different Effects, and Presets in InsA... make sure it is ON (GREEN), and also make sure each Element is routed to the effect (Element: 1 = InsA, 2=InsA etc).
This way, you hear only the Effect you are interested in.
Do not try to make Control Assigns yet. Just play with each parameter alone (use the Value Wheel) and listen to what the parameters are changing in the sound as you play. Try different "Effect Presets" (e.g. Short Delay, Medium Delay, Long Delay) and note which Parameter values change between Presets.
The Insert Effect Routing Allows you to connect 2 Effects In Series or Parallel (see "Insert Connect" in the Centre of the Screen).
You will find that sometimes 2 Effects in Series sound different depending on which Effect goes First (InsA -> InsB, or InsB -> InsA).
Remember, if you change from InsA->B to InsB->A, you will also need to change Element 1 InsB, Element 2 InsB etc.
It is Easier to just use InsA->B, and change the effects in A and B.
Sometimes you will find A->B sounds very different than B->A. Example Flanger -> Distortion, versus Distortion -> Flanger
Sometimes, the sound of the First Effect is washed away by the Second Effect.
Sometimes the sound of the Second Effect is washed away by the First Effect.
Sometimes Two Effects work very well together (Example Delay --> Reverb, or Compressor --> Chorus).
You will find out which Effects work well together.
You can set up unusual signal flows:-
Example
Element 1 = InsA
Element 2 = InsB
Insert Connect = InsA->B
Ins A = Delay
Ins B = Reverb
Element 1 ----->> Delay ----->> Reverb --------->> Output
Element 2 ----------------------------^^^^
Parallel Signal Flows
Insert Connect = Parallel
Element1 (Mono) ------>>> InsA Cross Tempo Delay 1/4 Time, Input L ----->> Stereo Output
Element2 (Mono) -------->>> InsB Cross Tempo Delay 1/8 Dot, Input R ----->> Stereo Output
Experiment.
For reference VCM EQ 501 is an Equalizer, Not a Compressor. There are 2 Free EQs in Routing that do not use an Insert Effect slot. There is a 3 Band EQ Before the Insert Effects, and a 2 Band EQ After the Insert Effects. Go to the EQ Tab to set the types/values.
- VCM Compressor model is called "VCM COMPRESSOR 376"
- Watch out for "Control ".
Example
Control Delay
Control Flanger
Control Phaser
These allow you to set Control Assigns for all their Parameters
- Watch out for "Free" Multi-Effects.... DIST Multi-FX... 5 for the price of 1.
Enjoy!
Posted : 07/01/2022 12:41 pm

Google Translate
Thank you guys! In any case, I see it a bit tough! It gets pretty complicated ...
In a nutshell, is it possible to know how many and what are the possibilities of using these 2 switches to alter the sound of a given instrument in live?
Yes. Normally, the Assign Switches 1/2 will glow when they are assigned to do something in the selected Performance. The switches can be used to operate certain parameters within a Part’s Control Set and/or it can be used to activate XA CONTROL (Expanded Articulation Control) which addresses the Part’s Elements when the Part is an AWM2 sample-based item.
You can review what exactly they are assigned to do in each Performance as follows:
From the Performance HOME screen:
Press [SHIFT] + [HOME]
This is the same as touching “Motion Control” > “Overview”
The “Overview” screen will show you how Controllers (magenta), Assign Knobs (green), Sliders (amber) and Super Knob (blue) are assigned to the 16 Parts of the Performance.
You will initially see the “COMMON” view, but you can change this to review specific assignments to each active individual Part, 1-16.

Concerning the Assign Switches 1/2, they will always be assigned within the PART (not COMMON).
Change “Common” to a “Part #” — you are now reviewing the assignments specific to just that Part #
You can consider that the each Part has its own two Assign Switches. Each Part can have different things assigned to the switches.
Below “Part 4” is *selected* to review:

When you engage the control device, it’s assignment will be isolated in the screen. Press a Switch or move a control device to see it momentarily isolated in the screen
If [AsSW 1] and/or [AsSW 2] is connected to the Part, you can review its assignment by tapping the box “Edit Part 4 Control Settings”
This will take you directly to EDIT —> Part 4 —> “Mod/Control” —> “Control Assign”
Find the box “Auto Select” and activate it (green is activate). Now when you move or touch a controller, everything it is assigned to control will be shown.
Press [AsSW 1] and then [AsSW 2] to review any assignments:

This is the “Source” — if assigned to a synth engine Destination parameter a numbered Destination box will indicate what it is assigned to control.
If you arrive here and nothing is indicated as a Destination, this means the AsSW is possibly working as an XA CONTROL switch (Expanded Articulation)… found on AWM2 Parts.
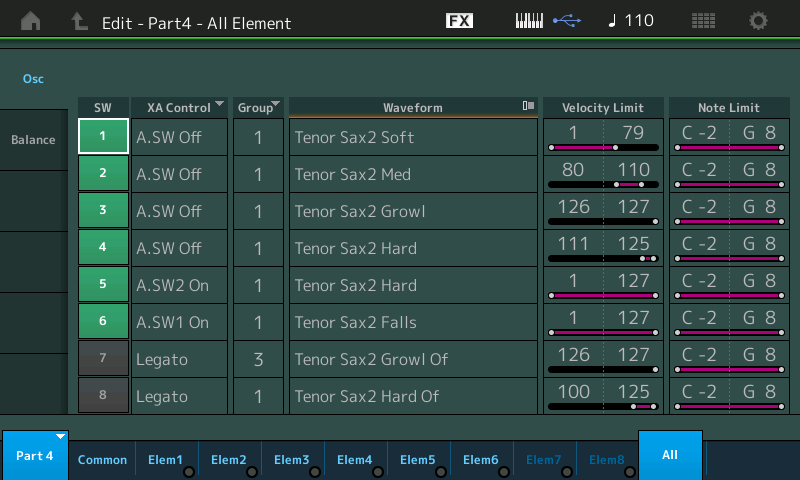
Along the bottom of the screen on AWM2 Parts you will have access to the 8 Elements (Elem1-Elem8, All).
If an Element is active it will appear in bright blue.
On the right side, touch “All” — this will show all Elements (OSC) and the column marked “XA CONTROL” will give you info on exactly when each Element will sound.
Extra Credit:
Additional information: The tutorial article, link below, will take you through the details of the Assign Switches and how they work within a Performance. When the Assign Switch is used to control a parameter Destination… if you tap the Destination box it will open a pop-up menu with a complete list of potential target Destinations… the Destinations will be context sensitive - they will apply to the selected Part, it’s specific Insertion Effects, and it’s individual Elements.

Link — Mastering MODX: Assignable Switches 1/2
If you have additional questions, post back here.
Hope that helps.
Posted : 07/01/2022 2:43 pm
Topic starter
ancora grazie!!! sperimenterò
Posted : 09/01/2022 6:36 pm
