I'm using a Keylab 49 as external keys with MODX to do Hammond. Got everything on the Keylab set to CH10 and put the Hammond performance on part 10. Works great so far, but I need some help to further tweak it nice.
I want to to use the sliders on the Keylab like drawbars to control the volume of each of the elements which will be set up for 16', 8' waveforms etc. Could someone walk me thru the process? I can reset the CC# of each slider if that would help. Now most of the sliders do nothing except CC72 which seems to control Release.
Sliders CC72? Not that I know of. In Performance mode (no PART selected) - the sliders use CC 7 (Volume). When a PART is selected and sliders are adjusting Operator/Element volumes - the sliders will use SysEx. I don't have my keyboard setup (played a gig) to scan these in.
You could also get the sliders to change the drawbar volume on a MODX Performance and look at a MIDI monitor to see what values are sent.
If your software cannot setup Keylab (I'm guessing Keylab is easiest setup with some software utility) to send SysEx - you may have some issues.
Current Yamaha Synthesizers: Montage Classic 7, Motif XF6, S90XS, MO6, EX5R
I want to to use the sliders on the Keylab like drawbars to control the volume of each of the elements which will be set up for 16', 8' waveforms etc. Could someone walk me thru the process? I can reset the CC# of each slider if that would help.
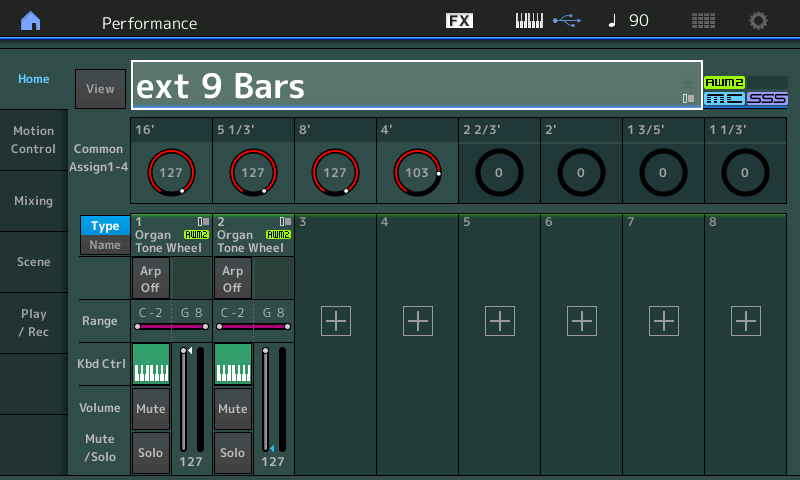
Of course. If it is desired to recreate all nine drawbars independently you can do this across a two Part Performance. Here is one way to proceed... In the example below the Elements are mapped as follows:
Part 1
Elem1 = 16’
Elem2 = 5 1/3’
Elem3 = 8’
Elem4 = 4’
Elem5 = 2 2/3’
Elem6 = 2’
Elem7 = 1 3/5’
Elem8 = 1 1/3’
Part 2
Elem1 = 1’
Elem2 = Percussion [AsSw2]
Important:: To play this from your external controller, set the MODX to MIDI I/O Mode = Single or Hybrid and select a communication Channel.
Because cc messages are Channel messages, the MODX will need to be set to receive on a single MIDI Channel.
Press [UTILITY] > touch “Settings” > “Advanced” > Set “MIDI I/O Mode” = Single or Hybrid, and select a MIDI CH.
How to setup the Tone Wheel Organ for Drawbar Control
What we will do is assign a Part Assign Knob to control one Element each
Elem1 Level to Assign Knob 1
Elem2 Level to Assign Knob 2
and so on.
In Part 2, we’ll use the Ribbon (16) to control the 1’ Drawbar in Elem1.
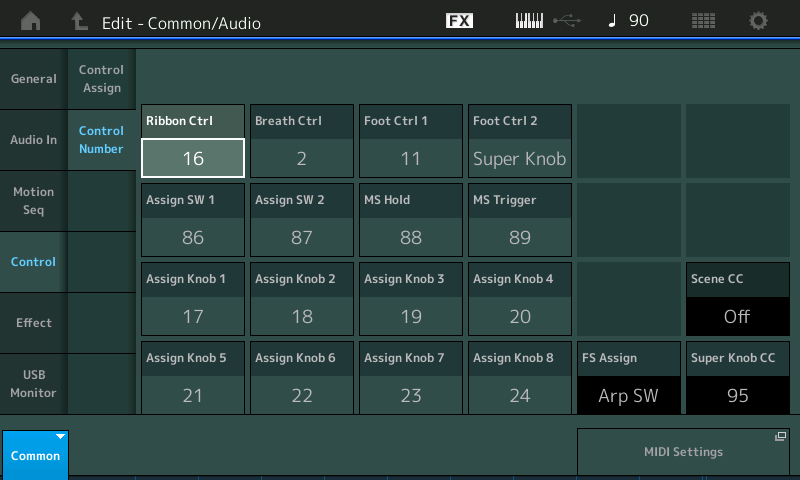
Above are the default settings for MODX - you can see the Ribbon Control and the Assign Knobs 1-8.
Set your external sliders to send cc 17, 18, 19, 20, 21, 22, 23, 24 and 16.
In the example, you see how this can be done:
Shown below are the first eight Drawbars, one Element each.

(Part 2 contains the 1’ Drawbar, and percussion [AsSw2])
PART 1 Element 1 Level is assigned to Assign Knob 1:
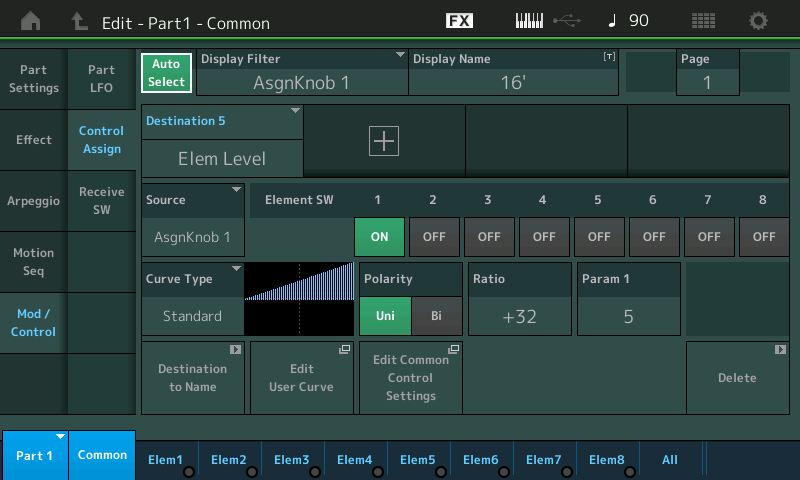
PART 1 Element 2 Level is assigned to Assign Knob 2:

PART 1 Element 3 Level is assigned to Assign Knob 3:
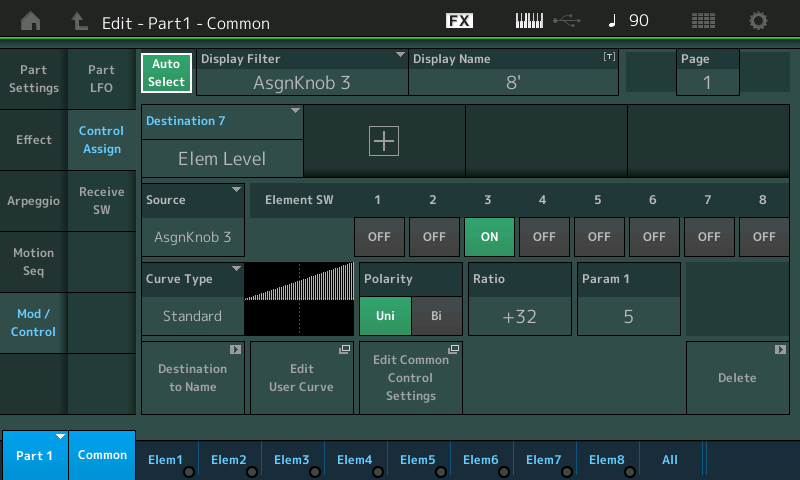
And so on.... through to PART 1 Element 8... and Assign Knob 8
In Part 2, Element 1 Level is assigned to the Ribbon (cc16)
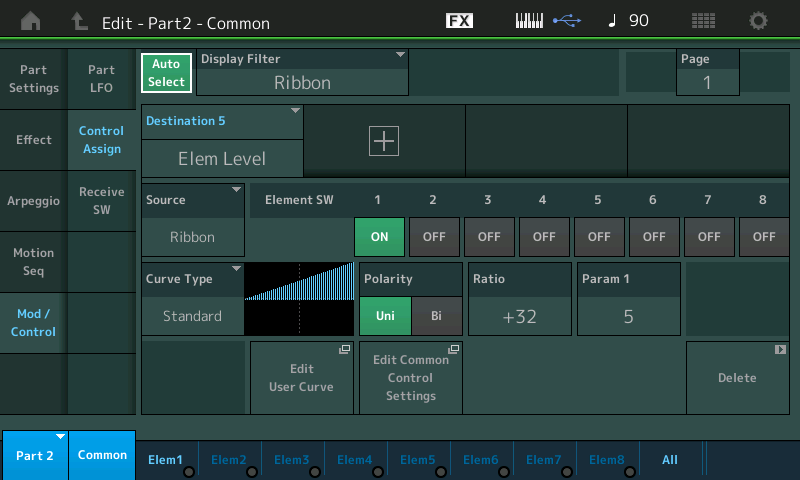
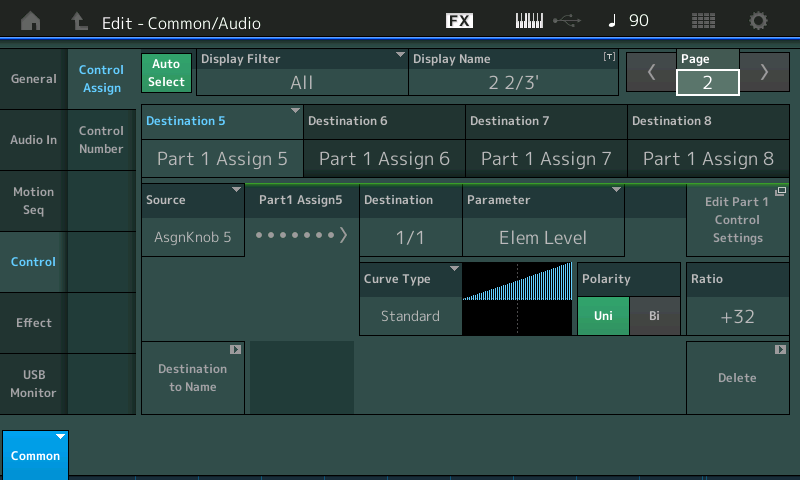
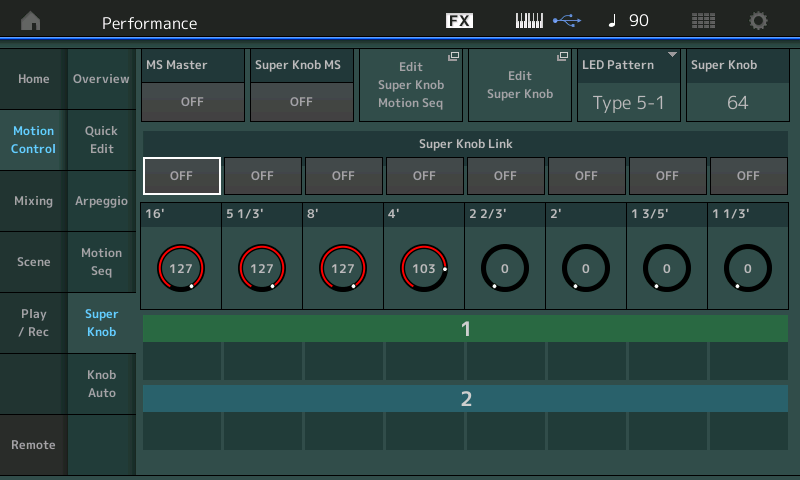
On the Upper Common/Audio level of the architecture, the PART 1 Assign Knobs are linked to the Common Assign Knobs:

The Common Assign Knobs are unlinked from the Super Knob - so that you can use them individually (as drawbars):
Find the MODX CONNECT version attached:
UnZIP and open with MODX CONNECT - this will send the data to your instrument's Edit Buffer. Not a finished program but one you can use as a template for building whatever else you wish to control within the sound.
Hope that helps
Hey Bad Mr,
Thanks so much! I'm starting to get it. So cool that the MODX is built on MIDI standards etc. It's just knowing where to find them..
I get assigning the element levels to the Assign Kobs, then setting my controller sliders to those CC's. But can you explain a bit more the relationship of the Commond Assign Knobs to the Assign Knobs? Don't get that one.
With this plan, can I set up other Parts to play from the MODX keys? Do I need to select a special channel for them?
John
Superknob doesn't have anything to do with what you're trying to do - but I'll bring superknob into this as a way to explain how common assignable knobs fit in.
If you want the superknob to control any parameter within a PART - you MUST go through common knobs in order to reach the final PART's destination. Superknob links directly to common knobs. There is no direct link between superknob and PART-level assignable knobs. The common assignable knobs are then programmed to link to one or more PART's assignable knobs. Finally, the PART assignable knobs will modulate the parameters used as destinations within that PART (or those PARTs).
Some examples of the linkages:
Superknob --> Common Assignable Knob #1 --> PART 1's Assignable Knob #1
Superknob --> Common Assignable Knob #1 --> PART 3's Assignable Knob #8
Superknob --> Common Assignable Knob #1 --> PART 2's Assignable Knob #4 AND PART 2's Assignable Knob #6
(you can assign one common assignable knob to multiple PART-level assignable knobs within the same PART)
Superknob --> Common Assignable Knob #1 --> PART 3's Assignable Knob #7 AND PART 7's Assignable Knob #4
(you can assign the same common level assignable knob to different PART level knobs - even different PARTs at once)
There's a picture in this thread:
Where common assignable knobs are shown in purple and PART level assignable knobs are shown in green.
Above I list "Superknob" as controlling the common assignable knob - but you do not have to do this. You can treat each common level assignable knob as a mini-superknob itself. And you can de-link these common assignable knobs from superknob control so even if you move the superknob - these common assignable knobs will not move.
Why use common assignable knobs? Because they offer you up to 8 CC values that you can control with external MIDI gear. Unlike direct slider control (PART/Element level) which require SysEx.
With an organ that has 9 draw bars - you run out of common assignable knobs (there's only 8). This is why there was a suggestion to use the ribbon controller to target the 9th drawbar. Because the ribbon controller has a CC value you can access/control with an external controller. In fact - it's the "only" way to affect the ribbon controller on MODX because MODX doesn't have a ribbon controller in the hardware itself (cost savings/simplification - also, if you want a positive spin, it increases the reliability of MODX vs. Montage because the ribbon controller used in Motif/Montage is a common controller to fail earlier than others -- not having this controller means you're immune to its failure).
.
Current Yamaha Synthesizers: Montage Classic 7, Motif XF6, S90XS, MO6, EX5R
Just downloaded an installed your 9 bars setup. I set MIDI I/O Mode = Single or Hybrid, but it seems that no matter what channel I set it to the MODX keys always play and the external controller on works when I set it to CH 1. What am I missing?
John
In fact - it's the "only" way to affect the ribbon controller on MODX because MODX doesn't have a ribbon controller in the hardware itself (cost savings/simplification - also, if you want a positive spin, it increases the reliability of MODX vs. Montage because the ribbon controller used in Motif/Montage is a common controller to fail earlier than others -- not having this controller means you're immune to its failure).
@Jason, Drivel...where do you get this stuff? That is simply NOT TRUE. “Positive spin” — ???
I get assigning the element levels to the Assign Kobs, then setting my controller sliders to those CC's. But can you explain a bit more the relationship of the Commond Assign Knobs to the Assign Knobs? Don't get that one.
A PART Assign Knob addresses the parameters within the Part. So in a normal situation you would need to *select* the Part in order for the Controllers to apply. The COMMON Assign Knobs are on the upper level of the Performance and give you access to parameters across all potential PARTs of a Performance.
After assigning the PART Assign Knobs to the Elements... I went to the upper COMMON level and linked each of PART 1’s eight Assign Knob to the corresponding COMMON Assign Knob... this allows Control without you having to *select* PART 1 when you want to use the “drawbars”. I then unlinked them from the Super Knob (normally tasked with moving the eight COMMON Assign Knobs as a group) — you want individual independent control (drawbars).
You can understand this — there are 16 Parts. Each of the 16 Parts has 8 Part Assign Knobs (That’s 128 Knobs)... they can be addressed by cc17-24 but only when you are addressing just that single channel. By linking the Part Assign Knob with the 8 COMMON Assign Knobs... (and placing the instrument in HYBRID Mode on a Single channel)... the cc17-24 on the basic channel will do the job.
With this plan, can I set up other Parts to play from the MODX keys? Do I need to select a special channel for them?
Yes and yes.
Parts 1 and 2 are linked by KBD CTRL and HYBRID Mode, CH 1 will let you address them as a unit.
Part 3 can be played from the MODX by selecting it directly... or by transmitting IN on channel 3
Part 4 can be played from the MODX by selecting it directly... or by transmitting IN on channel 4
And so on... thru to Part 16 on Channel 16.
OK, getting there...
The 1' part is always on. I have the fader ser to CC16. Any ideas? The other faders work fine. They are all set to CH10
Hmm, So the only way an external CC can control a part element is though the 8 Common Knobs, right?
So am I correctly understanding that there is no way to control the stops on the tonewheel organ without changing other parameters on parts (being played on the MODX) that are already connected to the Common Assignable Knobs?
Thanks for the help.
OK, getting there...
The 1' part is always on. I have the fader ser to CC16. Any ideas? The other faders work fine. They are all set to CH10
Then something is not right. Did you download the Performance I posted?
CC 16 should control the 1’ — perhaps the Ribbon being set to HOLD does not translate to the MODX. Hmm! I Bet that’s it...
From the HOME screen
Select Part 2
Press [EDIT]
Touch “Mod/Control” > “Control Assign”
Set the “Display Filter” = Ribbon
In this Control Set change the “Polarity” from Bi to “Uni” — that should fix it for the MODX.
You can actually use other CC numbers... I realize now that the MODX Ribbon will default to “Reset” (not HOLD) which sets it to Center (+64)
On the MONTAGE where I programmed this, you can select Ribbon - RESET or HOLD.
By setting it to “Bi” all values to halfway will be zero. (A stubby short drawbar) ... we can avoid that...
To get full range, you’ll want to set it to a controller that does 0 through 127. So in this new version I use Foot Controller 1 - set to cc25

Try this download it uses CC25 to control the 1’

Set your external Controller's Sliders to cc17 through 25... they will be your 9 (equal length) 'drawbars'
See attached: I made the changes - try it now!
Let us know.
So am I correctly understanding that there is no way to control the stops on the tonewheel organ without changing other parameters on parts (being played on the MODX) that are already connected to the Common Assignable Knobs?
Technically speaking, a tone wheel organ does NOT have Stops (Drawbars are different from Stops, as found on a pipe organ) but we know what you mean. And no, I don’t think you are correctly understanding this... Here’s why I say that...
Like it is a hog for polyphony, the emulation of a B3 tonewheel organ, hogs controllers as well. The use of the eight Assign Knobs does seem to hog the complete set of COMMON Knobs. But that was only to give full flexibility to the external drawbar interface. (Often since the 16’ and 8’ drawbars are the foundation of the B3 sound and are typically both pulled all out to 8’s, I use the WAVEFORM that combines drawbars “1 + 3”... saves all that extra work to have nine separate drawbars — when “eight is enough”.
As with polyphony an Element is used to make each drawbar, so 9 notes of polyphony are used for each note you play... making the B3 setting 8880 0000 0 a huge waste of resources... you have six generators generating zeroes.
We try to impress upon the serious users that a synth is a product that emulates, it does not *become* the instrument. There will always be some nuance or detail that is out of reach. Mainly due to the lack of resources. And the fact these things don’t cost $200,000
I’ll just ask ... what else do you want to do? And do you need to do it, simultaneously?
The “unlinked from the SuperKnob” feature that we used in setting up the Drawbars, can be instantly changed at a moment’s notice in a Scene Memory. So if you needed to use the COMMON Assign Knobs and the Super Knob for other duties, you can setup 8 different Scene configurations. It comes down to what you need simultaneously.
If you begin by outlining everything that you wish to accomplish, we can better allocate the resources when outlining what is possible... as we mentioned, there are often more than one way to approach almost any issue.
You wanted to use an external device to give you real-time access to nine drawbars... if now you want to do more, the HYBRID setting will allow you to play other MODX sounds by simply selecting them directly, but this should not prevent you from configuring them with Part Assign Knobs, Common Assign Knobs and the Super Knob.
But you’ll need to be specific.
For example, how many Zones (simultaneous) channels can you external Controller transmit on simultaneously?
Bad Mr-
You must be correct about the Ribbon. It does seem to be stuck about half-way on. I'm using Foot Controller 1 for volume (and Foot Controller 2 for wah).
Like you saidm I thought abount bundling the most common combinations (19, 5 1/3, 8) etc together on one Knob.
I can individially assign the sliders to any Channel and CC number if that gives me more flexibility.
Here's my wish list:
Ultimately I'd like to be able to have the Keylab always set to the best Hammond emulation I can.
The MODX would be able to switch out the other keys I use using Live Set.
The Keylab sliders should not affect anything that the MODX is playing.
I'm fine with copying a working Hammond emulation onto each Live Set slot as needed.
Easy, right??:p
John
You must be correct about the Ribbon. It does seem to be stuck about half-way on. I'm using Foot Controller 1 for volume (and Foot Controller 2 for wah).
You can use Breath Control cc2. just change the SOURCE = Breath Control for controlling the 1’ Drawbar... and set your ninth slider to cc2.
Is there any added flexibility in using more than one channel for my sliders?
In fact - it's the "only" way to affect the ribbon controller on MODX because MODX doesn't have a ribbon controller in the hardware itself (cost savings/simplification - also, if you want a positive spin, it increases the reliability of MODX vs. Montage because the ribbon controller used in Motif/Montage is a common controller to fail earlier than others -- not having this controller means you're immune to its failure).
...
@Jason, Drivel...where do you get this stuff? That is simply NOT TRUE. “Positive spin” — ???
Which part(s) is(are) not true?
a) The part about MODX not having a physical ribbon controller?
... I get this from the keyboard itself.
By ribbon controller "hardware itself" - I mean the equivalent of this component::
b) The part about using external controllers set to match the ribbon controller CC # as the "only" way to "move" the ribbon controller?
... I get this from using my own MO6 that does not have a ribbon controller, working with Montage/Motif to make ribbon work with it, and knowing that this should translate to making source->destinations "work" when using ribbon controller on MODX as a source. And that the options to get ribbon to "move" otherwise is fairly limited - although it's not the only way - which is why I quoted "only". You can assign the footswitch to a matching CC and I think this would probably "move" the ribbon on MODX.
c) The part about higher component count reducing MTBF and thereby increasing MTBF by having less components?
I get this from FMEA/quality/reliability training.
d) The part about removing the ribbon controller reduces cost and simplifies the build?
... I get this from personal experience with developing and manufacturing electro/mechanical devices housed in a chassis including having to perform BOM management, parts procurement, documentation, and other roles in bringing real products to market for industrial or consumer use. I know that removing the hole and mounting structure from the chassis simplifies the design of the chassis, reduces other part count (screws, cables) which reduces the cost of not only the piece part - but also the chassis itself (tooling, etc) and other related ripple effects.
e) The characterization that ribbon controllers are more prone to failure than other controllers?
... I get this from having a keyboard with a "half way" working ribbon controller (Motif XF) and personal experience with other Yamaha keyboards played with some form of failure with the ribbon controller. Not unique to Yamaha - as other keyboards from other manufacturers have exhibited similar failure over time. Other controllers I've seen fail less frequently (ignoring superknob).
All of the points a-e were quoted - so just trying to tease out the perceived good from the bad.
Seems like there's a question about my use of "positive spin". When explaining that one keyboard has something - and one keyboard does not ("something" being the physical ribbon controller) - the "knee jerk" reaction from the owner may be that it's unfortunate that they don't have what they're missing. The grass is greener and all that - if they only had a physical ribbon. I was offering the positive perspective of this situation - "c" and "d" collectively. That there is a beneficial side to not having a physical ribbon controller. A non-existent part never fails (keep it simple ...), costs less than the existing part, and reduces the build complexity compounding (in a good way) the cost (and weight) benefits.
I'm still open to learning if I'm off the mark on anything here ("drivel" / nonsense)
Current Yamaha Synthesizers: Montage Classic 7, Motif XF6, S90XS, MO6, EX5R
