Hi All,
I’m looking for some help with setting up the FC7 controller to control the volume of 2 (or more) performance parts parts so that one part is at max volume with pedal down and the other part is at max volume with pedal up. Basically switching between them or combining them in the middle position . I’m not really sure if this should be done via the super knob or directly via the controller assignment? What is the best approach here?
Welcome to Yamaha Synth... thanks for the question. This is a very common use for the Motion Control Synthesis Engine and its Control matrix. The concept is to have a “macro” controller — one that can be assigned to do multiple things to multiple parameters. And have it so that a single gesture can change several parameters simultaneously with precision. That is, each Control Set can be precisely set to move exactly the amount necessary so your one gesture accomplishes your desire change.
Place your MODX in [LIVE SET] (new MODX default to booting up in on the first Preset “Live Set” screen.
The very first Performance “CFX + FM EP 2”
This Performance is an example of exactly what you are asking about. And it is a microcosm of the synth itself: combining an AWM2 sample-based engine with an FM-X pure synthesis engine. Let’s take a close up look at what makes it tick.
Recall the HOME screen of “CFX + FM EP 2”
PART 1 = an acoustic piano
PART 2 = an FM electric piano
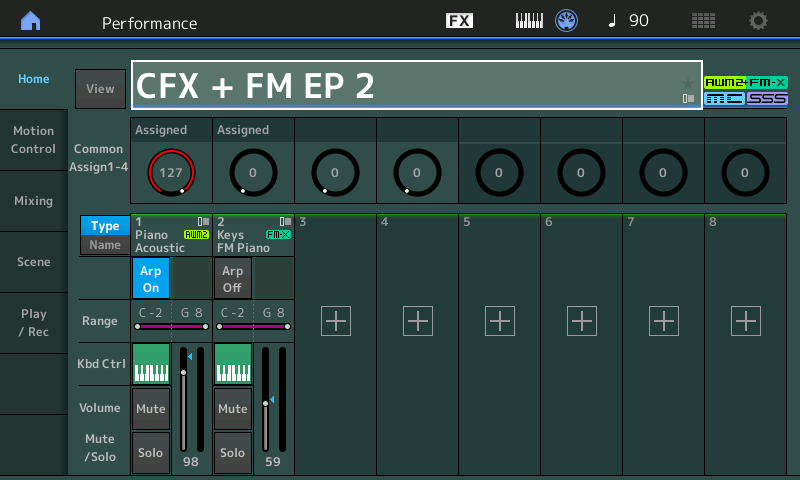
You can ‘morph’ between these two Parts by plugging your FC7 into the Foot Controller 2 jack.
Foot Controller 2 is used in all 2143 Preset Performances (all except the Init Programs) as the Super Knob surrogate.
Physical Controllers can be assigned on a per Performance basis.
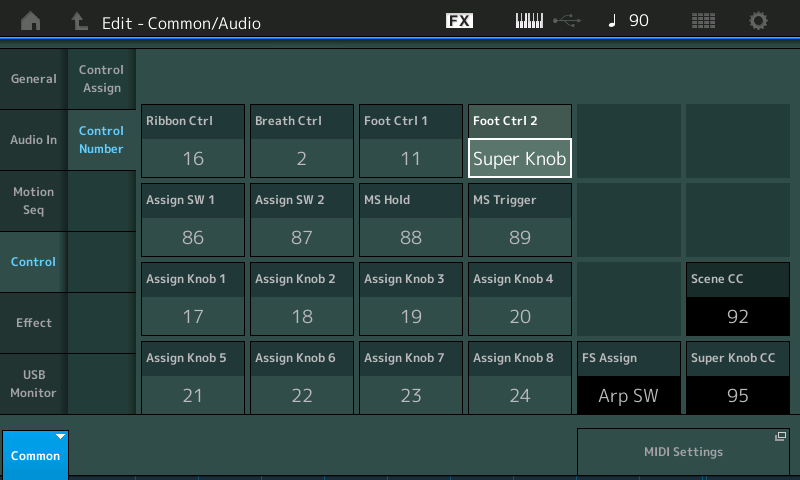
As you play this sound the Super Knob will turn down the acoustic as you turn it clockwise; the same gesture also turns up the FM electric piano. Moving the FC7 pedal set to Super Knob will have piano at heel-down, electric piano at toe-down... and both in the middle...
On the HOME screen that shows the Assign Knobs (there are two HOME screens... the “Home screen” is when the cursor highlight surrounds the Performance Name. Repeatedly pressing the [PERFORMANCE (HOME)] button again toggles the HOME “View” between the two screens.
Recall the HOME screen that shows the “Common Assign Knob 1-4” icons (shown in the first screenshot above).
You can visually see that among the eight potential Common Assign Knobs, one Knob is turning up the other moves in the opposite direction turning down. As you are playing morph the sound using the FC7... At around 12 o’clock both sounds are playing. Of the potential eight Common Assign Knobs only Assign Knobs 1 and 2 are linked to the Super Knob movement.
To explore the programming, let’s begin by pressing [SHIFT] + [HOME]
This take you to the “Motion Control” > “Overview” screen.
This shows you the control links to these physical Controllers for all Parts.
You can look at and review Common (affects the entire Performance) and individual Part assignments (each Part has its own set of 8 Assign Knobs)
Move the Super Knob, the MODX visually highlights its relationship with both Parts 1 and 2.
Set the “Part” from “Common” to “Part 1”, then to “Part 2”
You will see the relationships between the Parts and their Knobs
Let’s set "Part" = PART 1
Touch the shortcut box “Edit Part 1 Control Settings”
This will take us directly to Part Select 1 > Edit > “Mod/Control” > “Control Assign” screen
Tap “Auto Select” so it is active (green)
Now when you move a Controller the “Display Filter” will change to show that Controller’s assignments.
Move the Super Knob
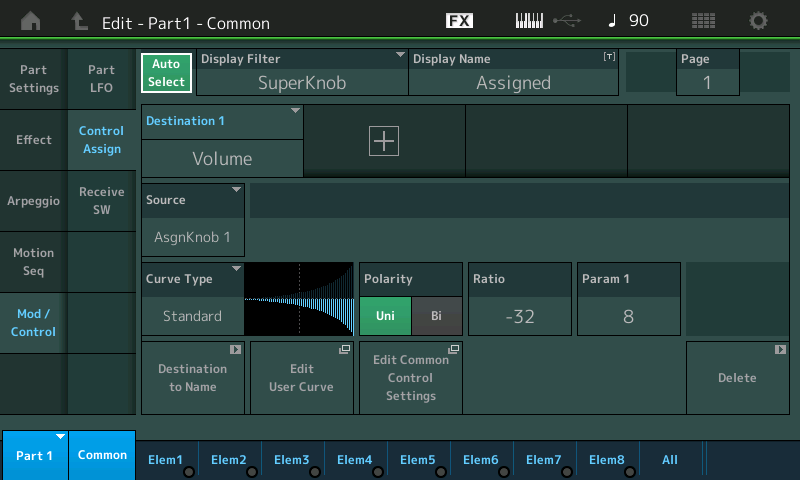
A quick glance here you can surmise that PART 1's Volume is being influenced by the position of the Super Knob... the rest of this Control Set describes what happens as you move the Controller. Read left to right, the Volume of Part 1 is definitely being reduced by turning the Super Knob up.
If you were now to switch to viewing PART 2 (touch the blue box in the lower left corner that says Part 1, to view the pop-in menu)
Select PART 2
Here the Super Knob is controlling two parameters: "InsA Dry/Wet" and "Volume"
Move the cursor over to Volume
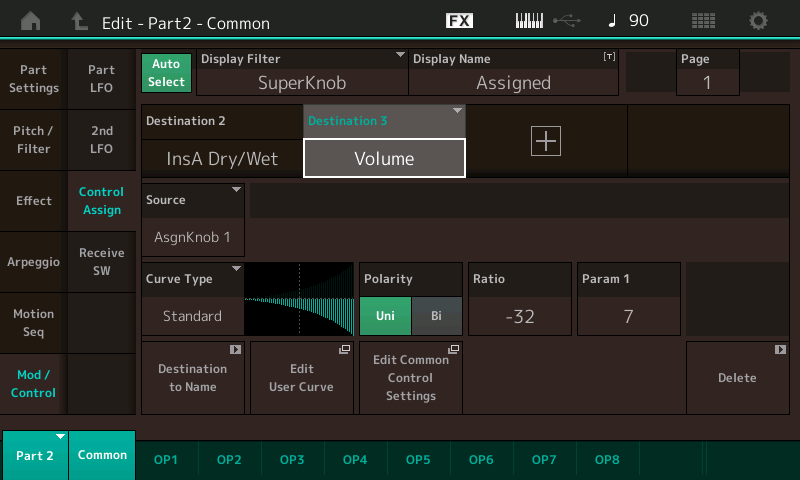
A quick glance here you can surmise that PART 2's Volume is being influenced by the position of the Super Knob... the rest of the Control Set describes what happens as you move the Super Knob.
From either one of the PART Control Assign screens you can take another shortcut to the upper Common/Audio level of the architecture by tapping the box that says "Edit Common Control Settings". This immediately takes you to the upper Common level, where you will see the Super Knob's Control Assignments
Of the eight Super Knob controlled Common Assign Knobs, only Assign Knob 1 and Assign Knob 2 are being used.
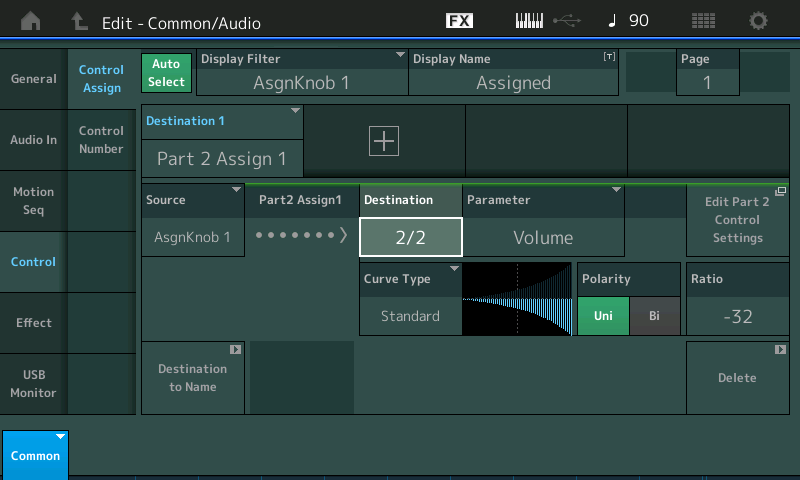
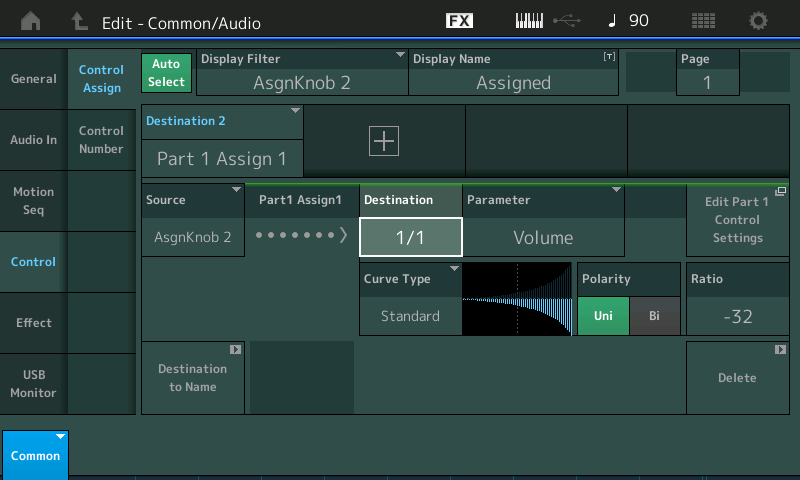
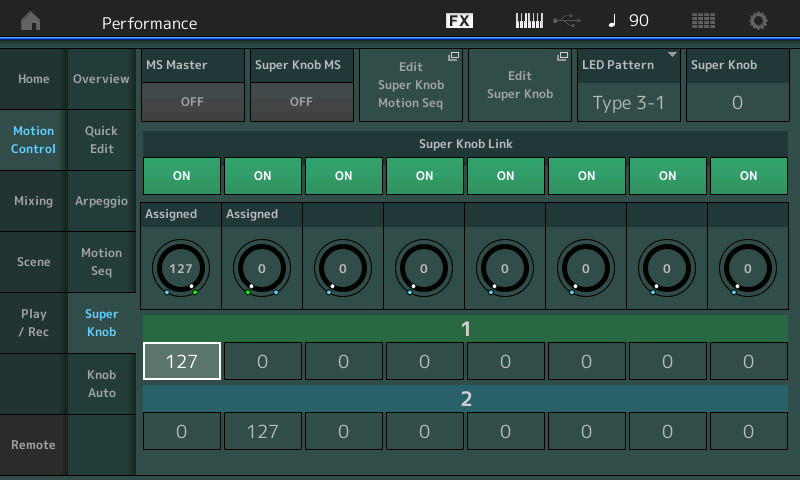
Return to the HOME screen... Listed directly below "Home" tap "Motion Control" > "Super Knob"
Here you will be able to see how they reversed Common Assign Knob 1 so that it is at 127 initially, and the Common Assign Knob 2 is at 0 initially.
Extra Credit:
Take your time with diving into Controller Assignments. We highly recommend the basic programming tutorial which goes into details on the how and why of control assignments (link below). There are several ways to do what is done above. You can reverse the direction of a control within the individual Control Set, or as is done above by reversing the Super Knob's control over the Common Assign Knob.
What is in play here is within a PART you can assign control over the PART VOLUME to a PART ASSIGN KNOB... That PART ASSIGN KNOB is linked to the upper COMMON level of the architecture, where those 8 Common Assign Knobs can be linked to move when the Super Knob is moved. We can address each with its own "scaled" control.
WIthin each Control Set (Source/Destination) you have CurveType, Polarity, Ratio, Parameter1 (shaper)... these determine or can, how the changes applied by the Source (physical Control) to the Destination (parameter). By shaping the Curve we can determine how much overlap there is... The red SCENE buttons 1-4, and 5-8 each offer a different position of the Super Knob - thus a different balance between the Acoustic Piano and the FM Electric Piano. SCENE 1 is all Acoustic, SCENE 8 is all Electric. Changing the Parameter 1 will change the shape of the Curve being applied.
Please see the MODX Tutorial series... 14 articles on getting deeper into the Control Assign functions...
Link: Mastering MODX: Super Knob Common
Link: Mastering MODX: Super Knob Morph
Link to the LEARN MODX articles (Overview): Mastering MODX Article Series
