good evening everybody.
I found another post with some great info on the subject but not quite exactly what I was looking for. For some reason was not able to post a reply to that post, so I started a new one. My apologies for any confusion this may cause.
What am I trying to do? Trying to detune (shift the pitch) about half step or so EACH way using my FC7 (a 1/2 step up and a 1/2 step down). I would also like to have the Super Knob "follow"the FC7 so I can have a visual of where the pitch is. Ex: When the "light" is at 12 o clock, it would be A440. When it is almost 4 clock, it would be almost a 1/2 step above. When the light is almost 7 o clock it would be almost 1/2 step down.
Why am trying to do this? just to create an effect as I play chords with a band. Just to create some "bite" in the chords. Experiment.
I think it is possible, but I don't think I can figure this out on my own. Guys here are much more knowledgable than I am .. Bad Mister, friends and followers - I am looking at you:)
Have a great evening and I thank you in advance!
with much respect.
Eduardo
Ps: The other post showed how to use "Detune" and pick some of the curves available. Problem was I could only bend the pitch up OR down. I really would like to be able "bend" whichever way I chose to, with the visual aid of the superknob...
Here's a tutorial on Bipolar SuperKnob programming.
https://yamahasynth.com/learn/modx/super-knob-bipolar-mastering-modx
This approach mapped to pitch should do what you want.
Thank you Dragos! I hope you are right! Your response is much appreciated. I will look into it tonight for sure...
Hi Eduardo,
There are probably several ways to accomplish this goal -- here's one:
The Coarse Tune parameter is real-time controllable. Each Element has access to being controlled - you can OPT IN or OUT on a per Element basis.
- Select the PART
Press [EDIT]
Touch "Part Settings" > "Pitch" > highlight the COARSE parameter
While it is highlighted you can press the [CONTROL ASSIGN] button which will let you assign a controller by simply activating that Controller.
In my example, PART Assign Knob 1 is available (note: you will want a Knob that is not currently set to do something else. Even though multiple things can be assigned to any Knob, we will need to restrict the movement of the KNOB to precisely 'tune' the pitch. And particularly because you will be using your foot to move the Super Knob, it makes sense to make the minimum pitch at one extreme (heel down) and the maximum pitch at the other extreme (toe down). The Foot being the least articulate of our physical limbs involved in playing synthesizer keyboards). What we will do is set the minimum position to -1 semitone, and the maximum to +1 semitone.
Theory:
We will set this PART Assign Knob to COARSE tune the Oscillators in this sound.
You will be taken to the PART's Control Assign screen, where the Assign Knob 1 is SOURCE and COARSE is DESTINATION.
We can use the Standard CURVE
Set the POLARITY = Bi _ This will allow us to raise and lower the pitch from the stored start point
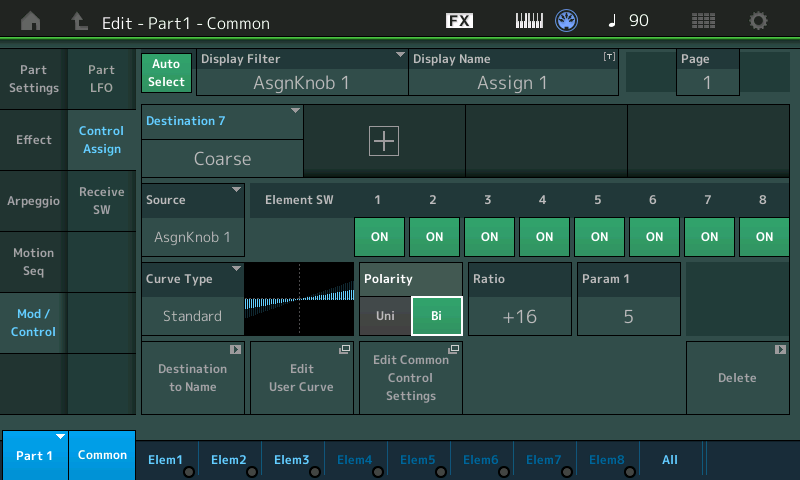
Set the RATIO = +16 _ This will allow the change from minimum to maximum of Assign Knob 1 to equal one Octave
(Background: Coarse tune is not Note Shift, Note Shift sets specific pitched steps that can be use to great effect when Equal Temperament is your goal. Coarse tune allows more continuous options and is not scaled so the increments are semitones... you will discover that +16 is one Octave, +32 is two Octaves, and so on.
The smaller we set the Ratio, the more accurately we will be able to tune this function. I started with one octave for minimum to maximum. You can experiment with finer resolution, if you desire or require.
Now when the PART Assign Knob 1 is moved to minimum, then raised to maximum it covers the distance of one Octave.
Using a RATIO = +16
Turning the PART Assign Knob to a value of 54 drops the pitch approx. one semitone
Turning the PART Assign Knob to a value of 75 raises the pitch approx. one semitone
Returning the KNOB to 64 (the 12 o'clock position) returns the pitch to normal
In order to 'tune' this accurately: you can use other Parts OFFSET TUNED to the amount you wish to set as Minimum and Maximum (or if you are blessed with perfect pitch), you can now Tune the range of movement for this Knob.
Example: Using a RATIO = +8
Turning the KNOB to a value of 42 drops the pitch approx. one semitone
Turning the KNOB to a value of 86 raises the pitch approx. one semitone
Returning the KNOB to 64 (the 12 o'clock position) returns the pitch to normal
(we will stick with the +16 Ratio for now...but the smaller the Ratio the more resolution you will have to fine tune the pitch)
Next step is to link the Assign Knob 1 of this Part to the Super Knob and set the Minimum and Maximum of how it will change the values that Part Assign Knob 1 is tasked with changing. From the PART Control Assign screen (above) find and tap the box "Edit Common Control Settings" __ this is the shortcut to the upper COMMON/AUDIO level of the architecture, where you can program how the Super Knob and its 8 Knobs will influence your Performance (shown below).
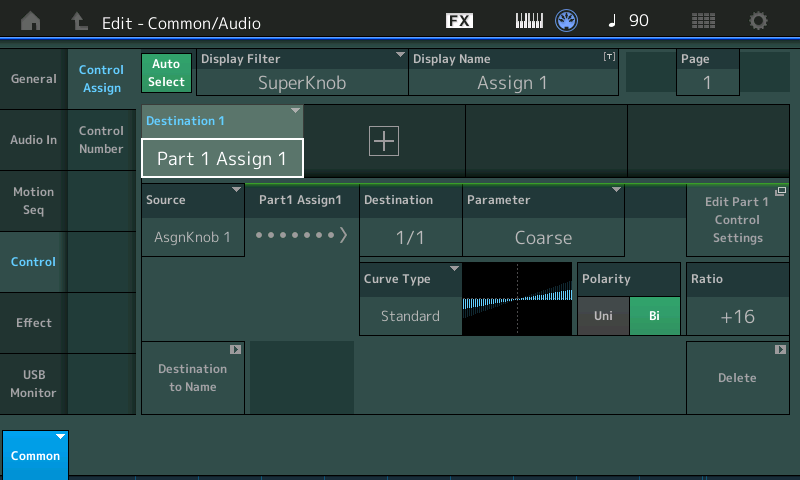
On the upper Common/Audio level, where the Super Knob and the Common Assign Knobs are programmed we will create a SOURCE/DESTINATION Control Set that uses an available Common Assign Knob to influence " PART 1 ASSIGN 1" which we setup for COARSE TUNE.
On this level, you can tap a "+" icon to ADD a Source/Destination Control Set. Touch the Destination box and select PART 1 ASSIGN 1 (which is Part 1's Assign Knob 1) - it will link this to the upper Common Assign Knob... the screen also shows you what parameter within Part 1, the Part 1 Assign Knob is set to control... (and a shortcut box to return there).
How I tuned the Assign Knob:
I used adjacent PARTs as tuning references. Part 2 is tuned down (-1), Part 3 is tuned up (+1), Part 4 is tuned correctly (0). Using the MUTE function I can check my settings as I adjust Assign Knob 1.
Here you can see (shown below) I'm working on PART 1, but PART 2 is an Init AWM Part, Coarse Tuned to -1. Parts 3 and 4 are MUTED.
While Part 1 is 'selected' I can use the Part 1 Assign Knob 1 to tune the pitch to match Part 2.
It is about 54... _ This will become our minimum.
Press [SHIFT] + [KNOB POSITION 1] __ the Knob Position buttons are located above and to the left and right of the Super Knob. By storing this value to KNOB POSITION 1 will allow you to set the Minimum value for the parameter assigned COMMON Assign Knob 1 when under control of the Super Knob (screenshot is from a MONTAGE so excuse the difference)
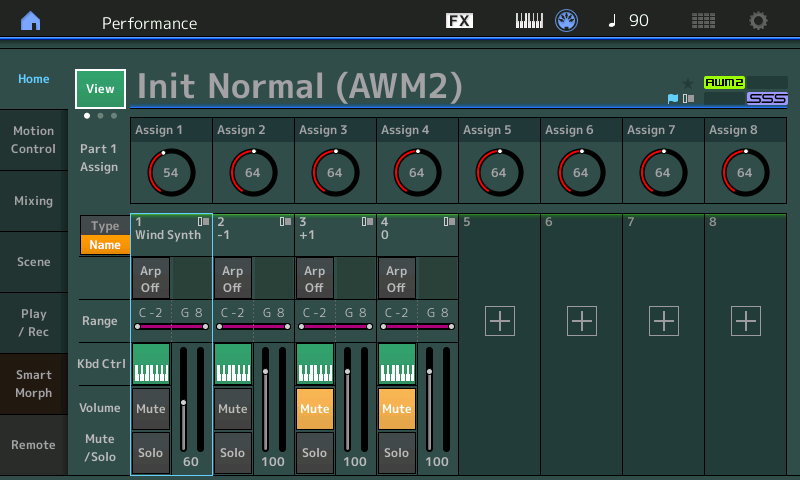
Next (below) I have activated Part 3 in place of Part 2 using the MUTE functions. I am temporarily using PART 3 as the tuning reference for Coarse Tune +1
Again using the PART Assign Knob 1 to tune PART 1, I get the pitch to match Part 3.
It is about 75... _ This will be our maximum.
Press [SHIFT] + [KNOB POSITION 2] __ the Knob Position will set the Maximum value for this COMMON Assign Knob when under control of the Super Knob.
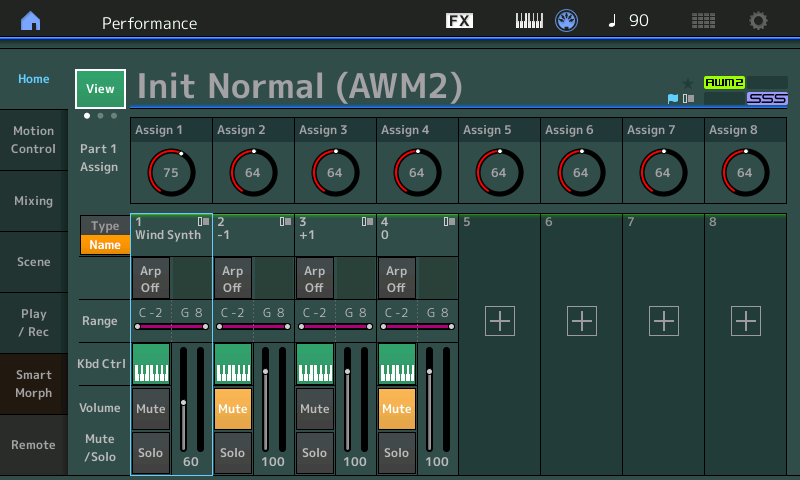
I setup Part 4 just to ensure 64 is the normal tune... These additional PARTS (2, 3, and 4) can be DELETED once you have your tuning range setup.... To DELETE a PART simply tap its "TYPE/NAME" box to bring in the pop-in menu, select DELETE. Rinse and Repeat for each Part you want to remove.
What the KNOB POSITION buttons have set is shown in the screenshot below...
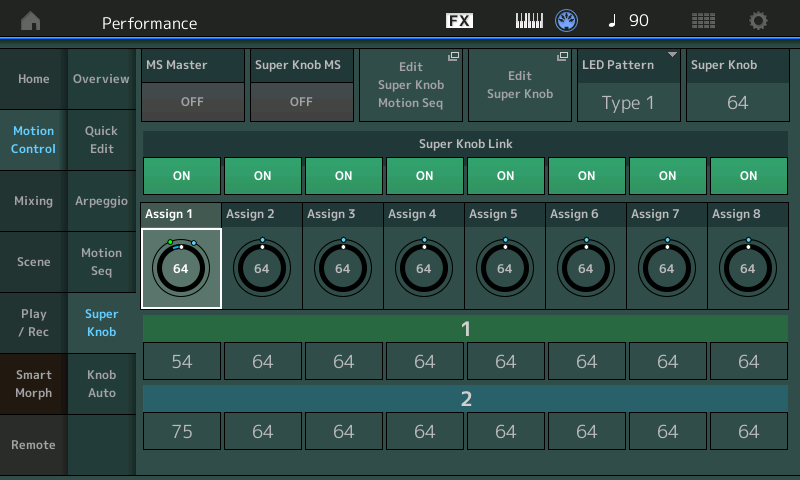
From HOME: Touch "Motion Control" > "Super Knob"
Here you can see that the minimum (green dot) and maximum (blue dot) of each of the 8 Common Assign Knobs is shown:
We have linked Part Assign Knob 1 with Common Assign Knob 1, and have restricted the movement of Common Assign Knob 1 to just 54 through 75 - this sets the COARSE Tune parameter of Part 1 down a semitone and up a semitone, respectively.
Move the Super Knob (or your FC7 set to Super Knob) from minimum to maximum - you will see how this moves the COMMON Assign Knob from 54 to 75 (instead of 0-127). You can reverse the direction, if you require/desire, by simply swapping minimum for maximum values. (Or this can be done back in the PART by setting the Ratio to a negative value, ie, -16)
As you already know, the Super Knob is typically linked to all 8 Common Assign Knobs... we are just working with Common Assign Knob 1 here... so that when the Super Knob is at minimum (green) the PART Assign Knobs it controls will change to 54, and when the Super Knob is a maximum (blue) the value will max out at 75
Hope that helps. If you get stuck, or if an instruction was not clear, post back here.
Thanks for the question.
Mr. Bad Mister,
This is incredible. Thank you for the detailed explanation. I need to study some more so I can fully comprehend what is going on. Your explanations are always on point. Thank you.
I guess I did a "simplified" version, where I just assigned the COARSE parameter straight to the super knob. And then plugged the FC7 on #2, which was already assigned to control the SuperKnob. It achieved my goal somewhat, but when I tried to do it with a piano sound it gave me a message that the assignments to the SuperKnob were "full"...
I failed to understand why you did not assign the COARSE directly to the SuperKnob. I am sure there is a reason... Do you mind sharing that?
I will try to follow your steps exactly this week to see how far I can get.
Thank you very much as always,
Eduardo
Coarse cannot be assigned to superknob because no Part level parameter can be assigned to superknob. Part level parameters only indirectly couple to the Super Knob via two sets of Assignable knobs. Common knobs which can be linked (or not) to Superknob with a range and polarity defined. Then these common knobs can be assigned to turn Part level Assignable knobs. These Part level Assignable knobs can be sources for pitch. That's the only path of Part parameters to Super Knob. Through two levels of Assignable knobs.
You can directly assign to pitch bend, ribbon, foot controllers, Assignable switches, etc. But not Super Knob
Current Yamaha Synthesizers: Montage Classic 7, Motif XF6, S90XS, MO6, EX5R
Also, each Part gets 16 destinations. If these get full, you can't assign more. The common area gets 16 destinations too. That can get full as well.
If you run out of destinations, some housecleaning is in order to make room for a new assignment. This may mean making tradeoffs or maybe just deleting orphan assignments.
Current Yamaha Synthesizers: Montage Classic 7, Motif XF6, S90XS, MO6, EX5R
I guess I did a "simplified" version, where I just assigned the COARSE parameter straight to the super knob. And then plugged the FC7 on #2, which was already assigned to control the SuperKnob. It achieved my goal somewhat, but when I tried to do it with a piano sound it gave me a message that the assignments to the SuperKnob were "full"...
I failed to understand why you did not assign the COARSE directly to the SuperKnob. I am sure there is a reason... Do you mind sharing that?
In reality, the Part parameter is not assigned "straight to the Super Knob"... Although I do know what you mean...
The Super Knob, by default, has 8 Common Assign Knobs. When you move the Super Knob, these 8 Common Assign Knobs move in concert with the Super Knob. We will use one of these 8 COMMON Assign Knobs to influence the PART Assign Knob which is set to Coarse tune the instrument sound in PART 1.
(Don't let the fact that it is also Knob 1; Common Knob 1 is different from Part Knob 1... the system typically uses the first available empty Knob).
It is the 8 Common Assign Knobs that can address any of the 16 Parts via their 8 (Part) Assign Knobs.
The reason I started my example within the PART - is because that is closest to the instrument sound. Think of the PART as the instrument; Think of the 8 PART Assign Knobs as belonging to the instrument you are tuning. Notice I started by programming the COARSE Tuning of the PART (the instrument sound)... so that turning the Part Assign Knob to minimum lowered the pitch of the sound and turning the Part Assign Knob to maximum raised the pitch - the entire range minimum-to-maximum was an octave (Ratio = +16).
When you follow the setup as I outlined...
From the HOME screen:
Press [EDIT]
On the upper Common/Audio level of the architecture, touch "Control" > "Control Assign"
Here you will see the SOURCE/DESTINATION Control Assign functions... four possible Control Sets to a PAGE, four PAGES - a total of 16 Control Sets.
And although each of these 16 Control Sets can control multiple parameter Destinations, in this case we are using the Common Assign Knob to refine the movement of the Part Assign Knob.
On this upper level Control Set... touching the first available "+" will ADD a Control Set, that is, it will add a Source (control)/Destination (parameter).
The SOURCE in this case is one of the COMMON Assign Knobs which are going to reach down into the PARTs and will be responsible for influencing that Part's Assign Knobs. The DESTINATION is listed as PART 1 ASSIGN 1... which literally means the COMMON Assign Knob in the "Source" box, is going to be controlling PART 1's Assign Knob #1. This is exactly what this screenshot of the upper COMMON/AUDIO level of the architecture is telling you: Follow it and see if it starts to make sense...
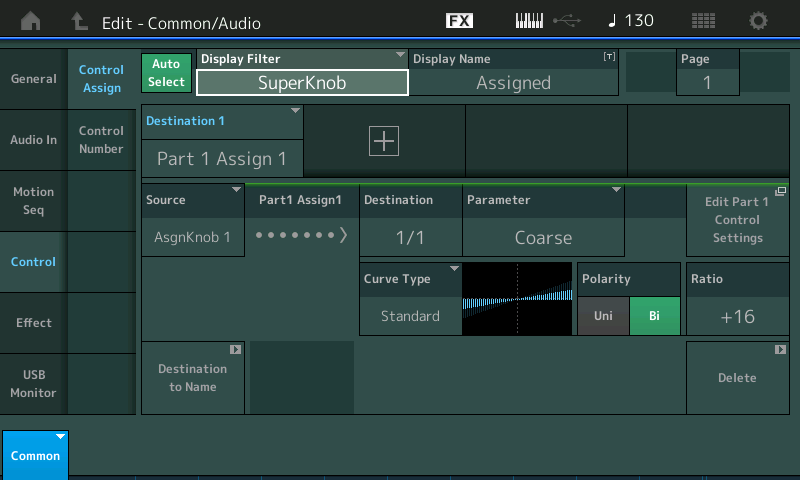
"Display Filter" is showing you what the "Super Knob" is assigned to - The "Display Filter" isolates whichever Controller you wish to view - it recalls all items assigned to it. Activate the "AUTO SELECT" box (green) and all you need do is make contact with the Controller to review its current assignments.
The SOURCE = the first available of the 8 Common Assign Knobs (in my example it happened to be Knob 1)
The DESTINATION = PART 1's first Assign Knob (PART 1 ASSIGN 1)
Which it shows you is assigned to COARSE, using Bi Polarity, Ratio +16
Tap the shortcut box "Edit Part 1 Control Settings" to see the Part level of the architecture - where the Coarse tuning is actually taking place.
So whenever you move the Super Knob, it will move Common Assign Knob 1; the Common Assign Knob 1 (Source) will move Part 1 Assign Knob 1 (Destination); The Part 1 Assign Knob 1 is assigned to change the COARSE tune parameter of that Part.
Okay, this begs the question - Then "how come" when I turn the Super Knob it does not control the same range minimum-to-maximum?
If you *select* the PART and turn Part Assign Knob 1 - you will hear it change an octave, minimum-to-maximum
If you select COMMON (the HOME screen) where the cursor highlight is on the Performance Name, you have access to the COMMON Assign Knob 1 - you will hear that it also changes the tuning an octave, minimum-to-maximum.
But, we have restricted the movement of this Knob by setting the Range that the Super Knob will be able to influence its movement - so that when you use the Super Knob, or your FC7 set to Super Knob - the range is precisely one whole step from minimum-to-maximum. That is the purpose of the 54 thru 75 range settings.
Programming Approach
Important: You can actually program it either way... but it does not change the outcome. Therefore, the way you did it is a viable programming method. When you were in the PART and you set the SOURCE = Super Knob - you probably did not notice the drop down item that informed you which Common Assign Knob was selected by the system to be the intermediary. The drop down would have said: "Modified: Common AsgnKnobX --> AsgnKnobY" where "X" is the Common Assign Knob it found free, and "Y" is the Part Assign Knob it is to influence.
It will always look for a Common Knob that is free... To avoid a conflict (however....
If you get a message that indicates the setup is FULL, this could mean that there are no longer any empty KNOBS... you may still be able to "piggy-back" it on another KNOB (assuming the direction of movement and the range is set as you require). But you would need to do this MANUALLY.
FACT: Each Common Assign Knob can control 16 Destinations!!! This is why it is important when posting an issue to give as much information as you can - if not, we just can answer generally, rather than specifically.
The Super Knob cannot be assigned directly to a PART's parameters... it is the Common Assign Knobs (the ones that follow the Super Knob by default) that can be linked to control the Assign Knobs within the Part.
Extra Credit: -- "Don't let this hurt your head" Department
The Super Knob has 16 Source/Destination Control Sets. Again four PAGEs of four Sets.
Each Common Assign Knob can be set to control 16 Destinations of its own, (you see in the screenshot, it currently says you are viewing COARSE and that this is the first of one Destination for this Common Assign Knob, written "1/1" -- Each of the 8 Common Assign Knobs can be set to 16 different Destinations.
For example, it is possible with a single Common Assign Knob to change all 16 Parts output Volumes.
This can be used to create Fade Outs. or you can group your rhythm section Parts to one Common Assign Knob, and your sweetening (strings, pads, brass, etc) to another Common Assign Knob. This is useful when you are working with a Sequence in a live situation. this is particularly useful on the MODX (as you have four sets of Slider) can be clumsy working them while playing... by grouping Parts to Common Assign Knob you can work like a recording/sound engineer.
And as we learned above, these Common Assign Knobs can be Linked or unLinked from the Super Knob movement... this means you can access the Knobs directly, independent of what the Super Knob is changing.
The system will initially look for an empty Knob... it will not automatically stack things onto one Knob. And when first starting out, this is recommended. But in more advanced programming, you can stack parameters on to a single Common Assign Knob.
wow. You guys are incredible. Don't have much to say except "Thank you".
I shall learn how to program nicely in this lifetime, I hope.
with much respect,
Eduardo

