Is there a way to group parts within a performance?
On live stage I often change the volume of parts on the fly. Suppose I have 3 parts: piano, rhodes and strings. The piano and rhodes act in fact one voice for me. I want to turn up the volume of piano and rhodes with one combined slider, and the volume of strings with another slider (and preferably the mix between piano/rhodes stays the same). Would that be possible? Or is there a way to easily combine two parts to one part?
Thanks for the questions.
Is there a way to group parts within a performance?
Yes there is...
On live stage I often change the volume of parts on the fly. Suppose I have 3 parts: piano, rhodes and strings. The piano and rhodes act in fact one voice for me. I want to turn up the volume of piano and rhodes with one combined slider, and the volume of strings with another slider (and preferably the mix between piano/rhodes stays the same). Would that be possible?
The Sliders have fixed functions as level controls. Therefore, you will not be able to reassign these freely.
_ When you are addressing the overall Performance, each Part has its own dedicated Slider that corresponds to its Part’s Volume.
_ When you are addressing an individual Part, each slider is the level control of the individual Oscillator (Element if AWM2, Operator if FM-X).
_ Beyond that the Sliders are not programmable
If you are on the [Performance HOME] screen, with Performance Control active, the Sliders function as Part Volumes... depending on how many Parts make up your 3 instruments, you might opt just to use the Sliders as they are... for example, if Piano is Part 1, Rhodes is Part 2, and Strings is in Part 3, then manipulating the three sliders is not that difficult (as is). But if your Piano is multiple Parts, the Rhodes is multiple Parts and the Strings are multiple Parts, then it would be best to utilize the MODX Assign Knob features. With the Assign Knobs one Knob can easily address two Parts.
The MODX has a massive Control Assign matrix where each of the16 Parts has 8 Part Assignable Knobs, which can be linked to the Super Knob and its 8 Common Assign Knobs. You can link the Part Volume of the Piano and Rhodes to the same Common Assign Knob and assign the Strings to its own Assign Knob.
The Super Knob can control the movement of the 8 Common Assign Knob, additionally, these Knobs are available to move directly, as individual controls. You can even give them ‘nicknames’ so it is clear what they each are doing. See attached example below... in the Extra Credit area.
Or is there a way to easily combine two parts to one part?
As we are fond of saying, there is no one-way to work, but yes, this is yet another way to proceed to accomplish your goal. This will depend on the make up of the Instruments. One of the things we are going to try to do in the new year, is give more attention to “how to construct your own instruments”. It is really difficult to fully appreciate a four Part 18 Element Acoustic Piano, without an appreciation of just how much can be done with a single Element.
Each AWM2 sound can have as many as 8 Elements. Each Element represents a complete synthesizer path... Oscillator, Filter, Amplitude Generator; with its own LFOs, EQ, Routing through the Insertion Effects, etc. It is possible to construct an acoustic piano/electric piano hybrid within a single Part. This will allow you to control both instrument sounds with a single slider (and you could still program individual control over the relative output levels of the two keyboard sounds. All of this is possible.
We’ll give you an example of this, as well...
Recall the Performance “Ballad Key” - This 8 Element Single Part Performance combines a CF3 acoustic piano (Elem1-Elem5) with a Rhodes (Elem6-Elem8)
Select Part 1, then press [EDIT]
Touch “All” in the screen to view all of the Oscillators in this Part
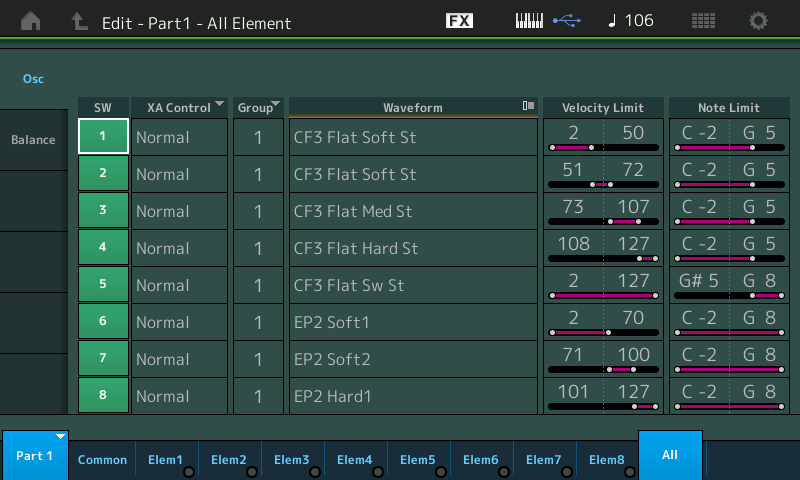
A 4-way velocity piano through the body of the piano, a single undampered Element above G#5
A 3-way velocity electric piano.
In the left corner touch "Common" to view "Part1-Common" parameters.
Touch “Mod/Control” > “Control Assign”
Make sure “Auto Select” is active (green). This will allow you to move a controller and see its assignment. Turn the Super Knob
The Super Knob controls Common AsgnKnob1 which is the acoustic piano Elements 1-5
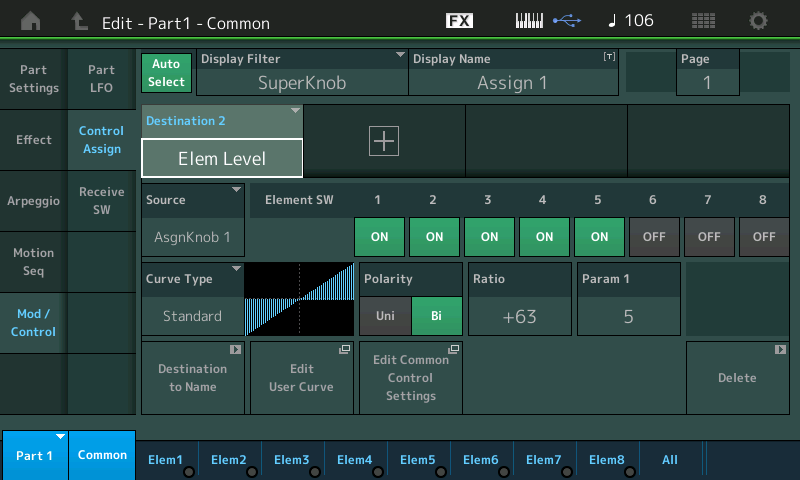
You can see that ”AsgnKnob1” is the “Source” for “Elem Level” for Elements 1, 2, 3, 4 and 5.
Move the MW. The MW position determines ‘how much’ electric piano, Elements 6-8; you can see how when the MW increases (left-to-right) it turns the volume of these Elements down.
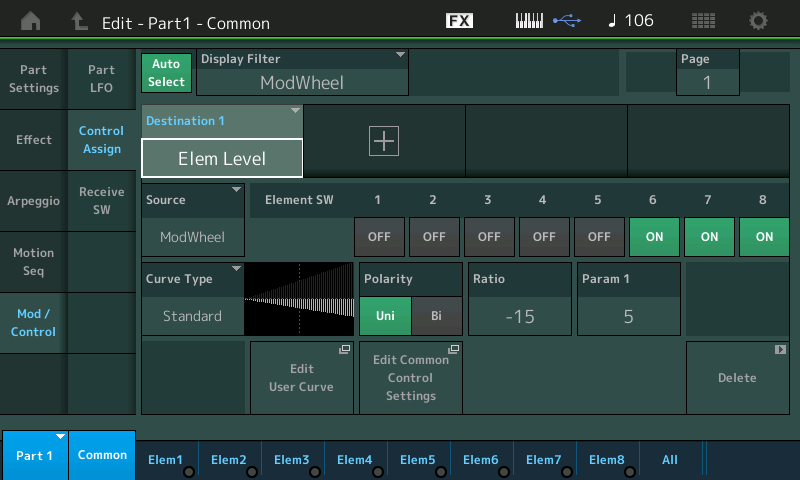
Within the Control Assign matrix you can select which Elements have their “Elem Level” set to follow the position of the selected “Source” (physical controller). You can see the MW is the ”Source” for “Elem Level” for Elements 6, 7 and 8.
This is an example, of how you can combine instruments within a Part and yet still maintain realtime control over their balance. This combination (Ballad Key) gets its name from the proliferation of Ballads from the 1980's that used a combination Rhodes and Acoustic Piano (Stevie Wonder, Hall and Oates, etc., etc.).
EXTRA CREDIT
Attached below is a 3-Part example, made by merging three Single Part programs; the “S700 for Montage” + “Contempo” + “Ens Mix”.
This shows off the flexibility of what is available.
The Sliders 1, 2 and 3 are individual Part Volumes for the Piano, E.Piano and Strings, respectively. This can be used to create the balance you require/desire.
The Super Knob is stored at 12 o’clock (64) which gives a balance of the Keyboards versus the Strings. Turning the Super Knob clockwise, fades the Strings and leaves just the Keyboards, turn it counterclockwise from 12 o’clock it fades the Keyboards and leaves the Strings. An FC7 plugged into Foot Controller 2 will allow you to move the Super Knob with the foot pedal.
Scene 1 will include all three sounds, the Keyboards and Strings... choose this Scene when you want to morph between the groups (all Parts are active)
Scene 2 will be just Strings... choose this Scene when you just want Strings alone; with SuperKnob (FC7) control for Volume
Scene 3 will be just the E.Piano... choose this Scene when you just want just the Rhodes alone; with SuperKnob (FC7) control for Volume
You can make other combinations if you so desire, even presetting the mix balance...
To make a Scene 4 with both Acoustic and Electric Piano setup the SCENE Memory as follows:
From the HOME screen, touch "Scene" in column 1
At the top touch SCENE 4
Activate the MEMORY ON switch above the "Kbd Ctrl" option
Activate the KBD CTRL icon for Part 1 and 2
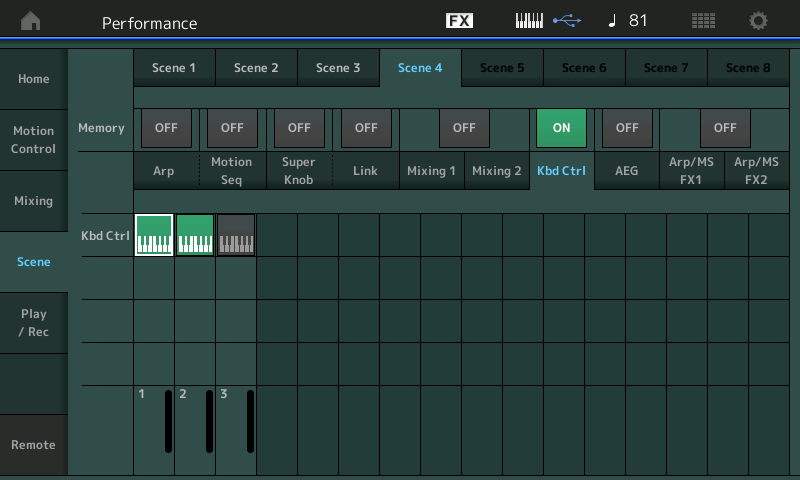
Changes made of the SCENE Memory screen are automatically stored - but you must also update the Performance by pressing [STORE] and writing it to your User Memory (or capture it with MODX CONNECT or Soundmondo.
Seamless transition between SCENE groups is accomplished using the SCENE Memory’s ability to store active KBD CTRL status
Within each Part, 1, 2, and 3, a PART ASSIGN Knob was called upon to be the Volume. We have programmed it so that both PARTs 1 and 2 share the position of COMMON ASSIGN KNOB 1
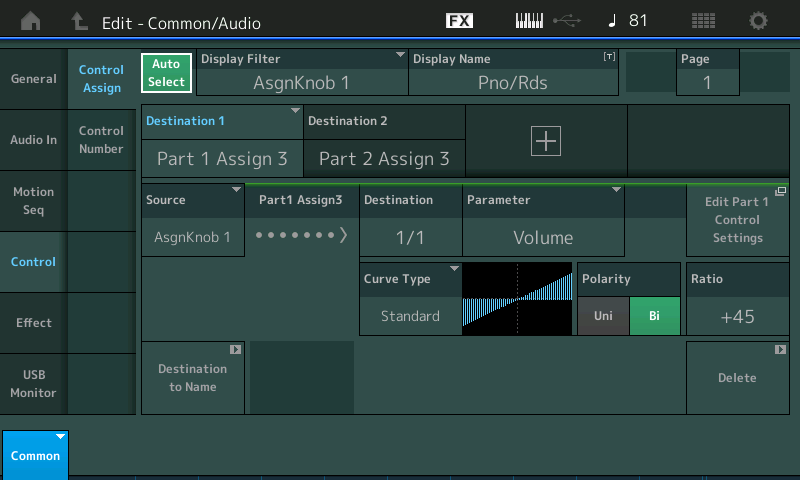
And the PART 3, Strings, have their own dedicated Common AsgnKnob 2
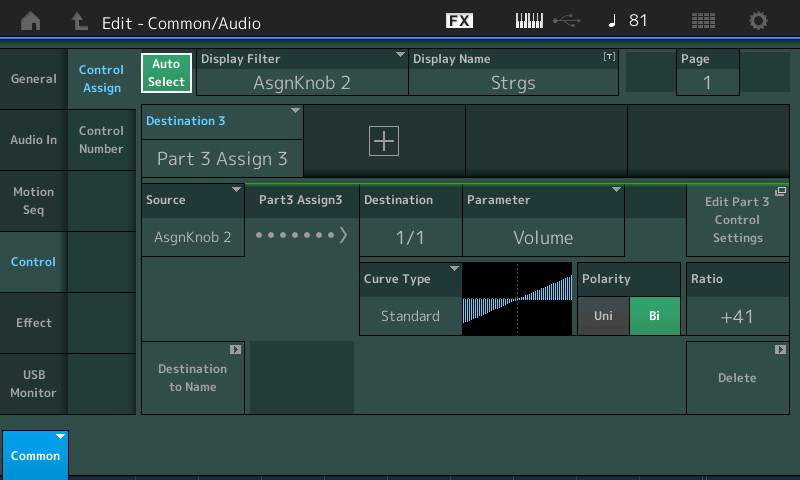
If you recall the Performance Home screen that shows you COMMON ASSIGN Knobs... you have access to COMMON AsgnKn1 and COMMON AsgnKn2 - which have been named "Pno/Rds" and "Strgs" respectively and are direct access to the VOLUMES
I’ve attached the data as a Zipped MODX CONNECT (.X8B) file. This can be opened by unzipping it and opening it with MODX CONNECT... which can send it to your instrument’s Edit Buffer (it overwrites nothing) you can play it, edit it, study it, etc. you can store it in MODX CONNECT or in your instrument’s User Bank.
I’ll also post it to Soundmondo
https://soundmondo.yamahasynth.com/voices/53807
Thanks for the question. Hope that helps.
Hi Badmister,
Thanks very much for your very detailed answer! I tried and I managed to do the job. I used the common assignable knobs to at the same time change the volumes of multipe parts.
Another option would be to use Envelope Follower.
Say PART 1 is strings, PART 2 is an FM sine wave, PART 3 is the piano and PART 4 is the EP ("rhodes" ).
You would set PART 2's output to OFF so it doesn't create any sound. But it will be used for envelope following.
In PART 2's AEG (the FM-X PART) you can set the hold level to 99. This will keep a note sustaining forever after you press a key. There's more you can do to smooth this out - but that's the simple story. Then use Envelope Follower 2 as the controller (modulator) to offset the level of PARTs 3 and 4 (your two piano types). Now you can use slider 2 to control both PARTs 3 and 4 volumes.
You can reorder the PARTs as PART 1 as FM-X and PART 2 as strings if you prefer slider 1 controlling both pianos and slider 2 controlling strings.
Current Yamaha Synthesizers: Montage Classic 7, Motif XF6, S90XS, MO6, EX5R
Thanks Jason.
So this would be a method to use the sliders instead of the assign knobs to change the volumes of 2 parts at the same time?
By the way, put this thread on Facebook (Yamaha Montage/MODX group)
Mr. Bad, is there also a way to control the Assign 1-4 buttons to CC's (or if not, to Sysex commands)?
Each of the 16 Parts has its own Assign Knobs, 1-8. (Remember you can swap the Assign Knobs from 1-4 to 5-8 using the [ASSIGN] button). When 5-8 is selected the button will flash.
The Assign Knob CC#’s are programmable on a per Performance basis. CC (Control Change) messages are Channel specific messages.
From the HOME screen:
Press [EDIT]
Touch “Control” > “Control Number”
The defaults are cc17-24 for Assign Knobs 1-8
Yes, using envelope follower would allow for you to use sliders for control. The slider is to increase and decrease the volume of a constant drone "dummy" PART that is not routed to your audible outputs. Instead, this PART is just the source for an envelope follower and the envelope follower outputs a low number for soft volumes and a high number for loud volumes of what it is following. In this manner, you can use envelope follower as the source controller to offset the volumes of a group of PARTs -- which is "following" the slider on your dummy PART.
It's just a way. Not the best. Not the worst. But if you want sliders to control the volume then it's one way to have this happen. One way because you could also use a slider to generate MIDI which is captured by a computer and then have the computer convert these MIDI messages into level MIDI messages for a group of PARTs. That's probably worse since it requires more gear and is not really any easier to setup. The only benefit of this method is that you get full 0-127 swing and 1:1 to your source slider. Something that envelope follower doesn't really accomplish because of the way envelope follower is difficult to get full 0-127 swing.
Current Yamaha Synthesizers: Montage Classic 7, Motif XF6, S90XS, MO6, EX5R
Hi Bad Mister,
This topic was a while ago, but an addition question to this topic. Using the assign button as you indicated, I noticed the volume sliders over overridden, which may be "expected behaviour". But also I noticed that scenes do not keep their part volumes any more (so if you move from scene 1 to 2, and back to 1, there original volumes of scene 1 are not restored. Probably because they are overridden by the assign button levels. Is there something to do about that? (So for example "remember" the assign button levels per scene)?
I do not recall using assign buttons ?
There are AsSw1 and AsSw2 (Assign Switch 1 and 2) which are buttons.
Re-reading this, perhaps you mean the [SCENE] buttons when you say 'assign button'. ?
If you are talking about [SCENE 1] and [SCENE 2] buttons, they will recall a VOLUME if it is a *stored* value. Here's what that means... If you do not list the VOLUME as a SCENE stored parameter, then the most recent VOLUME setting will persist. Newton's Rules of MIDI Physics: A MIDI value will remain as is, unless it receives a command to actually change.
You can review your current SCENE settings by going to the SCENE MEMORY screen... from HOME touch "Scene"
In order for a SCENE to send a VOLUME messages, the ON switch above MIXING 1/2 must be active (green).
The currently selected SCENE is listed across the top. And all changes made on this screen are immediately registered.
If in [SCENE 1] the "MIXING 1/2" MEMORY switch is OFF, then no VOLUME was memorized for that SCENE (it will inherit the last Volume value)
If in [SCENE 2] the "MIXING 1/2" MEMORY switch is ON, and the Fader is set to 99, then when returning to SCENE 1 the setting of 99 persists... it remains because no new value was indicated.
To activate a VOLUME setting for [SCENE 1], turn the MEMORY Switch ON and make that Volume setting with the slider indicator on this screen. (Use the screen to update the slider position/value).
Additionally, if the Volume has been assigned to a real time controller (an Assign Knob and/or the Super Knob, thus overriding the Fader) the Fader will move to the stored setting... whether or not that impacts the Output level will depend on how you have the Control Assign setup to influence the sound.
Remember the Fader is not the only control available to influence output level - The Fader setting could be used to set a MINIMUM value from which you are using the Super Knob to boost (offset) the value (instead of control it from 0-127) or in some cases the entire output (0-127) is being controlled by the assigned controller... your mileage will vary depending on how much of the total control of the volume you have given to the assigned controller.
I just answered a post earlier today where the poster wanted to set a Minimum and Maximum range for Volume via AsgnKnob control... The Fader in this instance sets the MINIMUM value - there are times when you want the MINIMUM to be something other than silence. So the position of the Fader can be set so that in a Plano/String layer you might have the string have a minimum setting and a maximum setting that you are controlling with an AsgnKnob... (You don't always want full silence to maxed out... some times just from a certain minimum to a certain maximum). See this thread: https://www.yamahasynth.com/ask-a-question/change-volume-ranges-of-a-part#reply-97134
Hope that helps.
