Notifications
Clear all
The most importen answere was that the Asio on the Windows (PC) should’t be ”MODX” just ”Yamaha Steinberg USB ASIO”.
Very good lesson to get the basic understanding.
/MH
Posted : 12/05/2020 7:44 pm
This is pretty good to send beginner students to, but there are several inconsistencies I found:
* In Quick setup choose Audio Rec on DAW, leave quick setup and when you go to quick setup again it is indicating Standalone
- but it seems that it is still in Audio Rec on DAW anyway -> the indication is wrong (MODX BUG)
* Go to Mixing and see the single part, push Part 1 - 16, then press EDIT, it goes to Edit-Common/Audio, no PART SELECT 1 here
- must push Common to get to Part 1 'button' (touch screen) -> editor needs more proofreading
* You must turn up the knob "USB Volume (Monitor)" to hear it
- in Utility the USB Volume setting is shown, not told where to
set the "Monitor Volume" setting
- in Mixing the "Mst" indication does not reflect the Master Volume knob (on the front panel)
setting, but you can click on it and change it
but it does not change the Monitor Volume setting either -> editor needs more proofreading
* It says "Object Selection" when you right click where indicated
- nothing about seconds there -> editor needs more proofreading
* Something about a "main VOLUME Slider on the MODX" but if you
bring down the "Mst" slider on "Mixing" it DOES change level going to
Cubase, while the MODX "MASTER VOLUME" knob (on the front panel) does not -> editor needs more proofreading
* Something about "the main front panel VOLUME slider" - you mean the knob? -> editor needs more proofreading
Posted : 16/05/2020 10:49 pm

In Quick setup choose Audio Rec on DAW, leave quick setup and when you go to quick setup again it is indicating Standalone
- but it seems that it is still in Audio Rec on DAW anyway -> the indication is wrong (MODX BUG)
That is not how the “Quick Setup” works. Tapping on one of the listed Quick Setup options does not select a mode, per se, it is a macro of changes to the status of your Audio, MIDI, and Utility Settings. The numbered Setups (1, 2, and 3) are completely customizable.
You are expecting it to show you which one you selected, it does not. It recalls the stored settings... if you are looking for what ha actually changed, you are to look to the “MIDI Signal Flow” diagram, and the “Audio Signal Flow” diagram shown on the Quick Setup screen. Additionally, the “MIDI I/O” settings, the “Audio I/O” settings, the Part “Output Select” parameter settings, and the UTILITY system settings which can be included in your customized setup.
The diagrams and actual stored parameters change to show you your current status. A QuickSetup can be a dozen or more individual parameter settings, you determine which ones they are and they can each still be manipulated individually. Instead of scampering through all the parameters when you want to work with a DAW, tapping one of the Quick Setup options makes all your stored settings for that Setup.
When you tap a selection, instantly the stored settings are recalled. Quick Setup does not inform you which one you just tapped beyond it flashing as you tap it and by the diagrams and parameters themselves which are recalled by the template. Quick Setup 1, 2, and 3 are use customizable, name able and storeable... So it is working exactly as it is designed to work.
For example, the Factory “Quick Setup 1“ is “MIDI Rec on DAW” — Tap it and immediately you see Local Control = Off status change. Tap “Standalone” and immediately you see Local Control = On. That is one of eight critical settings that this template alters.
Tap “Arp Rec on DAW”, notice the change in routing for the MIDI Signal Flow, and how the Arpeggiator is now positioned so it can feed the MIDI Out.
Tap “Audio Rec on DAW“ , notice how the Parts are now routed to USB 1-30
For more on how these Quick Setups work please see the following:
Mastering MODX: MIDI Settings Explained
”Using Quick Setup can instantly call up appropriate sequencer-related panel settings by selecting convenient preset setups, allowing you to simultaneously and instantly set a variety of important sequencer-related parameters.“
Go to Mixing and see the single part, push Part 1 - 16, then press EDIT, it goes to Edit-Common/Audio, no PART SELECT 1 here
- must push Common to get to Part 1 'button' (touch screen) -> editor needs more proofreading
What it actually says is:
From the HOME screen, touch "Mixing":
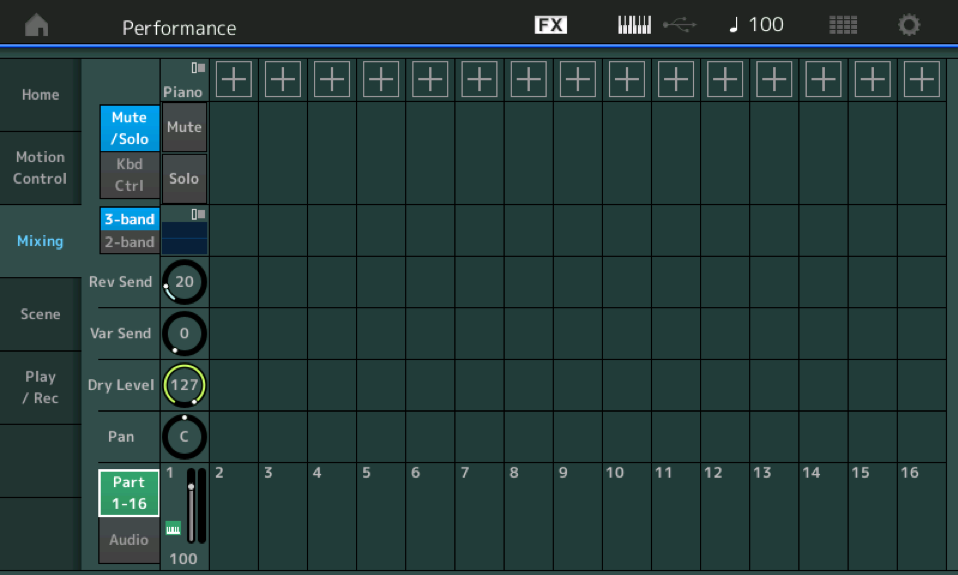
— We have the “Part 1-16” (green) view selected.
We will start here because it is a single PART and we will send audio output to the “MAIN L&R (USB Out)” for recording. As we go along we will learn to setup (bus) multiple audio outputs, as necessary, to record. The lesson here is to create an audio INPUT in Cubase to match each audio OUTPUT you use in the MODX; and then finally create an audio Track to document that signal. Let’s take it one at a time:
— Press [EDIT].
— Select [PART SELECT 1] to view PART 1 parameters. “Part 1 – Common” appear in blue in the lower left corner of the screen.
— Touch "Part Settings" > "General". "PART OUTPUT" is set here: Touch the box to see the pop-n menu with various options. We want "Main L&R" but you can use the Data Dial to scroll through the possible routing scenarios.
Posted : 16/05/2020 11:16 pm

In Quick setup choose Audio Rec on DAW, leave quick setup and when you go to quick setup again it is indicating Standalone
It's my opinion that the interface on this screen is clunky and poorly designed. Leading to questions and misconceptions such as this. And it's not your fault to be misled by the GUI - it's the GUI's fault for being so confusing.
Which button is highlighted is completely meaningless. When you are on this screen (and stay on this screen, not venturing off) and then press different template buttons - the screen does tell you which button you last pressed. However, which button was pressed is not remembered so any time you come back to the screen - the button will be reset. HOWEVER - the settings changed by pressing the button is not reset.
The way the buttons work is actually more like an old radio with the push buttons. When you press a button, it will set the radio station to whatever is programmed but then you let go - you can't "see" which button is pressed. I would just ignore which color the buttons are. You use them when you need to set the settings according to what the button does.
Note that certain settings the buttons change are settings that will be reset when you recall a new Performance. Therefore, you have to go back to the quick template menu and re-press the button after switching to a new Performance - if those are settings you want/need. Pressing the button does NOT change a mode. These are not mode buttons. It's just a way to quickly (and, at times, just temporarily) change settings. System settings will persist and these buttons do change system settings. But some settings such as the PART output (main l&r vs. USB 1&2, 3&4, etc) are not system settings. These will not persist when you change Performances.
Let me call back to the "meaningless" comment I made earlier. Say you press "Standalone". That's what you want. Pressing "Standalone" sets a handful of settings. Right after that, you can go to system settings and change all the settings that "Standalone" would have set. When you go back to the quick templates, the interface is still going to say "Standalone". It really doesn't mean anything which button is highlighted. The only meaning here is that AFTER you press one of the buttons - right after - the settings will be adjusted to match what the pressed button does.
Posted : 16/05/2020 11:21 pm
