I love the pad on "CFX & Pad" but I wish the pad started at zero volume on the Super Knob (counter-clockwise position). I tried changing the volume to 0 and then pressing the Control Assign, then nudging the Super Knob, but that didn't work. When that particular method doesn't work I get lost. Any help?
Thanks,
Phil
Try this...
Select PART 5 > Edit > Mod / Control > Control Assign, and choose "AsgnKnob 2" under 'Display Filter'. Change the Destination 4 'Cutoff' Ratio from +10 to +24
Then while still editing PART 5, select Element 1 > Filter > Type, and change the 'Cutoff' from 128 to 50
Basically, it just needed the Cutoff lowered on Element 1 (of PART 5) so that it no longer makes a sound when the SuperKnob is turned all the way to the Left, then the Cutoff Ratio that is controlled by AsgnKnob2 increased, so that when the SuperKnob is turned all the way to the Right, it increases the Cutoff to the same amount as it was originally programmed to do.
I love the pad on "CFX & Pad" but I wish the pad started at zero volume on the Super Knob (counter-clockwise position). I tried changing the volume to 0 and then pressing the Control Assign, then nudging the Super Knob, but that didn't work. When that particular method doesn't work I get lost. Any help?
Thanks,
Phil
That particular method *should work*! Which got me thinking, ‘why didn’t it work?’ It is exactly what I would have done!
Here’s what I discovered.
You went to Part 5, set the Part Volume = 0
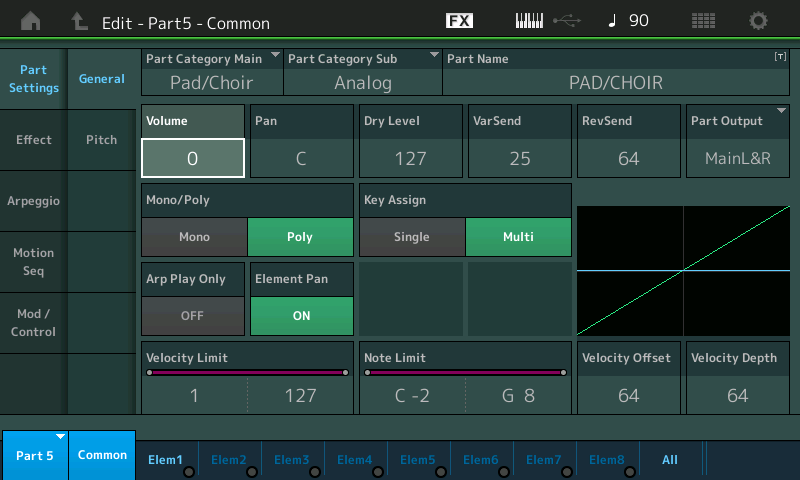
With the VOLUME highlighted you pressed [CONTROL ASSIGN] and activated the Super Knob. The exact steps to make all of the Knob assignment in between.
The clue shows in the form of a momentary drop-down message that appears when that assignment is made:
“Modified: Common AsgnKnob4 –> AsgnKnob3”
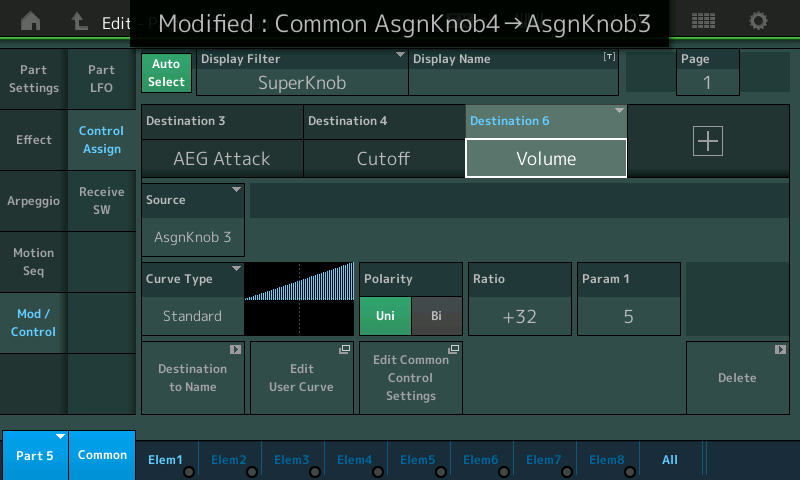
This drop down will inform you which of the Super Knob’s 8 Common Assign Knobs has been tasked with controlling Part 5, and which of Part 5’s 8 Part Assign Knobs is tasked with directly controlling the VOLUME.
This means on the upper Common level of the architecture, the Super Knob's Common Assign Knob 4 has been made the control that will move Part 5 Assign Knob 3 > Part Volume
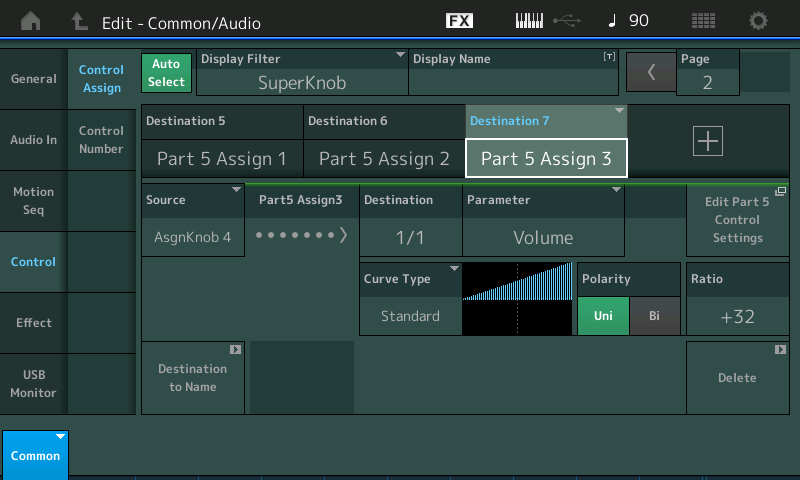
This assumes that Common Assign Knob is set to move with the Super Knob. Normally this would be the case BUT it doesn’t?
Here's why:
From the HOME screen, with the [ASSIGN] button lit, move the Super Knob, you will notice by the lighted knobs, only Common Assign Knobs 1, 2 and 3 are linked to the Super Knob’s movement… Common Assign Knobs 4-8 do not move. No wonder we are not hearing the result we expect: Common Assign Knob 4 is not in motion.
When you check the Super Knob Link…. Here’s how: on the HOME screen
Touch “Motion Control” > “Super Knob” — this is where the 8 Common Assign Knobs get their marching orders from the Super Knob.
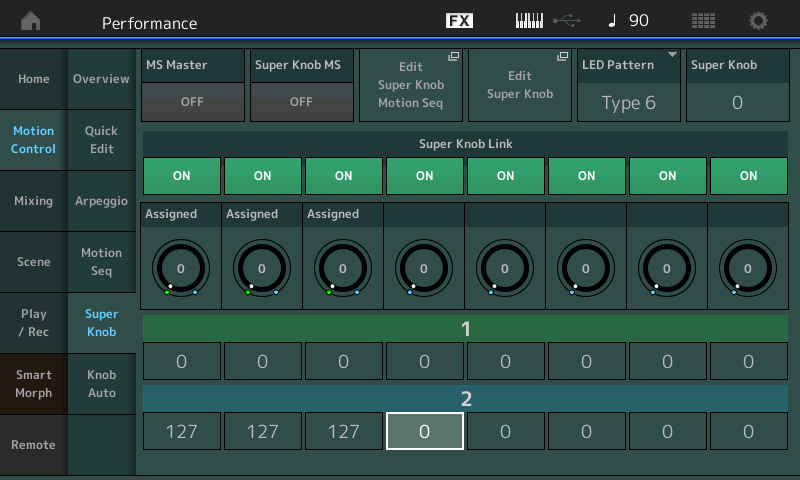
The Assign Knobs 4-8 have their Links set to ON but the Minimum-to-Maximum range is set to 0 ~ 0 (no movement). That’s the problem!
For Common Assign Knob 4 set the top (green) value = 0 for minimum, and set the bottom (blue) value = 127 for maximum.
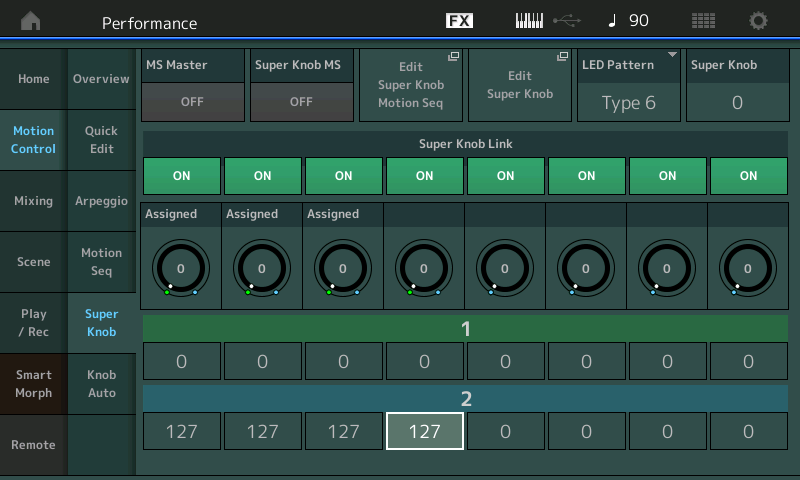
Now the Super Knob moves Common Assign Knob 4 which moves Part 5’s Assign Knob 3 which is controlling the Pad VOLUME
Your methodology was absolutely correct… there was a booby trap set for you … in the form of deactivated (for all intents and purposes) Common Knobs 4-8.
I like the variety of ways to achieve the same thing (or close to the same).
My first inclination was not to touch the volume and instead tweak the Cutoff, which doesn't change the Volume (increased) from what it is on the 'Preset' Performance when the SuperKnob is turned all the way to the Right (clockwise position).
However, I also like the adding of 'Volume' control option as well. With adding 'Volume' control, by default it causes the volume to be louder than the 'Preset' Performance, once the SuperKnob is turned all the way to the Right (clockwise position). And maybe this is even better for some people or particular instances/use cases. But if you wanted the volume to be the same at that clockwise position, then you can always just lower the Ratio (and possibly the Curve Type if desirable) so that the volume starts at 0 while the Super Knob is turned to the Left (counter-clockwise position) and ends up at the same volume as the 'Preset' Performance once it's turned all the way to the Right (clockwise position).
It's great to have options and these are just 2 of many ways to achieve this on the Montage... 😉
Thank you both for your responses! I'll give them a try.
Phil
