Notifications
Clear all
Topic starter
I'd like to do a silly little edit...using the Piano & Strings perf, I'd like to turn the string pad on/off using one of the assignable buttons instead of twisting the Superknob to increment/decrement the string volume under the piano. I can't for the life of me, figure out how the Superknob is assigned to the controller that's assigned to volume for the string pad. Help!
Posted : 12/08/2017 2:24 am

The Performance "Piano & Strings" is a Single PART, 8 Element AWM2 program from the Motif XS/XF Library.
Elements 1, 2, 3 and 4 make up the Acoustic Piano
Elements 5, 6, 7, and 8 make up the Strings
From the HOME screen:
Press [EDIT]
Press [PART SELECT 1]
The lower [COMMON] button lights
You can now use the bottom row of buttons (right front panel) to MUTE and UNMUTE the eight Elements. Notice how they are brightly lit when active.
You can use the row above to "Select" an Element for viewing/editing. Notice how these buttons glow less brightly, indicating you can use these to select an Element 1-8
In the screenshot below you can see on the "Mod/Control" > "Control Assign" screen, we have the "Auto Select" function active (green)
Move Assign Knob 1
You can see that the Strings (Element Switches 5-8 are active) and are going to change "Element Level" when Assign Knob 1 is moved
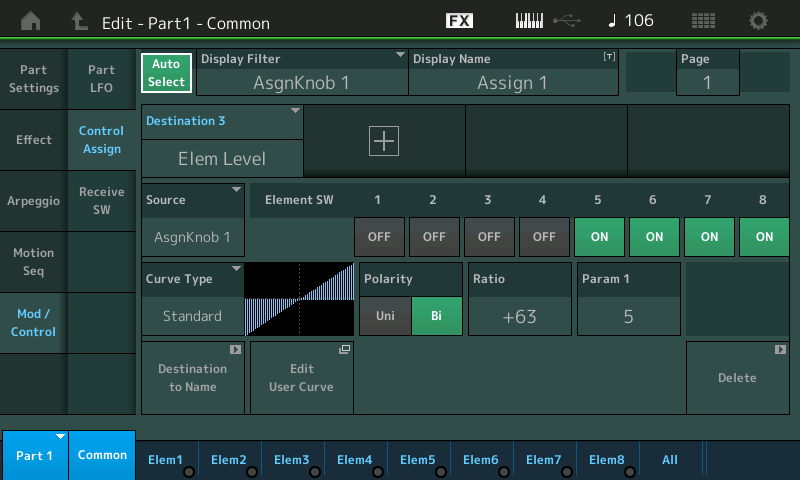
Assign Knob 1, as you might image, is going to be linked to the Super Knob... on the upper [COMMON] level of the edit architecture...
Press the upper [COMMON] button
Touch "Control" > "Control Assign"
Move Assign Knob 1

You will see that "PART 1 Assign 1" is the Destination... This means the Part 1's Assignable Knob 1 is linked to movement of the Super Knob.
You can use the SUPER KNOB as follows to accomplish your goal.
Turn the Super Knob full down (counterclockwise)
Hold [SHIFT] + [SCENE 1] (the blue button)
The screen will briefly say "Scene Stored"
Move the Super Knob a bit to a position where you bring in the Strings a bit... take another "snapshot"
Hold [SHIFT] + [SCENE 2]
Move the Super Knob a bit more to a position where you a bit more Strings to Piano... take another "snapshot"
Hold [SHIFT] + [SCENE 3]
and so on... Now you can simply press a blue SCENE button when you wish to change the balance of Piano to Strings.
You should navigate to the upper COMMON > "General" screen
Touch the box with the "Performance Name" and add your initials or something to differentiate your edited version from the Factory version
Press [STORE] and store it as a New USER PERFORMANCE.
Just FYI: the acoustic piano Elements 1-4 are under control of Part AssignKnob 2... but it is not linked to the Super Knob. You can move AssignKnob 2 directly to adjust the piano volume.
Hope that helps
Posted : 12/08/2017 3:37 am
Topic starter
Ok, this can work and I can figure out the switch assign too if I want. The ONE thing I missed...AND you also didn't mention is that the "ASSIGN" button next to the Superknob needs to be lit for the "Auto Select" to work for the assign knobs. My "Assign" button is dark for most of my performances right now and I hadn't made the connection between the "Assign" button and the Superknow AND the row of assign knobs 'till now. Thanks!!
Posted : 12/08/2017 5:19 am

The 8 rotating dials above the sliders are generically called Knobs 1-8. They can assume different uses depending on the mode of the keyboard.
The knobs can be assigned to "common" level assignable knobs - where the knobs can control multiple PARTs. To enter this mode, you can either press [PERFORMANCE] (HOME) or the PART [COMMON] button (the button right under [LIVE SET]). Also, the [ASSIGN] button must be lit orange or pressed if not lit (located to the left of superknob). Your indication that Knobs 1-8 are in the "common" level assignable knobs would be that both the [ASSIGN] button is lit and also the PART [COMMON] LED is lit bright amber.
When you press the [PART CONTROL] and PART SELECT buttons 1/1-8/16 (any of the 16 first buttons under "PART SELECT" - aka Number A [1]-[16]) then the Knobs 1-8 will be in PART-level assignable knob mode corresponding to the selected PART. This assumes the [ASSIGN] button is also lit bright amber. When selecting this mode, the PART [COMMON] LED will change to dim amber (still lit, but not bright). You can also press [PERFORMANCE CONTROL] and any of the 1st 8 buttons (Number A [1]-[8] ... or "1/1" through "8/8") to select PART 1-8 which also invokes the Knobs 1-8 as PART-level assignable knobs (PARTs 1-8 corresponding to the selected PART).
There are various non-assignable knobs (fixed-function knobs) that Knobs 1-8 can assume. For example, pressing the [MULTI] button just to the lower-left of the 1st Knob will set each knob to Pan (L/C/R) or Variation or Reverb (levels) depending on the green LED above the [MULTI] button. Pressing [MULTI] consecutive times will scroll through each option (Pan, Variation, Reverb).
Also, the Knobs 1-8 can assume the fixed functions [TONE], [EQ/FX], or [ARP/MS] which correspond to the functions silkscreened above the Knobs 1-8. Pressing any of these 4 buttons [MULTI], [TONE], [EQ/FX], or [ARP/MS] will turn off the [ASSIGN] LED which indicates the Knobs 1-8 are no longer serving as assignable knobs.
-------------------
For your superknob question - in addition to what has been offered thus far, you can also press buttons to move the superknob instead of physically rotating the knob. There are two buttons above superknob which are like radio station buttons for instantly going to saved superknob positions. You should be able to press [SHIFT] plus one of these two buttons to memorize the superknob position. These sort of work like a super-knob only scene switch between two superknob positions.
Posted : 12/08/2017 7:40 am
Topic starter
Good stuff! Thanks Jason and BM!!
Posted : 12/08/2017 4:02 pm
