Notifications
Clear all
Topic starter
I am able to record music through MIDI connection with my Yamaha Montage and my Windows Laptop - Cubase 10. Everything works just perfectly as explained by Mr.Phil in his Cubase Integration video. Now the interesting question comes. How do I recall all my instruments back again? There is a reason why I'm asking this.
When I close, save and recall the same instrument settings, the playback of recorded MIDI plays absolutely fine. But if I want to record another brand new track to that song and I play the voice on my keyboard, the voice of each performance sounds muffled (as if two performances of the same voice is played back on the output). It took so many months to figure out what causes the sound to be muffled, and the reason is two voices are played in same phase. That was for a totally different issue, I figured out the reason behind muffled sound. Now when recording on Cubase, I was unable to find out where from the other signal was flowing.
When I record I choose INIT / Multi Part MIDI and select each Voice. Recording on DAW is also enabled. After I'm done with my recording, I try to save and the setting on my Montage saves as Multi-part performance. When the same is being recalled for playing on keyboard, sounds plays muffled when played on keyboard and not when Cubase plays the recorded notes. After struggling for hours, I tried to compare INIT General MIDI setting and the one I saved, only difference I could find was Kbd Ctrl ON.
1. When I turned off Kbd Ctrl OFF, the sound coming out from my Montage was normal back again. Hurray! Is this how instrument settings should be recalled?
2. After recording an Arpeggio on Cubase should I turn off the ARP button? There seem to be a major difference on how the actual arpeggio sounds on the keyboard Vs how the arpeggio gets recorded as MIDI notes and when played back it play entirely different. Then I started recording it as Audio Signals or like a fully pressed chord on the Cubase Piano roll. What's wrong here?
Posted : 30/08/2019 11:31 pm

You are still guessing. Your solutions may fix the problem temporarily) but as you state things that are not actually true, we must conclude that you are not setup and working properly... we cannot agree with some of your conclusions.
Fortunately, we can and will help you. Promise. Then you can stop guessing. Let’s start with which version of Cubase 10 — yes, the version makes a difference. Are you using Cubase AI 10 or Cubase Pro 10?
We’ll continue here as if it is Cubase AI 10... but if you are using Cubase Pro 10 please let us know (there are more options available, as you might imagine in the Pro version). It gets easier with Pro...
How do I recall all my instruments back again?
Download and install MONTAGE CONNECT. This utility will run inside Cubase and will automatically capture your MONTAGE Performance. Even if you add other Parts to the Performance later, MONTAGE CONNECT will automatically update itself each time you SAVE the Cubase Project. Once you set it up, it can run totally in the background. You never have to bother with it. It simply does all the secretarial work for you. And when next you Open this Cubase Project, MONTAGE CONNECT will automatically restore the exact Performance you were working with, including any additions, edits, etc., that you’ve made to it! It’s free, it makes your life easy. If you are not using it... you’re working too hard!!!
When I close, save and recall the same instrument settings, the playback of recorded MIDI plays absolutely fine. But if I want to record another brand new track to that song and I play the voice on my keyboard, the voice of each performance sounds muffled (as if two performances of the same voice is played back on the output). It took so many months to figure out what causes the sound to be muffled, and the reason is two voices are played in same phase. That was for a totally different issue, I figured out the reason behind muffled sound. Now when recording on Cubase, I was unable to find out where from the other signal was flowing.
MONTAGE CONNECT will restore everything automatically. Whether or not you are hearing doubling (as if two performances of the same voice on my keyboard...) is matter of knowing, not guessing, about the current routing. We can help you with that, too, but need a better idea about what you are doing, specifically.
You can give us specifics about what you are doing (recommended best method) or we can give you a generic answer that you have to make fit to what you really want to do... you can better follow along when it’s actually what you want to accomplish.
1. When I turned off Kbd Ctrl OFF, the sound coming out from my Montage was normal back again. Hurray! Is this how instrument settings should be recalled?
We can’t just say, Yes. It’s not always that easy.
Yes, there are times when that is how you should recall things. It depends.
Knowing what KBD CTRL is will clarify this for you. I’m sure you know it’s short for “Keyboard Control”. It is designed for when you want to play more than one PART simultaneously. If you are Sequencing using Single Parts... that is, one instrument per Part, one MIDI Track, on one MIDI Channel... then YES, you want to leave KBD CTRL Off.
Here is a tip for when you are working in this manner:
Touch the “FX” icon on the very top line of the MONTAGE screen. Set the “KBD CTRL Lock” = ON.
what this does is temporarily lock KBD CTRL to Part 1. This way when you add a new Part, that new Part can be added without layering with any of the others. It will help you manage KBD CTRL... Because while it is active (while the Lock is On) only the *selected* Part will sound when you touch the Keyboard. If you “+” add new Parts, the new Part will play by itself (not layered with anything else).
2. After recording an Arpeggio on Cubase should I turn off the ARP button? There seem to be a major difference on how the actual arpeggio sounds on the keyboard Vs how the arpeggio gets recorded as MIDI notes and when played back it play entirely different. Then I started recording it as Audio Signals or like a fully pressed chord on the Cubase Piano roll. What's wrong here?
First, if you are Recording Arpeggios to Cubase, you need to remember to set ARP OUT = On if you want the output of the Arpeggiator to place MIDI events to your Cubase Track.
If you are recording the output of the Arpeggiator to Cubase, then it is important to realize that this data is now MIDI events... you can stop referring to it asan Arpeggio. Yes, you can now disarm the Arpeggiator. You can hold [SHIFT] + [ARP ON/OFF] (the button will flash indicating the Arp is now bypassed).
There should be absolutely no difference between when the Arpeggiators are playing in real time, and how they sounds when you play it back. (There is one exception, but that’s another discussion).
My questions for you:
What version of Cubase? AI or Pro 10?
Are you using MONTAGE CONNECT? If not, why not?
Can you give us an idea of what your Performance looks like, what’s in each Part?
Posted : 31/08/2019 12:47 am
Topic starter
1. I recently downloaded and installed Cubase 10 Pro version.
2. I never tried Montage Connect since I had no idea what it is used for. I thought it was a Performance Editor software driver. Also in your Cubase integration YouTube video, I did not see any mention of Montage Connect. I have installed it but I don't know how to bring it up in Cubase when I start recording. Please advise if I should choose any template. Where do I go and bring up Montage Connect? Or should I simply run it in the background. I'm unable to connect all the dots here.
3. My performance include a Concert Piano, Strings, Warm Pads and Bass Guitar. I just try to make cover videos.
Posted : 03/09/2019 6:57 pm
Topic starter
And big thanks for the detailed explanation!!
Will explore Montage Connect once you provide my directions on how to set it up and recall in Cubase.
Posted : 03/09/2019 7:01 pm
1. I recently downloaded and installed Cubase 10 Pro version.
Excellent! The MONTAGE and Cubase Pro is the best pairing of hardware and software.
2. I never tried Montage Connect since I had no idea what it is used for. I thought it was a Performance Editor software driver. Also in your Cubase integration YouTube video, I did not see any mention of Montage Connect. I have installed it but I don't know how to bring it up in Cubase when I start recording. Please advise if I should choose any template. Where do I go and bring up Montage Connect? Or should I simply run it in the background. I'm unable to connect all the dots here.
MONTAGE CONNECT was not available when that early video was shot. You have installed it... Excellent. It can be run as a Stand-alone application, but it’s true power is when it is running inside of Cubase Pro.
Let’s start with a test setup so you can see how it all works together. Yes, we are going to recommend choosing a template. Templates can be trouble because they take care of all the small details you should actually be learning. But we will (hopefully) be able to explain to you what it is doing... in which case, the template can be very useful.
First, you should have downloaded and installed the “Yamaha Steinberg USB Driver” version 1.10.4 for Windows. This Driver will handle Audio and MIDI communication between the MONTAGE and Cubase. You likely have already done this — I include this for others who may find this thread.
Turn on your MONTAGE — It should be powered on and ready when you launch Cubase Pro. During the launch of Cubase you will see it scanning its environment... it is querying the Ports and finding components that are connected.
In the MONTAGE, Let’s setup to record MIDI Tracks first. From the HOME screen, press [UTILITY] > “Settings” > touch “Quick Setup” or you can press [SHIFT] + [ UTILITY] (which also takes you to the “Quick Setup” screen...
On the Quick Setup screen, tap the box “MIDI Rec on DAW” option — This makes all the setting necessary to set your MONTAGE to communicate Out via USB-MIDI to Cubase.
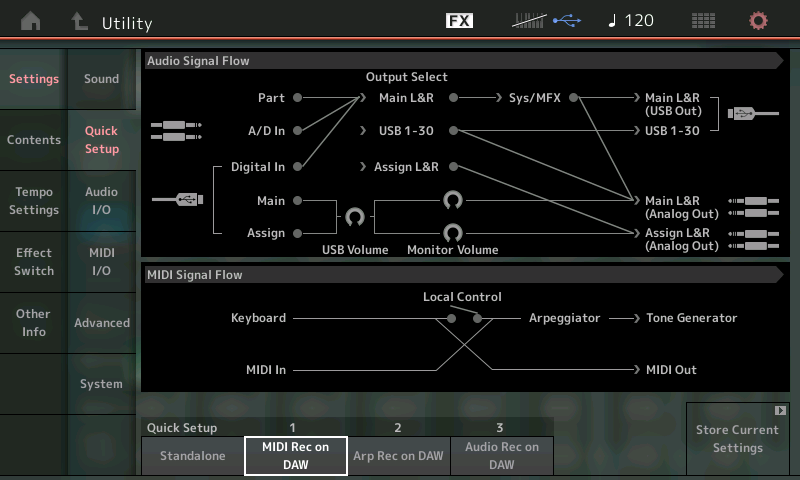
Significantly, it sets “Local Control” = Off, which disconnects the MONTAGE Keyboard from the MONTAGE Tone Generator. Don’t panic... when we have completed the routing through an active Cubase MIDI Track you will know we have completed our touring scenario. Just FYI: the muffled or weird sound happens when Local Control is On and you are echoing signal through a Cubase MIDI Track — you are actually hearing both signal paths. By setting Local Control Off we are breaking the normal direct connection.
While in [UTILITY] > “Settings” > touch the “MIDI I/O” > Set the “Super Knob CC” = OFF, and Set the “Scene CC” = Off.

This will cause them to Output System Exclusive message. Cubase Pro will Record these to a separate Track that only records SYSEX.
Launch Cubase Pro 10
During the launch it may find your MONTAGE and the “Yamaha Steinberg USB ASIO” Driver and ask you if you want to use it as your ASIO device... Yes you do.if it doesn’t not to worry... we will show you where that part of the setup takes place — just in case you ever need to troubleshoot it yourself.
Once Cubase has opened, let’s setup a few important Preferences...
Go to EDIT > PREFERENCES... > MIDI > MIDI FILTER > usually Sysex is checked in both columns... please uncheck it. We do not want to filter it... we want to use it.
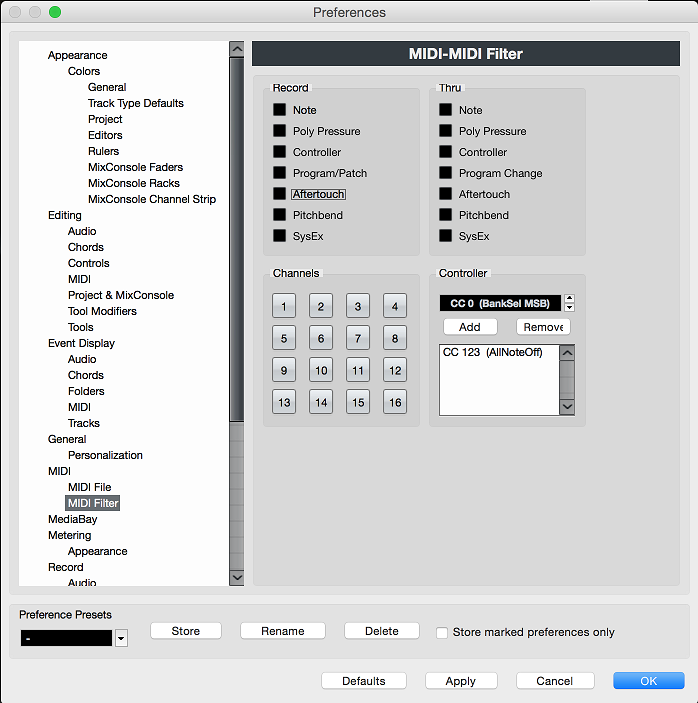
Click APPLY
Click OK
Go to FILE > NEW PROJECT > RECORDING
Select the template “Yamaha MONTAGE multi channel recording”

This Template has what is called an INPUT TRANSFORMER - this simply allows each MIDI Track to only record specific data. MIDI 01 will only record data output from the MONTAGE on MIDI channel 1, MIDI 02 will only record data output from the MONTAGE on MIDI Channel 2 and so on...
The Sysex Track will only record the movement of the Super Knob and the operation of the SCENE buttons.
![]()
In Cubase, the template opens with a VST INSTRUMENTS Folder (containing Montage Connect), a MONTAGE MIDI Folder, a MONTAGE AUDIO Folder; the MONTAGE Connect utility will initially be opened -make sure "Auto Sync" is ON (then you can close the "MONTAGE Connect" window, it will run and function automatically in the background).

(This screenshot is a Mac but yours will look similar.)
VST Instrument Folder: contains MONTAGE CONNECT - the "Track Lane" here is a pseudo-Track - no data is stored or recorded here, it simply reminds you that the MONTAGE CONNECT utility will be able to automatically capture and restore your MONTAGE Performance. Every parameter is captured and stored with the Cubase Project when you SAVE. The template has the AUTO SYNC = On so that whenever you open your Project, Cubase will automatically bulk dump the Performance you were using at the time back to your MONTAGE's Edit Buffer. This means you do not have to even have the Performance pre-loaded in your MONTAGE - everything is bundled and stored with your Cubase (.CPR) Project file. This FOLDER can remain closed - MONTAGE CONNECT works in the background, automatically, without you having to mess with it at all.
MONTAGE MIDI Folder: 17 MIDI Tracks (shown above):
- SYSEX Track - The Input Transformer for this Track has been set to reject everything that is not a SYSTEM EXCLUSIVE message. When Record is engaged it will capture all Super Knob movements and Scene button presses.
- MIDI Track 01-16 - Each of the numbered tracks have been setup by their Input Transformer to reject all Sysex messages and to reject all but the one MIDI channel that matches its name. Each MONTAGE Part will transmit directly to and receive data from the correspondingly numbered MIDI Track.
When you want to record to the Track labeled MIDI 01, by highlighting that Track in Cubase Pro, and selecting PART 1 in the MONTAGE you will have completed the routing circuit. As you play the keys you will see the MIDI Activity bar on that Track show incoming MIDI data.
If ever you want to record Multiple Parts from the MONTAGE, say you have a 2 Part program in the MONTAGE, you would select (highlight) two Tracks in Cubase. You click on the first and then SHIFT Click on the second. They both highlight. The INPUT TRANSFORMER will ensure that Track 1 only Receives data sent on Channel 1, and Track 2 only Receives the data sent on on Channel 2...
In order for MIDI communication to take place you are routing message THRU Cubase. So activating (highlighting) a Track, or Tracks, in Cubase is how you get the signal to track back to the MONTAGE Tone Generator.
Extra Credit:
The Template also have 16 Stereo Audio Tracks (below the MIDI Tracks)... For more details and please see the following article
MONTAGE and Cubase Pro 9 Workflow
Although it is using Cubase Pro 9, much of it applies in full to Cubase Pro 10
Of course, if you have specific questions - post back here...
Posted : 03/09/2019 9:07 pm
Topic starter
Thanks do much Phil! Will try everything and keep you posted!
Posted : 05/09/2019 5:47 am
Topic starter
Also it does look like what I guessed seemed be true. In another DAW setup video, another gentleman suggested to turn off “Local Control”. If this is not done both Montage sound and the Cubase midi sound is heard in unison as duplicate.
Posted : 06/09/2019 7:18 am
You can see this on the MIDI Signal Flow diagram. Signal travels left to right.
You play the KEYBOARD ... the signal going to the ARPEGGIATOR and TONE GENERATOR is not allowed when LOCAL CONTROL is OFF (broken circuit).
It travels to the MIDI OUT .... which arrives in Cubase. The active Cubase MIDI Track echoes the MIDI data back to the the synth... where it arrives at the MIDI IN ... and now passes through the ARPEGGIATOR and arrives at the TONE GENERATOR.
Easy to see how if LOCAL CONTROL in ON the signal will have two pathways (thus the doubling of signal).
Next to the “LOCAL CONTRL” parameter, in the screenshot above, is “ARP MIDI OUT” parameter. If you’re curious to learn more, temporarily switch ARP MIDI OUT = ON.
You can see that this repositions the Arpeggiator Block so that the notes generated by pressing Keys travel to the Arpeggiator and will reach the DAW (Cubase).
All the Signal Flow diagrams are dynamic... they are not fixed pictures, they actually represent your current status. Knowing how to read them is a most important skill when learning to troubleshoot problems on your own. As you can imagine the “Quick Setup” for “Arp Rec on DAW” flips this “ARP MIDI OUT” parameter to ON.
Hope that helps.
Posted : 06/09/2019 7:38 am
Topic starter
This was very helpful and informative article. I tried everything today and it worked! Awesome!
This brings 2 more interesting questions in my mind:
1. I have an existing project that uses only VST instruments. If I want to add 4 new Montage Track instruments the way you outlined, how do I do that without having to start from scratch?
2. I have customized my own voices and stored in Montage that has minimum 5 parts. Example, I have created a customized String Performance of up to 10 parts with different zones, velocity, dynamics & effects. If I import that into my MIDI channel Track 1 through Category Search from Montage, will I fall short of remaining MIDI Tracks?
What I mean is I’m calling my “Musicians” for each MIDI track. How does this work?
Posted : 07/09/2019 6:05 am
1. I have an existing project that uses only VST instruments. If I want to add 4 new Montage Track instruments the way you outlined, how do I do that without having to start from scratch?
You can either move the other Project’s Tracks into this MONTAGE template setup or you can learn how to setup the MONTAGE template in the existing Project.
And that is the problem I always have with Templates... while they work brilliantly, they teach you nothing about how they do what they do. In the case of this “Yamaha MONTAGE multi channel recording” template, it is brilliant because
1) it sets up the MONTAGE CONNECT utility as a VSTi
2) it sets up three types of Tracks: one that records Sysex (for the Super Knob and Scene messages) a second type, MIDI Tracks, one each for the sixteen possible MIDI channels, and a third type where there are sixteen Stereo Audio Tracks, one for each of the stereo USB pairs of audio Outputs
3) it sets up everything concerning MIDI Clock including the MONTAGE Port 1 as the clock destination.
And because it does everything for you, you only learn to depend on it... instead of learning how to setup the routing yourself. So your question is... what if I want to add MONTAGE to an already existing Project. The answer, of course, is in knowing HOW TO setup Cubase Pro manually to do everything the Template is doing. And this is highly recommended... but I must state, it might be easier just to copy your existing VST Tracks into the Yamaha MONTAGE template... add the VSTi’s and copy their Track data into a Project that has the MONTAGE template setup.
I can help with the harder method... because knowing HOW the Template was made, will help you master Cubase Pro and the MONTAGE.
(In my opinion two of the premiere tools for music production).
Let’s begin with setting up the MONTAGE CONNECT in Cubase Pro. You add it as a VSTi.
In Cubase Pro 10 on the far right side of the main Project screen, you’ll find tabs for “VSTi”, “Media”, “CR” and “Meter”... Select “VSTi” you can add MONTAGE CONNECT there as either a Track or Rack Instrument. Clicking on either one you’ll see a list of VSTi by category. MONTAGE CONNECT will be found under “OTHER”

If you add it as a “Track” Instrument you need not worry about the Audio Output... MONTAGE CONNECT will not output audio.
If you add it as a “Rack” Instrument you need not worry about the Audio Lane that is created.. nor do you need to create a MIDI Track.
The MONTAGE CONNECT will not be using the Audio feature... it simply will simply be handling bulk communication between the MONTAGE hardware and Cubase.
Let’s say you click on “RACK” > you look under “Other” > you select MONTAGE CONNECT
This will create a VST Instrument Folder If none exists; it will add Sub Folder called “MONTAGE CONNECT”
That Sub Folder will contain Automation Lane and an Audio Lane... neither of which will be used.
You will be asked “Do you want to create a MIDI Track assigned to plug-in “MONTAGE Connect?”
Click “Cancel”
The MONTAGE Connect window will appear.
Click the AUTO SYNC box to activate it — green is ON
You can now close the MONTAGE Connect window
On the right side you’ll see an item in the VSTi Rack for the MONTAGE Connect... there is an ON button, the letter “e” (this is used to open and close the MONTAGE Connect window... it you hover you mouse over the icons they identify themselves. “e” = Edit Instrument.
On the Track area of the screen you can collapse the MONTAGE Connect Sub Folder.
Right click in the Track list area to see the pop-up menu, select “Add MIDI Track”

Set the Count = 4
You can put a Name it if you wish ...If you name it Montage the Tracks will be named Montage 1, Montage 2, and so on
We will now setup each of the four Tracks to communicate with the Montage
We will activate the INPUT TRANSFORMER such that each Track will only record a single MIDI Channel.
Select the Track: “Montage 1”
Set the MIDI INPUT = All MIDI Inputs
Set the MIDI OUTPUT = MONTAGE Port 1
Set the MIDI Channel = 1
Likely these are already set but verify the Track Inspector. What they mean is worth understanding...

To the left of “All MIDI Inputs” you see an icon of an arrow pointing into a box... MIDI coming IN. Only the items you have marked in your STUDIO > STUDIO SETUP > MIDI > MIDI Port Setup... > “In ‘All MIDI Inputs’” column will be able to send MIDI messages INto this MIDI Track.
To the left of “MONTAGE Port1” you see an icon of an arrow leaving a box... MIDI exiting OUT. This is where the MIDI data is going to be sent.
Just below the Output line is attached a field of boxes with a number... this denotes the possible MIDI channel that the MIDI data will be sent Out on.
Summary: A Cubase MIDI Track will Record all incoming MIDI data coming from connected devices. We have defined using “MIDI Port Setup” the MONTAGE Port 1 is the Input device. All MIDI Channels coming from this defined device are recorded to this Track. The Output defines where this Cubase Track is going to send all this incoming data. And that channel number is applied to *all* data coming this Track.
In the Track Inspector you’ll see an icon for the INPUT TRANSFORMER
![]()
Click on it and select “Local”
We are going to setup for this Track what data will be be allowed into this Track. The MONTAGE, as you may know can transmit multiple MIDI Channels simultaneously. Perhaps you are already seeing the issue... say you recall “Seattle Sections” a string orchestra sound where you are transmitting on 7 MIDI Channels simultaneously. Or maybe, you setup a Performance with an organ in Part 1, a Drum Kit w/arp in Part 2, a bass w/arp in Part 3... that’s transmitting on 3 separate MIDI Channels, simultaneously. If a Track records all incoming channels, but then forces all of those channel to the MIDI Out Channel... that means everything is re-channelized to just one Channel, that will be a mess.
How can we keep the Organ notes separated from the Drum Arp Notes, from the Bass Arp Notes?
Enter the INPUT TRANSFORMER. It is a Filter we can setup to block all but the Channel data we want from being recorded to each Track.
Click on the INPUT TRANSFORMER icon and select “Local”
A window pops up. “Montage 1 - Input Transformer”
Module 1 is selected - to the left of the title Module 1 click on the ON switch (turns blue)
Just above the Module is a box that allows you to Select Preset
Click here and select “Channel Filtering” - Pass CH 01
This will insert a line that says basically ... if you ain’t Channel 1, you shall not pass!
In the middle of the Input Transformer window is a divider... on the left side, (above the word “Action Target” ) click that “+”
This will add a second line... reading “Type is” ......”Equal”...... “Note”
Click on the word “Note” a drop down appears, change this to “Sysex”
This line translates to if you are a System Exclusive message you ain’t getting in here either!

Done, you can close this Input Transformer.
Select the next Track “Montage 2”
Click on the Input Transformer icon, select “Local”
A window pops up. “Montage 2 - Input Transformer”
Click on the “Select Preset” option box, select “Channel Filtering” - Pass CH 02
Add a line to Filter Sysex....
Rinse and repeat for each MONTAGE Track.
Now if you are going to be recording to Cubase using KBD CTRL of multiple Parts... you will want to setup an additional MIDI Track that is setup to record ONLY the System Exclusive data.
You would create a MIDI Track, activate the INPUT TRANSFORMER, Local, but instead of click on “Select Preset”, just go to the “+” left side on the center line... “Type is” ....... “Unequal” ....... “SysEx”....
Done.
In the MONTAGE remember to Set the “Super Knob CC” = Off and the “Scene CC” = Off
This indicates that rather than send a Control Change number, they send a System Exclusive message.
Extra Credit: the reason you will want to have SysEx on its own Track will allow you to isolate and animate just the individual sounds you want to hear when you are using the Super Knob to morph between KBD CTRL Instruments. Example, “Seattle Sections” has the first violins in Part 1, second violins in Part 2, violas in 3, cellos in 4, contrabasses in 5.... and solo violin-viola-cellos in 7... the SK morphs between the full orchestra (1, 2, 3, 4, 5) and the solo instruments (7)... what if you only want to hear the Second violins and hear how they morph to the solo instruments... well you could *select* just the tracks involved... having the SK movement on its own Track means activating and just the instruments you want to can now be done... without having the movement merged with another Tracks data. It simply is more elegant.
When you get into using the Super Knob as a serious weapon, having it isolated on its own Track is extremely powerful...
Posted : 07/09/2019 11:40 am
Topic starter
I saved all the settings from original template as User Presets and tried recalling them in my own project. I attempted to do all the settings as you suggested but I do have some challenges.
1. When I called up Seattle Strings from INIT / GM MIDI, only few parts of the strings section are playing.
2. Also how do I record the motion control, cut off, variation delays and other parameter events? I’m unable to capture them for recording & playback.
Posted : 08/09/2019 12:43 am
1. When I called up Seattle Strings from INIT / GM MIDI, only few parts of the strings section are playing.
Not sure what that means? Sorry.
Posted : 08/09/2019 1:04 am
Topic starter
What I mean is, I wanted to record Seattle Strings on Cubase. I initiated from Category Search on Montage -> GM MIDI and then searched for Seattle Strings. It had 8 Parts.
I assigned the Track 1 to MIDI Channel 1 on Cubase. When I tried to play or audition the performance, some of the parts on my lower left hand notes did not play. I believe this is because the other parts are assigned to other MIDI Channels.
So is the overall recording of Montage on Cubase is only one to one mapping of channels? Can I not record performance built of multiple parts on Cubase?
Unfortunately I’m ending up to record only performances that are single parts and simple voices? My knobs and super knobs are also not functioning.
Please advise?
Posted : 08/09/2019 1:27 am
If you want to record “Seattle Sections” ...start by recalling “Seattle Sections” — it occupies 7 Parts.
Here is what your MONTAGE screen will look like...

Here is what your Cubase Pro 10 will look like...

Posted : 08/09/2019 3:00 am
Topic starter
Thank you Phil! I thought of this approach but I was wondering if there was some other way to record each multipart performance in one MIDI track which now makes sense not possible.
For my other part of my question, how can I record parameters? Do I have to directly record them directly to Audio Track and engage Super Knob and other knobs? No way to correct or tweak in MIDI?
Posted : 08/09/2019 4:31 am
Page 1 / 2
Next
