Is there an easy way to move an organ vibrato/rotating speaker effect from the tone wheel to the Superknob? Specifically, using "Dave's Nu Organ". (I don't mind losing the other changes the Superknob is currently using.) I would like to free up my left hand to play a different instrument.
Thank you,
Phil
You would pull up all PARTs that use the rotary speaker effect and edit the source controller. I think probably the mod wheel is what's controlling the rotating speaker speed.
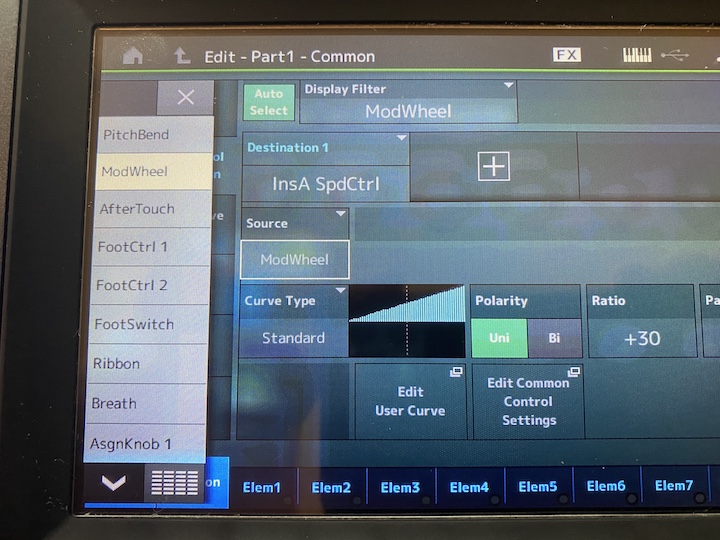
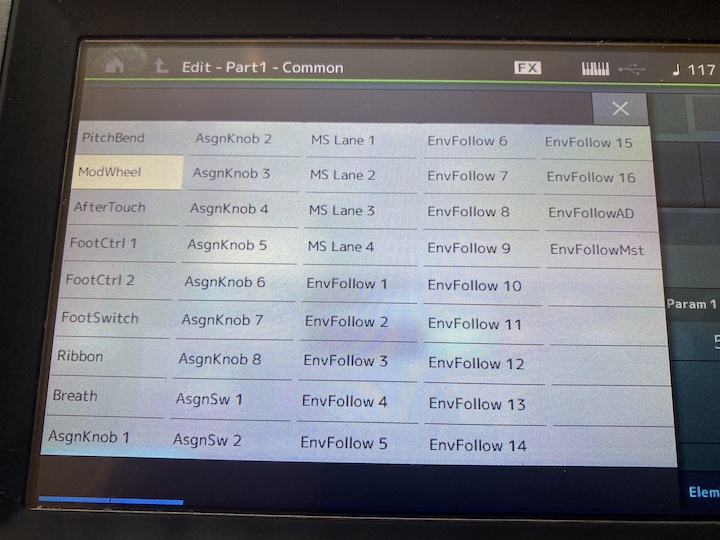
So you'd select a PART, then [EDIT], then select the menu "Mod/Control" -> "Control Assign" menu. Make sure "Auto Select", the button near the upper-left, is ON (green, not grey). Spin the mod wheel. I'm pretty sure this will call up the rotary speed and related destinations. Touch the "Source" and change it to superknob. Rinse and repeat for all other PARTs that are involved (that have the rotary speaker effect). I think Dave's Nu Organ is a 1-PART organ - so you should be done at this point. More generically, some organs spread out the drawbars across multiple PARTs - so each of those PARTs with drawbars would have the rotary speaker and so each of these PARTs would need to apply the same changes to the Mod/Control -> Control Assign menu (changing the source for rotary speaker speed).
There's another thread that goes into more detail and has another approach included.
https://www.yamahasynth.com/ask-a-question/reprogram-leslie-from-mod-wheel-to-foot-switch
Jason, thanks for the help!
However, there must be a step missing. When I "Touch the ""Source""...", I cannot change it to the superknob because it does not show up on the menu.
I also looked at the other thread and went through Phil's tutorial twice and couldn't get the Assign knob 1 to connect to the Superknob.
So, I am still without a solution here. Can you tell me where I went wrong on your instruction?
Thank you,
Phil
You're right - the quick summary doesn't work because the same enhancements that were made to Montage for [CONTROL ASSIGN] assigning three things at once (Superknob + Common Assignable Knob + PART Assignable Knob) didn't happen at this menu level. You still have to go through and make sure you more manually fiddle with the assignments at the "Control Assign" menu level.
The shortcut of spinning the superknob is good for seeing the current assignments of superknob however.
When you spin superknob you can see there are 4 destinations assigned in PART 1 (the only PART). These you may want to clean up so superknob doesn't adjust these values. I would delete the assignments at the Common/Audio level to remove the control of the Common Assignable knobs to the PART 1 assignable knobs. However, I won't go into the detail of what to do to clean up the superknob to "free it up" for use for the rotary speaker speed right now.
Instead of manually doing everything (which would probably be a good exercise at some point) - I'm going to use what's already assigned and reassign it. This isn't generic - it's specific to the Dave's Nu Organ Performance. But the approach can be applied to other Performances.
First, I want to see if PART 1 has any assignable knobs that are already controlled by superknob that will work. To do this, I will be looking at the home menu [PERFORMANCE] (HOME) and look at the superknob values. Press [PERFORMANCE] (HOME), then touch PART 1 - which shows a popup menu (to edit, etc) - but exit out of that menu. All we want is PART 1 selected (white box around the PART). This changes the display to show the PART assignable knobs instead of the common assignable knobs. When you move superknob, you'll see PART 1 Assignable knobs 1-8 in a circular "dial" type graphic. Here's what I see:
Part 1 Assign (1st knob) - Range of 64-65. When superknob is full counter clockwise (CCW), value is 64. When superknob is at 12 o'clock knob 1 has a value of 65 and stays 65 through superknob at full clockwise (CW) position
Part 1 Assign (2nd knob) - Range of 64-80. When superknob is full CCW, value is 64. Values quickly step through 65, 66, through 80 as superknob is rotated to full CW
Part 1 Assign (3rd knob) - Range of 64-80. Same as 2nd knob
Part 1 Assign (4th knob) - Range of 0-127. This is directly mapped. So full CCW of superknob is 0 on the assignable knob and full CW is 127 for the assignable knob. Every one of the 128 values of superknob are directly reflected in this assignable knob (Part 1 assignable knob 4).
When we look at the table for Rotary Speaker and look at the "Speed Control" setting - we see that a value of 0 is slow and a value of 1 is fast (in fact, values 2-127 should be fast as well).
If we used a standard curve with a positive ratio and unipolar - then assignable knobs 1-3 would never change the rotary speed since it's likely that when the assignable knob is 64 (the lowest value of these assignable knobs) that more than 0 would be added to the parameter. And any value that is not 0 will be considered fast. Part 1 Assignable knob 4 CAN have a value of 0 (with a standard curve, uni-polar, positive slope) - so we'll use assignable knob for now. It's still kind of tricky to use since ONLY full CCW will be slow and the slightest movement CW will flip the "fast" switch. Keep in mind that there's just slow and fast for this parameter (like the half moon switch of a Leslie). It's not "how fast" - it's "fast, no?" or "fast, yes?". Slow/Fast.
At any rate - follow the steps I outlined before and set the source for the rotary speed to PART 1 Assign 4 Knob. (AsgnKnob 4).
Now you should have hair-trigger control of the rotary speaker speed to fast. Easy for fast since every position except full counter clockwise will be fast and only that full CCW will be slow. There's a way to fix this - you could change the curve to a type that will only output 0 from the range from the "far left" to the "middle". Change the curve type from "standard" to "threshold". I usually change Param 2 to 0 and then you can set Param 1 "back and forth" to change where the slow-to-fast crossover point is.
Another way to have more "cushion" between slow and fast - then you could use something else (not AsgnKnob 4) - but you'll also have to change the curve parameters.
You could assign the source for speed control to AsgnKnob 1. This is the knob that only transitions between 64 and 65 and is 64 from full CCW to just before 12 o'clock and is 65 from 12 o'clock to full CW.
After you change the source to AsgnKnob 1 - you'll need to change the curve from Uni-Polar to Bi-Polar. Standard curves, when bipolar, default with having "0" as an output when the input is 64. This means when the attached source is at a value of 64 - the curve's output value (the offset to the destination parameter) is 0. Now when the superknob is 12 o'clock to full CCW the input value to the curve will be 65 - just one notch above the 0 point. If your rotary speaker speed doesn't speed up - you may have to increase the ratio (the slope of the curve) so that this value will be non-zero. Make sure from the middle to the right side the triangle is above the "x" axis and on the left side of middle, the triangle is below the "x" axis. This should result from changing the ratio from negative to positive. And all of this is only when using AsgnKnob 1. Using AsgnKnob 4 - you don't have to fool with the curve or polarity setting.
Jason, again I want to thank you for spending the time to write out that detailed post. After following your directions closely, I got "mostly" there. Evidently this performance had two simultaneous vibrato effects going on at the same time. After following your directions, only one of them ended up on the Superknob, the other one seems to have gotten lost, or turned off. Also, I really didn't like the other effects attached to the Superknob, basically the gritty distortion that increases. I couldn't remember how to remove those effects from the other AsgnKnobs, so I just moved them to AsgnKnob 5 which had no Superknob movement. Is there a better way to have addressed this?
If you can answer these followup questions, that would be great. If not, that's OK, too. You have been a great help.
Just FYI, your instructions made something click that I didn't know before. When a part is selected on the home page, the assign knob attached to that part appear in the row above the part, ALL the way across even above the empty part slots. I always thought that those knobs ONLY applied to the part directly underneath each column. It's not intuitive and thus had always been an enigma for me.
Thanks again,
Phil
Connecting the Dots
Each of the 16 Parts has its own 8 Assignable Knobs... when you *select* a Part from the HOME screen, the 8 Assign Knobs for that selected Part appear.
The upper COMMON level has its own 8 Assign Knobs that can be linked or unlinked to the Super Knob.
That’s 136 total (potential) Assign Knobs in a Performance.* (* each Part has an additional 24 “Quick Edit“ Knobs, and so does the upper Common level of the architecture).
The “Dave’s Nu Organ” is a Single Part Performance so it has 8+8 total Assign Knobs.
8 belong to the Super Knob and upper COMMON level of the architecture (Common Assign). Shown below (4 are assigned):

8 belong to the Part itself. Shown below "PART 1 Assign" (seven are assigned):

Of the seven Part Assign Knobs four are linked to the Common AssignKnobs (which move when you move the Super Knob).
The reason you could not just change the “Mod Wheel“ to Super Knob is because the Mod Wheel is a Part controller, while the Super Knob can be assigned to parameters on the upper COMMON/AUDIO level of the architecture.
Ultimately, what you need to do is assign control of the Rotary Speaker‘s “Speed Control” to a Part Assign Knob (Part Assign Knob #8 is available)... then link that Part Assign Knob to one that is linked to the Super Knob's movement. It sounds complex, but the following will step you through the process:
How to do this
Since you want to change what was originally programmed (linked) to the Super Knob, I recommend you review each assignment, in turn, then eliminate those you do not want to keep. Reason: you don’t wind up discarding something you might want to keep, plus it will broaden your understanding of how things work. And how to go about navigating the system.
Let’s take a look at the upper “Common/Audio” level of the architecture to see what is being currently controlled by the Super Knob in the Preset Performance “Dave’s Nu Organ”:
On the Home screen you can see “Common Assign” next to the 8 Common Assign Knobs... and four of them are “Assigned” to do something
Press [SHIFT] + [HOME] to see an Overview... for clarity's sake tap the words “Controller” (magenta), and "Fader" (amber), to remove their lines from the graphic... you can see the first four Knobs are linked to PART 1 (Assignable is green in the graphic). Super Knob is blue.
Touch the box that reads: “Edit Common Control Settings”
You are taken to the “Edit - Common/Audio” screen where Control Assignments are made
Touch the “Auto Select” box to activate it (green) and turn the Super Knob.
Here you will see the four Destinations 1, 2, 3, 4... notice how each of the four Knob rotary encoders move a specific distance, allowing the programmer to control *how much* each is changed when the Super Knob is moved. The four DESTINATIONS:
PART 1 ASSIGN 1 — translation Part 1’s Assignable Knob #1 is set to “InsA Rot/Hrn” — turn Knob 1, directly and listen
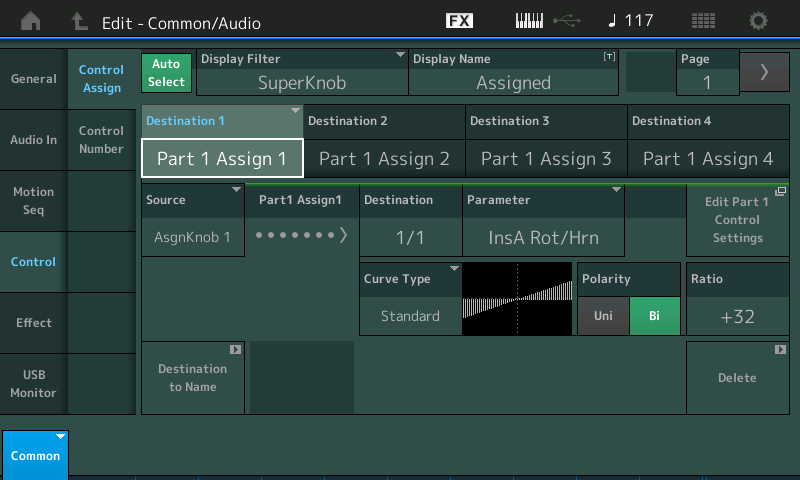
This is controlling the balance between the Rotor (low frequency component of the Leslie) and the Horn (high frequency component of the Leslie
Notice the SOURCE = AsgnKnob 1; it is important to realize that this is referring to Upper COMMON/AUDIO Assign Knob #1 (which is set to move just a small amount)
PART 1 ASSIGN 2 — Part 1’s second Knob is set to “Element Level” — turn Knob 2, listen
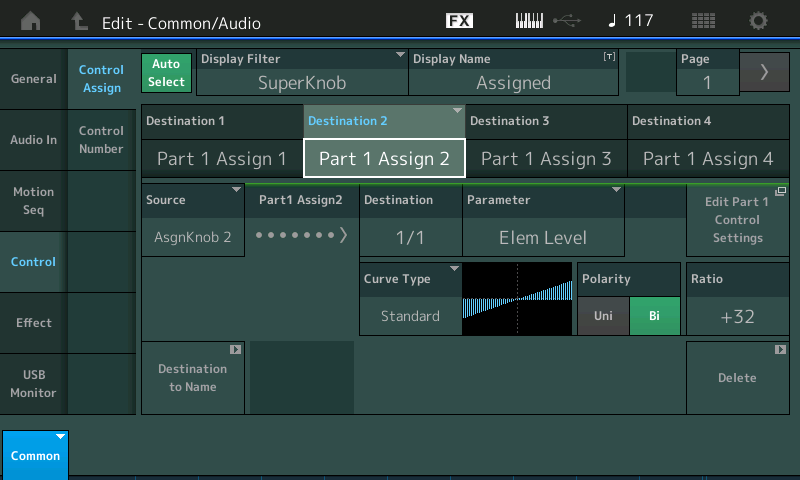
This is controlling Element 6 Output Level (the Rotor Grit)
Notice the SOURCE = AsgnKnob 2; it is referring to Upper COMMON/AUDIO Assign Knob #2 (also programmed to move just a small amount with the SuperKnob)
PART 1 ASSIGN 3 — Part 1’s third Knob is set to “Element Level” — turn Knob 3, listen
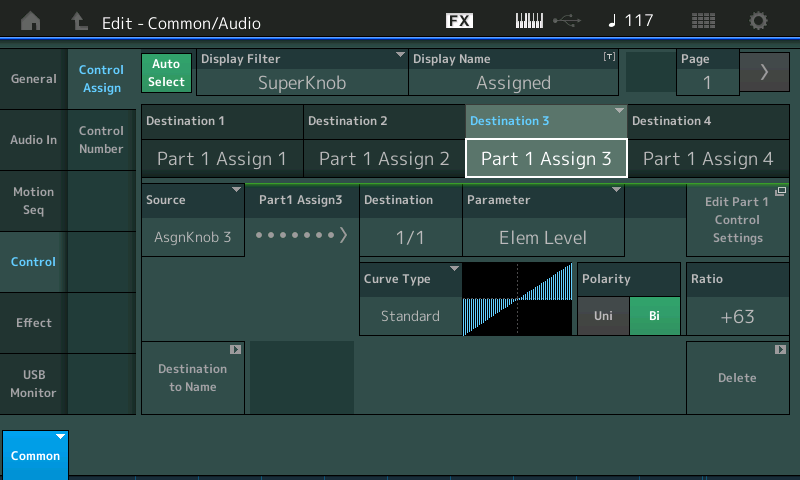
This is controlling Element 7 Output Level (the Rotor’s fixed frequency whistle)
Notice the SOURCE = AsgnKnob 3; it is referring to Upper COMMON/AUDIO Assign Knob #3
PART 1 ASSIGN 4 — The fourth Knob is set to two Destinations “InsB Distortion Drive” and “InsB Output” — turn Knob 4, listen
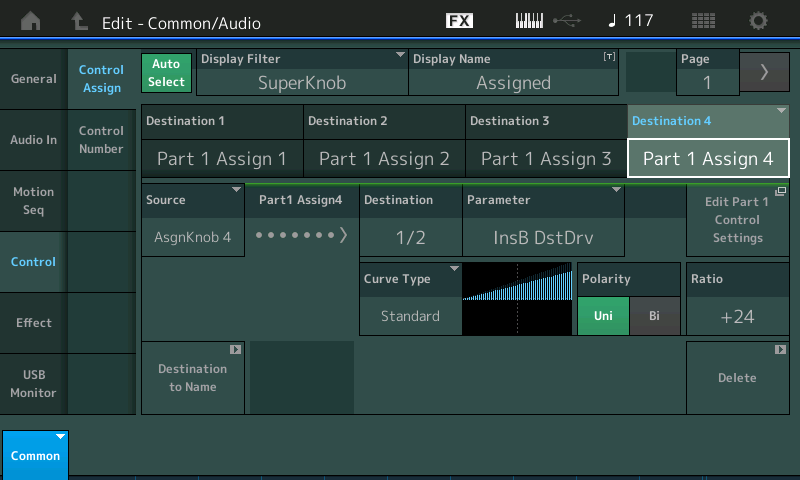
This is applying change to two parameters of the Insertion B Effect, turn up the distortion drive while losing the effect’s output.
You can see the "1 of 2" and "2 of 2" indication in the “Destination“ box - highlight this box and use {INC/YES] and [DEC/NO] to toggle the view for both assignments
Notice the SOURCE = AsgnKnob 4; it is referring to Upper COMMON/AUDIO Assign Knob #4
Summary On each of the above screens you have a shortcut box that will take you directly to the PART Assign screen where this parameter is initially assigned. It drops you from the upper COMMON/AUDIO to the individual PART 1 assignments... You can return to the upper COMMON/AUDIO level by touching the shortcut box labeled "Edit Common Control Settings"... this 'wormhole' lets you move back and forth between the individual PART Knob assignments and the upper level COMMON Knob assignments.
You can at this point make a decision about which of these you wish to keep or you can simply tap the DELETE box in the lower right corner of each COMMON level assignment to remove it from being active. Notice that when you are looking at a particular DESTINATION #, it appears in blue.
Super Knob Range setting
Next, navigate to the screen where you can view *how much* each of the four Common Assign Knobs was programmed to move in response to the Super Knob movement. Some moved very very little (1) while others moved more (2, 3) and Knob 4 moved the full range 0-127
Press [HOME]
In the first column tap "Motion Control" > "Super Knob"
You will see Value 1 (green) and Value 2 (blue)
Turning the Super Knob from minimum to maximum causes each of the first four Knobs to move from the Green value to the Blue Value.
You may wish to reset these so that Value 1 is 0 and Value 2 is 127 for those you have DELETED.
You can highlight it and use the Data Dial or you can double tap it and enter the value on the numeric keypad.
Turn the Super Knob to understand that its position can determine how much change is applied by each of the Common Assign Knobs.
Finally: Lets assign the Rotary Speaker Speed Control to the Super Knob
Press [EDIT]
Select PART 1 (the Rotary Speaker is a PART Insertion Effect).
In the first column tap "Effect" > "Ins A"
Move the cursor to highlight the "Speed Control" so that it reads SLOW with the cursor highlight box around it
The [CONTROL ASSIGN] button glows to indicate this is an assignable parameter.
Press [CONTROL ASSIGN]
You are taken to a screen that asks you to Activate the Controller you wish to assign
You wish to assign the SUPER KNOB
Move the Super Knob... you are taken to the Part Control Assign screen where the assignment has been made...
Notice that a drop down appears briefly indicating "Modified: Common AsgnKnob 1 > AsgnKnob8"
There are 8 Part AssignKnobs. Seven of them are already in use... MONTAGE found the available PART Assign Knob #8 and linked it with the first available COMMON Assign Knob.
Final clean up: The MOD WHEEL is still assigned to control the Rotary Speaker "Speed Control"
Move the MW
This recalls the assignment
Tap DELETE in the lower right corner to remove this assignment.
Now the Super Knob is you one control to switch the Speed Control from Slow (Chorale) to Fast (Tremolo).
Press [STORE] rename and store your newly edited organ to your USER Bank.
Hope that helps... not only getting it done but hopefully is something you can refer to when analyzing what you are inheriting from previous programming.
How far you move the Super Knob will be determined by the Curve Type, Polarity, Ratio and (shape) Parameter of the Part Control Set.
When set to Curve Type = Standard (a ramp)
Polarity = Uni (one direction and back)
Ratio = +32
Param 1 = 5
All values below 12 o'clock will be SLOW, and all values above 12 o'clock will be Fast
If you set the PARAM 1 = 0 all the way down will be slow and the slightest move of the Super Knob will cause the transition to begin
If you set the PARAM 1 = 10 then only when the Super Knob is advanced to maximum will the Speed transition begin
Phil, I know I am late saying this, but I appreciate you walking me through that.
Thank you,
Phil Bates
