Notifications
Clear all
Topic starter
Just got a Montage and would like to know if the ability to separately record tracks using the record function at the Play/Rec/Midi screen is no longer possible and has basically been replaced with the Pattern Sequencer in V3.0. Before V3.0, it seemed that you could, for example, record at the Play/Rec/Midi screen (which provided the record, dub, and punch functions) a four track Song with each track being a dub (recorded separately but while listening to the other track(s)). That Song (or those four tracks) could then be used as the four tracks in the four track arpeggio recorder. If this is no longer possible at the Play/Rec/Midi screen (and has in fact been replaced with the Pattern Sequencer, along with other functionality), can you tell me what one would use the recorder at the initial Play/Rec/Midi screen for? It seems that you can record 16 tracks but only simultaneously (i.e., it captures exactly what you play at a given moment, as opposed to being able to dub tracks). If so, is its use simply that or have I missed other capabilities at Play/Rec/Midi screen? Thanks.
Posted : 23/04/2020 5:50 pm

Hi David,
Thanks for the questions. There is no one approach to how you can use the new Pattern Recorder function or the MIDI Song Recorder function.
We will go over one of the most common methods:
1) Recording Track-by-Track (traditional sequencing, one after the other using Overdub)
Recording Track-by-Track
First, let me say... Of course, you can record Track-by-Track. What makes this a sort of a “hidden” feature is probably the fact that you can record as many eight Tracks, simultaneously. This is available because, as we’ll discuss in section 2 — eight Arpeggiators are available to assist the player in getting inspiration. But if your comfort zone is to lay down one instrument at a time, you must appreciate an important design difference about MONTAGE/MODX (this is included to accommodate the *other* workflow) which lets you record multiple instruments all at the same time.
One thing that is different about the Performance Recorder is that you do not put a Track in Record, per se. When you hit Record, because each Part has its own Track, they potentially are all in Record! Whether or not any data gets recorded depends on if you decide to communicate with the Part. If you are playing/hearing it — it is recorded. So all Tracks are in technically in record.
This is very important to get because when you first hit RECORD, each track is technically in record. Each subsequent Track you want to record you MUST set the RECORD TYPE = OVERDUB. Failure to do this will wipe out all previous recording. By placing your second, third, fourth, fifth, sixth, etc., etc., etc. in OVERDUB, you will be able to add new data to already recorded Tracks... and because you will be selecting one instrument at a time, you will only be recording that one instrument.
Setup:
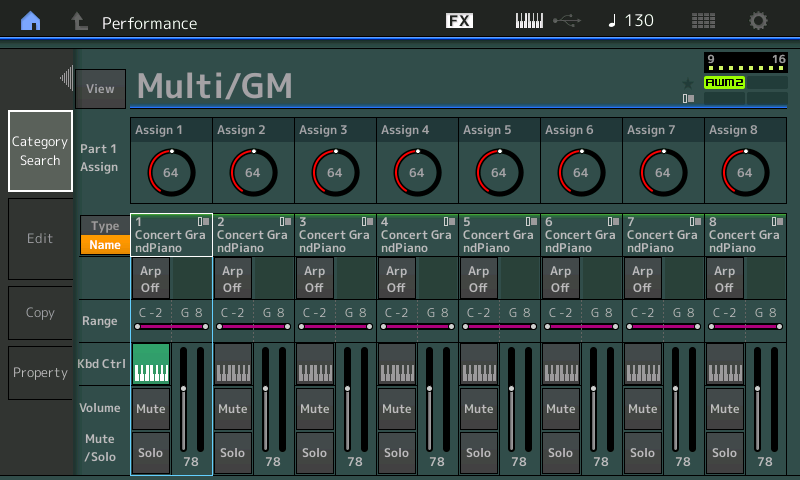
You can start with any Performance or you can build one up from scratch or you can start with an initialized Performance that has a ‘placeholder’ instrument in each Part. This last one has the benefit of making the workflow similar to how the Motif/MO-series sequencers have worked for the last two decades. We’ll describe using this workflow because it allows you to replace the placeholder Part with the instrument or instruments you want. We’ll frame it so that the workflow is one Part, one Track, one Channel. Later you easily will understand how to incorporate Multi Part Instruments into this workflow.
Press [CATEGORY SEARCH]
“Bank/Favorite” = All
“Attribute” = All
Select “Init” > “Multi/GM”
Press [HOME]
To make the selection of your instruments easy, I recommend you touch “FX” top center of the screen and set the following:
Set KBD CTRL LOCK = On
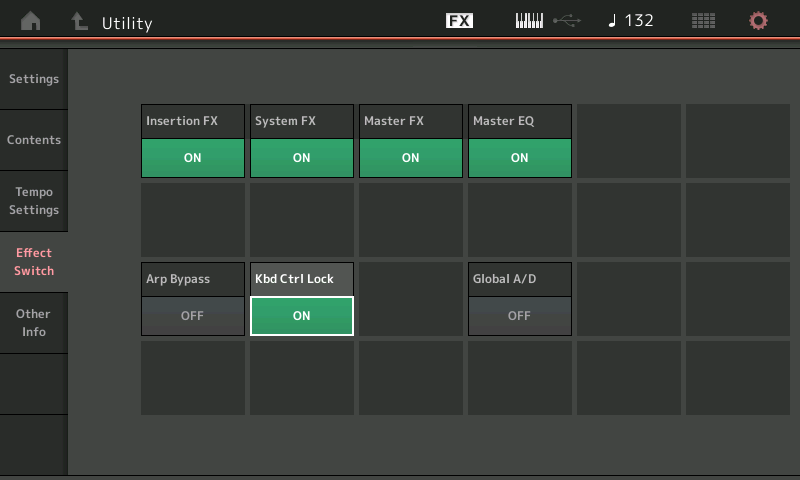
This lets you choose each instrument Part, one at a time. You will communicate with just that Part (Normally, when you add a Part KBD CTRL will add it to the Part already playing... this allows you to ONLY communicate with one Part at a time... the one you *select*. The KBD CTRL will stay fixed on Part 1... but when you select Part 2 you will be playing only Part 2 and when you select Part 3 you will be playing only Part 3, and so on.
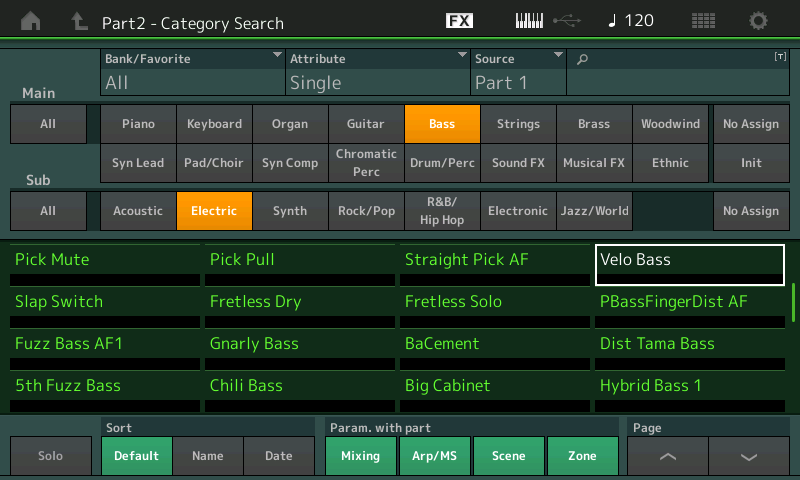
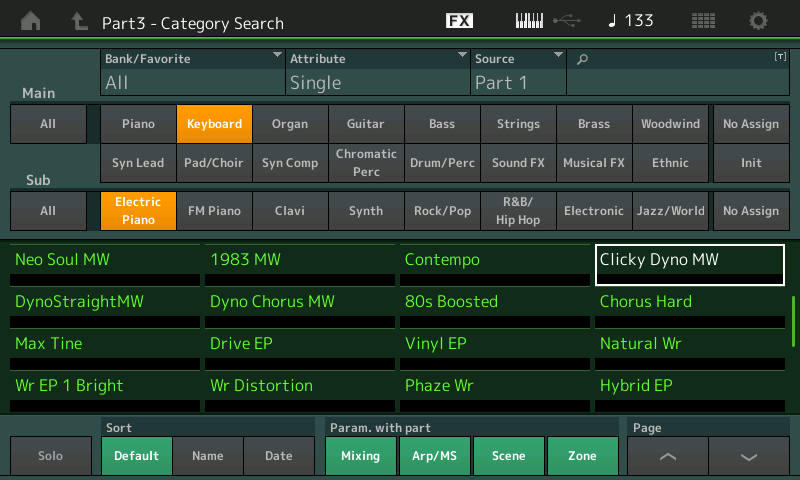
From the HOME screen you can start by selecting a few instruments... for example, *select* Part 1 (you can either press the Part Select 1 button and use [SHIFT] + [CATEGORY SEARCH] or you can tap the Part 1 “Type/Name“ box to see the pop-in menu with the “Category Search” Option) — what you want to see is the “Part 1 Category Search” screen.
Using this method select several instruments... Drums on Part 1, Bass on Part 2, Keyboard Part 3... I recommend you select several before beginning to record. This way you don’t have to stop your workflow... you can always change you mind later.

With three or more instruments in place press the RECORD button.
This will take you to a blank location in the sequencer.
Make sure you choose “Pattern” if you want to record in looping sections, or “MIDI” if you want to record into a linear Song.
Pattern Scenes 1-8 can be “chained” to playback in any order you desire, for as many measures as you desire, then *converted* into a linear MIDI Song... while in Pattern mode you can adjust the feel/timing, and perform several types of Edit and Job functions.
Let’s choose Pattern, [Scene 1]
Set the “Length“ before laying down any data. This will determine how many measures play before it loops back to the top.
Set the Time Signature as this will also determine how the sequencer counts. Length and Time Signature must be set before laying down any data.
Set the Record Quantize if you wish... you do not have Quantize, you can Quantize on the way into the sequencer, or you can do it after you record... your choice.
The Record button will flash RED when you are in record standby (rehearse) Mode. If you press the Play button, the count-in will begin. The Measure counter will show Measure and Beat. At any time during Record you can press the Record button to drop out of record and into Rehearse mode... this lets you practice or find the notes you want to play. To re-enter record simply press it again.
Solid red = recording
Flashing red = rehearse
You can move directly to you Part 2 (Bass in my example) since all tracks are in record by selecting Part 2 you are automatically recording Track 2.
If you hit stop, you must then press the Record button again to re-enter Record ready Mode... this time the REC TYPE box appears... unless you want to wipe out what you previously recorded, set the REC TYPE = OVERDUB.
*Select* the Part you want to play, and press Play... the count-in begins, and away you go.
Posted : 23/04/2020 8:43 pm
Topic starter
Bad Mister--seriously appreciate the response. I got it and was able to record separate tracks as you indicated using the Midi recorder (as opposed to Pattern). What I was doing was recording Part I and then going back to HOME to select Part II but instead of hitting the PLAY/REC on the touch screen, I was hitting the Record button, which was then triggering a new Song and clearing the previous recording. I must not have realized the Song was a "new" Song since I wasn't paying attention to the Song name box. By hitting the PLAY/REC, the REC TYPE box then shows up, which allows the selection of dub. Again, really appreciate the time put in to reply. (Thanks also for all the videos.)
Posted : 23/04/2020 11:28 pm
