Hello,
I'm hoping for some help with recording in Cubase using the CFX Concert patch. My problem is that when I record audio, it just doesn't sound the same as it does when I'm playing the MIDI track.
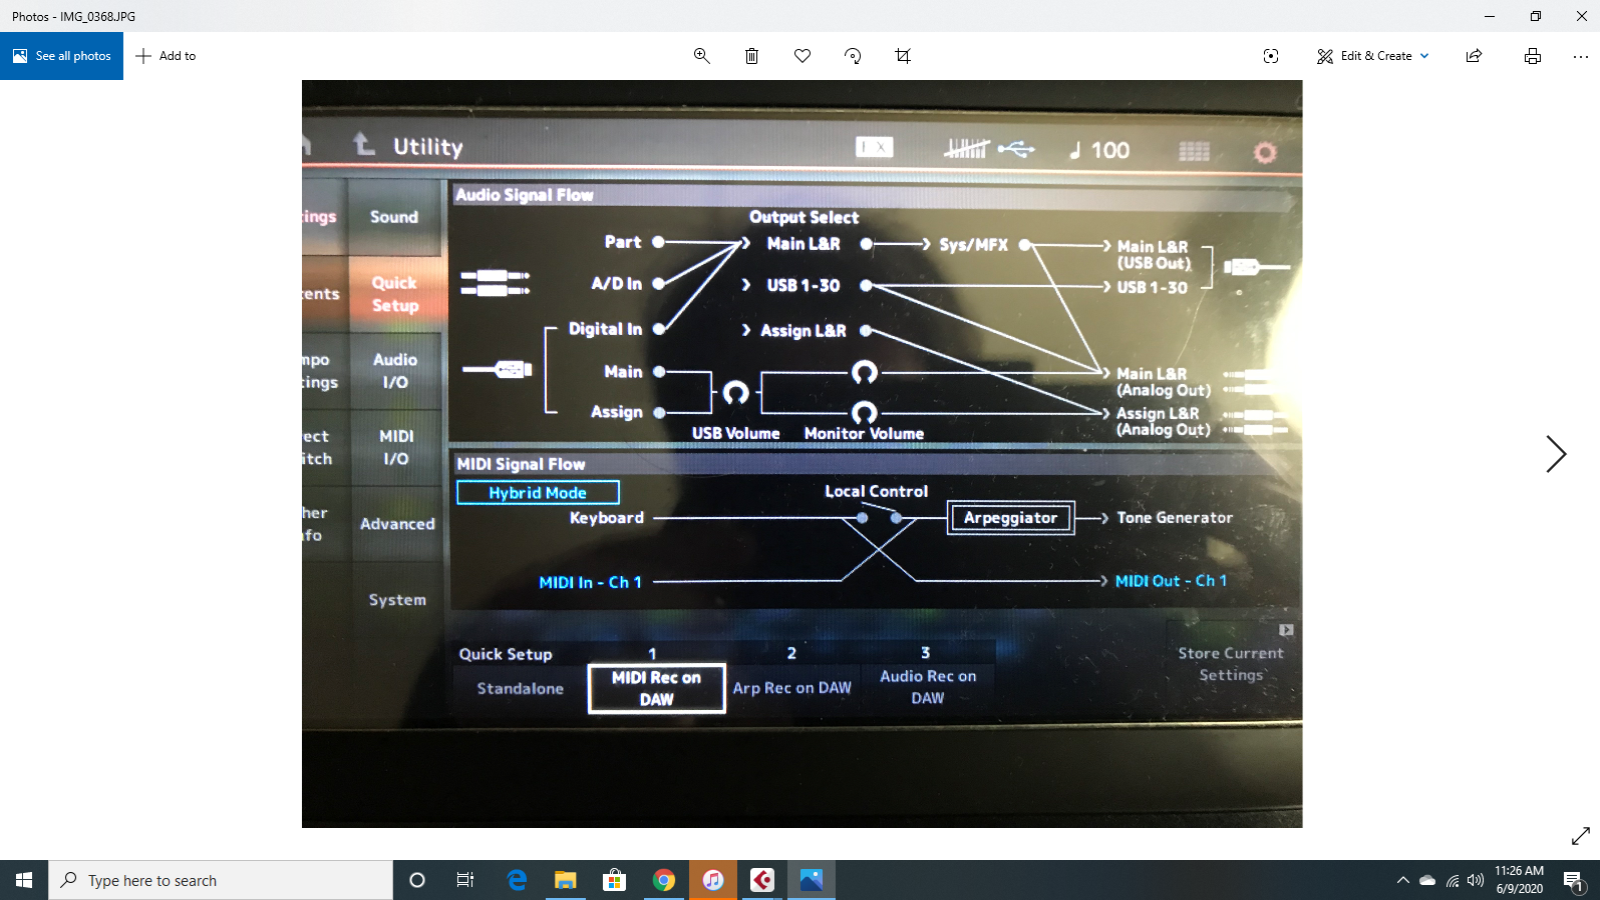
Not sure if I've been doing this correctly, so here is how I've been doing it: I use the "Hybrid" setting, record using DAW setting, and I think that's it for settings. In Cubase, I add an audio track, select the record button on the audio track, then play the MIDI and record.
But when I play back the audio, it sounds different. Something is lost, and it sounds almost nasal (can't think of how else to describe it). I keep the audio track on solo as well, so it isn't the effect of a doubled MIDI track, though it sort of sounds that way. The bass/midrange parts also tend to overpower the treble, unlike how they sound when I'm just playing the MIDI, which means I have to lower the velocities on bass/mid notes and that creates another set of problems. Yeah, I can EQ it but like I said, something gets lost.
That's my big issue. Another less important issue I have is I can't get decent volume on the audio track. I guess it's sort of loud enough, but I've literally had to triple up on audio tracks to get volume that can compete with my VI's because I can't increase, or even control, the volume of the piano in Cubase, only on the Montage itself. Something has got to be wrong.
Here is an example of how it sounds:
https://www.youtube.com/watch?v=WzR1gv2yTLw
Thanks in advance for any help.
I'm hoping for some help with recording in Cubase using the CFX Concert patch. My problem is that when I record audio, it just doesn't sound the same as it does when I'm playing the MIDI track.
Not sure if I've been doing this correctly, so here is how I've been doing it: I use the "Hybrid" setting, record using DAW setting, and I think that's it for settings. In Cubase, I add an audio track, select the record button on the audio track, then play the MIDI and record.
I’ve read this many times and it unclear what you are doing. Are you recording MIDI or Audio?
If MIDI? How is the MIDI Track setup ... you never say. What Midi Channel, how many MIDI Tracks?
You selected Hybrid... what Channel.
You mention “record using DAW setting” ? What does this mean exactly?
Describe it like we can’t see what you’ve done.
Please try to explain this again, thanks.
Screenshots help.
I'm wondering what your audio interface is. If it's set to the Montage ASIO Driver
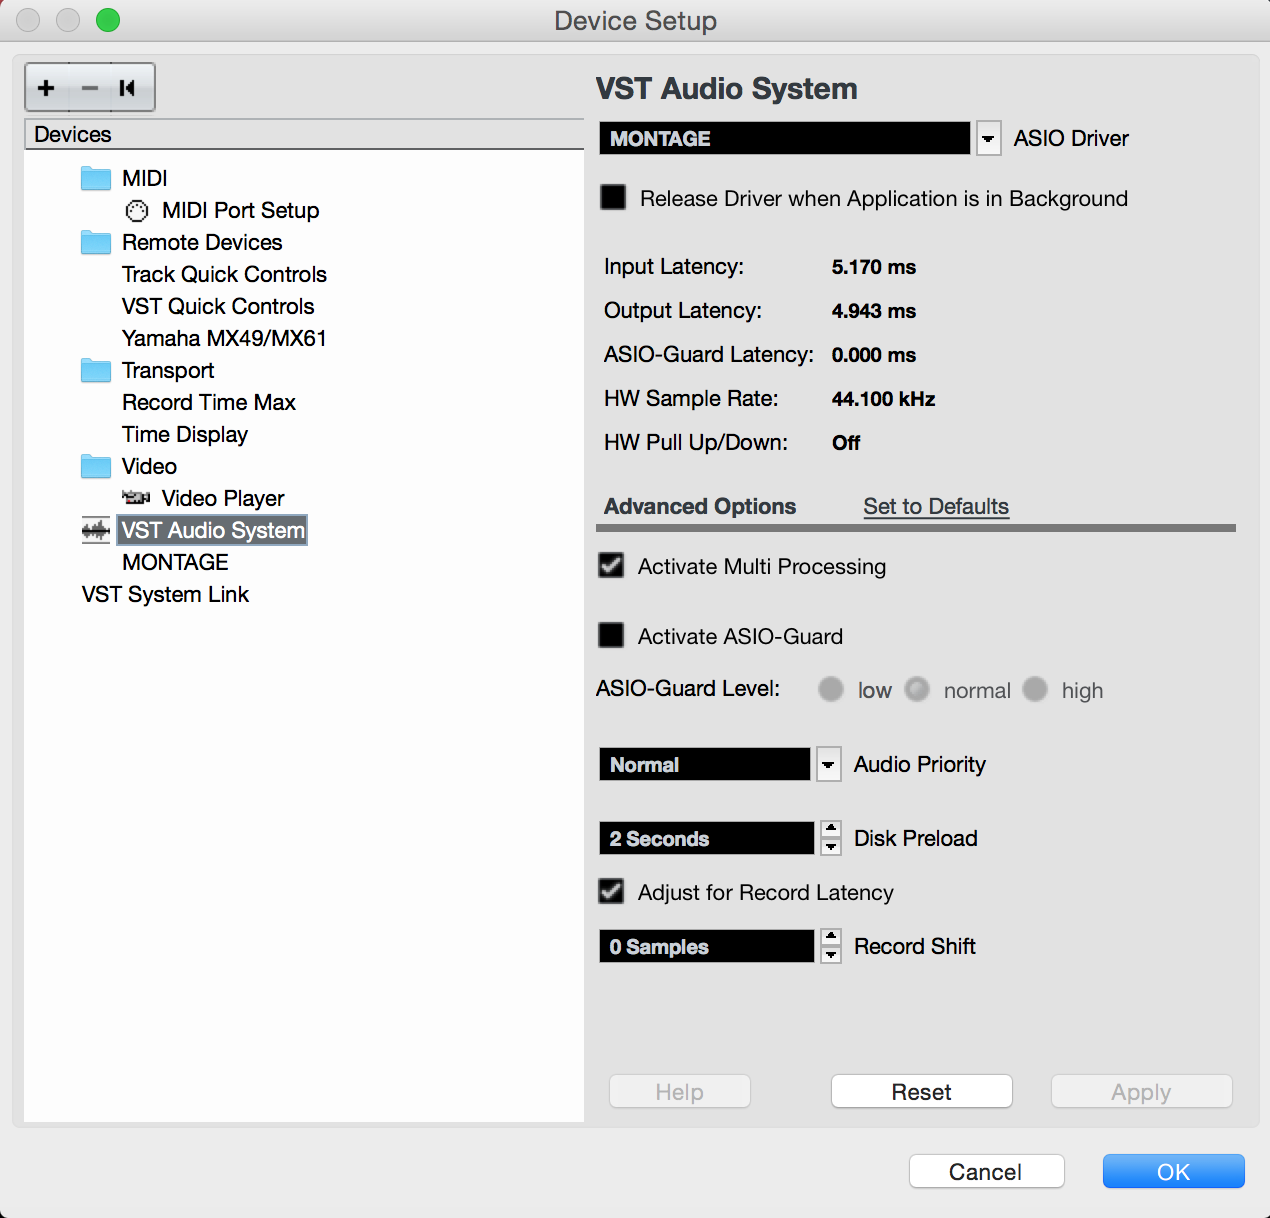
... and also if you have a mic attached to A/D inputs (this is an alternative theory - if you are using Montage's ASIO driver).
Because this sounds to me like a mic'd recording and not a direct digital one.
Current Yamaha Synthesizers: Montage Classic 7, Motif XF6, S90XS, MO6, EX5R
I have the same problem. the "audio rec to daw" quick setup template routes each part to a separate audio track (Usb 1, 2, 3 etc). So to record this piano sound, which has 4 parts, you´d need 4 audio tracks with this setup...not ideal.
on top of that, the master reverb and master effects are also lost. so yes, everything sounds different when recorded that way.
so I changed my "audio rec to daw" template on the Montage to output each part to "MainL&R". that way I record exactly what I hear and don´t have to wonder about why it sounds dry. (I know you´re supposed to add reverb in your DAW, but still, I prefer to record it as I hear it on the Montage)
and yes, why is the volume of the recorded audio tracks always so low? I never figured that one out.
I have the same problem. the "audio rec to daw" quick setup template routes each part to a separate audio track (Usb 1, 2, 3 etc). So to record this piano sound, which has 4 parts, you´d need 4 audio tracks with this setup...not ideal
Not sure how you can say you have the same problem, as it is not really clear what the problem is with the original poster. In general, what follows is what I think may help both of you.
You are recording one instrument (a piano) you can record one MIDI Track, and then correct your data if you wish while it is a single MIDI Track in Cubase. Hybrid allows you to record the multiple Part Performance on a single MIDI Channel. One MIDI Track is easier to edit.
Then to render this MIDI Track as audio, you would play your one MIDI Track back to the MONTAGE, have it output AUDIO on a single pair of USB Outputs. You can setup so all four Parts are set to “Main L/R” If you’d like to record audio using the MONTAGE System Reverb. Or you can route all four Parts to a numbered stereo pair, like “USB 1/2” (which will bypass the System and Master Effects). But with a multi-Part single instrument program you want to treat it as a single instrument (stereo recording is sufficient).
Recording the CFX Concert as MIDI
On the MONTAGE, select “CFX Concert”
[UTILITY] > “Settings” > “Advanced”
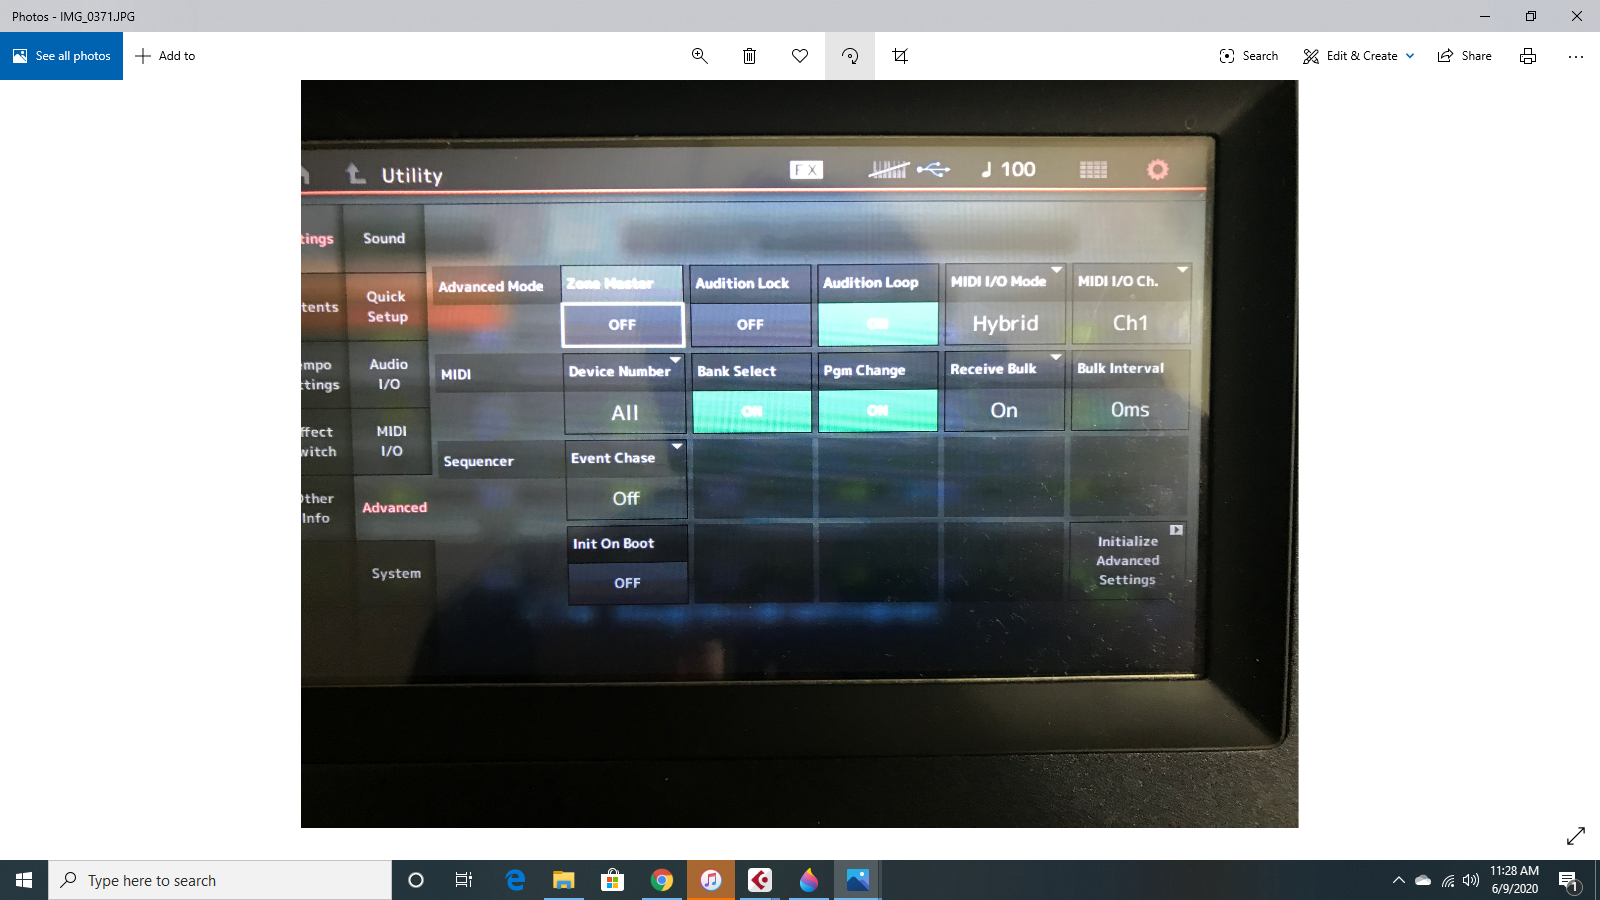
Set “MIDI I/O Mode” = Hybrid, set the MIDI Channel = 1
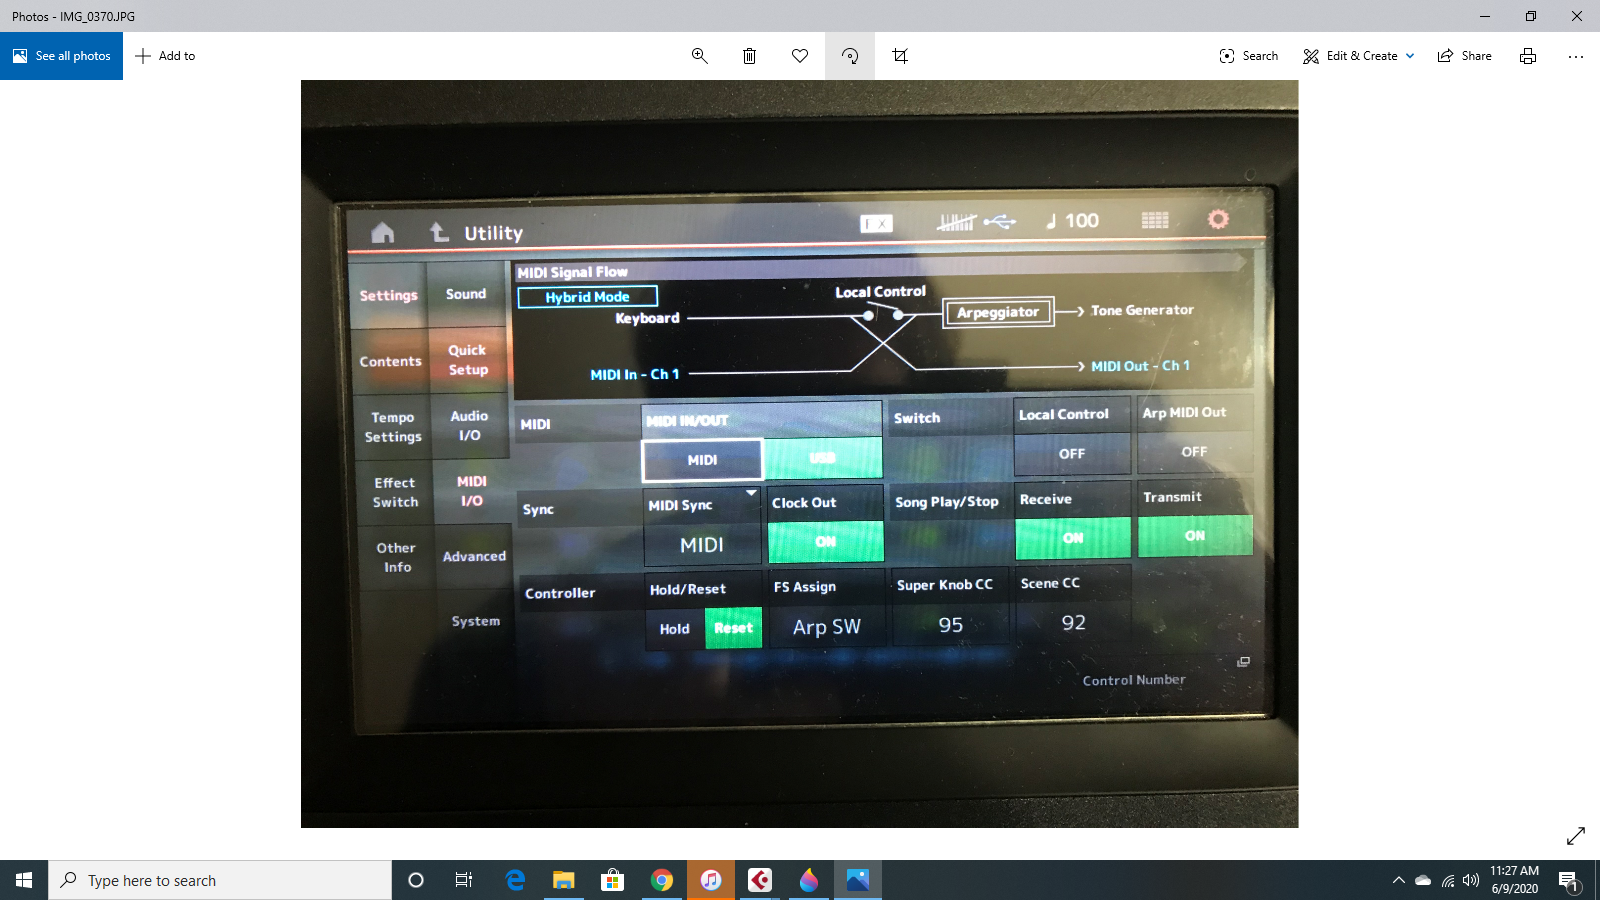
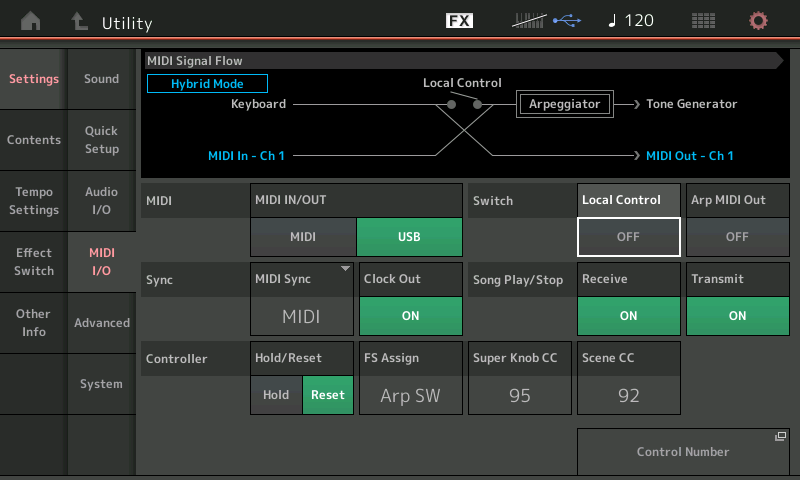
On your [UTILITY] > “Settings” > “MIDI I/O” > site “MIDI I/O“ = USB (green), set “Local Control” = Off
This disconnects the MONTAGE Keyboard from the local MONTAGE Tone Generator... MIDI messages are only Output via USB
You now must create a single MIDI Track to document your data — that MIDI Track will complete the routing to the MONTAGE Tone Generator.
Set the MIDI IN = MONTAGE-1 (port 1)
Set the MIDI OUT = MONTAGE-1 (port 1)
Set the Midi CH = 1
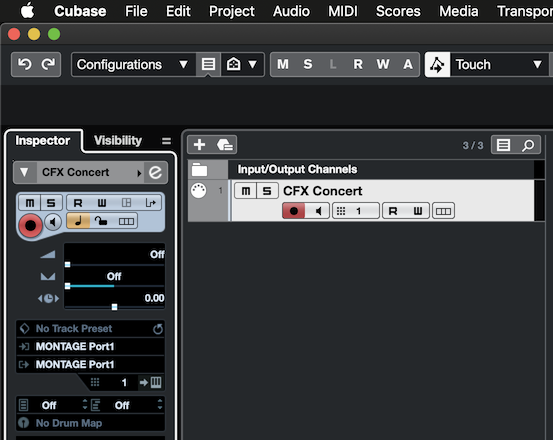
You should now be able to play and hear the MONTAGE. Local Control is OFF but we are routing the signal through the active MIDI Track.
Record your musical performance as MIDI to Cubase. One Track, MIDI CH 1
Playing back your CFX Concert MIDI Track
Once you have captured your single stream of MIDI data using the Hybrid MIDI I/O Mode, you can easily edit any mistakes, and you, of course, can listen to the MIDI data faithfully reproduce your playing performance.
You can now setup to record your performance to Audio.
[UTILITY] > “Settings” > “Audio I/O” > set “Direct Monitor” = Off
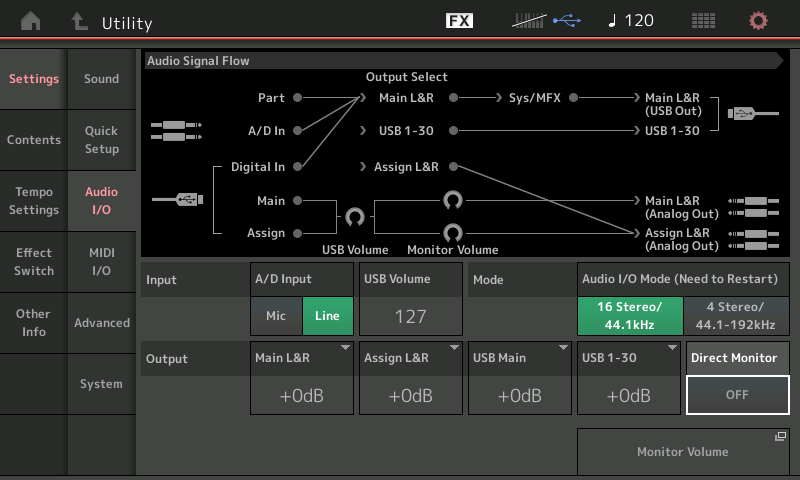
This disconnects the MONTAGE Tone Generator from going directly to the Analog Output (speakers)... instead audio is only routed Out via the digital USB assignment. By turning “Direct Monitor” to Off, you will only hear the playback when you have successfully routed the signal through a Cubase Input to an Audio Track set to that Input... and you arm that Audio Track. Here’s how:
Each of the four Parts of the “CFX Concert” should be routed to the same stereo pair of Outputs. The default is “Main L/R” but you could opt to send each of the four Parts to USB 1/2, for example. The routing of the MONTAGE Parts to audio outputs takes place as follows:
From your HOME screen
Press [EDIT]
Select [PART SELECT 1]
Touch "Part Settings" > "General" > "Part Output"
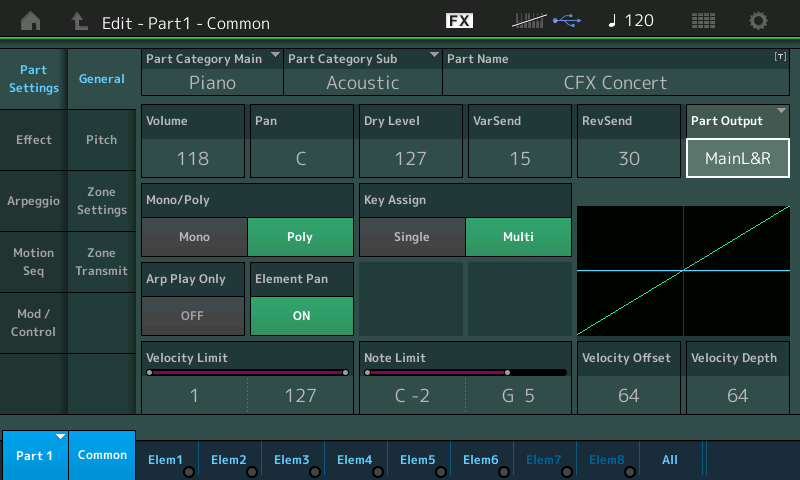
Each Part 1, 2, 3 and 4 has a “Part Output” setting — ensure they each are routed to travel on the same bus.
In Cubase go to STUDIO > AUDIO CONNECTIONS > INPUTS tab

Here you can verify the Stereo bus you are using... if you placed your four passengers on the “Main L/R” bus in the MONTAGE, you want to have a “Stereo In” that is set to receive Audio from the “Audio Device” = MONTAGE (or Yamaha Steinberg USB) on “Device Ports” = “USB Main L“ and “USB Main R“
If you placed your four passengers on the “USB 1/2” bus in the MONTAGE, you want to have a “Stereo In 2” that is set to receive Audio from the MONTAGE (Yamaha Steinberg USB) on “USB 1” and “USB 2”
Create a Stereo Audio Track (just one)
Set the AUDIO IN = Stereo In which represents your selection
Set the AUDIO OUT = Stereo Out
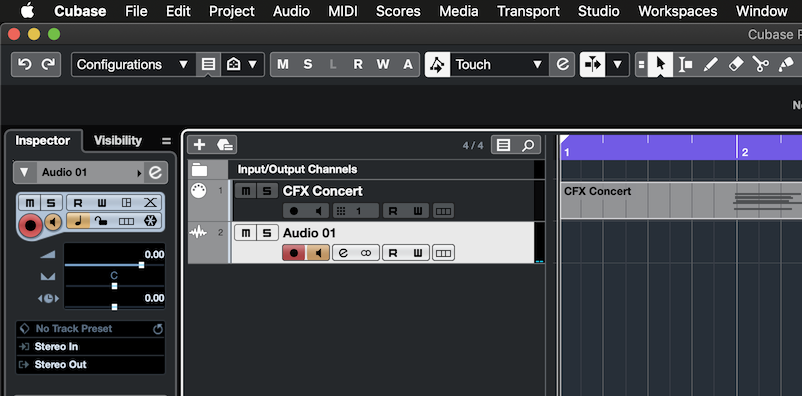
Not until you create this Stereo Audio Track and activate it, will you be able to hear the MONTAGE (Remember we turned Direct Monitor to Off so all audio must arrive in Cubase and traverse an active Audio Track set to receive its data and route that data to the Audio Interface). While in standby click on the Monitor Speaker icon on the Audio Track to hear your data arrive in Cubase — this is when you can verify your level.
Audio record level
Is reflecting how strongly you played the MIDI data (Velocity) ... if you need to increase or decrease the audio level you can do so with the following parameter settings:
On your Performance, press [EDIT]
Press [PART SELECT 1]
Touch “Effect” > “EQ”
This takes you to the screen where you can access the “3-band EQ” and the “2-band EQ” — these Part EQs are located pre- and post- the Insertion Effects Blocks, respectively, and the “2-band EQ” is the last stop before the assignable Output and where it goes through this Part Output Level parameter.
Select the “2-band EQ“
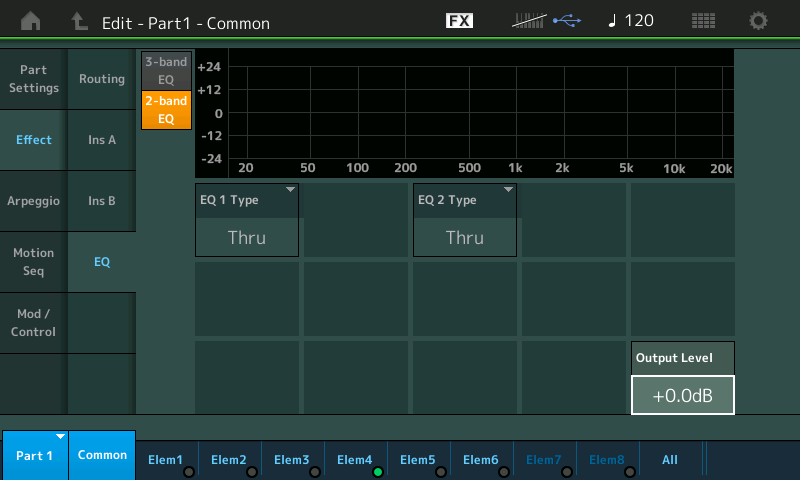
In the lower right corner is your Output Level parameter, this is a -/+12dB cut/boost for this Part
Set it equally for each of the four “CFX Concert” Parts
Careful, just because you didn’t know how to increase the Level, make sure you use only what your need. Be sure to make this setting while looking at the Meters in Cubase. Do not overload the audio track — no clipping allowed!!!
EXTRA CREDIT:
Multi-Part single instrument programs, like CFX Concert, allow for much greater detail in the creation of playable AWM2 sampled-based sounds. The CFX Concert is an 18 Element piano — each of the 18 oscillators is responsible for a particular nuance in recreating the acoustic piano. This use of multiple Parts to make a single playable instrument presents a challenge that perhaps you’ve not run into before. The Hybrid MIDI I/O Mode was created to make it easier to record and edit this type of instrument. You can address all the KBD CTRL Parts on a single MIDI Channel.
Once you render the “CFX Concert“ as Audio, you can put the MIDI Track in a Folder and Mute it. Use the audio rendering of your piano performance if you wish to add more tracks. This will free the entire MONTAGE for new sound making duties. In other words, you’re back to having a 16 Part multi-timbral synth engine at your disposal.
Mastering this type of workflow (which includes rendering audio) opens the door to unlimited creativity. You work with MIDI because of its ability to be changed, easily... you can change the synth sound you played, you can change the notes you played, you can change the feel, Etc. basically, it’s in a form where you have lots of options to ‘change your mind’.
Committing to Audio, is a commitment — you are locked into some of your decisions, no doubt. But because we are going to keep the original MIDI Track data in a Folder, muted, you can always go back and make those changes... then render a new Audio Track!
With the powerful MONTAGE effect processors, this workflow becomes infectious... because when you know and are comfortable with rendering audio from your MIDI Recordings you quickly never run into the 16 Part multitimbral limitation... you never run into the limitation where you want to use several Multi-Part Performances in your work. The limitation just ceases to exist. Rendering your data to Audio is a key feature and powerfully implemented on the MONTAGE. Make it apart of your workflow! Limitless...
Hope that helps...
Ok so I've looked at these posts and am still not sure what's wrong. The only things I could identify that were different or possibly wrong were concerning the direct monitoring option in Utility-->Audio I/O. I had that on "on," but switching it off seemed to have no effect. Still sounds really bad. The other thing is that in my Cubase, in the Inspector element for the audio track, mine says Left - Stereo In and Left - Stereo Out. I can't get it to just say "Stereo In" or "Stereo Out." Maybe I'm still missing something obvious here...
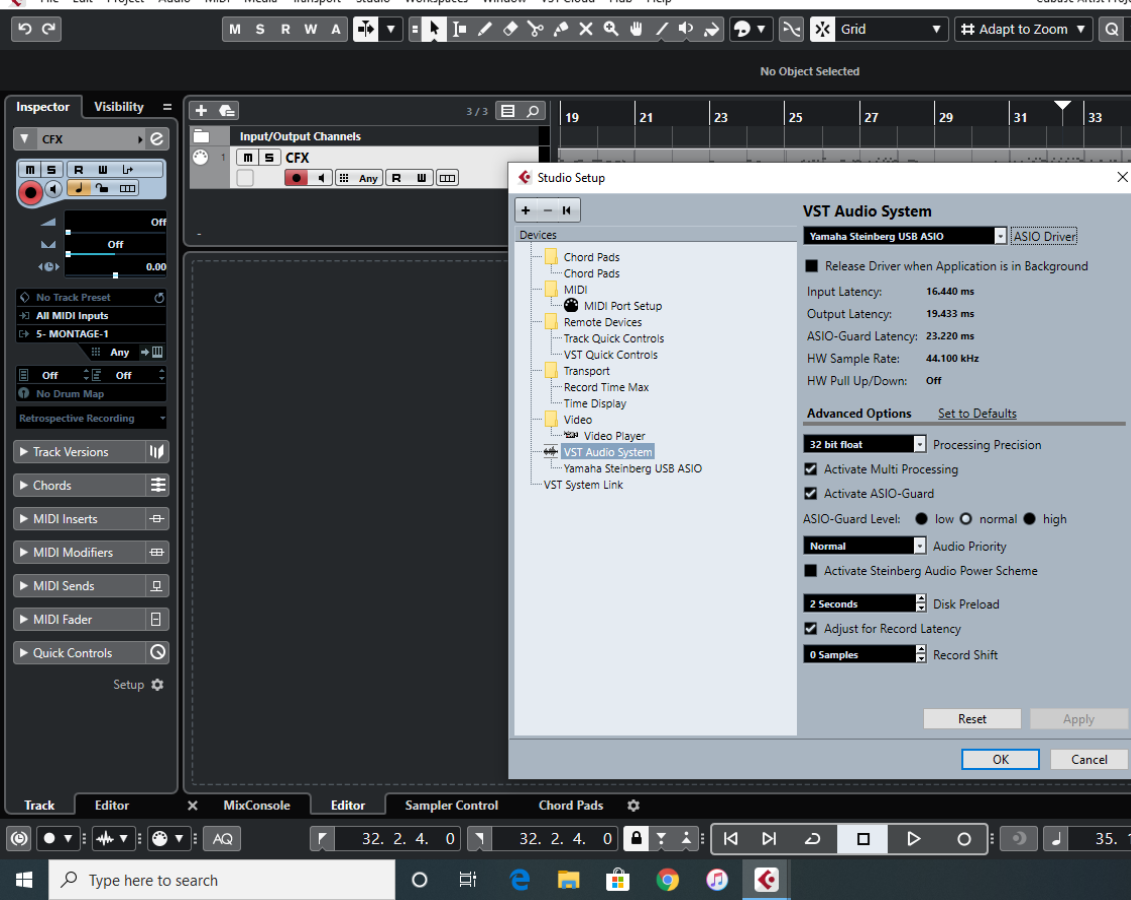
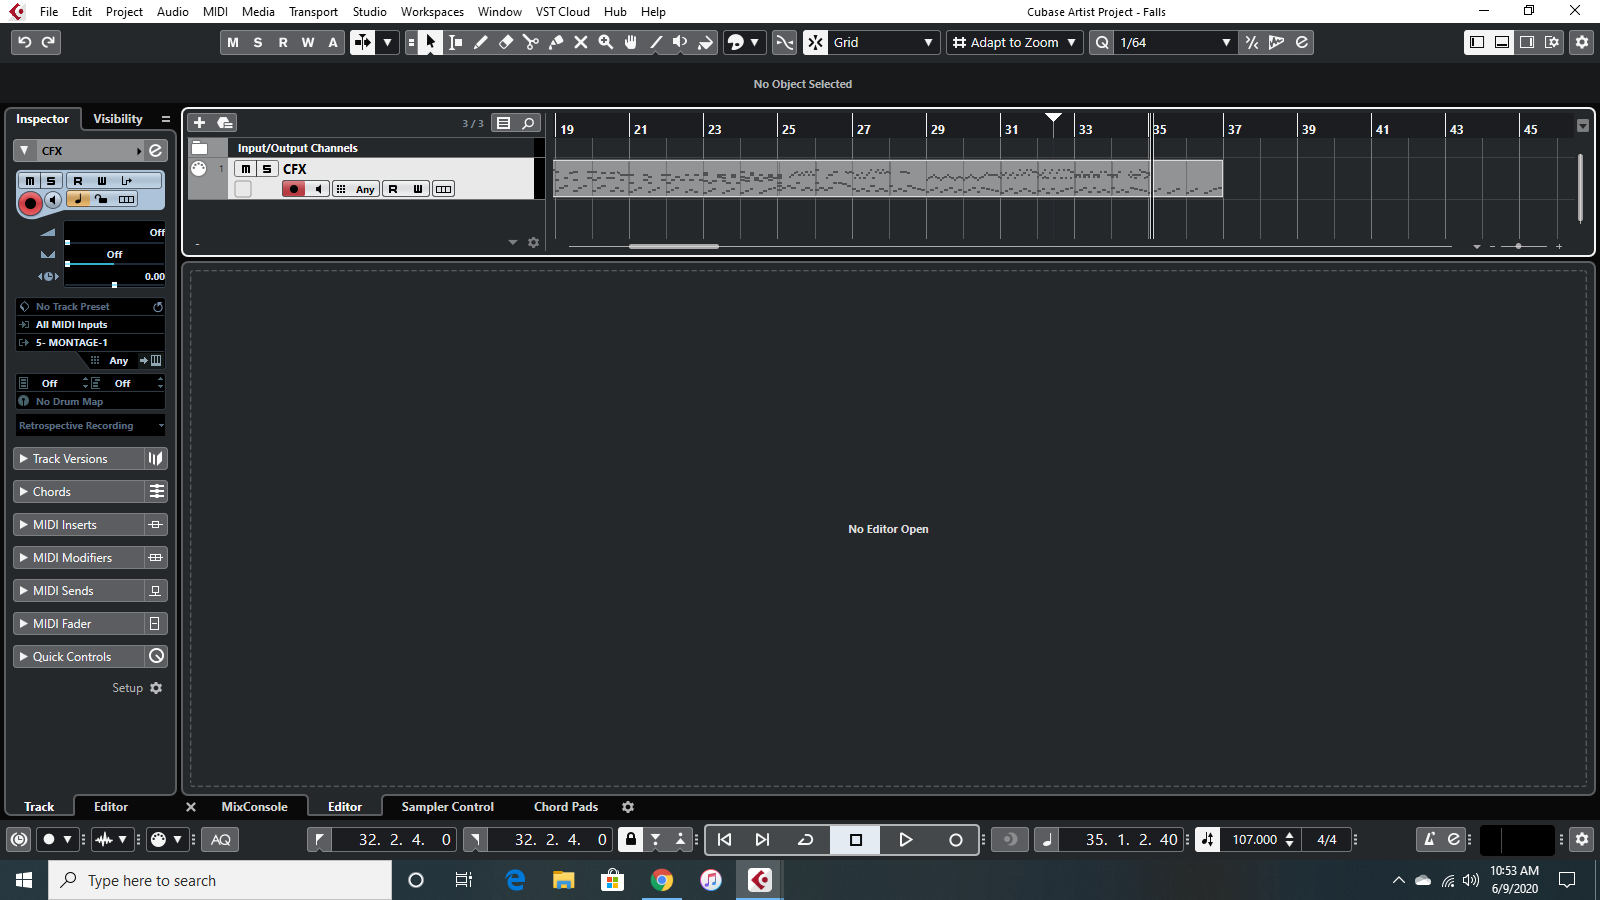
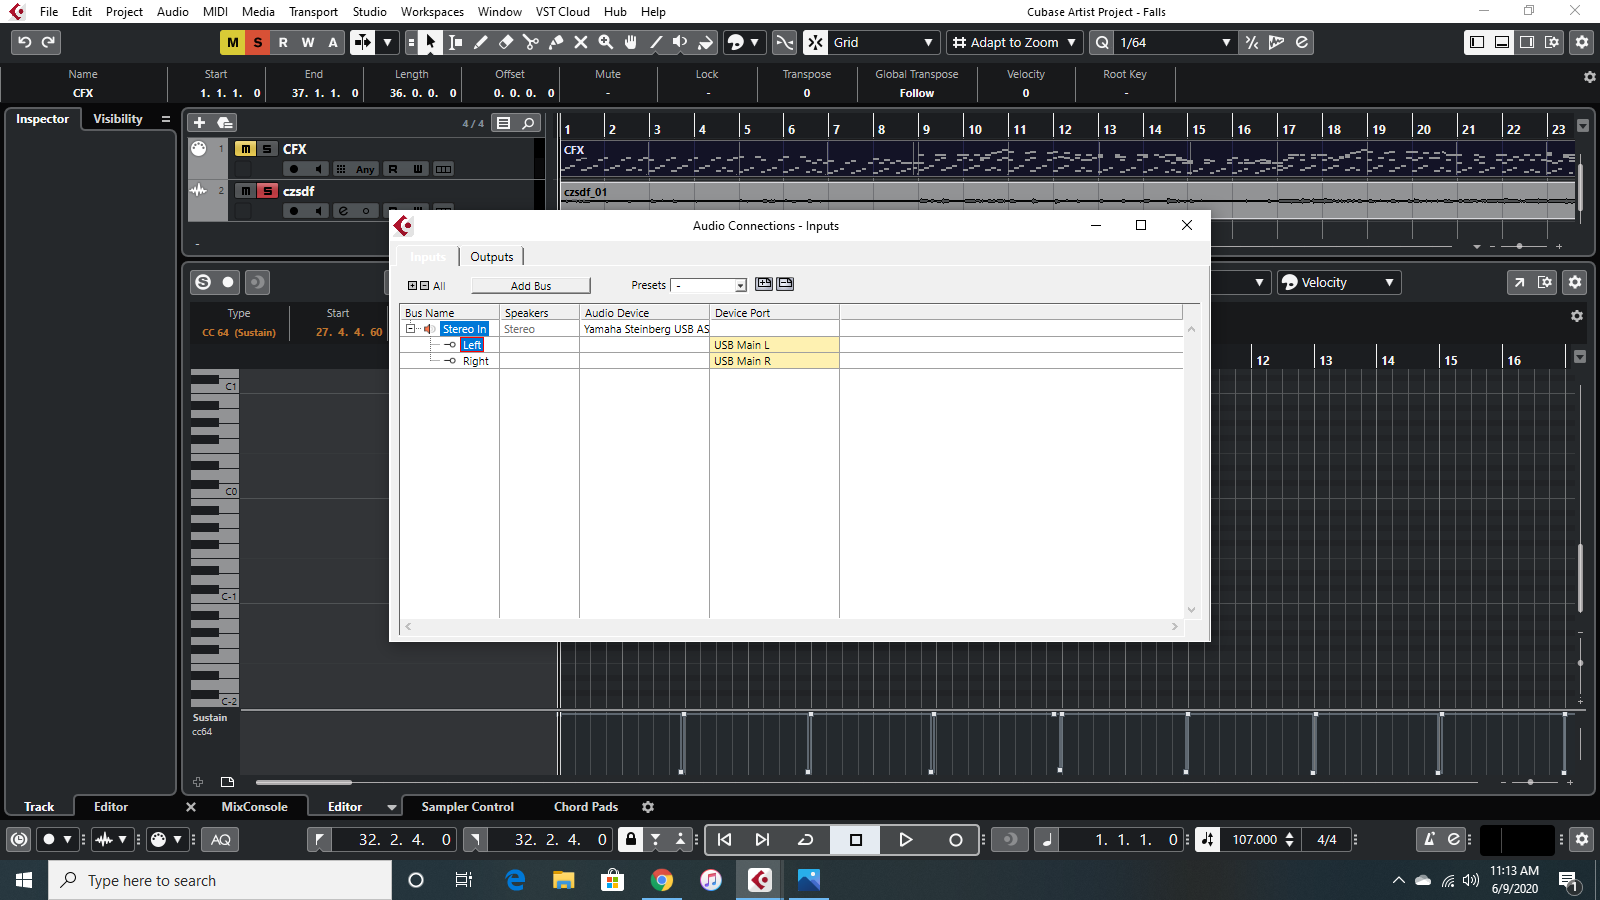
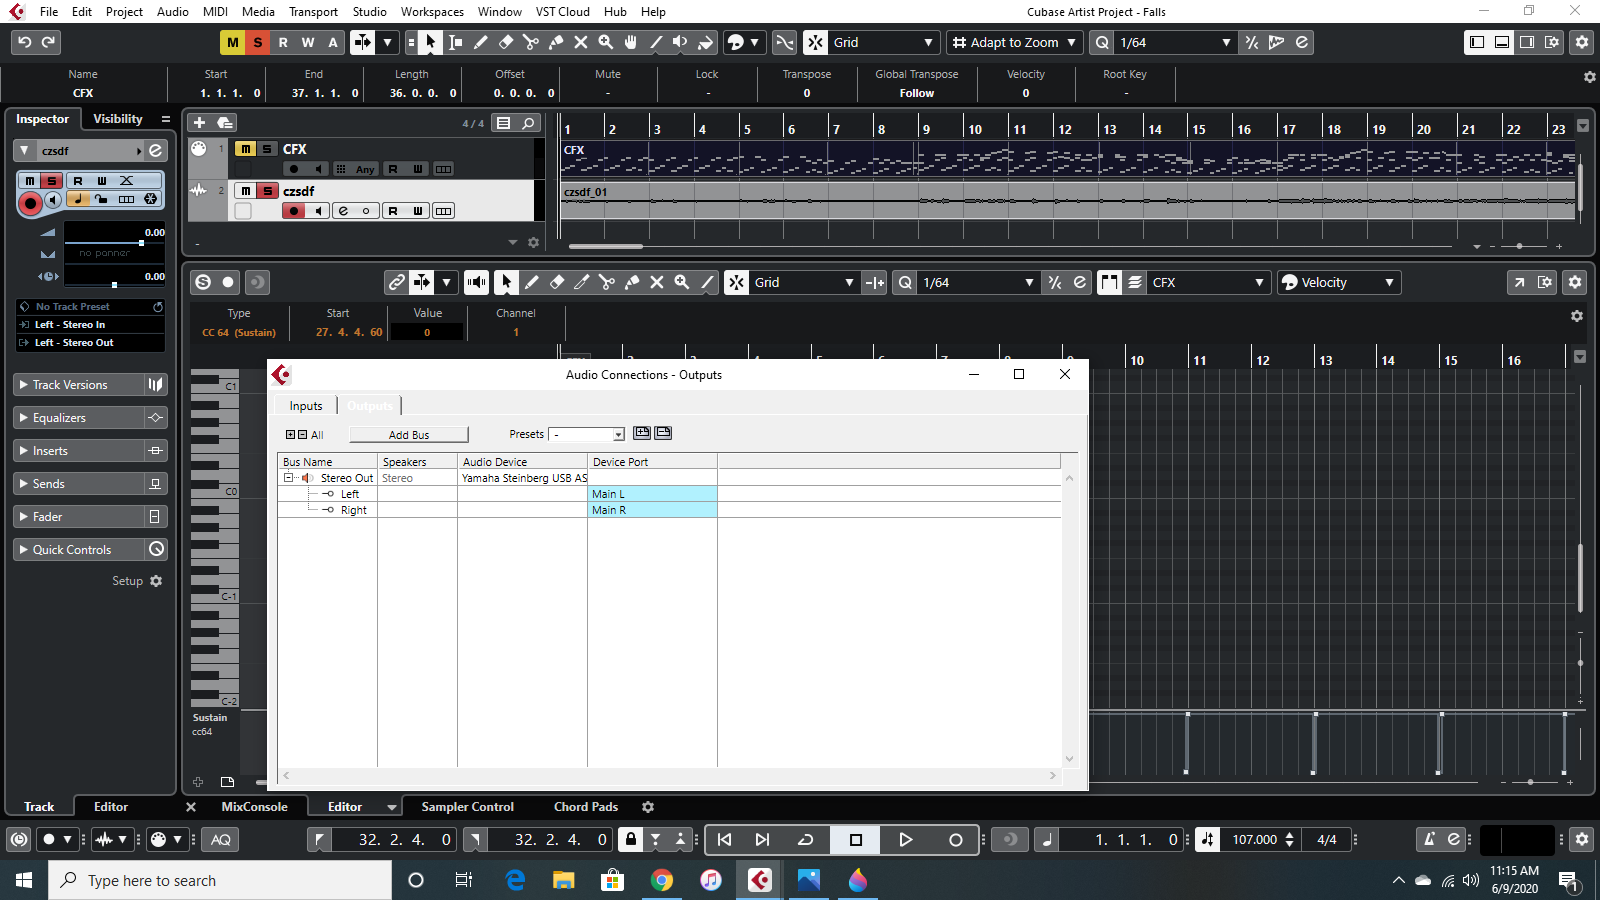
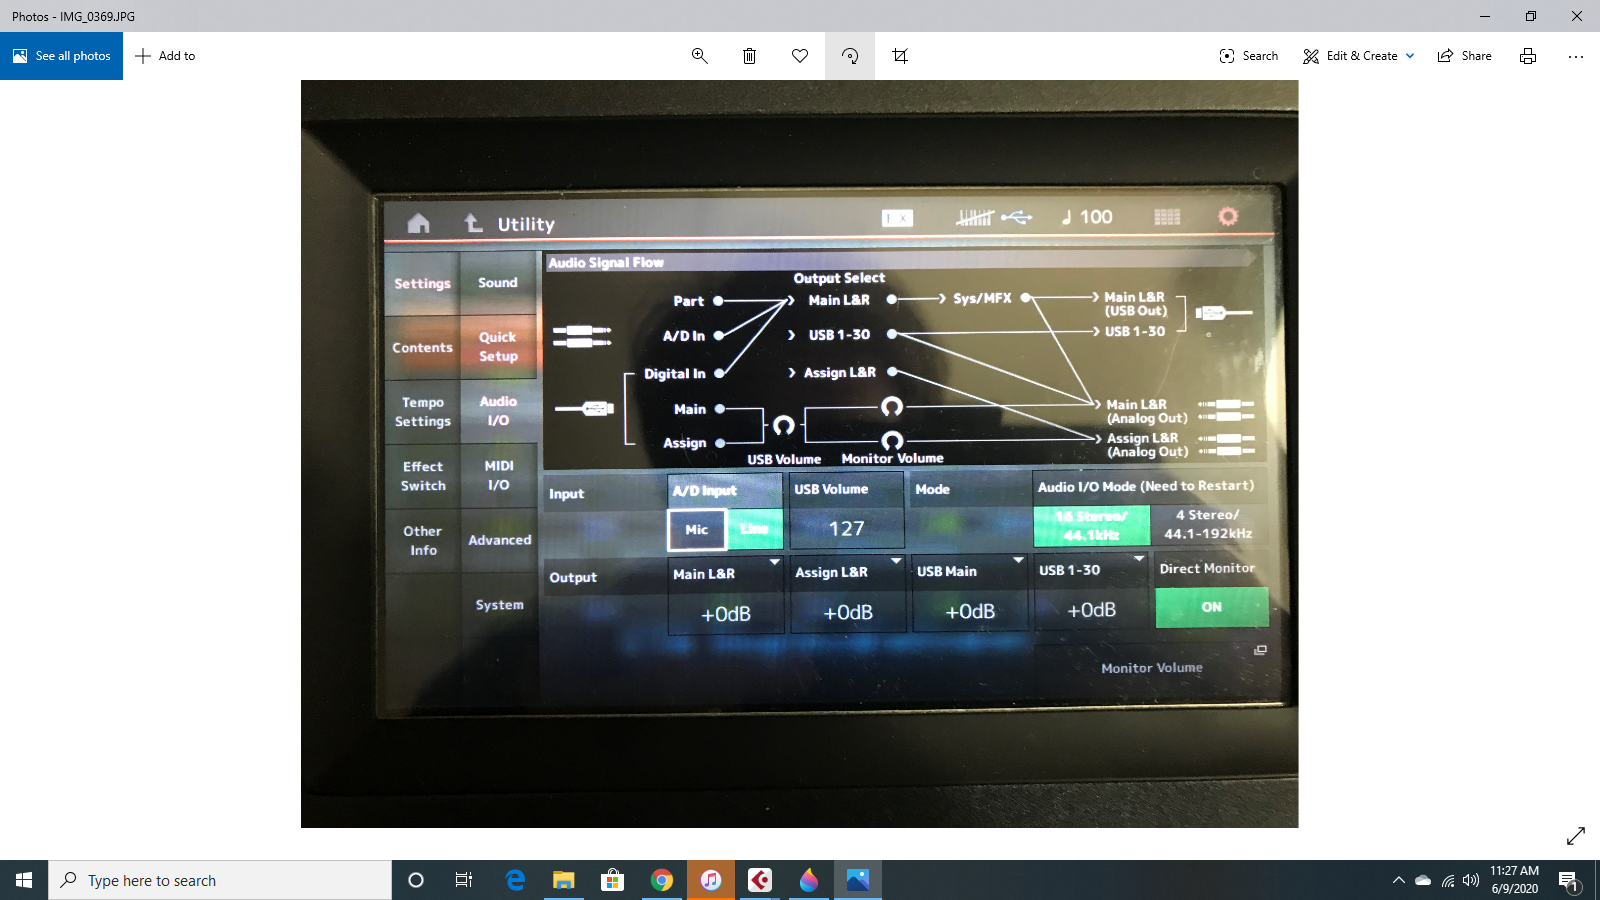
Here are screenshots of everything I can think to include:
Ok so I've looked at these posts and am still not sure what's wrong. The only things I could identify that were different or possibly wrong were concerning the direct monitoring option in Utility-->Audio I/O. I had that on "on," but switching it off seemed to have no effect.
When you say it had no effect — of course, it has an effect. Turning Direct Monitor to OFF means you no longer have a path from the MONTAGE Tone Generator to the Analog Outputs. The effect should be that you no longer hear the MONTAGE. Are you still hearing the MONTAGE? I assume, no... so it has had its desired effect. It means that we must now complete the routing circuit by routing the Stereo Audio through a Stereo Input and assign it through a Stereo Track that returns audio to the Stereo Output.
So not to worry, this step is fine.
The other thing is that in my Cubase, in the Inspector element for the audio track, mine says Left - Stereo In and Left - Stereo Out. I can't get it to just say "Stereo In" or "Stereo Out." Maybe I'm still missing something obvious here...
That is huge... you are recording only the Left Output. Like listening with a sock in one ear.
Let’s go step-by-step through the process of setting up the Stereo Input and then selecting that Stereo Input as your Audio Track’s Input.
In your third screenshot overall. The one that correctly shows STUDIO > AUDIO CONNECTIONS > INPUTS tab
Double click where it says “STEREO IN” and re-name “Miles’ Montage”
The reason I am having you name this is so that you know which Audio Input to select when you create the Stereo Audio Track.
Next, let’s create the Stereo Audio Track.
Go to PROJECT > ADD TRACK > AUDIO
When the “Add Track” dialog box appears
Set “Audio Inputs” = “Miles’ Montage“ (it’s now on that list, find it! Select it!)
Configuration = Stereo
Audio Outputs = Stereo Out
You can Name the Track if you wish
Count = 1
Click “Add Track”
We have routed a Stereo Out from MONTAGE via USB... to a Stereo Input (Miles’ Montage)... we have created a Stereo Track being fed by “Miles’ Montage” ... the Output of this Audio Track goes to AUDIO CONNECTIONS > OUTPUT tab > which is set to return audio to the Montages Main L/R Analog Outputs... ultimately feeding both channels and both ears.
Thanks Bad Mister, that definitely fixed the problem! Seems to have improved my volume issue as well. I appreciate your quick and thorough responses very much.
Excellent!
ok...I´ve been following this, I read this like 10 times and still don´t understand what you´re talking about.. my Cubase looks exactly the same and I never have bad sound. are you really telling my that this setup is still wrong? please.... what´s wrong with it and how is renaming it fixing anything? (how do I upload a screenshot? why do I get an error message when trying to upload a jpg file? what format does this forum need, please. jpg is standard!)
The file montage audio.JPG, which you are attempting to upload is in an unsupported format. WHY?
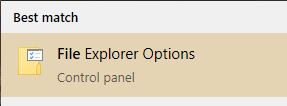
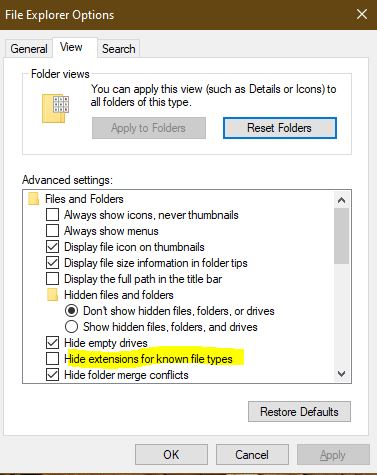
You need to rename it to audio.jpg (for some reason the site cares about the case of the extension)
oh for God´s sake, why? and how? if I rename it, it will be called audio.jpg.JPG. I cannot change the format of the extension in Windows. or at least, I personally can´t do it, and if someone else can please tell me how....

