Hello and a Happy New Year to everyone! When creating new Pfs of 4 Parts (for example) I sometimes create variations using the 'Scene' buttons by muting one or more of the Parts and storing it as a Scene (SHIFT + SCENE) - a little window drops down to advise it's done. However, when working with Elements (INIT AWM2), having created a 4 Element Pf as PART 1, I try the same by switching off the Elements not required and storing with SHIFT + SCENE - little window drops down etc: but only that particular mix is stored on all active Scenes. Is there no way I can store different Scenes with Elements - or do Scenes only work with Parts?
That is correct thinking thus far - here is how to proceed to solve this. I often use the analogy of the musician and the technician, as the MONTAGE combines both a synth and a digital mixer. You must wear two hats: one the musician hat, the other the sound technician hat. If you view things from this perspective...
If you think of a Part as a musical instrument, then the Element is a single oscillator (tone source) within the instrument.
MUTEs, in this analogy, are a function of the band’s mixing console. So the technician (sound engineer) operates the MUTE status... they can Mute the entire channel by interrupting the audio output from reaching the Main L&R Outputs. The MUTE cannot Control things on the musician’s instrument,... only the musician can do that. Mutes control the entire Output of the Part.
If you want to make change as intimate as changing a function within the musician’s instrument, you would do so with the musical controls. These include the MW, the Pitch Bend Wheel, Aftertouch, an Assignable Knob, the Assign Switches, a Foot Controller etc., These are items you operate while ‘performing’. Therefore, you can begin by assigning a musical controller to Element Level... then we can deal with how MONTAGE makes the link between the technical and the musical....
Scene
“You can store all parameter settings such as Arpeggio type, Motion Sequencer type, and the Part parameter values together as a “Scene.” There are eight Scenes and you can select them by pressing the [SCENE] button. From the Scene display you can edit parameters related to the Scene function.
When [Memory] is turned on for the function, the Motion Sequencer type, or the Arpeggio type, the corresponding function information is automatically memorized to the currently selected [SCENE] button.”
Therefore, to accomplish control over which oscillators within the instrument are set to sound you would program the PART’s Control Assign setup and use one of the physical performing controllers to adjust which of the oscillators are set to sound. The MONTAGE features several examples of this kind of manipulation of AWM2 Elements (and/or FM-X Operators), within the Part. Let’s take a look...
The Single Part Performance “St Ensemble K” is a String sound the ‘hides’ a Brass ensemble and Orchestral Bell... depending on how you operate the Controllers. It is a 5-Element instrument —Elements 1, 2 and 3 make up the string ensemble, the individual “Elem Level” for Element 4 is assigned to MW, such that only when MW is raised to you hear the brass ensemble. And only when AssignSwitch 1 is activated do you hear the high orchestral bell.
That all said, the MONTAGE is a powerful synth... we mentioned it combines a musical synthesizer with a powerful digital mixer... because you can link individual Element Level to Part Assign Knobs and you can then link the Part Assign Knobs to the position of the Super Knob, and finally, because the Super Knob position, can be memorized by a Scene... the programming answer is, Yes you can...
Let’s reprogram the Brass Element (Elem4) so that it is ‘biased’ to an available Part Assign Knob, then link that Part Assign Knob to the Super Knob...
Press [EDIT]
Press [PART SELECT 1]
Lower left corner “Part1-Common” appear in blue
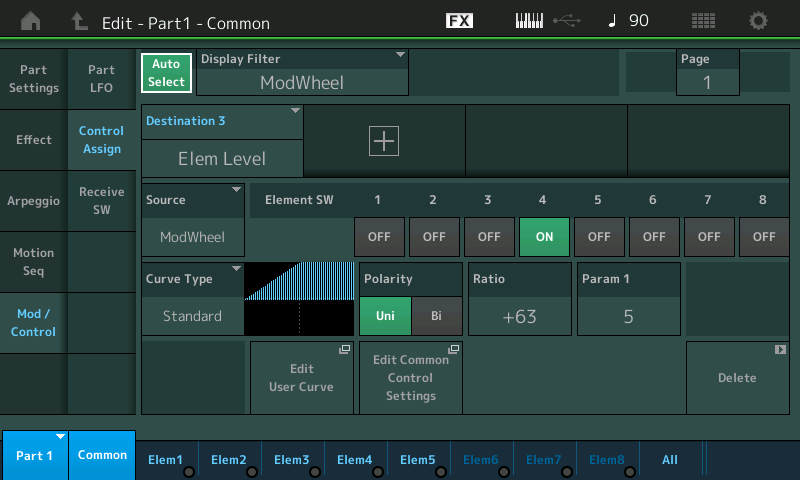
Touch “Mod/Control” > “Control Assign”
Activate the “Auto Select” option (green), and move the Mod Wheel to recall its assignment.
“Source” = Mod Wheel
You can see that raising the MW will increase the level of Element 4

Unfortunately, the position of the MW is not memorized in a Scene. We will need to use MONTAGE’s massive Assign Knob functions... Before we make new assignments, let’s see what is already programmed. (Very important)
Press the [ASSIGN] button so that it is lit - this activates the Assign function, this will allow you to move each of the eight Assign Knobs, in turn, to see what, if anything, is currently assigned.
Part Assign Knob 1 = nothing
Part Assign Knob 2 = Part “Volume”
Part Assign Knob 3 = “Rev Send”
Part Assign Knob 4 = “Var Send”
Part Assign Knob 5-8 = nothing
Take note of how far they move when you move the Super Knob (you can scale ‘how much’ they move in response to the Super Knob position). Only the Rev Send and Var Send Knobs respond. This means on the upper COMMON level of the architecture, there are two Part Assign Knob linked to the Super Knob.
While you can assign multiple things to a single Knob, if you have one that is available, you should use it.
Part Assign Knob 1 is available.
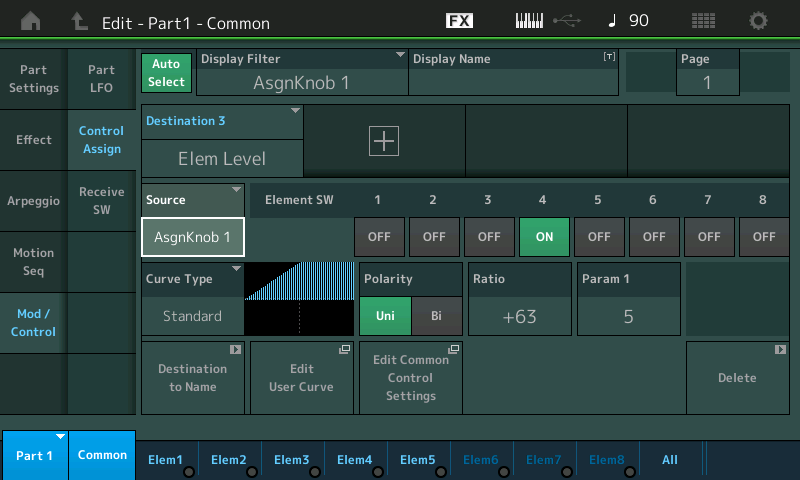
Move the MW to view its assignment
Tap the “Source” = “ModWheel” to view the options
Select “AsgnKnob 1” > press [EXIT]

Turning “Part Assign Knob 1” directly now controls the Brass output level.
Tap the shortcut box “Edit Common Control Settings”
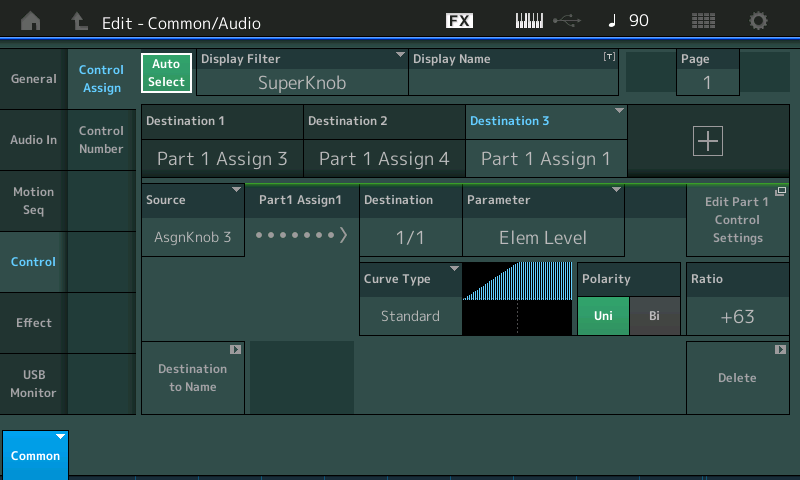
Move the Super Knob to recall what is assigned... as we expected Part Assign Knob 3 and 4 are “linked” to the Super Knob (upper Common level of the architecture)
Let’s “+” add our Part Assign Knob 1
Touch the “+” to add an assignment
The default parameter appears... tap it to open the options window...
You want to select “Part 1” > Part 1 Assign 1

When you do it will make the link between the PART’s Assign Knob 1 and the first available Common Assign Knob which is #3... I gave it a Display Name “Brass”
The position of upper Common Assign Knob 3 will control the Elem Level within Part 1.
The position of the Common Assign Knob 3 will match the Super Knob position.
The Super Knob position is *memorized* in a Scene.
That is how you can approach something like that... each Performance is different, and you will need to work out what else is assigned to the Super Knob position so it behaves as you desire. Half the battle is learning to explore and change the existing programming to what you need to accomplish.
If you get stuck, please provide details of the exact items you are dealing with...
Hope that helps, Happy New Year's!
WOW BM! Thanks! My poor sight means I have to use the 'low vision' settings on my computer (which effectively converts all images into negatives) so I can't see the screendhots, but your narrative makes it perfectly clear! In fact, it goes further than I was asking about, in that I could evolve the sound using the superknob (as well as take snapshots with the Scenes). That gives me 8 variations of a 4 Element Pf - but 11 combinations are possible - I could use the Assignable buttons and the MW to produce the other 3.
I'll start with the example you gave *St Ensemble K' just to see I have it straight, then apply the same principles to my Pfs ... most interesting! Thanks again, BM! I hope your 2020 goes beautifully - and starts with a raise ... 🙂
OK BM - I have now had a session on Montage, and the problem is that I am not starting with a Preset, but INIT AWM2. So far as I can see, no 'Elements' have any effects applied in that the superknob has no effect at all. I want to select any 2 Elements from 4 in turn (there are 6 possible variations), and then any 3 from 4 (there are 4 possible) as well as all 4. Which makes 11 possible variations, but only 8 Scenes - so I have to select all 4, plus the 7 best variations. I have not been able to work out how I can do this going the 'Assugn' route (though I did find trying very interesting!).
However, I have found a simple way to achieve what I want, and that is to make each Element a Part. So INIT AWM2 > HOME > + > INIY AWM2 > HOME > PART 2 > EDIT > Element 2 > Tap On > Select Number > Done > EXIT back to HOME > + > INIT AWM2 > HOME > PART 3 and so on ... it looks complicated but is very simple and as the Elements are now PARTS the Scenes capture them, so I can just Mute unwanted Parts as I go along. Works a treat.
I don't apply much effect to any of them - perhaps adjust volumes and add a little Common Release. The music the sound is used for will require its own effects to be made then.
Sorry, you’ve lost me.
I don't get it either - but somehow I imagine he's splitting individual elements to single PARTs and then using MUTE as a crude way to toggle elements - which was the original goal, I gather.
Scenes do not have direct control over elements - this is true. However, scenes can control superknob. And superknob can control assignable knobs. And assignable knobs can affect individual elements. Even "toggle" elements on/off by using element levels that are controlled by assignable knobs.
You can program positions of superknob that "toggle" elements on/off for various values of the superknob. And then use scenes to pick the exact superknob position which yields a certain "on/off" combination for the elements by element level. It may be easiest to employ user curves and use step type curves. That is what I tend to use for this sort of thing.
That does require possibly a lot of programming where using mute is easier. But it seems the tax of using mute would be that you have to "burn" PARTs to split up a single PART into many PARTs. And this may not be achievable in a Performance that already uses lots of PARTs.
I guess one benefit of splitting a PART into many PARTs to break apart the elements would be that each element has even more control over how the effects are applied since now each element has its own bank of possibly different insertion effects where the original PART (with all elements together) had to share two insertion effects. But that doesn't really make life easier as a programmer - which I imagine was the point of breaking apart the elements.
Superknob isn't the only trick up the scene 1-8 button sleeve. You can also use control ARPs to "move" your assignable knobs to different positions. Here you would need to likely employ user ARPs. Use of ARPs would mean you have to trigger a note first before the ARP starts. But once the first ARP starts - you can just have the ARP behavior as "hold" so you only need to trigger once for that Performance. Then scenes can switch to a different setting for the assignable knob. And you'd have to relate to these very similarly (in programming) as the superknob->assignable knob method. Except that this ARP'd assignable knob approach lets you free up superknob for something else. Or just take that one level of programming out of the equation.
Hahaha BM - I evidently use Montage in unique ways. My solution to making Scenes work with Elements is much easier to do than to explain, as is often the case. I am not a great programmer as I become impatient with details and getting ever deeper into the mire - so I look for simple answers. Often triggered by your comments - in this case by your confirmation that Scenes do not work with Elements as they do with Parts - so could I make Elements into Parts? Yes I could ...
You're right Jason - I like to achieve my aims by the simplest means, and my programming skills are - uh - limited, is the kindest word! No patience, see? I followed BM's clear instructions,and it became obvious that the simple thing I wanted to do would require a considerable amount of programming for each Scene. Not worth it. In this instance the Scenes are only experimental options, rather than finished products.
