Hello all
First of all, I am able to change the volume for all other the performances that I’ve used on my Montage.
When I try to change the volume on certain performances using the fader, or the data wheel within the performance, I see the the volume going up and down but there is no change audibly. The volume remains constant. This happens with these performances
88 Key Case Hard
88 Key Case Soft
Case 73 Soft
Case 75 Medium
Case 75 Hard
SuperDynoChorus DI
Wr Tremolo Amp
Wr Amp
Trumpet Ensemble
Trombone Ensemble
There are more - but these are some examples
I have made sure that I have examined the performances and change the volume for all of the parts . There is no volume pedal connected or mini cables.
I have performed a hard rest but the issues persist
I can put use the same results if I create an initialize performance and use the same sounds
Can somebody tell me why I am unable to change the volume on these performances but I am able to change the volume on the vast majority of performances ?
Thankyou
The short answer is: another Controller (other than just the Slider) has been assigned to control Part “Volume”. This is done when both hands need to be on the keys while performing and the performer wants to determine how the volume of the controlled Part’s behaves individually.
As you may know, a Foot Controller can be used to control Volume ... either cc7 (Channel Volume) or cc11 (Expression). The Slider sends cc7 and responds to cc7 when routed in via MIDI, an FC7 plugged into Foot Controller 1 will control Expression cc11. These are the traditional MIDI devices to control performing Volume. cc7 is like the mixer volume, while cc11 is like the instrument’s volume control... meaning the level of cc11 always works within the level set by the channel volume, cc7.
This has been how it works forever... when using cc7 all items on the channel move to the Volume of that control; when you use cc11 all items on the channel change level but remain proportional to each other. This is great - you can opt IN or OUT per Part, but what about more complex control over volume during a musical performance...
What the synth engine in the MONTAGE/MODX offer is additional ways to control a Part’s Volume. Part “Volume” is assignable to any physical controller. The very first Performance “CFX + FM EP” illustrates this important fundamental concept. As you move the Super Knob (which can be done hands-free with an FC7 Pedal plugged into Foot Controller 2) you are turning up the FM Electric Piano, simultaneously as you turn down the Acoustic Piano.
The traditional cc messages 7 and 11, would require a pedal to increase 0-127 and a second to decrease 127-0, if using the front panel Sliders that means two hands, great if you're the recording engineer working a console, but you’re a musician playing the Keyboard. How can you turn the E. Piano up and turn the Acoustic down with a single gesture? Well, the Control matrix behind that “Super Knob” in the synth, can move scores of parameters, simultaneously (not just volume) But volume is a good start to understanding this concept.
To view controller assignments
You can see an overview of front panel Control assignments, and then take a shortcut to the screen where these assignments are made. The OVERVIEW is useful to get a quick idea of the alternate candidates.
The individual Part's CONTROL ASSIGN screen is not only where the assignment takes place, but is where either partial or total control over the Part Volume is determined.
Let's look into "88 key Case Hard"
PART 1 is the Rhodes sound
PART 2 is the mechanical noise made by a Rhodes
You are meant to balance the amount of "mechanical noise" to the amount of the actual instrument (Rhodes)... This is accomplished by linking the control of the PART 2 Assign Knob 1, to the position of the Super Knob... So that as you increase the Super Knob position from minimum toward maximum, you are actually increasing the amount of the "mechanical noise". Here's how that happens...
PART 1 has its AsgnKnob1 set to reduce the Volume of that Part

To arrive here from the HOME screen:
Press [EDIT]
Press [PART SELECT 1]
Touch "Mod/Control" in the first column
Touch "Control Assign" in the second column
Make sure "Auto Select" is active (green)
You can now move a physical controller to view its assignment.
Make sure the [ASSIGN] button is lit...
Move Assign Knob 1 to see the screenshot above.
The graphic shows that as the controller is increased (left to right) the parameter will be reduced from maximum to minimum (top to bottom).
Turn it directly and observe. Part 1's Assign Knob is active because we have *selected* Part 1.
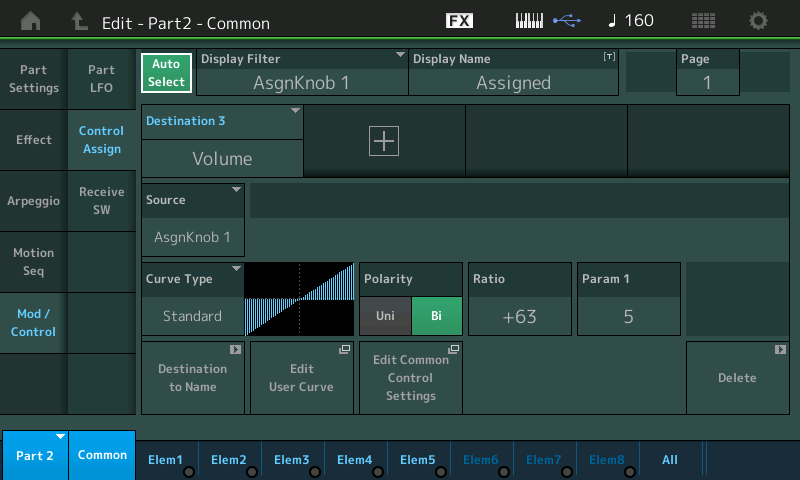
While PART 2 has its AsgnKnob 1 set to increase the Volume of that Part

To arrive here from PART 1 simply:
Press [PART SELECT 2]
...to see the screenshot above.
The graphic shows that as the controller is increased (left to right) the parameter will be increased from minimum to maximum.
Each PART has eight Assign Knobs, which can be assigned to multiple parameters.
Each PART has sixteen Control Assign, Source/Destination setups... called Control Sets.
If you wish to remove this Control Set, you simply tap the "DELETE" box within this particular Control Set. Doing so will return the control over the Volume to the Slider.
PART 2 is linked to the Super Knob movement... in the second screenshot above, you can see the shortcut box "Edit Common Control Settings". If you tap that box you will be immediately taken to the upper Common/Audio level of the architecture (where the Super Knob, and its eight Assign Knobs live and where the links to them exist). Here you can see "PART 2 ASSIGN 1" = VOLUME.
The Super Knob has eight Assign Knobs (called the Common Assign Knobs) they can move when the Super Knob is moved... so that when you link a PART's Knob to one of these, it will also move. The Super Knob can be moved, hands-free, by plugging an optional FC7 sweep pedal into the back panel Foot Controller 2 jack.
If some, or all, of these terms are new, please take your time and try some of the Mastering MONTAGE tutorial articles that step you through not only navigation but the important concepts of 'control'.
Let's look at "Trumpet Ensemble"
When you first recall this two PART Performance, the Slider for PART 1 is all the way down, but the Super Knob is all the way up... just this observation should be a clue that there is something happening here. Turn the Super Knob down toward minimum, notice that the PART 1 activity indicator show the sound has faded out (your ears will tell you also)... These are the harder blown brass... you are left with PART 2 - the softer blown brass.
Here the Super Knob accomplishes a kind of brass ensemble volume 'swell'. You are changing the balance between PART 1 and 2 with the position of the Super Knob... using the FC7 to morph the balance, you can easily accomplish the ensemble volume swell while keeping two hands on the keys.... also the added benefit of an FC7 in Foot Controller 1 will let you control the overall output level of the combination. Foot Controller 1 is set to do cc11 Expression.
FC7 in Foot Controller 1 is set to Expression
FC7 in Foot Controller 2 is set to Super Knob
Accomplishing both the ensemble volume swell, and controlling the overall Performance Volume is possible, while BOTH HANDS remain on the keys!!!
If you DELETE the PART "VOLUME" Control Set in each PART... you will find that it is difficult (impossible) to pull off the two-hands on the keys control like it is handled by the Control Sets.
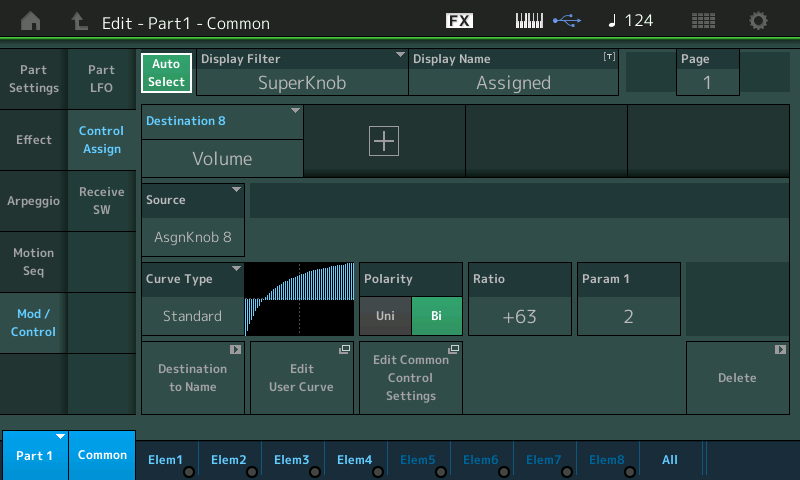
PART 1's Part Assignment to Volume

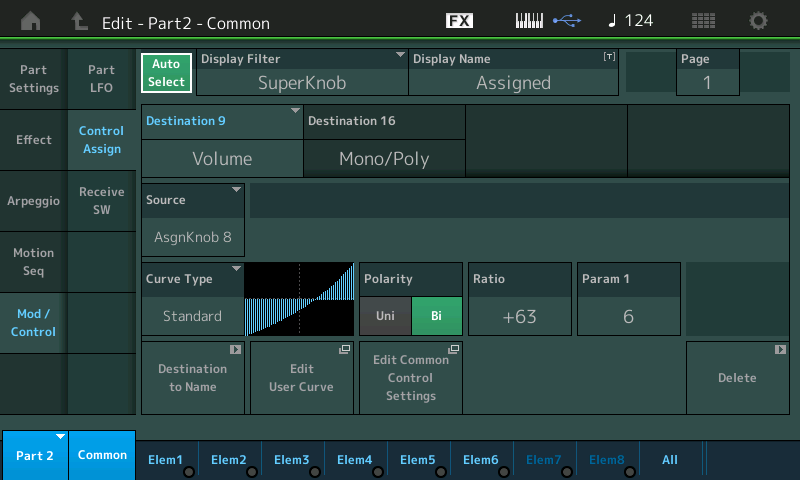
PART 2's Part Assignment to Volume

Here both PARTs 1 and 2 are being turned up by the Super Knob, but by a different amounts... PART 2 is, in fact, linked to a Super Knob controlled Common Assign Knob, that moves in the opposite direction... so that as you turn up the Super Knob - you will observe that one of the Common Assign Knobs is moving in the opposite direction (AsgnKnob2) - turning down the PART 2 softer blown brass, but not completely (by a programmed amount)... while at the same time, the harder blown brass in PART 1 come toward the front!
Obviously none of this type of detailed control could be handled by just the Sliders and Foot pedal alone... It is the Super Knob and its Assign Knob system that allows for very detailed control, very detailed hands-free control (if you get the FC7 pedals working for you).
Thankyou for taking the time to post such a comprehensive reply, Bad Mister. That was very useful.
