Notifications
Clear all

Topic starter
I feel like I kicked big box of puzzle around the house and one day I trip over one puzzle ....oh I wander what this is for.......let me google......I will email ......few days later.... oh there is another one,,,.....let me you tube it, nope can't find it..........and there were about 5000 pieces In that box....:D 😀 😀 😀 😀 .......:(
The vst editor it's self is confusing with so much options ......and then cubase and all the routings etc....it's just too much without logical step by step toutorias.....
Posted : 12/12/2014 7:31 pm
Topic starter
Bad Mister
I'm gonna skip that whole step of rendering each midi track to separate audio channel and muting and putting in one folder all midi tracks. As good as it sounds that's just too complicated. I will do all mixing in midi and then I will do audiomixdown of all midi tracks into one audio channel and there I will do mastering. Mastering should be done on master channel mostly anyway right?
If you could only guide me how to use more then 16 sounds from motif xf.so I could have in my cubase project 20,30 or more instruments all together, and I will mix those in mix console then.....? 🙂
Posted : 12/12/2014 9:00 pm

I'm not sure why one would think that the first time you do something it will be easy. But much like when you learned to ride a bicycle, it, at first, seemed very complicated and difficult, but once you traversed the "learning curve" period, how easy is riding a bicycle? Same thing will apply here.
We will post a video outlining the routing and basic procedures of rendering VST MIDI tracks to audio. This is, after all, an advanced feature. If you read and understood the example I mentioned, you have many, many options for rendering your XF Parts to audio.
If you wish to use the Motif XF for additional MIDI Parts (beyond 16) you simply FREEZE the current 16 and begin a new set if 16. You can do this until you reach the number of Parts you require.
-----------------------
"When you Freeze a VST Instrument, the program renders an audio file of the instrument output (taking into account all unmuted MIDI parts routed to that VST instrument). This file is placed in the "Freeze" folder within the Project folder.
All MIDI tracks routed to the VST instrument are muted and locked (greyed out)
When you start playback, the rendered audio file is played back from an "invisible" audio track, routed to the VST instrument's MixConsole channel. Thus, any effects, EQ, or mixing automation will still be applied."
----------------------
The result of the Freeze is that you get exactly the same sound as before, but the hardware (XF) does not have to generate the sound in real time. So it is free to work on the next set of 16 Parts.
The FREEZE icon is found on the VST INSTRUMENT rack. See your Cubase Operation Manual for details.
Posted : 12/12/2014 10:16 pm
Topic starter
I can't find this freeze icon , it's nowhere in midi tracks, end not in vst editor, I see it only next to audio track , but all my instruments are midi.....?
Posted : 15/12/2014 4:57 am
Topic starter
I went to devices , vst instruments and froze them , so that froze all 16 midi tracks, I added 8 new midi tracks but don't know how to connect them with vst editor so I could use the sounds from motif??? When I open editor it tells me that port has not been properly set. Where do I go from here?
Posted : 15/12/2014 6:58 am
I went to devices , vst instruments and froze them , so that froze all 16 midi tracks, I added 8 new midi tracks but don't know how to connect them with vst editor so I could use the sounds from motif??? When I open editor it tells me that port has not been properly set. Where do I go from here?
As mentioned, the FREEZE function is found in the VST INSTRUMENT Rack.
When you click on the Freeze icon, you have to make your settings for this option. (We assumed you would look this up in the Operation Manual) but we are happy to help you - after all it is new. When you click on the Freeze option you can select to add a "tail" - This is recommended if you are using any reverberation or delay effects that might hang on past the last measure/beat. The Freeze function creates a temporary audio file (in the Freeze folder of your Project). This audio file will playback via the VST Instrument's audio lane (of the first instance of the Motif XF VST).
_You also want to mark the option that "unloads the instrument" so you can use it again. This is very important because you want to utilize the Motif XF hardware for another 16 PARTS. This releases the hardware for more music.
You say you don't know - but I disagree, you do know how to launch another Motif XF. You just don't know that you already know!
🙂
It is the same as launching the first one. Once you "unload the instrument", it is free to be used... Here what you do: You simply go to the DEVICES > VST INSTRUMENT click on the little downward pointing triangle, select EXTERNAL > Motif XF VST and ADD a second Motif XF VST..... it will be "02"
When you do, it will create a new MIDI track assigned to "02. - MOTIFXFVST-Midi In" - the second XF.
Cubase will add another VSTi to the folder and create another automation and audio lane... And you continue just as before.
The first Motif XF VST (01) is "frozen", and it's MIDI Tracks will be locked.
Posted : 15/12/2014 6:35 pm
Topic starter
Hallo
Yes, so i did last night what you suggested today except i didnt Mark the "unloads the instrument" so vst was showing not set up properly,.
Now it's ok its online but I'm not sure about this.........vst nr 1 I had in song mode with all the instruments from the song in motif, now shall I be in song or voice mode in vst? Also some new midi tracks show options for channels and routings in inspector but some are grayed out?
Posted : 15/12/2014 10:05 pm
Now it's ok its online but I'm not sure about this.........vst nr 1 I had in song mode with all the instruments from the song in motif, now shall I be in song or voice mode in vst?
What you did with "01. Motif XF VST" with all the instruments in Song Mode, has no bearing on how you use "02. Motif XF VST".
You are asking ...should you be in Song mode or Voice mode?
What do you want to do next? If you plan on doing more than one MIDI track, then it follows you should select a multi-timbral mode, Song or Pattern mode, because they allow you to access 16 Parts. If you select Voice mode then you can only record one additional MIDI Track.
Make sure you target any additional MIDI tracks to the second Motif XF VST... It will be identified by "02.MOTIFXFVST - Midi In"
Also some new midi tracks show options for channels and routings in inspector but some are grayed out?
I don't understand the question?
All the MIDI Tracks of the "frozen" XF VST, are greyed out. They are idle (while frozen) they are locked. A copy of the audio that they would generate is currently housed in a special FREEZE folder in your Project's Folder. This temporary audio file is played back through Audio Lane of the "frozen" XF VST.
Please compliment what I am explaining to you with Cubase Operation Manual. It will help you to understand how this works. Basically, instead of active MIDI tracks sending data in realtime to the Motif XF, we have taken a "photo" of that result... We have rendered a temporary audio file, which plays back instead of sending all that MIDI data. As you can understand - this removes the need for the XF tone engine to reproduce audio in response to MIDI data. It is totally liberated from that task.
The sound of the freeze file is identical to the sound of the XF responding to MIDI.
The FREEZE function, is a very important tool when working with today's computers. It allows you to focus your CPU muscle where it is most needed. As you get deeper into this you will discover, a finished project is made up of various bits of recorded audio knitted together to create one final stereo file. As you "commit" portions of your performance to audio, you'll find you process, EQ, and polish each bit as your music requires.
Posted : 15/12/2014 11:45 pm
Topic starter
Shall I be freezing only instruments or instruments and channels?
I menaged to to do what you described , I have second vst editor , I am in song mode in vst editor and in motif xf , I added 4 midi tracks and assigned them to 02. motifxf vst-midi in and I chose the channels 1,2,3,4 for them . So now when I press on the new midi tracks in project window I see them corresponding with 1234 channels in 2 vst editor, but.................... When I press 1trouh 4 channels in 2 vst editor I see the first 4 frozen channels in project window reacting , and when I play on motif any of the new midi tracks I hear instrument and it's echo.? I think It's not a delay because I do hear sound right away but then it bounces like echo, plus I'm in direct monitoring. I am doing something wrong in 2 vst set up I think......
With first vst I had to import the song to vst editor trough file -open....in 2 vst editor I don't do that right?
I'm missing small detail somwher
Posted : 16/12/2014 5:31 pm
Topic starter
And also when I unfroze the tracks the vst editor 1 shows : port open error?
Posted : 16/12/2014 5:46 pm
Chopin123 wrote:
And also when I unfroze the tracks the vst editor 1 shows : port open error?
Unless you have a second Motif XF you cannot hope to unfreeze that data. Something about this you are not following. The Freeze is called that because much like a picture is a moment frozen in time, we have taken one complete performance of you entire song and have frozen it in a temporary audio wave that plays back instead of the MIDI data triggering the XF Tone Generator in realtime.
The FREEZE data It's audio, you cannot unfreeze XF VST number one until you freeze XF VST number two. You only have one real Motif XF, after all. Correct?
but.................... When I press 1trouh 4 channels in 2 vst editor I see the first 4 frozen channels in project window reacting , and when I play on motif any of the new midi tracks I hear instrument and it's echo.? I think It's not a delay because I do hear sound right away but then it bounces like echo, plus I'm in direct monitoring. I am doing something wrong in 2 vst set up I think......
The "frozen" channels are locked and have nothing to do with what you are playing now. What most people do is put the frozen MIDI TRACKS in a Folder and close the folder. They are frozen, you cannot do anything with them - their audio has been captured and is playing back via what Steinberg refers to as an "invisible" track and monitored through the VST Audio Lane.
Posted : 16/12/2014 6:40 pm
Topic starter
yes!! i just got that, i removed second vst editor and now it's ok.
regarding my second problem, the echo…….i just noticed that if i play one of the new midi tracks via 2.vst editor ,when i change output select in vst window from L&R to FW1&2 or FW3&4 and so on then there is no more echo , it sounds good. in my 1.vst i had all out puts set to L&R……..i'm not sure when i would use other out puts???
Posted : 16/12/2014 6:48 pm
Topic starter
Bad Mister
I hope I didn't confuse you too much 🙂
I do understand what you said that I need to freeze one vst in order to use the other one because I am using only one motif XF.
I said I deleted (not froze) second vst and everything was working because I am in experimental project ,as you suggested earlier, so I don't worry if I mess something up, so I just got rid off second vst in order to hear first one. I understand I would need to freeze it if had something important on it.
Now when 16 midi tracks are frozen and I'm in second vst recording 17th instrument ,what's the best way to match the volume ? I have used some plug ins effects in the 1vst and now when I want to add 17th instrument I can barely hear it even with volume at max.
In the 1vst I had all the 16 outputs in vst editor set to L&R and t was working great. I know that in the French tutorial (mossieurs)he assigned outputs to FW1&2,FW3&4,FW5&6 and so on ......and also I had to do that for that 17th instrument in 2vst in order to get rid of that echo . I don't understand what these outputs represent and how I should use them properly?
Posted : 17/12/2014 1:01 pm
Now when 16 midi tracks are frozen and I'm in second vst recording 17th instrument ,what's the best way to match the volume ? I have used some plug ins effects in the 1vst and now when I want to add 17th instrument I can barely hear it even with volume at max.
Turn down the audio wave of the first VST. The audio from the first (frozen) VST plays through the Audio Lane of the first VST - it has a channel on your Cubase Mixer. Recommend you spend some time with the Operation Manual of Cubase. Adjusting Volume is easy - really.
In the 1vst I had all the 16 outputs in vst editor set to L&R and t was working great. I know that in the French tutorial (mossieurs)he assigned outputs to FW1&2,FW3&4,FW5&6 and so on ......and also I had to do that for that 17th instrument in 2vst in order to get rid of that echo . I don't understand what these outputs represent and how I should use them properly?
Your issue with "echo" all though you think you solved it, is a simple matter of still not understanding how you are routing signal.
Remember there are two signal paths created between the Motif XF and your speakers. One is direct, the other travels through the computer.
The signal goes normally directly from the Motif XF to the main L/R output (this signal can be defeated when using the VSTi Routing by selecting FW MONITOR SETUP = "with PC" ). When you select "with PC", the DIRECT audio path between the XF and speakers is broken, audio for the main Outputs will travel through Cubase, first, and be heard via the Audio Lane of the currently selected VSTi. Signal assigned OUTPUT SELECT = L/R naturally travels through the Audio Lane and returns to the XF (audio interface).
IF and WHEN you decide to use the additional assignable outputs - that is, you assign a PART to OUTPUT SELECT = FW1/2 or FW3/4 or any of the other assignable FW outputs, this removes the signal from the main STEREO L/R output (this you must remember) so it no longer is included in with the others going to the main L/R, this is when "PC Direct" Monitor will allow you to monitor what you are playing "live" - it takes whatever you are assigning to the individual assignable FW outputs 1-14 and lets you monitor it "direct" (zero latency).
"PC DRCT" = the audio that you are overdubbing to (the audio playing back) is allowed to use the "with PC" routing, while the actual PART that you are playing ("live" ) and are directing to an assignable OUT has its audio go DIRECT to the audio Output and you do not hear it via the path of the other PARTS (until you playback). In other words, the PC DRCT option prevents the latent signal of a PART being routed to an assignable output FW1-14 from being heard. You monitor what you play, DIRECT. Make sense yet?
If you route it back via the VSTi to the Main L/R (OUTPUT SELECT = L/R) - yes, you get doubling. You call it "echo" - I've been calling it "doubling" - it is the same thing.
Doubling means you have created two pathways for the audio to travel. One direct to the outputs and one via the VSTi Routing. You need to select the one that makes sense. And only monitor that one path.
Normally when doing an original record you monitor everything through the Main L/R outputs. You assign something to the FW1/2, FW3/4, FW5/6 etc., when you want to isolate something to its own audio track.
Do an experiment. Assign a PART you are overdubbing to OUTPUT SELECT = FW1/2
You will need to activate that OUTPUT from the Motif XF:
On the Editor click the small chevron (arrow) in the upper right corner of the screen - to see the drop down - select ACTIVATE OUTPUTS and you will see the 8 Stereo Outputs that are available. The first pair (Main L/R) are always active (check mark). You will want to activate the second pair.
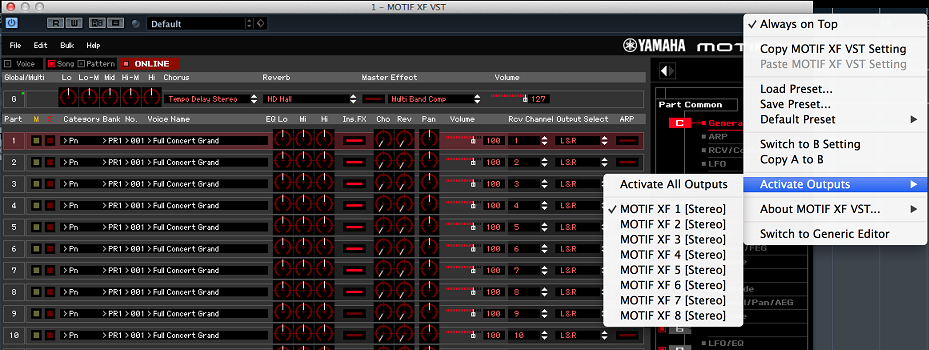
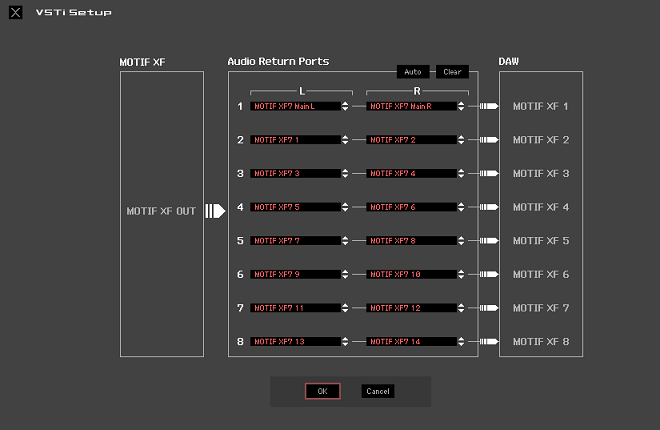
In the Editor VST go to FILE > VSTi SETUP > Make sure that Motif XF 1 is assigned to Motif XF Main L and Motif XF Main R
Make sure that the second pair (Motif XF 2) is assigned to Motif XF7 1 and Motif XF7 2
Posted : 17/12/2014 9:24 pm
Topic starter
Thanks a lot Bad Mister
I totally understand , I have not had the doubling problem until I unfroze one of the vst editors , it must have reroute on its own while opening vst I think.....
I also noticed that when i assign couple one or couple of instruments to these outputs fw1&2 or 2&3 ...... I can use on them all the effects from cubase , on regular midi there's is no option to do that individually on each instrument , so I can apply for example magneto II individually. That's why I thought earlier that I had to render all midis individually to audio in order to be able to do that. All the instruments I want to have certain effect I route together to FW1&2 for example and it affects them all using one output only.........I think I'm right with that,yes?
Posted : 17/12/2014 10:33 pm
