Notifications
Clear all
MOXF Series Music Production Synthesizers
7
Posts
2
Users
0
Likes
462
Views
Topic starter
Hello people!
I need assistance from someone who is using MOXF6/F8 with Cubase.
Ive not used my Cubase in a longer time and i am still not amazing at configurating and set-upping.
My ports are all messed up, no sound is coming anywhere when I am about to record. I am blind to my own problem.
Could some kind soul who is using Cubase with MOXF6/8 send me a few screenshots of their cubase setup and configuration? This includes pictures on how to setup the MOXF Editor. Everything is wrong now.
Thanks in advance
Posted : 07/10/2021 4:53 am

We’d be happy to help you get setup (which you will do once) — you don’t necessarily need to do this multiple times. But before we begin you need to tell us what Cubase version you are using (it does make a difference).
Saying you use “Cubase” doesn’t give us enough information about the setup… Are you using a recent version of Cubase, or are you using the one that came free with your purchase… which could be as old as 8 years ago.
Also we need to know what type of computer you’re running, Mac or PC, because again, the details will be different.
Thanks.
Posted : 07/10/2021 5:40 am
Topic starter
Thank you for the response.
Oh sorry, my version of cubase is Cubase AI 9.5 and im using PC Windows 10
Posted : 07/10/2021 6:30 am
Okay excellent! This is a long (but complete), step-by-step but includes information about WHY you are doing things. Even if you don’t initially understand WHY, you can refer back to it, later. Some information is repeated for clarity… Once you do a Project with this setup Cubase will be able to return to this SETUP when next you open the Project.
If you get stuck, please post back here.
CHECKLIST: What you will need for this:
_MOXF6/MOXF8 connected to your computer via USB (do not use a hub)
_MOXF6/MOXF8 firmware v1.12
_The Yamaha Steinberg USB Driver version 2.0.4 for Windows
_The MOXF6/MOXF8 Remote Tools v1.0.5
_The MOXF6/MOXF8 Editor Standalone VST v1.6.8 for Windows
_The audio outputs of the MOXF6/MOXF8 connected to a quality stereo sound system
Link — The Official MOXF6/MOXF8 Download Page
For this example, we will set the MOXF6/MOXF8 to dual stereo record (4CH):
(This mode allows you to address the external DAW via two discreet stereo feeds - you route signals as you require to accomplish various recording schemes).
Press [UTILITY]
Press [F5] USB I/O
Press [SF1] OUT CH (OUTPUT CHANNEL Mode)
Verify that the parameter is set to "4CH"
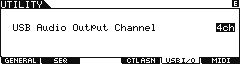
If not, you will need to change it, press [ENTER] and then reboot the MOXF6/MOXF8 - for the change to take place.
By making 4 Channels available you will be able to address the DAW on two separate Stereo feeds - it is all about flexibility and being able to isolate parts when you want to separate them from the rest.
Your 16 Part multi-timbral MOXF [MIXING] setup defaults to the synth Parts assigned to USB 3/4, while the AD INPUT defaults to USB 1/2
Important note about the [SF1] OUT CH (OUTPUT CHANNEL): Pressing this button calls up the display which determines whether the maximum number of output channels for USB is 4 channels (2 stereo channels) or 2 channels (1 stereo channel). If transfer of the audio signal between the MOXF6/MOXF8 and the computer connected to the MOXF6/MOXF8 is compromised or impossible, set this parameter to "2ch." This setting reduces the CPU load of the computer, and may resolve the problem. After changing this setting, press the [ENTER] button, then restart the MOXF6/MOXF8.
_ After changing this setting and pressing the [ENTER] button, make sure to restart the MOXF6/MOXF8; the instrument will not operate otherwise. Before restarting, make sure to store any important edited data to prevent it from being inadvertently lost.
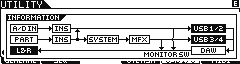
Press [SF6] INFO to view the routing (signal flow)
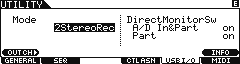
Press [F5] USB I/O
Set MODE = 2StereoRec (Dual Stereo Record Outputs)
· Make sure the MOXF is set to communicate via USB. You do so by pressing [UTILITY] > [F6] MIDI > [SF4] OTHER. Set the MIDI In/Out parameter to USB. (The Editor cannot be run with just a 5-pin MIDI interface).
Launch Cubase
Because you have properly installed the REMOTE TOOLS (which includes the EXTENSIONS) Cubase will ask you if you want to use the Yamaha MOXF6/MOXF8 as your ASIO interface.
Yes, you do!
Open a NEW PROJECT > use the EMPTY template
Create a NEW FOLDER on your computer to house your Project as directed by Cubase
And again because you have properly installed the REMOTE TOOLS/Extensions, Cubase will automatically setup MIDI, REMOTE, and VST AUDIO SYSTEM settings for you.
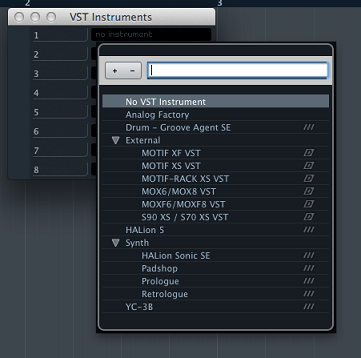
Go to STUDIO > VST INSTRUMENTS > Click in the first empty item on the instrument rack > EXTERNAL > MOXF6/MOXF8 VST
You will be asked if you want to create a MIDI Track assigned to this VST device... Create it.
By creating a track assigned to the MOXF6/MOXF8 VST, this prevent us from having to individually assign each track (manually).
You will be creating a new MIDI Track (assigned to the “MOXF6/MOXF8 VST MidiIn” ) for each Part you wish to record! Just go to PROJECT > ADD TRACK > MIDI
Cubase will add a new MIDI Track and assign it to the next highest MIDI CH of the “MOXF VST”
The MOXF6/MOXF8 Editor VST and the tone generator settings
Verify your setting within the Editor VST. If you have setup up before it should just come online. However, for the purposes of this checklist, we will go through the verification steps - so if you ever need to troubleshoot it, you will know how to do so:
On the EDITOR VST:
Go to FILE > SETUP
Verify that the USB Port Details are setup as follows:
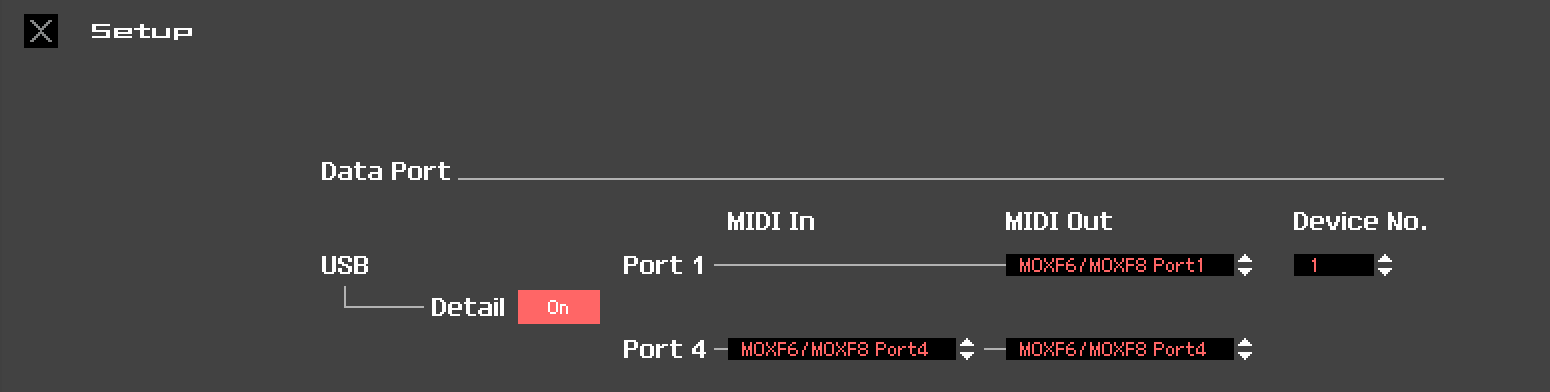
Notice that the MOXF6/MOXF8 communicates on two separate PORTS (Port 1 and Port 4). Port 1 is the normal MIDI OUT messages of musical note, controller and tempo data. Port 4 is used exclusively for bi-directional communication between the Editor and the MOXF6/MOXF8 hardware (which is external to the computer).
Go to FILE > VSTI SETUP
Verify that your USB AUDIO BUS outputs are setup as follows:
The MOXF VST Setup
The MIDI track for MOXF data and a VST Folder for the “audio lane” will appear. Later you can create as many MIDI tracks, assigned to this VSTi, as you require. Each new PART you want to use in your multi-timbral MOXF requires you create a new MIDI track assigned to the MOXF VST's MIDI IN.
Important to understand is this: when your goal is Multi-track recording, you will be using one of the two Sequencer Modes of the MOXF: Either SONG or PATTERN. These allow you to setup as many as 16 Parts in the linked [MIXING] setup.
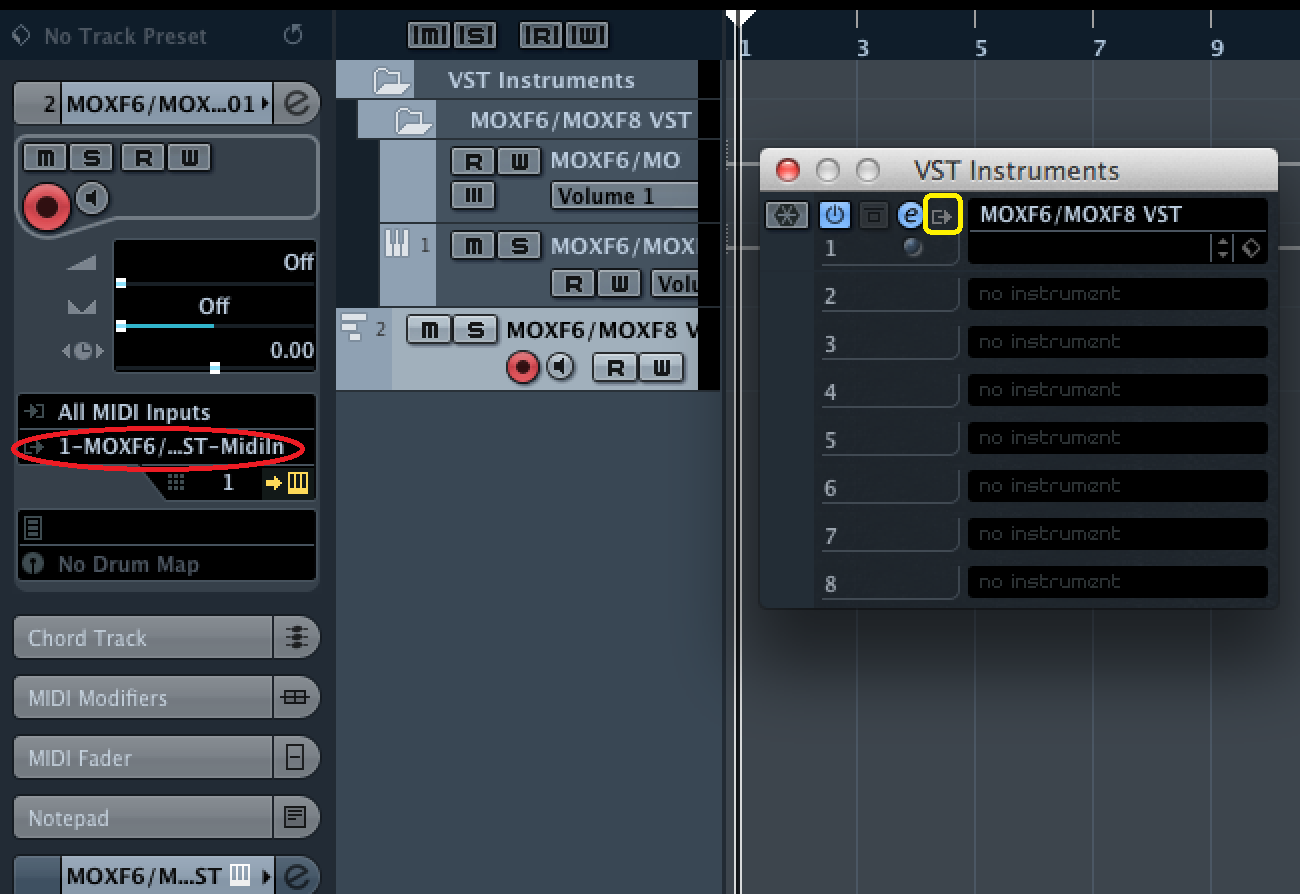
Do not miss this point: The "MOXF6/MOXF8 VST MIDI In" (circled in red in the screenshot below) is different from the "MOXF MIDI In" - and is selected as different. The VST MIDI IN allows the MIDI stream to traverse the graphic user interface that you consider the "editor". Not only do the keys on the graphic keyboard indicate what you are playing, the knobs and parameters in the Editor will animate in response to the data you are generatoring - it is literally the MOXF's 1:1 representative in the computer. Each MIDI track will address this one instance of the MOXF VST. The number of audio lanes will depend on the number of audio Outputs you activate for the MOXF.
Activating outputs is done on the VST INSTRUMENT rack by clicking on the OUTPUT icon (indicated in the yellow box below) or by activating them in the MOXF6/MOXF8 Editor VST (upper right corner of the Editor VST). You can select to activate all outputs or simply click on the output you require. There are Dual Stereo Outputs available.
Important note: Remember multiple MIDI PARTS can share an audio output. You may wish to group your musical PARTS to outputs, as makes sense for your music project. PARTS of your MOXF MIXING setup are routed to the different OUTPUT buses with the OUTPUT SELECT parameter on the main Editor window (on the far right of the screen).
Understanding the Theory of Operation
The VST version of the Editor works by establishing both the MIDI path between your computer software applications (Cubase) and an audio path for the returning audio signal (discussed below). Often you will see the reappearing question where the answer outlines the difference between MIDI and audio. We will repeat that discussion, here, as it is pertinent. MIDI data cannot be heard. It only represents the music as notes on staff paper represent the music; as holes punched in the paper of a piano-roll represent the music... these coded messages must be reinterpreted and translated back to the instrument of origin in order to be turned back into music (audible to the human ear).
By establishing a signal path that routes the MIDI data from Cubase to the MOXF tone engine and then returns the audio from the MOXF to Cubase, we can establish the same kind of relationship that a computer-based VSTi has. When you launch a computer-based VST Instrument, you establish a MIDI track for the data that is routed to the VSTi engine, because its audio path is known (within the computer) you can process the signal using VST Effects and use the EXPORT AUDIO MIXDOWN to render your MIDI data to audio tracks. Basically, you are sending MIDI to the tone engine and then returning audio from the tone generator... the only difference is the MOXF is external hardware. External to the computer - we reach it by ROUTING the MIDI signal back to the hardware, and the AUDIO signal then arrives in the Cubase VST INSTRUMENT audio lane!
The VST EDITOR allows you to establish this type of communication by enabling the returning audio path. Each of the assignable paired (USB) outputs. Shown below is the VSTi INSTRUMENT SETUP within the MOXF Editor VST.
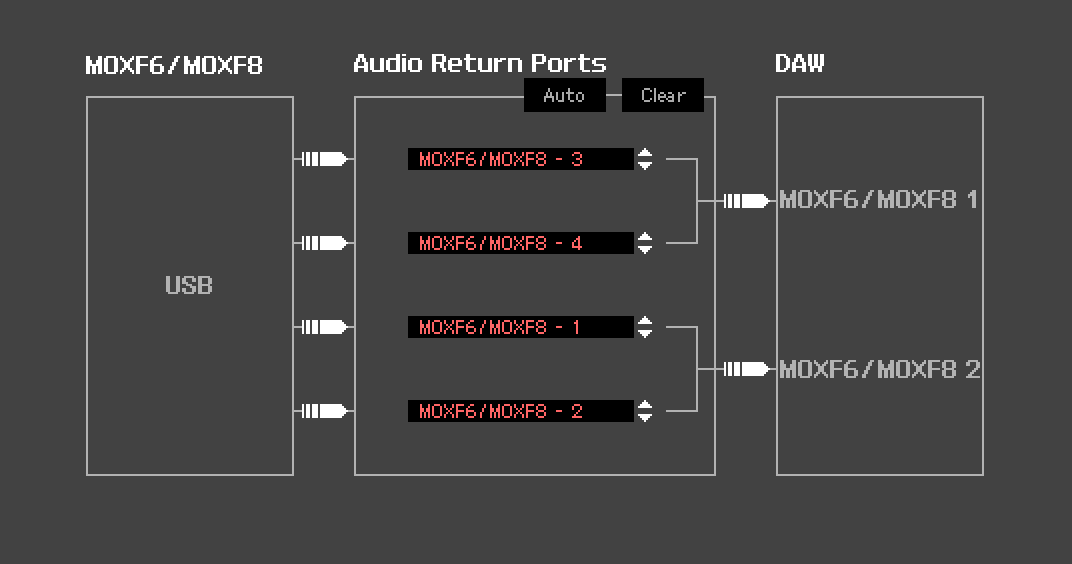
Go to FILE > VSTi Setup
The center panel shows the outputs of the MOXF (which is acting as your computers audio interface). "MOXF6/MOXF8 - 3" and "MOXF6/MOXF8 - 4" are the default Left/Right output for the MOXF's internal synthesizer PARTS.
All PARTS routed to OUTPUT SELECT = "3&4" will travel to the DAW via the indicated bus. "MOXF6/MOXF8 - 1" and "MOXF6/MOXF8 - 2" are the default Ports for the A/D INPUT PART and can be used for any synth PART you wish to isolate.
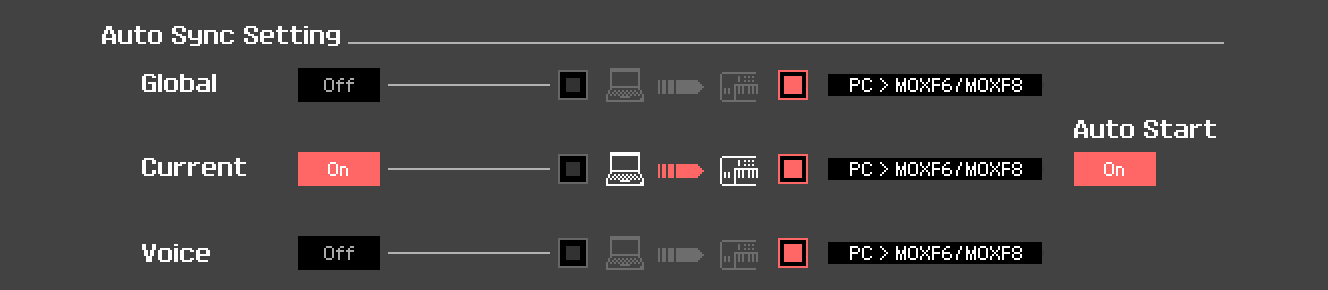
Auto Sync parameter:
To really start enjoying your MOXF Editor VST it will be important to get a handle on the “Auto Sync” function. This deals with the direction of the flow of information. You have two choices: Data can flow from the MOXF to the computer, or vice versa, from the computer to the MOXF. Thinking this through, if you start work in the hardware MOXF, and want to capture what you have done as far as setup data, you want the arrow pointing from the XF to the computer. However, when you have archived a session and wish to recall your work, this is when you want the arrow pointing from the computer towards the XF.
Stating this sounds so very obvious, but you will not appreciate it until you wipe out some work that you have done by replacing it with all piano Voices in all 16 PARTS. Even if this happens to you, do not panic. Remember the hardware MOXF can be returned to the last stored state by simply recalling the current program. So even if you have a setup you've made in the MOXF and you have the Editor's AUTO SYNC setup to go in the wrong direction, all may not be lost. You can simply recall the current Program in the hardware MOXF and then set the Auto Sync in the correct direction.
Also learning to use the ONLINE/OFFLINE function will be important. Anytime you want to make a change in the hardware without the software documenting it, you can simply click the ONLINE option. This will take the Editor OFFLINE. You can try out your change. If you like it and want to keep it you can bring the Editor back ONLINE.
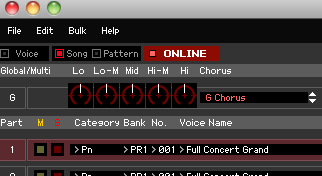
· ONLINE (active) data will automatically be synchronized in hardware and software
· OFFLINE (active) data will not automatically be synchronized
· OFFLINE (non-active) you have a problem to troubleshoot as you have no communication.
The "BULK > DATA SYNC" function is also an important tool. This tool allows you to initiate Bulk dumps from the Editor to the MOXF (TRANSMIT) or to receive bulk dumps from the XF into the Editor (RECEIVE). This can be accomplished with the Editor in the active OFFLINE status.

Data Sync can be used to import the Normal USER and Drum USER Voices into the Editor - this, as mentioned, is useful when you want to store an entire Library (all or a bank of Voices that you used for this Project) - Rather than limit you to just the 16 Voices of the multi-timbral MIXING setup, you can have the Project store/recall every Voice currently in your MOXF. This is useful when your Project includes several Program Changes and/or you are not completed and wish to keep your current Library of Voices available. To restore all the VOICES in the Library, you would opt to configure the AUTO SYNC SETTING for VOICE (if you recall, we did not have that set to synchronize, because it does take some time to restore all 384 Normal User Voices and 32 Drum User Voices from memory and this would only need to be done once, and for this specific use case).
Posted : 07/10/2021 10:23 am
Topic starter
Wow what an answer!
Thank you so much, I will try this tonight.
Posted : 07/10/2021 12:58 pm
Topic starter
Hello again sir!
Almost everything works as a charm. Sound is finally back and I CAN record, however my MOXF Editor still times out when trying to go "ONLINE". Problem 2: MOXF sounds I am using , lets say im using Grand Piano, becomes a completely different sound when i hit my moxf6.
Also my input busses in Cubase doesnt connect if i make sense. One last push before i can do music again! Im sorry for the inconvenience. Otherwise i did exactly what you said in your amazing answer.
EDIT: Or rather... the midi track i create after the VST track, becomes its own master and does as its pleases. Does whatever sound it pleases and makes the first track become a different sound than i put in the editor etc.. Help would be hugely appreciated
Thank you
Posted : 10/10/2021 3:28 pm
EDIT: Or rather... the midi track i create after the VST track, becomes its own master and does as its pleases. Does whatever sound it pleases and makes the first track become a different sound than i put in the editor etc.. Help would be hugely appreciated
Let’s see if we can fill in some of the gaps.
Let’s say you are going to record 16 Tracks to Cubase.
You would begin by setting your MOXF to a blank SONG (or blank PATTERN). You will be working EXCLUSIVELY in Song mode or EXCLUSIVELY in PATTERN mode.
These are the only multi-channel, multi-MIDI channel modes in the MOXF. We will be using the [MIXING] setup. You will be using Part 1 for Track 1 (when you first select to launch the MOXF VST - it automatically asks you if you want to create a MIDI Track for this VST. It only creates the first one.
Start Steps
Make sure your MOXF is set communicate via USB: if not, the Editor will not come ONLINE.
Press [UTILITY]
Press [F6] MIDI
Press [SF2] SWITCH
make sure Local Control = Off (seems I may have left that out) this disconnects the MOXF Keys from the MOXF Tone Generator… which means you must be transmitting Thru an Active MIDI Track set out Out Channel # that matches the MOXF Part’s Receive Channel.
Press [SF4] OTHER
Make sure MIDI I/O = USB
Open a NEW PROJECT in Cubase. Use the EMPTY template
Go to STUDIO > VST INSTRUMENTS > Click in the first empty item on the instrument rack > EXTERNAL > MOXF6/MOXF8 VST
This launches the MOXF Editor VST
It should be ONLINE… If not, let us know.
The first Track it Creates should be assigned:
MIDI IN = “MODX-1” (Port 1) or “All MIDI Inputs”
MIDI OUT = “MOXF6/MOXF8 VST - MidiIn”
the OUT CHANNEL # = “1”
You should be able to select Part 1 on your MOXF
As you touch Notes they are sent via USB to the first created MIDI Track, the MIDI Activity meter should be responding to each key press and controller movement… that Track’s MIDI Out is sent to MOXF VST Editor… you should see the keys you press change color on the Editors graphic keyboard.
The Editor sends the MIDI messages to your MOXF hardware.
Your MOXF hardware generates audio that travels to the speakers connected to the Main L/R Outputs of the MOXF.
When you create the next MIDI Track, you can right-click on the Track made by launching the VST
Select “ADD MIDI TRACK”
It should automatically assign itself to the MIDI OUT to “MOXF6/MOXF8 VST—MidiIn” and set Out Ch # = “2”
If you highlight this Track in Cubase, the second Part in the Editor will be automatically selected…
You can use the Editor to select the instrument for Part 2 (the default will be a Concert Grand piano). Choose whatever sound you like… if you click on Part 2 you search by Category or by Bank.
Posted : 10/10/2021 4:57 pm
