Notifications
Clear all
Topic starter
Hello,
Just purchased a Montage 8 (well, actually, it was a Christmas present from a generous wife! :p ). I also had purchased Cubase Pro a few years ago when Cakewalk went through it's changes, but had still been using Cakewalk. Since the Montage integrates better with Cubase, I'm ready to make Cubase my primary DAW, and I updated to Cubase Pro 11 yesterday.
In any case, Bad Mister's video seems to illustrate the steps to connect the Montage with Cubase AI, since AI is included with a Montage purchase. To connect the Montage with Cubase Pro 11, as the interface looks a little different, I thought I should click on Studio->More Options->Midi Device Manager->Install Device. I see many synths/keyboards listed, but couldn't find Montage. I did see Yamaha MO (Yamaha). Is this for the Montage, or do I choose Define New, or am I way off in my thinking?
Also, how would I then connect the Montage to Cubase for audio?
Thanks for any input,
cohenville
Posted : 25/01/2021 6:34 pm

You'll get different answers depending on perspectives. I always "setup" Cubase by creating an empty project. Then for audio I'd add an Audio track.
There's more nitty gritty (on Montage side and Cubase) - but I would tend to skip the templates and setup more from the ground up. That's a personal choice.
Posted : 25/01/2021 7:30 pm

To connect the Montage with Cubase Pro 11, as the interface looks a little different, I thought I should click on Studio->More Options->Midi Device Manager->Install Device. I see many synths/keyboards listed, but couldn't find Montage. I did see Yamaha MO (Yamaha). Is this for the Montage, or do I choose Define New, or am I way off in my thinking?
You are way off... there does not exist a MIDI Device for MONTAGE. The MO was a Yamaha synth released in 2005 (long gone).
The MONTAGE can be setup without that (we’ll get back to the MIDI Device Manager, later). What you want to do first is download and install MONTAGE CONNECT for your computer type. This is a utility program that when installed on your computer will create a communication vehicle between Cubase Pro and your Synthesizer... it will manage your MONTAGE Performance (sounds) for each Project. It runs as a VST plug-in.
It can be configured to capture your MONTAGE Performance when you SAVE the Cubase Pro Project and it can automatically restore your MONTAGE Performance each time you open the Project. Once configured it can run in the background keeping track of the synth housekeeping. It bundles your MONTAGE program with the Cubase Pro Project.
It can also be used to communicate directly with your MONTAGE’s “Pattern” Folder and “Song” Folder. You can literally drag and drop MONTAGE Sequences into a Cubase Project via the USB connection.
MONTAGE CONNECT also installs to Cubase Pro the “Recording” Templates for “Yamaha MONTAGE multi channel recording” and “Yamaha MONTAGE stereo recording” — these two Recording Templates automatically configure your New Project with a setup that makes using this a breeze.
The Multi channel recording template sets up 17 MIDI Tracks (in a Folder named “MONTAGE MIDI” ) assigned to your MONTAGE... one for System Exclusive messages, and one for each of the 16 synth Parts. It also sets up an Audio Folder, named MONTAGE Audio”, with 16 Stereo Audio Tracks.
It also configures MONTAGE CONNECT which will automatically open with each Project.
Eventually, you will want to learn, how to setup and configure your own- but this is best left until you know enough to have a workflow preference. While the templates are a shortcut, they can get you up and running with a minimum amount of frustration. Learning how the templates were made, will come and you will get to the point where you can make, name and store your own template based on how you like to work. The reason to start with a template is simply to get to where you can record, playback and render audio without having to read most of the 1100 page Operation Manual (yikes!). The Recording templates were developed by someone sitting at a MONTAGE with Cubase Pro - the template can ease the learning curve — a great deal, trust me. Hopefully, you become naturally curious and begin to develop your own workflow... a little at a time.
Once the basic stuff is configured (preferences), Cubase Pro will remember your settings... Cubase Pro can run on a Mac or a PC... the steps to do the initial settings are just different enough for us to have ask are you setting up on Windows or MacOS, and what OS your computer is running.
Let us know and we’d be happy to get you up and running.
Posted : 25/01/2021 7:35 pm
Topic starter
Thanks - Forgot to mention that I had already downloaded and installed Montage Connect. PC Operating system is Windows 10. Am I now ready to do initial settings setup? Next steps would be appreciated.
Regards,
cohenville
Posted : 25/01/2021 9:13 pm
Taken and updated from the article on Cubase Pro 9 Workflow...
In Cubase, go to FILE > NEW PROJECT > RECORDING. Here you can select from the various Project Templates:
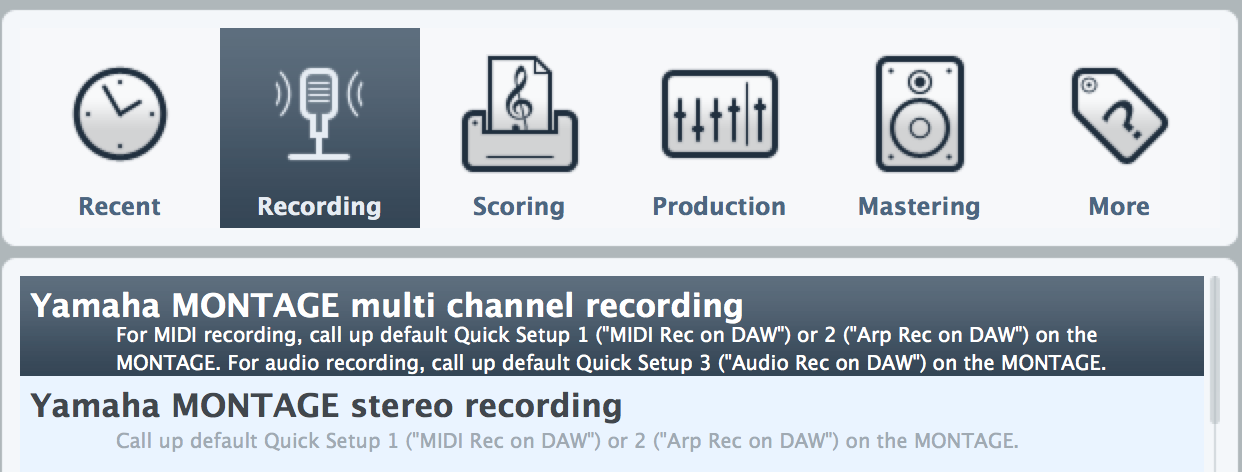
As you can see this TEMPLATE is useful in conjunction with each of the three QUICK SETUPs in the MONTAGE: MIDI REC on DAW, ARP REC on DAW and AUDIO REC on DAW. We will take a close look at how it can serve you as a starting point for different recording Projects.
This TEMPLATE makes use of the Cubase Pro's INPUT TRANSFORMER - a device through which your MIDI data will be sorted and filtered.
![]()
In Cubase Pro, the INPUT TRANSFORMER is used to create a situation where each MIDI Track can only record the data as specified: the "Sysex Track", for example, has the Input Transformer that Filters all but System Exclusive messages. Each of the numbered MIDI Tracks, 01-16, is set to reject all but a single MIDI channel and to reject Sysex:
![]()
Normally, a Cubase MIDI Track will record any and all incoming MIDI data, but this template sets up a situation where each MIDI Track can only record data from a specific MIDI Channel, and only the SYSEX Track can document System Exclusive mesages.
The Audio Tracks will only record what you bus to them by making the PART OUTPUT parameter settings in the MONTAGE and routing it via the Track Inspector selection in Cubase. We'll learn how to do this, as well.
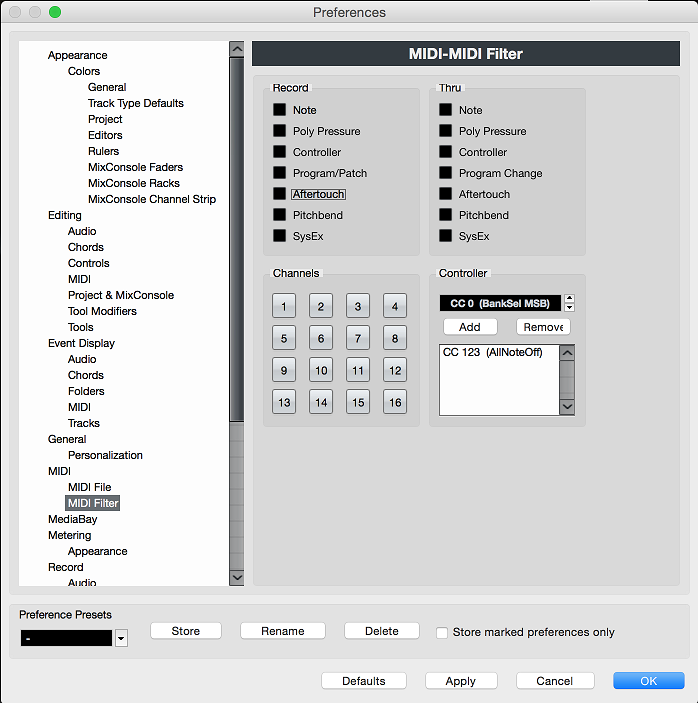
Disable Sysex Filter in Cubase Pro 11
Go to EDIT > PREFERENCES... > MIDI > MIDI FILTER > make sure that SYSEX messages are NOT blocked from being Recorded or passed Thru. If marked, unmark the box for "SysEx". Click "APPLY", then Click "OK"
What we will do next is in MONTAGE, activate System Exclusive Messages for the global controllers; namely- the Super Knob and the Scene buttons.
Set the SUPER KNOB CC = OFF and SCENE CC = OFF. Here's how:
- Press [UTILITY]
- Touch "Settings" > "MIDI I/O":
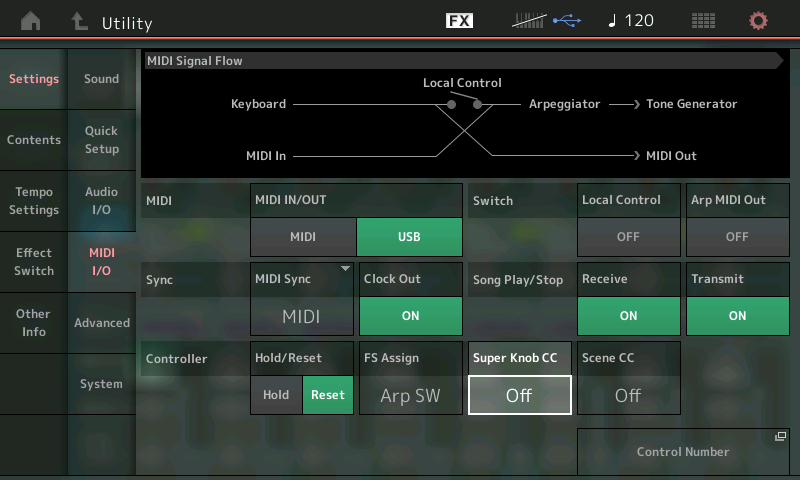
This will cause these devices (Super Knob, Scene buttons) to generate System Exclusive messages Out via MIDI - when the CC Number is set to OFF, the devices generate System Exclusive messages instead of a CC number. Why we are making this change is because, normally, it would merge that CC data with data on MIDI Channel 1 (by convention). By making them System Exclusive, they technically have no channel, the Template will now be able to isolate these on their own Track allowing us to activate and deactivate these global messages separately from MIDI Channel 1 data.*
Each MIDI Track will reject (Filter) Sysex, except the one labeled "Sysex". Each numbered track will only record the specific one MIDI channel indicated.
*There will be times when you want to have the SYSTEM EXCLUSIVE messages active while you are muting and/or soloing various individual music tracks... to hear how a single Part behaves in different Scenes keeping the control commands on their own track simply allows us the flexibility to keep these commands active independent of any music on Channel 1. By isolating the Super Knob and Scene change commands, as we have done, to their own track, we create a situation where we can independently apply these recorded changes, or not. By activating this track in conjunction with any other MIDI Track, you can isolate just the Super Knob or Scene events for the MIDI Track you want to hear solo'd. You can activate multiple Tracks by using the COMMAND + CLICK on a Mac or CTRL + CLICK on Windows.
The TEMPLATE:
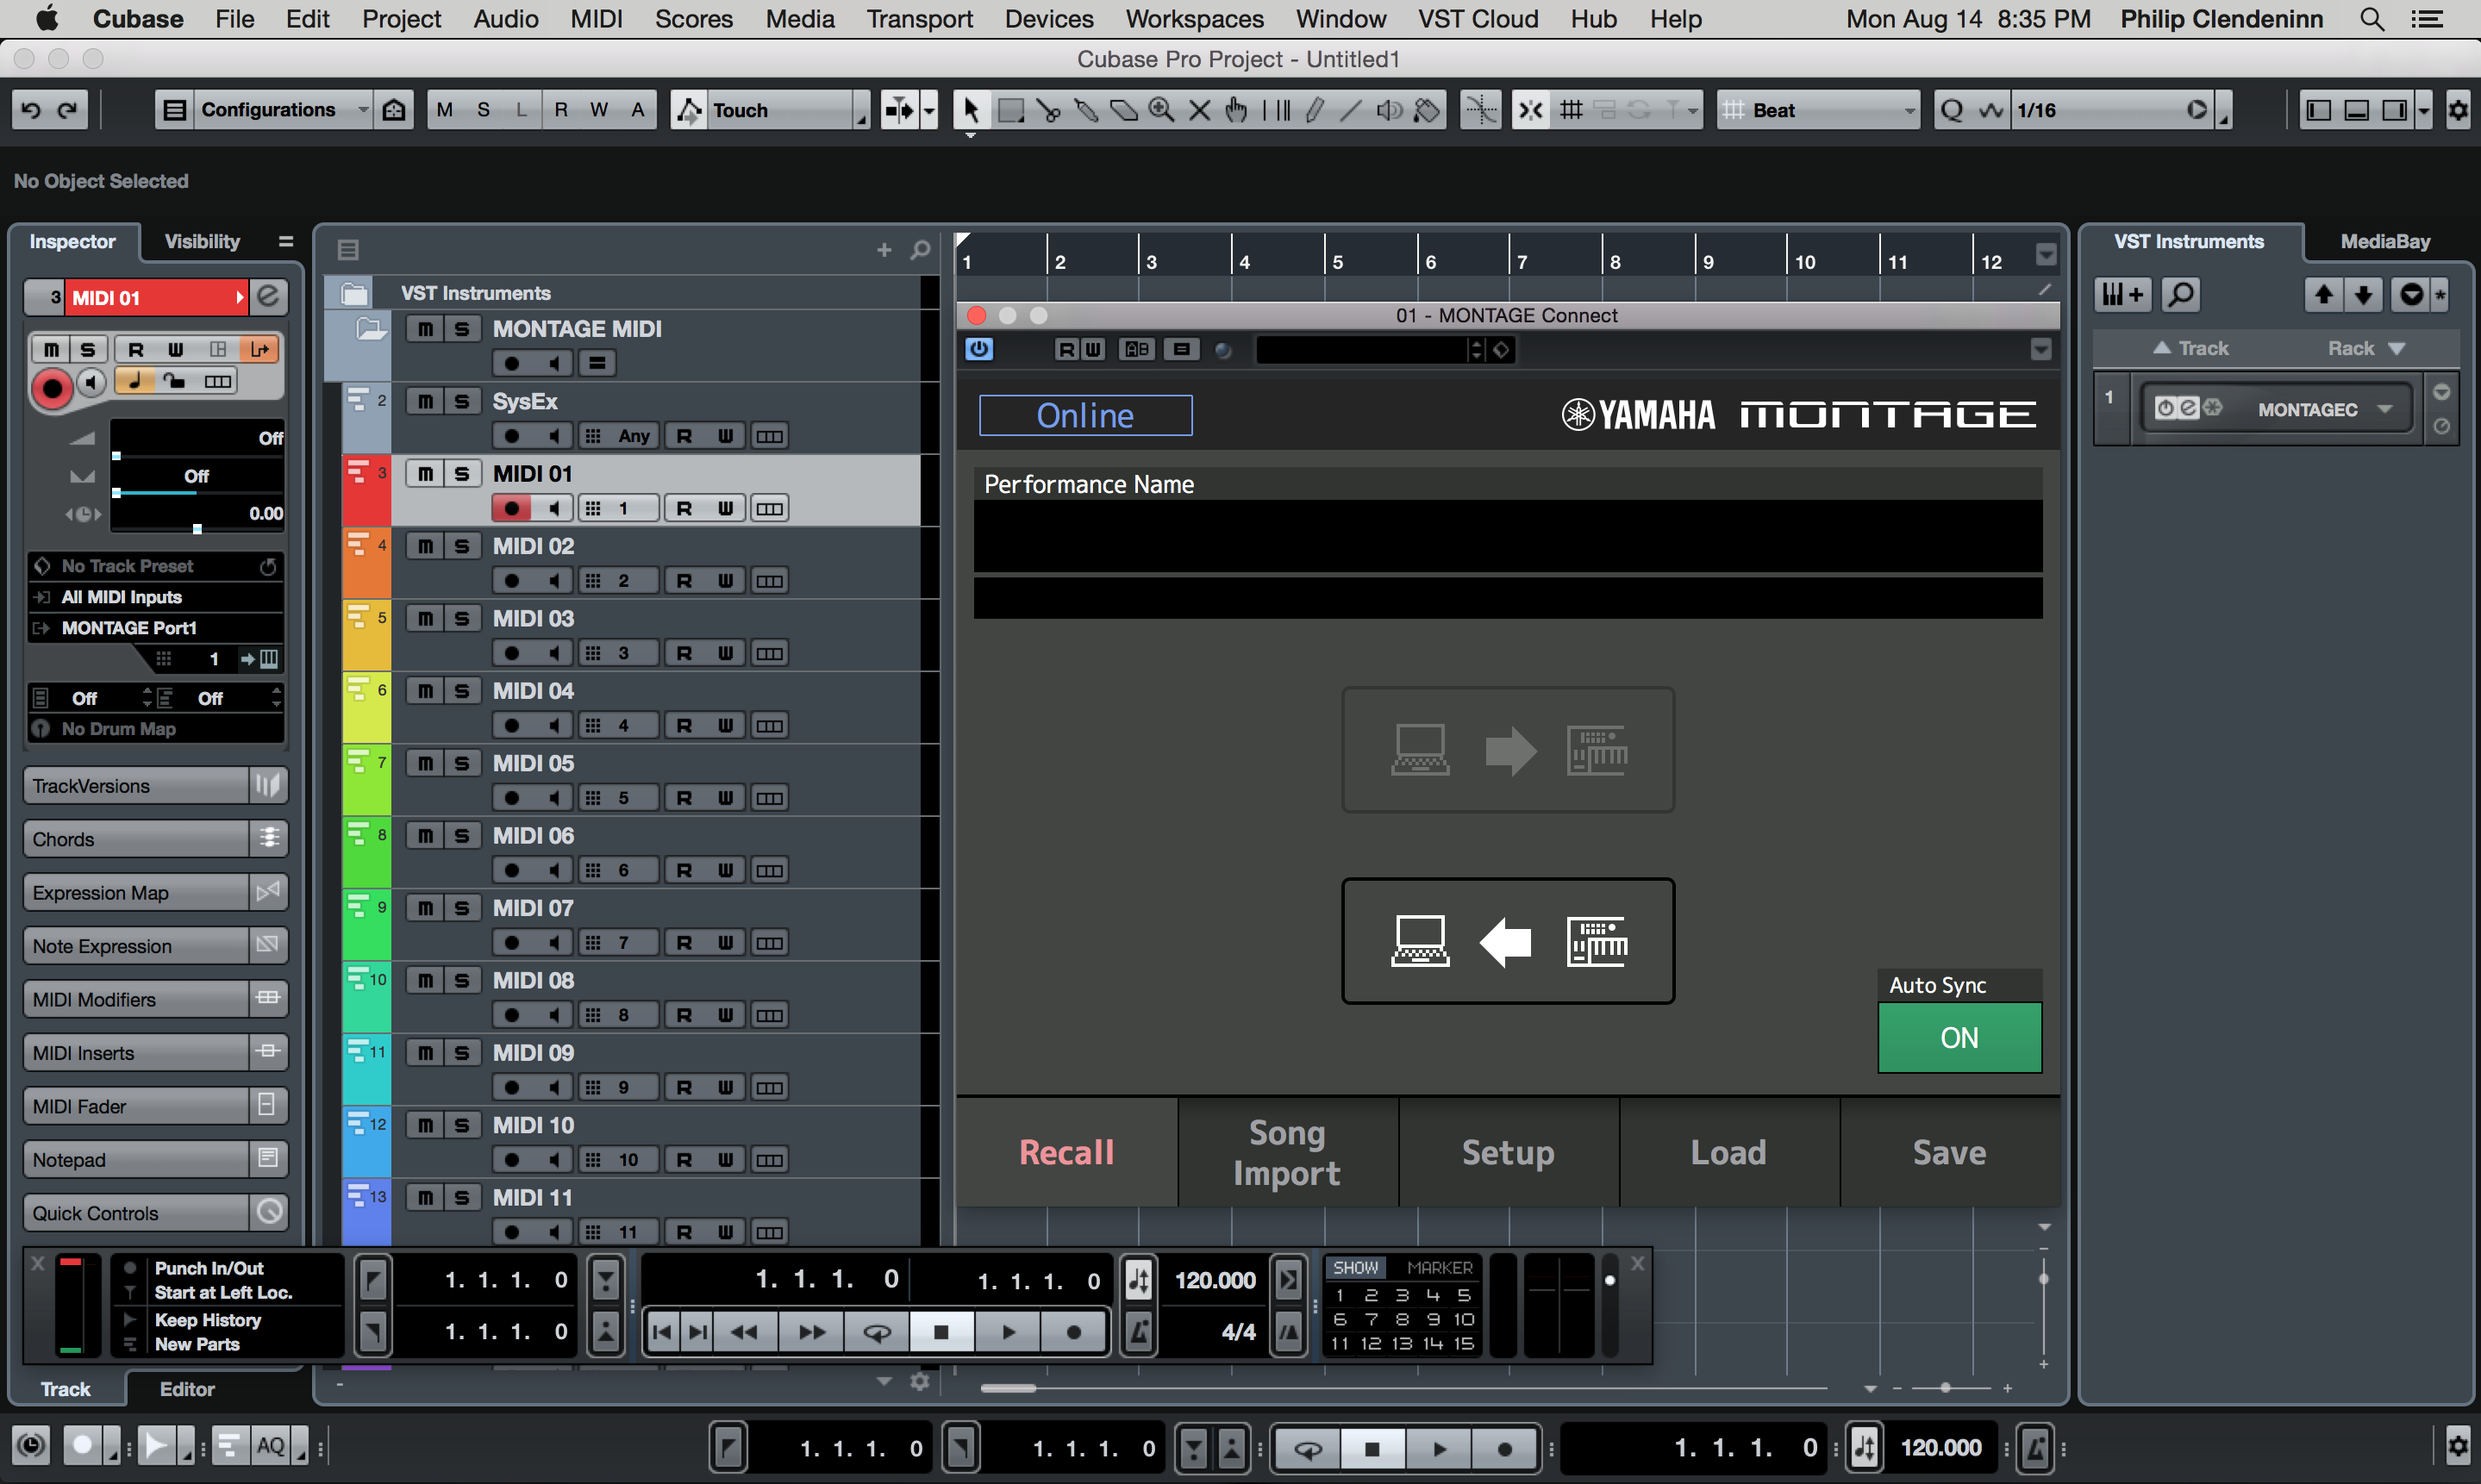
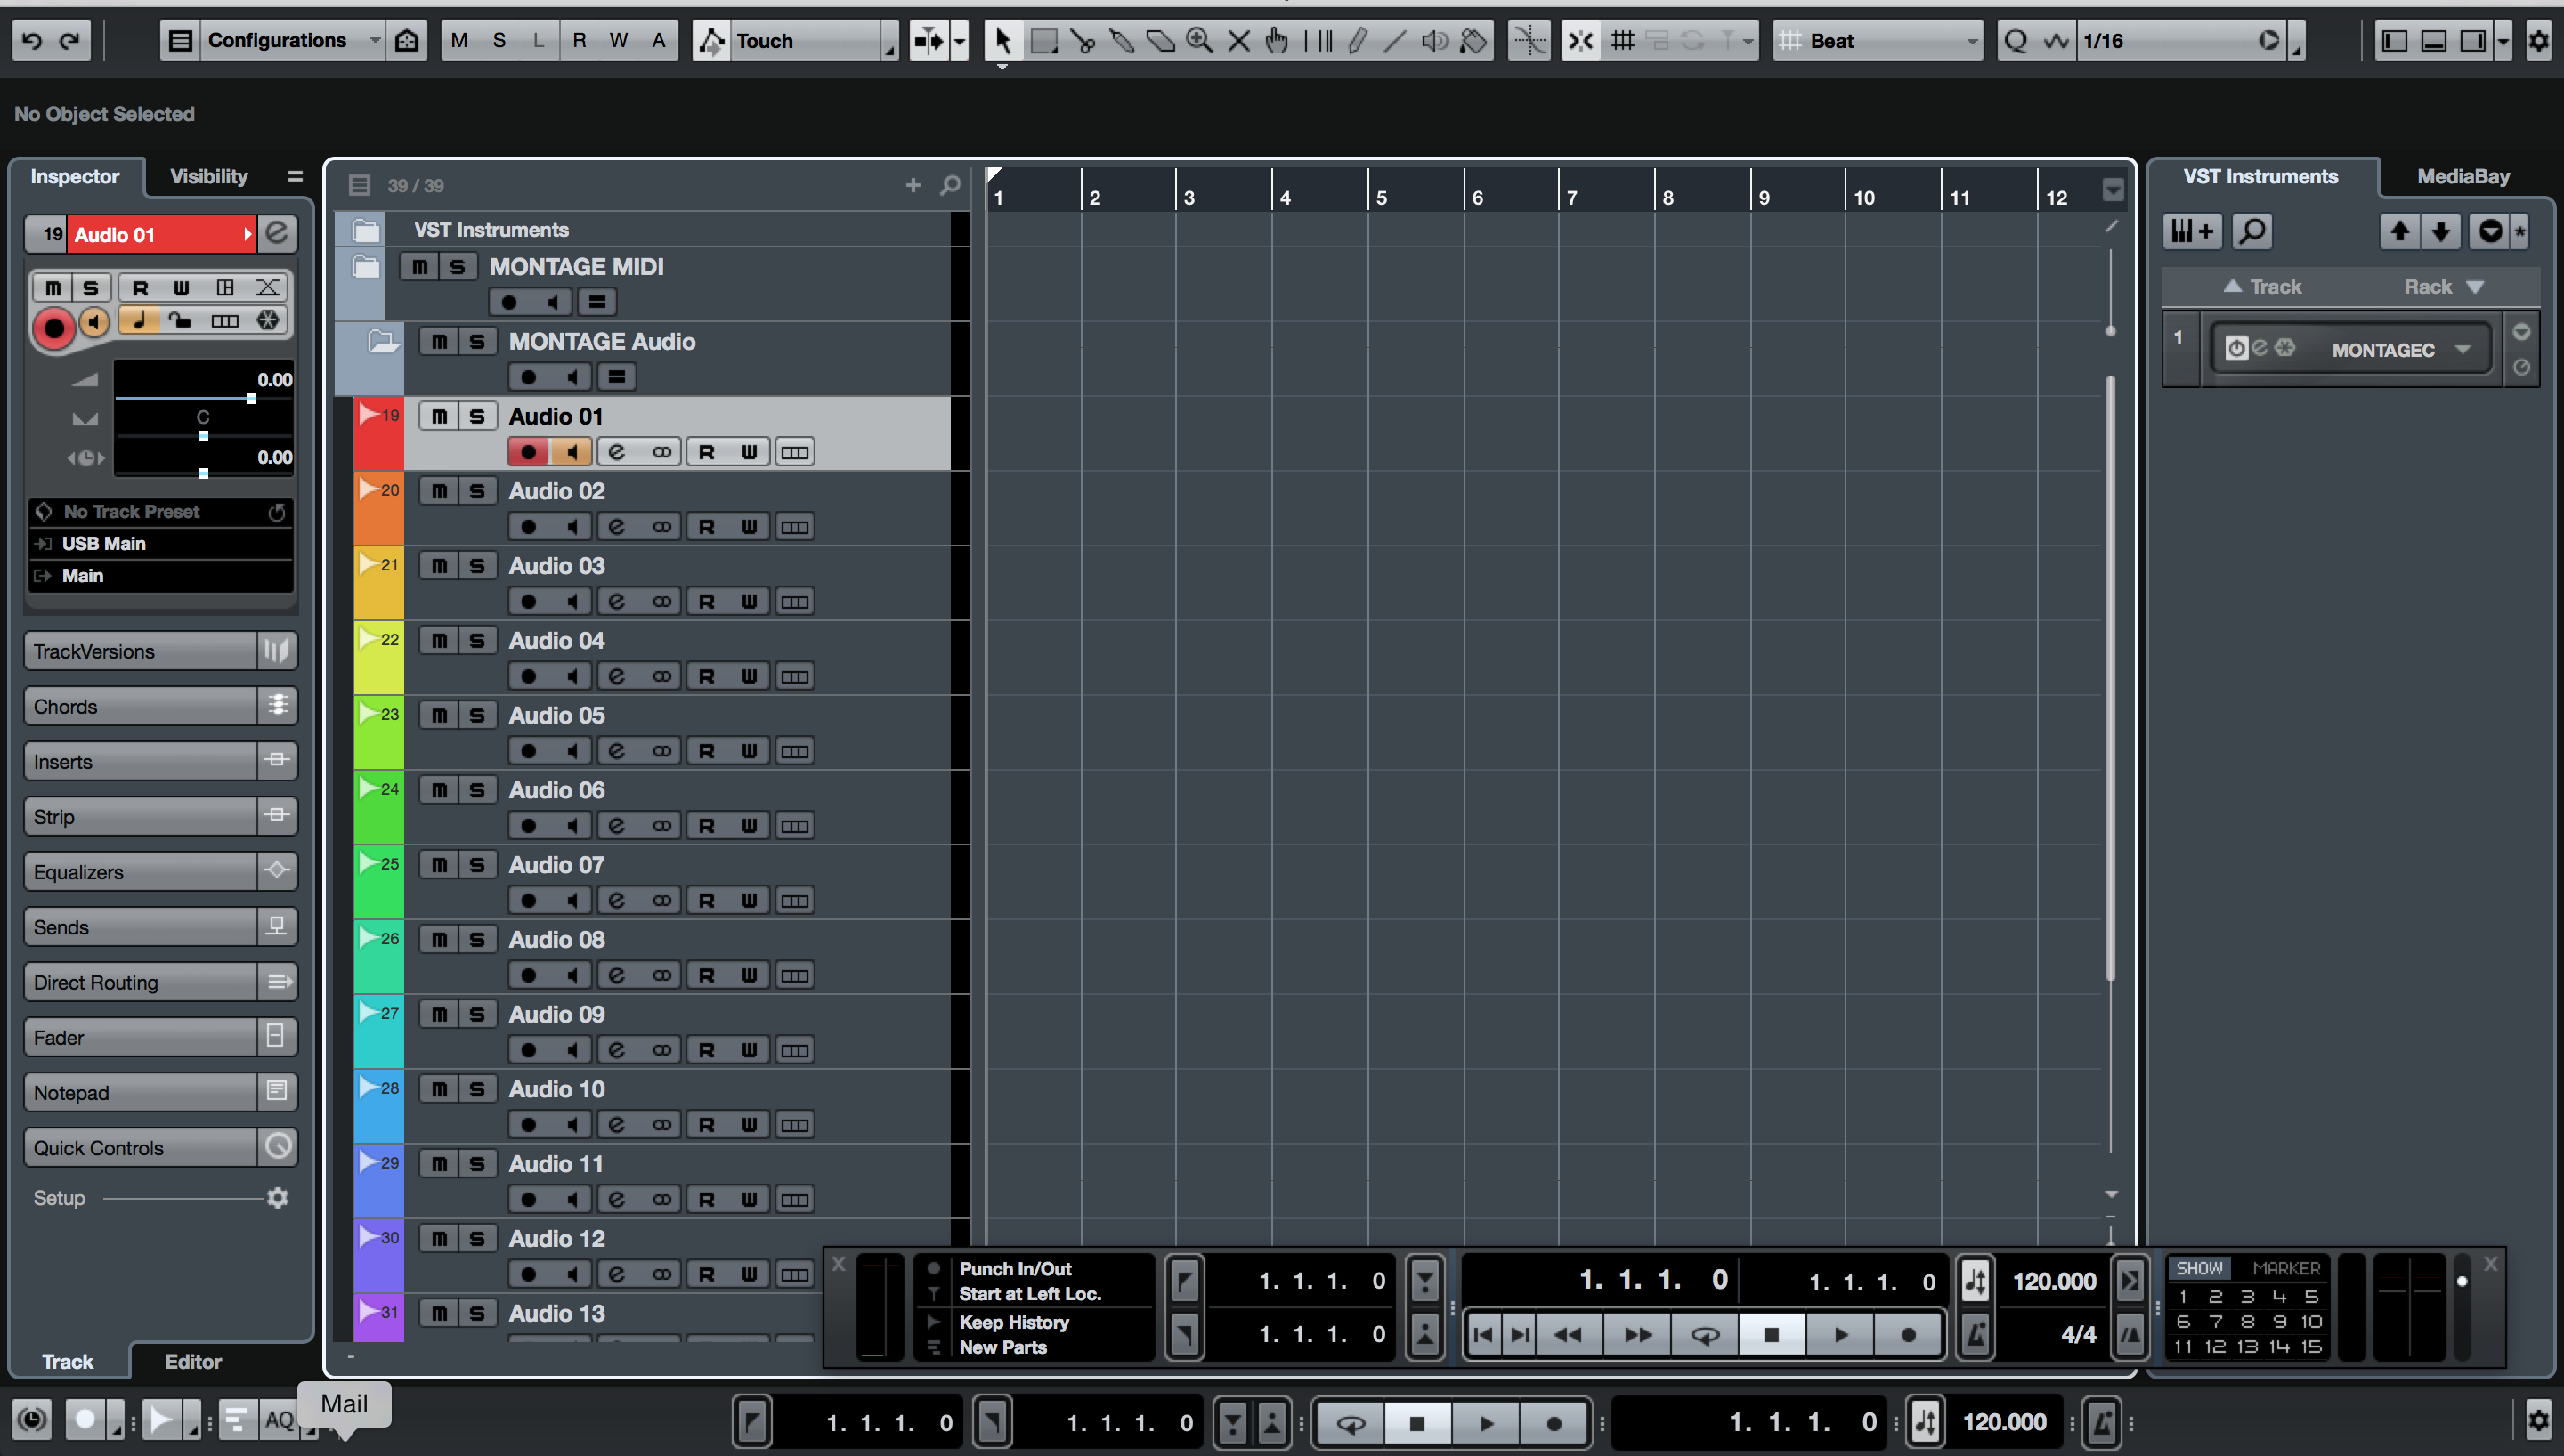
In Cubase, the template opens with a VST INSTRUMENTS Folder (containing Montage Connect), a MONTAGE MIDI Folder, a MONTAGE AUDIO Folder; the MONTAGE Connect utility will initially be opened -make sure "Auto Sync" is ON (then you can close the "MONTAGE Connect" window, it will run and function automatically in the background). You can see the program listed, (screen right), in the VST INSTRUMENTS area:
 CubaseMainView
VST Instrument Folder: contains MONTAGE CONNECT - the "Track Lane" here is a pseudo-Track - no data is stored or recorded here, it simply reminds you that the MONTAGE CONNECT utility will be able to automatically capture and restore your MONTAGE Performance. Every parameter is captured and stored with the Cubase Project when you SAVE. The template has the AUTO SYNC = On so that whenever you open your Project, Cubase will automatically bulk dump the Performance you were using at the time back to your MONTAGE's Edit Buffer. This means you do not have to even have the Performance pre-loaded in your MONTAGE - everything is bundled and stored with your Cubase (.CPR) Project file. This FOLDER can remain closed (as shown above) - MONTAGE CONNECT works in the background, automatically, without you having to mess with it at all.
It is important to know that when you execute the normal Cubase SAVE operation, MONTAGE CONNECT will request a bulk from the MONTAGE hardware - it thus automatically updates and documents the Performance being used your MONTAGE at the moment you SAVE the Project. And you will notice that upon opening that Project in the future will automatically restore the PERFORMANCE to your MONTAGE... Even if the Performance is not in your User Bank, MONTAGE CONNECT will restore every setting.
In the screenshot above the VST INSTRUMENT Folder (at the top) is closed. The MONTAGE MIDI Folder is open with its MIDI Tracks: Sysex, MID 01, MIDI 02, MIDI 03 and so on. Offscreen below the MONTAGE MIDI Folder is the MONTAGE AUDIO Folder with its sixteen stereo Audio Tracks.
MONTAGE MIDI Folder: 17 MIDI Tracks (shown above):
- SYSEX Track - The Input Transformer for this Track has been set to reject everything that is not a SYSTEM EXCLUSIVE message. When Record is engaged it will capture all Super Knob movements and Scene button presses.
- MIDI Track 01-16 - Each of the numbered tracks have been setup by their Input Transformer to reject all Sysex messages and to reject all but the one MIDI channel that matches its name. Each MONTAGE Part will transmit directly to and receive data from the correspondingly numbered MIDI Track.
MONTAGE AUDIO Folder: 16 Audio Tracks (shown below):
- Audio Track 01-16 - The Audio Tracks can be used any time you wish to render your data in a permanent fashion. This will require matching a "Part Output" assignment in the MONTAGE hardware, with a target Cubase "VST Connection > Input", then activating a specific Audio Track to use that Input. Once you are familiar with this signal flow path, everything will start to fall into place. You will be able to make audio recordings whenever you desire.
The 16 Audio Tracks each are assigned a Stereo bus: USB Main, USB 1&2, USB 3&4, USB 5&6 ... USB 29&30. You can setup your "AUDIO REC on DAW" QUICK SETUP function in the MONTAGE to configure your PART OUTPUT assignments as best serves your needs. The default has PART 1 assigned to USB MainL&R, _PART 2 to USB1&2, _PART 3 to USB 3&4, _PART 4 to USB5&6 and so on through _PART 16 to USB29&30.
MONTAGE CONNECT window can be opened using the "e" (edit) icon found on screen right in the VST INSTRUMENTS area. This template has it setup so that you do not have to fuss with it at all, it can remain hidden and it will work all the same. What you need to know is that whenever you SAVE the Cubase Project, MONTAGE Connect will "request" and capture the current conditions within your Performance. This is intended to be used to restore the initial start condition of your mixing settings - the Motion Control Engine invites changes across many different parameters - the "initial condition" needs to be captured as a "snapshot" so that all parameters start from the position to which you have set them for the start of the composition. As you can imagine, it's a type of "reset" - but not just for MW, PB, FC and the usual physical controllers but for every possible parameter in the entire Motion Control Synth Engine!
The concept of the "initial condition" needs to be considered when you SAVE. The idea is you Save when you are closing down working on the Project, simply ensure that before you close, you set the MONTAGE to the condition to which you want it to be restored when next you open this Project. This eliminates you having to STORE the Performance in your MONTAGE. You need only open the Cubase Project and automatically, the data will be bulked via USB-MIDI to the Edit Buffer of the MONTAGE. This works out great, as oft times you may work on a Project over several weeks, making changes, and updating data; MONTAGE Connect will automatically backup and restore every detail as you go.
MONTAGE Connect can be easily deactivated using the "On/Off" button in the VST INSTRUMENTS area (next to the "e" icon that opens/closes the GUI).
Posted : 26/01/2021 7:55 am
Topic starter
Bad Mister,
Thanks for the very detailed information. I will try to digest and apply.
Regards,
David
Posted : 26/01/2021 6:26 pm
Topic starter
Update: So, I've been working on getting acquainted with both the Montage 8 and Cubase. Happy to say I was able to set up a keyboard instrument in Cubase per the instructions above (I think) and record something in a Midi Track on Channel 1, so that's pretty exciting...:p
However, when I then went to set up a bass track on Channel 2, by setting up a performance on the Montage and then selecting the second midi track, I could not arm that track to record the bass performance I set up in the Montage (no sound and no signal shows to the right of the orange/white title bar that says "Montage Bass"). Note that I had configured the first midi track - at Track 3 - (Midi 01 before I renamed it) using channel 1. I'd set up the second midi track (It says "4" on the left) using channel 2.
When I go back and highlight the Montage Keys track, but with the Montage bass performance selected on the Montage, and I play the recording previously made on the Keys track, it is now using the bass performance for the Keys sound.
When I had previously used Cakewalk with a Korg Krome keyboard, I would configure the instrument to be used in the internal sequencer of the keyboard as well as in Cakewalk, and Cakewalk would consequently know which track/channel/instrument to trigger.
I'm sure I'm missing some steps here, so would appreciate being informed about what additional steps I need to take to record properly on multiple tracks with multiple "instruments."
[Note I tried to attach a screen shot of my Cubase project to this post as I'm sure it would be helpful in pinpointing steps I'm missing. However, neither Word or pdf docs appear to be supported by the forum. I also tried to paste a screenshot to the post but that didn't work either. if someone can tell me how to provide the screenshot, I can add that.]
As an aside, I had followed instructions on a Sweetwater web page (since I purchased the Montage from SW) on setting up a Montage-DAW connection:
Setting up your DAW
After you have installed the Yamaha Steinberg driver and connected it to your computer, you first need to configure the Montage, so it communicates properly with your DAW. You will need to change the MIDI I/O settings. If you plan on using the Montage with external audio gear, you will also need to configure the Audio I/O settings, as well. Follow these steps to configure your Montage.
1. Connect the Montage to your computer, press the Utility button, and select Settings.
2. Select the MIDI I/O option and change the following settings:
MIDI IN/OUT: USB
Local Control: OFF
3. Select the Advanced tab and change the MIDI I/O Mode to Multi. This allows all Parts of your Performance to have its own MIDI channel.
The Part number of the Performance is assigned to that MIDI channel number. For example, Part number 1 is MIDI channel 1; Part number 2 is assigned to channel 2, etc. These MIDI channels cannot be changed.
4. Go to the Performance screen and turn off KbdCtrl for each Part. If this is left on, it will play all the Parts that are in that performance.
However, that last instruction - 4. (bolded above) was confusing. I didn't know if it was referring to GLOBALLY turning off KbdCtrl for each part, or individually by performance, which didn't seem to make sense. I couldn't find a place to turn off KbdCtrl for all performances, so I did a chat with Yamaha Montage Tech Support on Friday and the gentleman assisting me didn't know either....
Also, the Sweetwater Montage setup page featured the BadMister Mastering MONTAGE: Cubase Setup videos, and I had thought I could learn some things there, but it appears those were based on the AI version on Cubase, since the menu options are different from those in Cubase 11 Pro, and I couldn't correlate the information for my version of Cubase. I'd like to see a comparable set of videos for Cubase 11 Pro, if it exists and is appropriate.
I'll appreciate any assistance in setting up Cubase properly to record the Montage.
Thanks,
David
Posted : 07/02/2021 2:21 am
Update: So, I've been working on getting acquainted with both the Montage 8 and Cubase. Happy to say I was able to set up a keyboard instrument in Cubase per the instructions above (I think) and record something in a Midi Track on Channel 1, so that's pretty exciting...:p
it is perhaps wise to pause here (in the learning of Cubase Pro) to learn how your instrument, the MONTAGE.
The Performance is the main structure in the MONTAGE architecture - there will one Performance per Cubase Pro Project.
A Performance can have 16 Parts.
A Part can be a musical instrument. But know that MONTAGE also can have MULTI Part instruments*
You can “merge” 16 Parts into your one Performance.
*The MONTAGE does allow you to program an instrument using multiple Parts.
I highly recommend — while learning to use this setup — to begin with SINGLE Part instruments. What this means is set your selection option to limit you to recording one MONTAGE Part to each Cubase MIDI Track... starting with “MIDI 01” and continuing toward “MIDI 16”.
And once you are comfortable with the logistics of this operation, then and only then proceed to adding Multi Part instruments to your recordings setup skills. I ask you to trust me on this, jumping in and behaving like you know what your doing will cause to rely on memories of your old synthesizers and how “you used to work” — instead of learning the system and perhaps, new opportunities that are bound to come about when using this new system!
Why Single Part recording, initially?
Mainly because the workflow is familiar and similar to what you may be previously used to... this will get you to a certain ‘comfort zone’. And when you do move to more complex recording setups, you will be able to appreciate why certain setting must change. When playing Multi Part instruments, your workflow may need to change depending on how your multiple Parts are interacting - remember there are some new things possible between multiple Part instrument sounds are are NEW and DIFFERENT from any synth you may have previously encountered or attempted to record — and it will be better understood after conquering the straight “One Part to One Track on One Channel” recording methodology.
Initial MONTAGE setup
From HOME
Press [CATEGORY SEARCH]
Set “Bank/Favorite” = All
Set “Attribute” = All
Select “Init”
Select “Multi/GM”
This places a “placeholder” instrument in each Part, 1-16 which you will replace, one-by-one.
Notice the initial setup has KBD CTL set to Part 1 (alone)
I recommend activating the KBD CTRL LOCK = ON — this will allow an individual Part to play only when you select it, directly. When you want to interact with Part 2, simply select Part 2, only Part 2 will sound.
Touch “FX” at the very top center of the screen - this is a shortcut to the Utility screen where you can bypass effects, and set the condition for the KBD CTRL LOCK.
Set the KBD CTRL LOCK = On
Press [EXIT] to return to your work.
Using the “Part Category Search”
You will create a New Performance by *replacing* each Part, one after the other.
We want to limit our search to the hundreds of Single Part (green) listings in the Search engine.
__ Select a Part
__ If you tap the “Type/Name” box in the screen by Part 1, a pop-in menu will appear, you can tap “Category Search” to launch “Part 1 - Category Search”.
__ Set the “Bank/Favorite” = All, Set the “Attribute” = Single
This will refine the Search to just those programs that are full instruments and occupy a single Performance slot. Making a selection will *replace* the placeholder “Concert GrandPiano” with your selection.
Select Part 2 and make a selection, and so on...
Alternate method: Button Method
__ Select Part 1 using the right front panel button [PART SELECT 1]
__ Press the [SHIFT] + [CATEGORY SEARCH] buttons to launch the “Part 1 Category Search”
__ Set the “Bank/Favorite” = All, Set the “Attribute” = Single
With this setup you will be able to move from Part to Part adding a new instrument to each Part.
You can set LOCAL CONTROL on the MONTAGE = OFF (If you select the MONTAGE “Quick Setup #1” — “MIDI Rec On DAW” this will set Local Control =Off... Here you use Cubase Pro to determine what you a hearing...
When LOCAL CONTROL is OFF, you will hear and be able to communicate with a MONTAGE PART by selecting it on the MONTAGE and activating (selecting) the corresponding MIDI Track in Cubase... remember: it is the MIDI CH number that is important!
Select Part 1 (using your favorite method) on the MONTAGE.
Highlight MIDI 01 Track in Cubase Pro... you should now be able to play and hear the instrument you selected for Part 1
Record several tracks — the Part number will correspond with the default name Cubase gives the MIDI Track.
Get used to the basic stuff, looking at the various Edit screens - the KEY EDITOR, the LIST EDITOR, the SCORE, get used to setting playback functions, Cycling, resizing, etc., etc., etc. take your time — get comfortable. Test yourself by challenging yourself.
Practice things like punching in and out, copying and pasting, basic editing. Once you are comfortable with Muting, soloing, punching in and basic editing, then see if you can start to transfer some of the edited Parts to Audio Tracks... the idea is to master the workflow from MIDI to Editing to Rendering Audio... before diving in the deeper end of the pool.
Let us know.
Posted : 07/02/2021 3:46 pm
Topic starter
So I've been working on getting comfortable with the coordination between the Montage and Cubase over the past month using Montage Connect. I configured 6 single-part instruments within a Performance and have been recording, editing using the various Cubase editors, punching in and out, copying and pasting, muting, soloing, etc. i figured I was ready to ask about adding multiple-part instruments.... but first, I decided to add another few single-part instruments first, and hit a minor roadblock: From the Performance view, I selected the 7th Part, clicked on Category Search, chose an instrument, but from there couldn't figure out how to back out to view the full Performance again (other than reloading it from the Cubase project via Montage Connect). Also, I did not see or hear a signal from that instrument by the track title field in Cubase (unless I turn on Local On), although I could see the signal very bottom right in the Cubase screen. The channel is set correctly in the track in Cubase. Predictably, when I reload the Performance from Cubase, the new instrument is not showing - so I'm sure I'm doing something incorrectly.
Please advise.... Thanks.
Posted : 18/04/2021 4:19 am
Press [PERFORMANCE] (HOME) to see the the "full" Performance. It's to the right of the touch screen along the top row of buttons.
Or you can press the "home" icon in the upper-left corner of the touchscreen.
Also, I did not see or hear a signal from that instrument by the track title field in Cubase (unless I turn on Local On)
If this is a MIDI track - then you don't hear MIDI. MIDI can tell Montage to make noise - but the MIDI track itself isn't audio and cannot be heard. It's not clear the type of track exactly - and it's not altogether too important rather I'm just covering a reminder that it's important to be precise (or as precise as your current skill level allows).
If you need to turn local control on in order to hear anything for Part 7 - then it seems the Cubase track handling this MIDI channel may be configured unlike the others. Make sure, in Cubase, the MIDI output of this track is going back to Montage and set to channel "ANY" - which ensures that the outgoing MIDI channel will match the incoming channel.
Just in case: zone master should be turned off for this as initial Cubase learning doesn't need to deal with zones.
Posted : 18/04/2021 6:15 am
From the Performance view, I selected the 7th Part, clicked on Category Search, chose an instrument, but from there couldn't figure out how to back out to view the full Performance again (other than reloading it from the Cubase project via Montage Connect).
You can always ‘back out’ by pressing the [EXIT] button, or by tapping the ‘Return’ icon (very top line of the screen), or tap the little ‘House’ icon located right next to the Return icon, this HOME icon will take you all the way back to the Performance HOME screen, or press the dedicated [PERFORMANCE (HOME)] screen button.
When you *select* a program item using [Category Search] for Part 7, by the way, there are two different possible ways to do so:
__ 1) use “Performance Merge” — this is launched when Part 7 is empty, ...meaning you tap the “+” symbol to add Part 7. If you ADD a Part this way the Search screen is called “Performance Merge”. It allows you ADD new Performance Parts to the existing Parts, starting at slot 7.
__ 2) use “Part 7 - Category Search” — this is launched when Part 7 is already occupied (either by a Part you previously selected, or when you are replacing a previous instrument in the Multi/GM template)... you are replacing whatever is occupying Part 7. “Part 7 - Category Search” (the screen name, upper left). You need to launch the Part Category Search by [SHIFT] + [CATEGORY SEARCH] or from the HOME screen, tap the Part 7 “Type/Name” box to reveal the pop-in menu, tap the “Category Search” option.
Also, I did not see or hear a signal from that instrument by the track title field in Cubase (unless I turn on Local On), although I could see the signal very bottom right in the Cubase screen. The channel is set correctly in the track in Cubase.
Probably something is missing ... when you properly select the program for Part 7, you did not mention, but you should set the “Bank/Favorite” as you desire, but most importantly, set the “Attribute” = Single.
Important Concept: Setting the “Attrubute” This will turn all search results in the field to green options. Green here signifies a Single Part fully playable instruments — all green sounds shown would be appropriate for use in a Single Part slot. It is possible to miss this (if for example, you selected a blue, MULTI Part, option... not only will it not fit into just Part 7, but it is quite possible it may not sound. REASON: the first Part of the Multi Part program might only cover a specific velocity range, or might only be assigned to a particular region of the keyboard. Say you select a blue option, and Part 1 only sounds at velocities 92-127, or only when you play above G5 on the keyboard... you might think you’ve selected a silent sound. Conclusion: when seeking to fill a Single Part, set Attribute to “Single” - doing this the search results show you only programs that will function as complete instruments from one slot.
You are sending MIDI OUT to Cubase, because you have *selected* MONTAGE Part 7. Signal is arriving in Cubase.
You are not hearing the sound because you must *select* a MIDI Track in Cubase - The Track must be set to receive MIDI from the MONTAGE (Port 1),
It must be set to transmit Out to the MONTAGE (Port 1) , and the Out channel should be “7”
When working with Single Part instruments, there is no need to have any of the KBD CTRL icons active... you activate a MONTAGE single Part by simply selecting it.
You activate a Cubase MIDI Track by highlighting/selecting it.
This completes the routing circuit back to the MONTAGE Tone Generator. (But only when that MIDI Track is actively selected).
“Local Control” = Off disconnects the MONTAGE Keyboard from the MONTAGE Tone Generator.
You are literally placing the MIDI Track between the Keyboard and the Tone Generator.
Extra Credit: — Add and record a Multi Part program
Say you wanted to ADD a 2-Part instrument sound. It would need to occupy Parts 7 and 8.
You would tap the “+” in empty Part 7
This would launch the “Performance Merge” search engine
Set “Bank/Favorite” = All
Set “Attribute” = All (you will now see blue, Multi Part, and green, Single Part, options.
Tap “Main”
Set as “SynLead”
For this example, let’s say you wanted to add the Synth Lead sound called “Singleline 2” (a 2-Part AWM2+FM-X synth lead)
Adding this will place programs in both slots 7 and 8
Here, in order to play both Parts simultaneously you must return to the HOME screen
Ensure the KBD CTRL icons are active (green) for both Parts 7 and 8
In Cubase, select two Tracks set to Out data on Channels 7 and 8 respectively.
Because the Input Transformers are in play... data arriving from the MONTAGE on Ch7 will only be recorded to the MIDI Track set to Channel 7, and data arriving on Ch8 will be recorded by the MIDI Track set to Channel 8.
You can select two tracks in Cubase... and play the
Hope that helps.
Posted : 18/04/2021 7:38 am
Topic starter
Jason,
Thanks for your response. I'm currently dealing with all MIDI Tracks.
Regarding my inability to get back to viewing the full Performance, when I hit the Performance or Home button, it leaves me in the Part view of the Instrument I've just selected and doesn't take me to the full Performance view - hence my confusion. Maybe I'm missing a step in confirming the selection of the Instrument Part?
Also, I understand that MIDI itself doesn't generate sound but rather sends messages to the keyboard to play the sound. With my other MIDI iInstrument tracks in this Project, as long as I have the Instrument Part coordinated with the appropriate Track in Cubase, I should be able to hear sounds played on the Montage and see a signal in the Track Name pane in Cubase - neither of which is the case with this Instrument/Track, while MIDI Local Off is selected.
Note that when I started on this odd side trip today, I was in the Performance I had created weeks ago in conjunction with Cubase. When I decided to add a 7th Instrument/Track, I selected the 7th Instrument slot of the Performance, then selected Category Search, I noticed that the Instrument I selected produced no sound (sorry if I'm being redundant).
Per your suggestion, I will double check to make sure that that Track is configured like the others.
Posted : 18/04/2021 8:04 am
Topic starter
I was not feeling well over the weekend, but am feeling better today, so I'm wanting to tackle this problem.
I did check the track settings for Track 7 in Cubase and they are indeed the same as for the other 6 Tracks. Also, I hadn't mentioned earlier that I was setting Attribute to Single all this time, so I've only been using Single Part Instruments - so that is not the cause of the problem.
To reiterate: After trying to add (or in this case replace) the Instrument in Slot 7 by selecting that Slot, clicking on Category Search, and selecting Tenor Max, I could not back out to see the whole Performance - either by hitting Performance, the Home icon, etc. Nothing would change, and I could hear no sound even when that Track was selected in Cubase, unless I changed Local Control to On. So, the problem is not yet solved.
Added twist: I have a tendency to click Save in Montage Connect whenever I am about to exit Cubase; so today, when I turned on the Montage and Cubase, and tried to load the Performance Instruments from Cubase to the Montage by choosing the X7B file name of the previously saved Performance, I noticed in the Performance Name slot: "Tenor Max." So, I'm thinking that I likely hit the Save button in Montage Connect the other day before exiting Cubase when I was stuck in a single Part and Montage Connect overwrote the Performance combination associated with that file with "Tenor Max." I also tried to load an earlier X7B file I had created, and that came up with "Mellow Amp," as the Performance Name - which also brought up "Mellow Amp" on the Montage. That was a keyboard Instrument that had been part of that earlier Performance..... so I'm stuck with Performances that are single Instruments that make no sounds!
It seems like when I was selecting a Part within a Performance, the Part selected became the whole Performance. I don't know how I made that happen...
It's certainly more fun working with the Montage and Cubase when you know what you're doing!
Posted : 20/04/2021 2:14 am
To reiterate: After trying to add (or in this case replace) the Instrument in Slot 7 by selecting that Slot, clicking on Category Search, and selecting Tenor Max, I could not back out to see the whole Performance - either by hitting Performance, the Home icon, etc. Nothing would change, and I could hear no sound even when that Track was selected in Cubase, unless I changed Local Control to On. So, the problem is not yet solved.
Again, these are incorrect steps
After trying to replace the instrument (Single Part) in slot 7 you must press [SHIFT] + [CATEGORY SEARCH].
If you forget to hit [SHIFT] + [CATEGORY SEARCH] you will not launch “Part 7 - Category Search”
What you’ll see instead is “Performance Category Search” — read my post carefully, you missed [SHIFT]
These are two separate routines... one replaces just Part 7.
The other, what you did by just pressing [CATEGORY SEARCH] alone, replaces all 16 Parts with an entirely new (different) Performance. You want to replace just one Part - therefore, it involves the [SHIFT] button. I also offered an alternate method using the screen... and the pop-in menu. (Learn to use both, so you get comfortable navigating).
It seems like when I was selecting a Part within a Performance, the Part selected became the whole Performance. I don't know how I made that happen...
Exactly, what is happening. Learn to read the *name* of each screen — upper left of each and every screen (it tells you where you are). There are three different types of Searches for sounds.
1) Performance Category Search - replaces the entire Performance
2) Performance Merge - adds “+” the new Performance selection to empty Parts of the existing. Initiate by tapping “+”
3) Part Category Search - Select the Part, then [SHIFT] + [CATEGORY SEARCH] to look for a replacement.
You want to use #3 “Part Category Search”, specifically “Part 7 - Category Search”. Once you recognize/understand the three different types of Searches for sounds, you’ll stop having the issue. It is why I explained both Performance Merge and Part Category Search in my post above... you said you added Parts which could be by either “merging” or “replacing” the Part slot #7
Also... if you put “AUTO SYNC” = ON, MONTAGE CONNECT will automatically SAVE your Performance when you SAVE the Cubase Project (watch it happen).
And conversely, it will automatically restore the MONTAGE Performance when you next open this Cubase Project (assuming you are running the MONTAGE CONNECT *inside* of Cubase as a VSTi.
Posted : 20/04/2021 5:59 am
Page 1 / 2
Next
