Tagged Under
The Basics : Sampling in the Sequencer
In addition to its use in the Voice and Performance modes, the Sampling mode can also be entered from the Song and Pattern modes. This lets you record audio (such as vocals, electric guitar, or audio from an external device), and use it directly on a Song/Pattern track as a Sample Voice.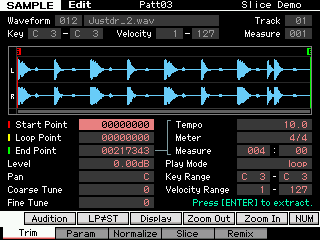
The Integrated Sampling Sequencer (ISS) allows you to record audio into a SONG or PATTERN. The RECORD TYPE “Sample with Note” (sample+note) is ideal if you simply want to add audio phrases to your song. In this mode, you can record vocals and guitar phrases directly into your sequence while listening to playback of any MIDI tracks you’ve already created. After recording the audio, the Integrated Sampling Sequencer will automatically create a User sample Voice, map it to the keyboard and put a MIDI note in the pattern/song at the appropriate time. If you would like to play the same audio phrase later in the song, you can simply trigger it with a MIDI note instead of having to sample it again and use up valuable sample memory. When you make your final arrangement, your phrases will play back in perfect time.
The Basics
Call up a PATTERN or SONG you have previously composed. Here we will learn to Sample with Note (sample+note) so that we can overdub audio to MIDI tracks. We will also use the Trigger Mode “measure”, to automatically start and stop audio recording.
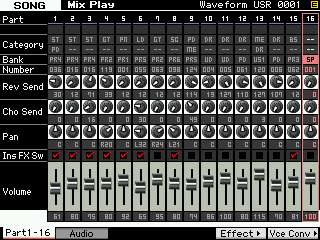
In the example, we are recording Vocals directly into a SONG, and are going to target Track 16 (of course, you can target any track you desire and the source could be a guitar, a bass, your band’s mixer, …whatever). We have setup to use a microphone input, and we have a dynamic mic plugged into the Left A/D Input jack on the back panel.
Press [INTEGRATED SAMPLING]
Select an empty WAVEFORM number 001-128
Press [F6] REC>
Here you arrive at the SAMPLE RECORD screen where you can setup the SOURCE and DESTINATION for your recording.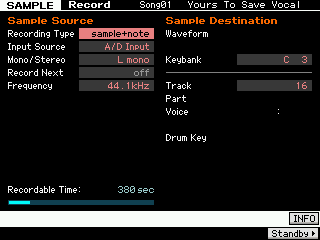
SAMPLE SOURCE
“Recording Type = sample+note” – for sampling in the Sequencer. A note-on event is automatically generated to trigger playback of the sample audio. This note-on event is placed precisely where sampling begins and the note’s duration (GATE time) will be precisely the number of measures, beats and clock pulses to hold that note until the sampling is completed.
“Input Source = A/D Input” – analog-to-digital input receives the analog signal of the microphone and moves it into the digital domain of the XF.
“Mono/Stereo = L mono” – source is mono
“Frequency = 44.1kHz” – highest resolution
SAMPLE DESTINATION
“Keybank = C3” – The default Keybank is C3 (middle C)
“Track = 16” – This is our target track for the Vocals. The ISS will automatically create the User Sample Voice to house the sample waveform and it will create a MIDI note-on event that will precisely trigger the audio playback.
Summary: As you can see, we are ready to record a microphone input and are targeting a specific note and track of the sequencer. The Integrated Sampler will do most of the heavy lifting.
Next step: The TRIGGER MODE
Press [F6] STANDY
Here you can review your setup thus far. We are targeting a blank Waveform (001), Track 16, currently the transport is located at measure 001. The RECORD MONITOR parameter is how loud we want to listen (this does not affect the recording, only how loud the singer hears themselves in headphones). The Target KEY is middle C (C3).
Set the TRIGGER MODE = “meas”
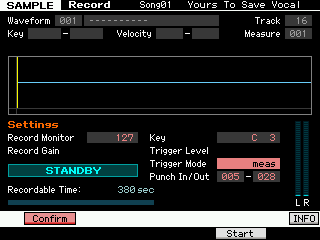
“Trigger Mode = Meas” (measure) ideal for when sampling to the Sequencer, because it allows you to set a precise punch-in point and punch-out point, fully automating the process.
And we have set the PUNCH IN/OUT measures to match what we require for this song. Recording will automatically begin when the transport reaches measure 005, and will punch out automatically when the transport reaches the top of measure 28.
When sampling in your home studio, it is very important to remember to turn OFF your Monitor speakers if they are in the same room as your microphone. You must isolate the microphone from picking up signal from the speakers. Have the vocalist don a pair of comfortable headphones. If you have the ability – isolate the singer completely by putting them in another room.
Run a test. To do so you can simply begin playback. Adjust the GAIN/TRIM control on the back panel. Microphones are very weak signal so it is not unusual to have to boost the signal fully clockwise. You will see the signal registering on the METER on the right side of the screen. You may opt to record the vocals with a compressor or other effects (we’ll cover that later in the article) for now, let’s concentrate on the basics of recording.
When you things comfortable and ready, STOP playback and hit the LOCATE TOP button on the transport to return the sequencer to the top of the SONG (of course, if you wish you can use the [<<]/[>>] Rewind/Fast Forward buttons to locate to any measure you may require. It is customary to give the singer a few measures in front of the punch-in point to get ready.
Press [F5] START
This will arm the sampler… “STANDBY” will change to “WAITING” – the sampler is waiting from us to press PLAY on the sequencer and for the sequencer to reach measure 005.
The RECORDABLE TIME parameter says 380 seconds. This is simply a reminder that the longest single sample you can do is 6 minutes and 20 seconds. This will only read something less than that if you are getting to the point where you have almost filled your SDRAM. When this occurs you can simply transfer your audio to FLASH Memory Expansion Modules. We’ll cover that in another article.
Recording will being and end automatically. When completed you will be given the option to AUDITION the recording. If you absolutely hate it, you can hit [F6] STOP at any time during the recording, then press [EXIT] to return to your STANDBY status. Locate the Transport again (measure reads out in the upper right portion of the screen).
Do it again.
When you have a “keeper” press [ENTER] to fix.
This action will create the Waveform USR 0001, assign this waveform to USER SAMPLE VOICE (SP 001), assign that VOICE to current MIXING setup on our target Track (16).
Additionally, it creates a Bank Select/Program Change event and a note-on event on track 16. This ensures that the proper VOICE (063/050/000) is recalled and that the sample begins precisely at measure 005, beat 01, clock 000 and is held through to the top of measure 28.
This is why they call it the Integrated SamplingSequencer.
Setting up to sample Vocals through the VCM Compressor 376
Call up a PATTERN or SONG you have previously composed. Here we will learn to Sample with Note so that we can overdub audio to MIDI tracks. The Compressor is one of the powerful professional tools in the arsenal of recording studio engineers. It is basically a leveling amplifier and is used to control the DYNAMIC RANGE of audio. If you have ever sampled and found that your level okay but that your recording lacked presence – the compressor is the device that will give you presence. It will make your sample perceptibly louder without actually going over the 0dB line. One of the special new features in the Motif XS is the inclusion of the VCM processors. The Compressor 376 is a phenomenal recreation of the classic studio compressors of the 1970’s and 80’s:
It is an Insertion Effect so let’s set this up on the vocals:
• Press [MIXING]
• Press [EDIT]
• Press the [COMMON EDIT] button
Turn the main VOLUME down while we setup the processor – this is important as you do not want to scroll through various effects with an open microphone – it is just good standard practice. Once you have selected your Effects, you can bring the main Volume back up.
• Press [F5] AUDIO IN
Here you can see the parameters that are controlling the OUTPUT assignment of your AD Input. Although you see sends to the REVERB and CHORUS these will not be recorded to the sampler. The INSERTION EFFECT however will be recorded to the sampler.
• Press [F6] EFFECT
• Press [SF2] INS SW – Insertion Switch
Here you can activate the Insertion Effects on any eight PARTS. You may need to temporarily turn the Insertion Switch OFF on one of the Parts so that you can turn it ON for the AD PART.
• Select the INSERT SWITCH for AD
• Press [F5] AUDIO IN
• Press [SF2] CONNECT
Here you will see the AD PART routing to the Dual Insertion Effects
• Press [SF6] LIST – to see a list of effects that you can assign
• Select “CMP” the “VCM Compressor 376” is the first one of the compressor types
• Press [SF3] INS A – to see the parameters of the “VCM Compressor 376”
• Move the cursor down from TYPE to “PRESET”
• Press [SF6] LIST – to view a list of Preset configurations
• Select “Vocal Comp 117x”
Tweak the INPUT until you see about –1dB of Gain Reduction. What this is doing is setting both the threshold and Gain Reduction. A compressor reduces the incoming signal when it ‘sees’ a loud peak, this has the end result of reducing the overall dynamic range – those giving the signal more weight or presence. The amount you will need to change the INPUT to see one dB of Gain Reduction will, of course, depend on the input signal, i.e., this is based on how loud or strong the signal coming in registers. This can vary depending on the microphone and the person in front of it. One dB of reduction may not seem like a lot; but in fact it is a protection against the incoming signal going over into the red. You will be able to see your incoming signal meter when you go to the Sample Record screen.
Once you have completed recording in the Motif XF, as always you should press [STORE] which writes your latest edits to internal Flash memory and then you should go to [FILE] and back up your work by saving an ALL data File (.X3A). This will save the entire Motif XF and all your settings. It will also allow you to IMPORT the entire session into Cubase for further tracking, if you so desire. (Please see the article linked below, on how to have Cubase open the .X3A file and extract each MIDI track to a Cubase MIDI Track and it will extract your audio recordings to Cubase AUDIO Tracks:
This method of IMPORT is very economical – you do not have to create complete audio stems – the ISS will place the audio at the proper Measure:Beat:Clock pulse where it belongs. This way you do not wind up with large areas of empty data. Even if you have punched in and out multiple times, the SONG IMPORT function will properly place the audio recording. Of course you are free to copy and paste them as necessary. You will find that this makes for very creative possibilities within the DAW environment.
Alternative methods include recording the finished SONG directly to your computer or to a USB stick as a stereo 16-bit/44.1kHz .wav File. No computer is necessary in this method. If you are completely satisfied with the production as it is recorded you can simply have the Motif XF write the data out as a .wav – this is done in real time and allows you to have a finished project ready for burning a CD or converting to MP3 (or any other audio format you might prefer).
METHOD: AUDIO RECORD/PLAYBACK from USB drive/Ethernet Connection
The quickest/easiet way to transfer your sequences to .WAV. This function found on the XF, allows you to record from your Motif XF directly to the USB drive plugged into the USB TO DEVICE port. This function is found as apart of the [FILE] function.
Connect your USB drive and select the SONG you wish to record (or PATTERN Chain) (You can record your playing “live” if you wish to simply record a solo piano performance, for example) Simply select the mode you want to work in first, then:
Press [FILE]
Press [F4] AUDIO
Press [SF1] REC
Give the wave file a name and press [ENTER]
Set the required trigger level.
If you set the trigger level to “manual”, recording will begin whenever you press the [ENTER] button. Alternatively, if you set a value between 1 and 127, recording will begin automatically – simply press [ENTER] to arm the function, then when the playback volume exceeds the TRIGGER LEVEL recording will begin. The level set here will be indicated by red triangles in the level meter. For best results, set this parameter as low as possible to capture the entire signal, but not so low as to record unwanted noise.
Press the [ENTER] button.
If you have set the trigger level to “manual”, recording will begin immediately and the displayed status will change from “STANDBY” to “RECORDING”. If you have set a value between 1 and 127 as the trigger level, the displayed status will change from “STANDBY” to “WAITING”.
If you set the trigger level to a value between 1 and 127, recording will begin automatically whenever the playback volume exceeds that level; furthermore, the displayed status will change from “WAITING” to “RECORDING” at that time. If you want to include the currently-selected Song or Pattern in your recording, press the SEQ TRANSPORT [>] (Play) button at any time to start playback. You can also press one of the Number buttons [1] – [16] while recording to change parts if you are going to play along with your sequence.
Via this method you can record a maximum file of 74 minutes continuously (whew!) or to the limit of your drive size, whichever comes first.
Alternatively, if you have an Ethernet Network connection established between your Motif XF and your computer, you can record directly to that computer or any of its shared assets using this same method.
Fundamentally, the Motif XF is creating the .wav file in real time to a storage device, be it the connected USB drive or the computer hard drive via Ethernet.
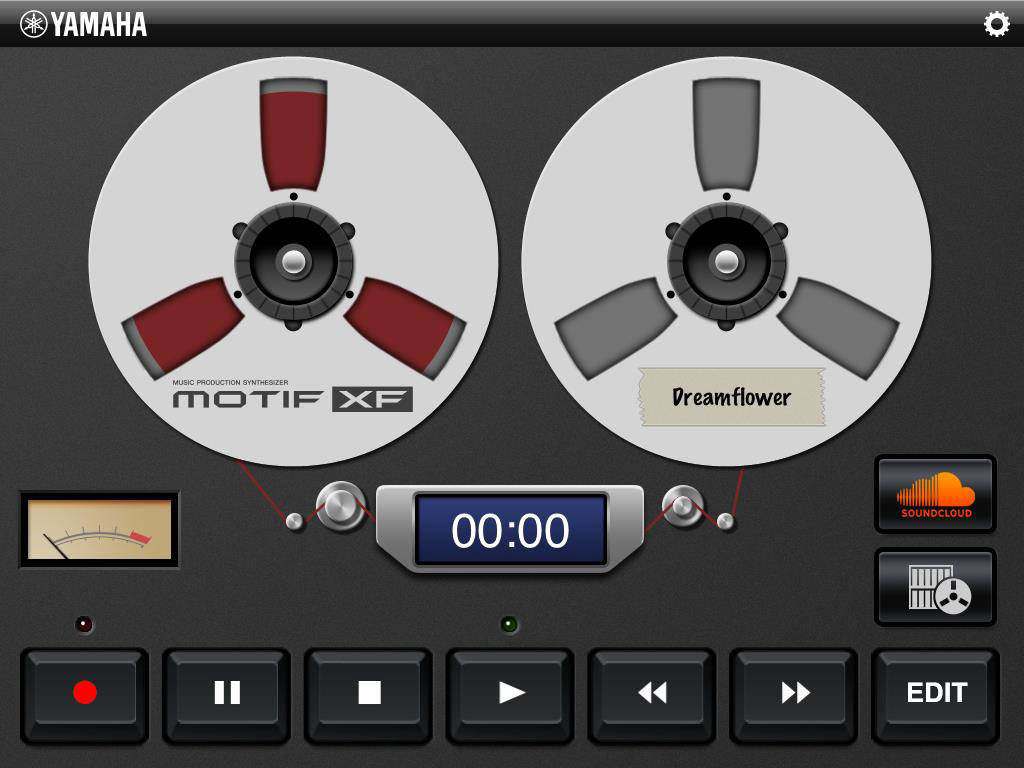
METHOD: Wireless Recording – CLOUD AUDIO RECORDER FOR MOTIF XF. (Requires compatible USB WiFi device)
This app for iPhone/iPad allows you to record wirelessly direct from your XF to any iPhone or iPad within range, via a compatible USB Wifi stick attached to your XF. The result is a 16-bit, 44.1kHz wav that you can post (upload) directly to the Internet (to your SOUNDCLOUD account) and let the world hear your music minutes after you complete it.
Cloud Audio Recorder for Motif XF