

Tagged Under
GETTING STARTED: CATEGORY SEARCH and PERFORMANCE CREATOR
Basic Skills: CATEGORY SEARCH is a basic skill that will serve you well when using other more advanced routines on the XS. With more than one thousand VOICES on-board being able to find them efficiently makes Category Search the first skill you should master. This article goes over this function and applies it to the PERFORMANCE CREATOR feature – which allows the user to assemble multiple Voices into a program for real time play.
Category Search:
Given the number of sounds (called VOICES) that are available in the S-series, among the first things to tackle are how to make sense of the front panel and how to find the sounds.
The screen is in the center, to the left of the screen are your real-time performing controls: Volumes, effects, knobs, sliders, transpose, microphone parameters, the illuminated Real-time Performance Mode Controls, the Mod Wheel, Pitch Bend Wheel, etc. To the right of the screen are your main Mode and sound selection functions.
Start with [VOICE] mode
Press the [VOICE] mode button
Press [CATEGORY SEARCH]
Use the DATA WHEEL, [INC]/[DEC] buttons and/or the dedicated front panel buttons (shown below) to view them. If using the dedicated buttons: the first press selects the top function – the second the item listed under it.
Category Search will allow you to quickly find any sound that you might need by MAIN and SUB Category listings.
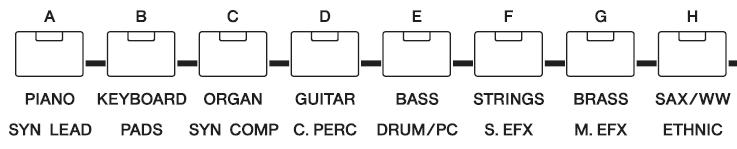
Category functions via the front panel:
The 8 buttons allow you to reach the first 16 MAIN Categories in this fashion.
Example: press [B] the first time to select “KEYBOARD” MAIN category, the second press selects “PADS”
Cursor down to highlight the Sub-Category function
Use the DATA WHEEL and/or [INC]/[DEC] buttons to view them
Press [ENTER] to view a list of your selections.
Example: Press [CATEGORY SEARCH]
Select Piano as the main category.
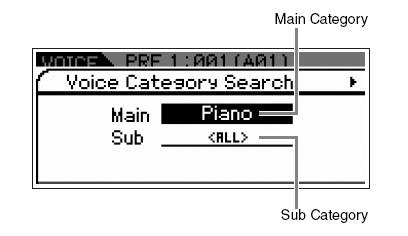
Move the cursor down and select Sub Category = “ALL” Change Sub Category
Change Sub Category = “Layer” (Piano+)
Change Sub Category = “Modern” (Contemporary)
Change Sub Category = “Vintage” (Classic)
Performance Creator:
This makes it possible, without being a programming guru, to make splits, layers and add drum accompaniment without ever having to push the [EDIT] button. The first key to understanding how to use this powerful tool is to begin in VOICE mode.

Starting from [VOICE] mode, select the Natural Grand S6 piano Voice.
The Performance Creator makes programming Performances a very intuitive process… building up from single sound to completed combination.
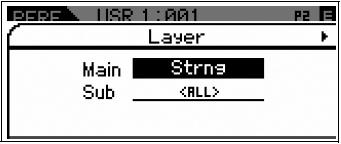
First, let’s build a simple Performance Layer.
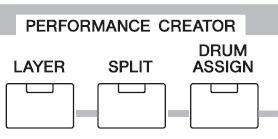
• Press the [LAYER] button
• You have created a Layer
• Immediately, you are seeing the “STRING” Category in the window and you are layered with Piano and Strings across the keyboard.
• The Performance Creator takes you immediately to the Category Search function and now you can easily find the type of Voice that you would like to layer. Press [ENTER] and you will be taken to the NEW PERFORMANCE screen.
• Later you can tweak parameters, name and store your creation to the USER PERFORMANCE Bank #4 (USR4) where you will find 128 blank locations for your own combination programs.
Now lets build a SPLIT Performance:
• Start over again by repeating the same starting point in VOICE mode (_very important_)
• Return to [VOICE] mode and recall the “Natural Grand S6” piano VOICE
• Press the [SPLIT] button
• You have created a Split
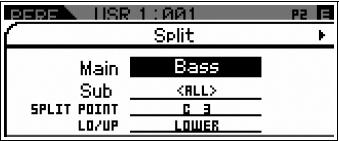
• Immediately you are seeing the “Bass” CATEGORY SEARCH in the screen and you have created a Split Performance with a Bass on the left and Piano on the right. Play the keyboard. You can cursor down and select a KEY for the SPLIT POINT.
• To complete the process, select your bass sound, press [ENTER] you will be taken to the main NEW PERFORMANCE screen.
• The LO/UP (lower/upper) parameter allows to quickly swap the left hand (LO) Voice with the right hand (UP) Voice. If you had started with the Bass sound (the lower sound) when making this SPLIT, this would allow you to conveniently swap them.
The Voice that is automatically selected for the Layer process is customizable and so is the Voice that is automatically selected for the Split process. Yes, you can have the split point at any spot on the keyboard… the SPLIT POINT parameter is immediately in the screen and available for you to set.
And as we will see, it is just as easy to add a Drum kit w/arpeggio to a LAYER or to a SPLIT.
DRUM ASSIGN
• After creating either a LAYER or SPLIT, or even directly from a single Voice, it is very simple to add a drum arpeggio pattern to your program.
• Press the [DRUM ASSIGN]
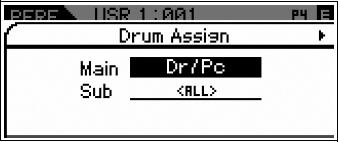
• You will be taken to the Category Search for Drum Kits.
There are over 2000 Drum grooves among the 6779 arpeggios on-board.
When you recall different KITS, you will hear different arpeggio patterns. Later you can customize exactly what drum arpeggio you wish to use. As you call up different Drum Kits, the assigned arpeggios change. This is simply because different kits have different arpeggio patterns associated with them. This is quick and easy.
Selecting Arpeggio Types
On the left front panel you will see the backlit buttons representing the PERFORMANCE PARTS and their current status. The Performance Creator will always place the Drum Kit in PART 4 of the NEW PERFORMANCE program. If you would like to audition different drum arpeggios patterns, the simplest method is to simply choose a different kit. However, if you would like to find a specific arpeggio pattern you can do so as follows:
• Press [EDIT]
• Press PART SELECT button [4]
• Select “Arpeggio” in the screen Edit Select options
• Cursor to “Arp 1 Type” and press [ENTER]. Here you can see the MAIN Category is Drums and Percussion and you can cursor down to the SUB Category and TYPE options to select from individual Arpeggio Types.
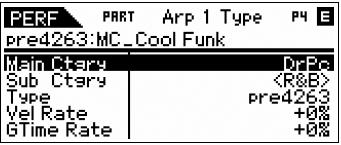
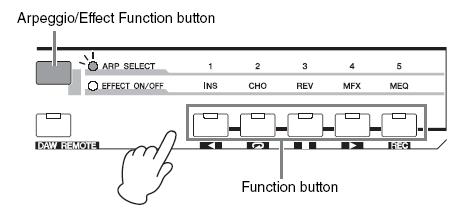
Five different Arpeggio Types can be associated with each program and are accessible via the five dedicated ARP SELECT buttons just to the left of the screen.
The Favorite Category:
Grouping your most-used Voices together—Favorite Category
Category Search also has a convenient Favorite Category that lets you collect your most often used and favorite Voices for easy selection. This is one mo re useful way you can quickly select the Voices you need from the huge number available on the instrument.
Over time you will develop favorite Voices, the FAVORITE CATEGORY is simply a place you can keep these Voices.
• To register the current Voice to the Favorite Category, simply hold the [SHIFT] button then press the [FAVORITE] button.
It will appear with an ‘x’ next to it when you are viewing the Category Search list. It will appear with a heart icon when viewing the main VOICE screen. And will be added to a list of your favorites accessible when you press the [FAVORITE] button.
The order in which the Favorites appear is not programmable – so do not attempt to make it a VOICE selection order list – it simply allows you to mark your particular favorite Voices and distinguish them from all others. The Voices will appear in order of their location PRE1:001 through PRE8:128 for normal Preset Voices; followed by USER1:001 through USER4:128, PDR (Preset Drums), UDR (User Drums), GM Normal, and finally GMDR (GM Drum).
• To remove the current Voice from the Favorite Category, simply hold the [SHIFT] button then press the [FAVORITE] button. This will de-select it, the ‘x’ will be removed and the heart icon will disappear. The Voice, however, will still be accessible by normal means.
Category Search for PERFORMANCES:
A PERFORMANCE is a combination of up to four VOICES (each placed in a PART). Each PART can be under your real time control and/or responding to one of the four available arpeggiators. Performances can be complex splits/layers and can be used as writing tools when looking for interactive inspiration. When in PERFORMANCE mode you can search for Performance programs using the same skills outlined above. The search can be done in the screen or using the front panel buttons. The Categories will be divided into genres of music and/or their function, i.e, Rock, R&B, Electronica, Jazz, World, Splits/Layers, and FX. You can see these written under the buttons [A]~[G]. There are also associated Sub-Categories as well.
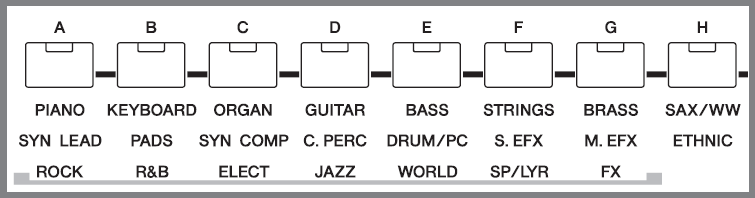
For example, the ROCK Category is sub-divided into “Top 40”, “Classic”, “Hard”, “Country”, “Blues”, “Folk”, “Ballad”, and “Film”.
These Categories and Sub-Categories are there simply to help you navigate through the 3 Banks of 128 Performances provided (384). There is a fourth bank of 128 USER PERFORMANCES that are blanks (Initialize Performances) – awaiting your creations. When you create your own VOICE or PERFORMANCE you can select from the provided Categories and Sub-Categories – you can select these in the COMMON EDIT parameters when you NAME the program. You can additionally mark any of them as your FAVORITE same as you did for VOICES.
These categories are provided simply to help you find your data in an efficient manner.