

Tagged Under
IMPORTING SAMPLES TO A DRUM KIT
Call up a USER DRUM KIT you want to work with and go directly to [FILE] from VOICE mode.
• Select TYPE = WAV (or AIFF, if your audio clips are in that format)
• Move the cursor up to the DIR (Directory) and navigate to the folder or file name of the wave you want to import.
• Move the cursor to the bottom of the screen and target the KEY within the USER DRUM KIT you have selected. You can use the [SF6] KBD function to target the KEY. (Hold [SF6] KBD + NOTE on Keyboard)
• Press [SF2] LOAD
Although the sample is immediately assigned to the Drum Kit and Key you selected, the original pitch of the sample when you go to edit it is C3 (middle “C”). This is at first a head-scratcher, but is just what you will want to happen if you need to use this sample elsewhere (like in a dedicated normal Voice) or when you want to EDIT this sample. The original pitch is centered on the keyboard giving you ample opportunity to pitch it up or down from there.
Say for example you target USER DRUM VOICE UDR:003(A03), KEY = C1 for your first imported sample audio clip. Immediately this sample will be triggered in the target Drum Kit on note C1. Were you to go to EDIT the sample… you’ll find that the sample will be assigned to C3, middle “C”. You can edit the START POINT, LOOP POINT, END POINT, etc., and you can set various parameters including output level, pan position, setting a Play Mode (direction), tuning the pitch up or down, and setting a Velocity and Key Range to which the sample will respond when placed in the Voice. Let’s do it… (At the end of this article find a ZIPPED download. A Folder that contains several .WAV audio loops you can experiment with… of course, you can use your own data. Unzip the File and place the “XFwav” Folder on a USB stick you use with your Motif XF).
• Call up USER DRUM KIT “UDR:003(A03) Hyper Standard Kit”
Initialize COMMON parameters and KEY = C1. Here’s how:
• Press [JOB]
• Clear the box that says “ALL”
• Make sure COMMON and KEY are checked
• Highlight the KEY parameter and set it to C1, you can do so quickly by holding [SF6] KBD + the KEY C1
Next we will load a WAV onto this KEY
• Press [FILE]
• Set the TYPE = WAV
• Use the LEFT CURSOR arrow to move to the DIRECTORY.
• Navigate to the Folder of waves provided with this tutorial and load the one called: “Rap3V_~1.wav”
• Use the RIGHT CURSOR arrow to move the lower portion of the screen and setup your LOAD options. 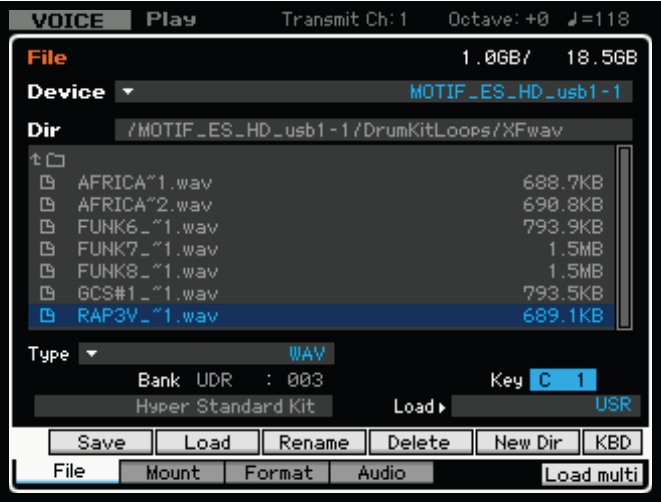 You will see that the Hyper Standard Kit is already selected. You can send the data to SDRAM by setting the LOAD option = USR, or you can transfer it directly to your FLASH BOARD by setting it to FL1 or FL2, as you require.
• Press [SF2] LOAD
• Press [INC/YES] to execute
• Immediately the sample is assigned directly to the KIT on the note you designated.
• Press [VOICE] to return to the Drum Kit Voice.
You will notice that the Drum Kit has been edited. How? The small purple letter “E” in the upper right corner of the screen is an indication that your VOICE (in this case) has been edited but not yet stored – just F.Y.I.
• Press [INTEGRATED SAMPLING]
You arrive at the Sample Select screen and your Waveform has been given the same name as the file: “RAP3V_~1.wav”.
• Press [SF5] KEYBANK
You can see the waveform has been assigned by default to middle “C”. The sample can be used separately in different Voices, in different drum kits and assigned to any key. Don’t get confused by this. We call it to your attention because it is important to know.
• Press [EDIT]
Here you get the [F1] TRIM screen where you can Edit the Start Point, End Point, set a Loop Point, calculate the Tempo; You have ZOOM tools: Zoom Out, Zoom In and Display (returns the full screen view of the wave). Also at [F2] PARAM you will find where you set Key range and Velocity range, play direction, etc.
This sample was left purposefully with a bit of an error at the very end – let’s now talk about editing the END POINT and learn about some of the tools available. 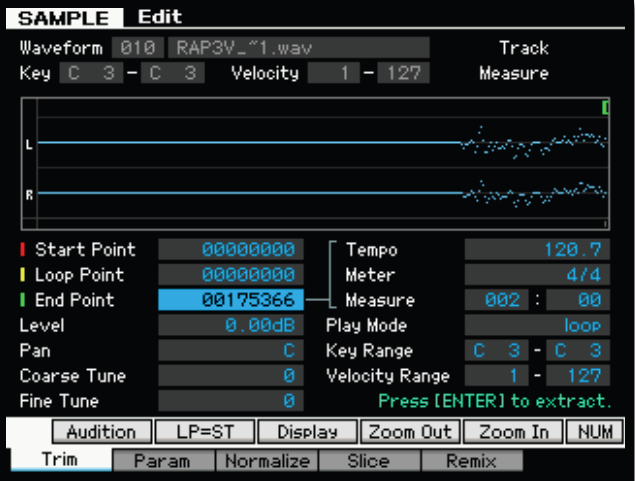 While in EDIT:
• Press the [F1] TRIM button to view the wave.
• Move the cursor to highlight the END POINT parameter 00175366 (that is the number of samples at 44.1kHz)
• Press the [SF5] ZOOM IN button (repeatedly) until your screen looks like this screen shot (shown left).
The [ZOOM IN] will zoom-in on the End Point of the wave. (To ZOOM IN on the start of the wave you would highlight the numbers representing the Start Point). That little roughness at the end is heard as a very sharp click.
• Change the PLAY MODE from “loop” to “one shot”.
This action will let you clearly hear the problem.
Use your DATA WHEEL counterclockwise to set it just to the left of the roughness. (Approximately: 00175290). This will eliminate the click 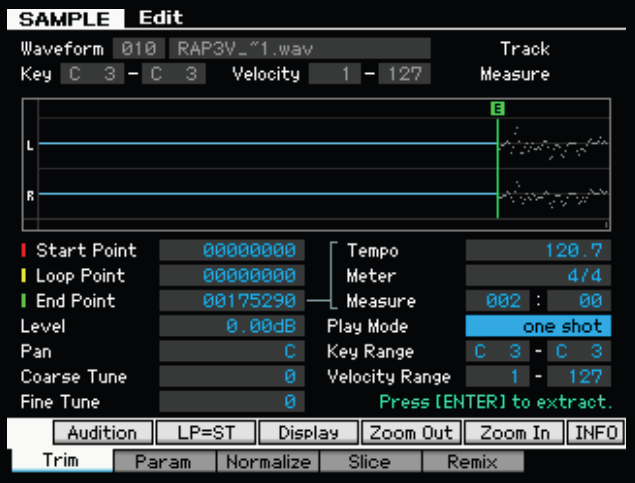
• Press [ENTER] to extract
Extracting here, will keep the good stuff and eliminate (discard), permanently, the bad stuff – shorten the wave.
• Press [SF3] DISPLAY to return the full view of the waveform
• Change the PLAY MODE back from “one shot” to loop
Summary: The ZOOM function can be used any time you need to get closer to the graphic of the waveform. If you are one of those spinning the Data Wheel tirelessly to get from here to there, please stop it… you will wear the thing out. Learn to use the Start Point, Loop Point and End Point parameters in conjunction with the Zoom Tools to get where you are going.
Additionally, when you highlight a value, you see at [SF6] NUM (number). This will let you type in a number to move the cursor to that location. Say I want to do something in the middle of a long clip… if I’m not thinking I guess I could spin that Data Wheel until I got there or I could highlight the LOOP POINTparameter and then press [SF6] NUM and type in an approximate value to find the location. Once I’m in the area, I can use the ZOOM IN tool to get closer. Math works as well. Once I have determined that there are 175,290 samples in the two-measure phrase, you can bet that one measure is approximately 87,645 (half the value)…
Samples when imported directly to a Drum Kit are added to the WAVEFORM List with a default tuning of C3. You can place them anywhere without affecting this original pitch key. If you want to change the original tuning of the sample, for example, have it play lower and slower, you would do so in Integrated Sampling > EDIT > [F2] PARAM > Coarse and Fine Tune.
If you want the sample available for “normal” play (across several keys of the keyboard) again, this is done by setting the Key Range parameter. Default, remember, is a single key C3 – if you want to pitch it across the entire keyboard set the range to C-2 through G8. Then when this waveform is accessed in a normal VOICE it will be available for all keys (Drum Kits always access the original pitch from just a single key). Again, by default the sample will automatically default to Equal Temperament tuning. In a normal VOICE under Element PITCH parameters you will be able to either fix the pitch or have it change differently. The parameter is called (appropriately enough):
Pitch Key Follow. Default = 100%
 LOADING MULTIPLE SAMPLES TO A DRUM KIT
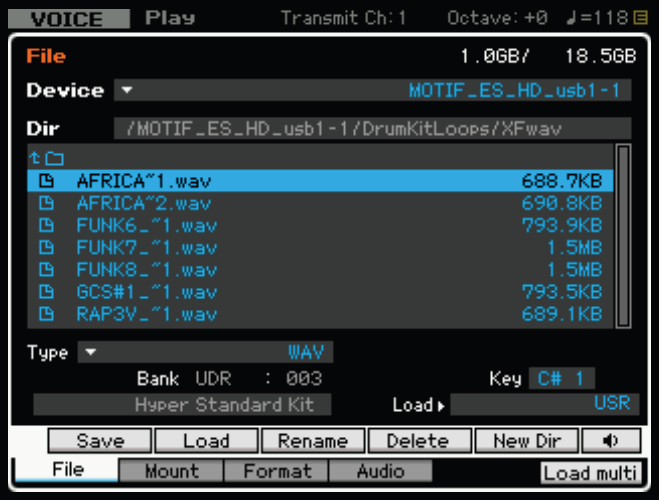
While we are working with the HYPER STANDARD KIT – let’s quick describe a couple of useful features.
[SF6] Speaker icon – Press and hold to “audition” the wave directly from the disk (stereo, 16-bit, 44.1kHz)
[F6] LOAD MULTI – this function will load all of the .wav files in the current folder starting chromatically up the keyboard starting at the KEY you set.
SAMPLING TO A DRUM KIT
Much of what is true about importing/loading samples to a Drum Kit will hold true here. Call up a USER DRUM KIT you want to work with and go directly to [INTEGRATED SAMPLING] from VOICE mode. The context sensitive Motif XF will then offer you parameter options to sample directly to a VOICE.
• Press [INTEGRATED SAMPLING]
• On the Sample Select screen select a blank Waveform
• Press [F6] REC
• Setup your SOURCE and DESTINATION parameters:
Sample Source
Recording Type = sample
Input Source = A/D INPUT (or FW)
Stereo/Mono = *when you select a User Drum Kit, then
Record Next = on the Drum Key parameter appears.
Frequency = 44.1kHz
Sample Destination
VOICE = Your selected Drum Kit
DRUM KEY = Your selected Drum Key
By setting the RECORD NEXT = ON, when you have completed sampling to one KEY you will automatically be setup to target the next Waveform assigned to the next chromatically higher key. This can make sampling a bunch of things in a row quicker and easier. If, for example, you start at Drum Key = C1, once you have accepted (decided to keep) the recording the Integrated Sampler will automatically advance you to the next Waveform and arm the sampler for C#1, and so on. If you are working from a source like a CD player you can use the Trigger Mode = LEVEL so that sampling begins on audio input. (Sampliers are always recording… the butons that you press really only determine what audio you keep. The XF will always record and keep 100ms of audio prior to the actual recording trigger. This “pre-record” allows you to scroll backward in time in case you missed the actual start of audio. If you are sampling at 44.1kHz (the highest sample resolution) you may notice your samples always seem to start at 00004410… Now you know, the XF sampler “keeps” 100ms prior to sampling beginning in case the sound has a subtle attack).
It is also possible to sample any audio directly from your computer. If you are using the FW16E (firewire) connection to your computer (using the XF as your soundcard/interface) signal routed out to the Motif XF on FW L/R (aka FW 03&04) will arrive in your unit as INPUT SOURCE = FW.
For example, if you have audio you wish to sample, you could simply drag the audio into an open Cubase session. Cubase allows you to drag and drop audio into an open session – it will automatically create a track for that audio. The six audio outputs from Cubase going back the Motif XF via FW are as follows: 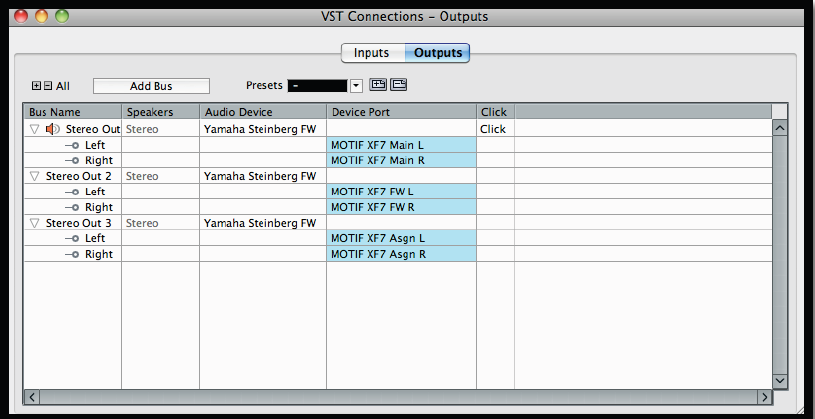
“Motif XF Main L” / “Motif XF Main R” – mean the audio will be routed directly to the main Left and Right outputs of the Motif XF. (a/k/a: ASIO FW 01 & 02)*
“Motif XF FW L” / “Motif XF FW R” – mean the audio will be routed directly to the FW audio channel within the Motif XF. This appears in your MIXING setup as an input and it appears in your Integrated Sampler as an Input Source (FW). (a/k/a: ASIO FW 03 & 04)*
“Motif XF Asgn L” / “Motif XF Asgn R” – mean that audio will be routed directly to the analog assignable output jacks on the back panel of the Motif XF. (a/k/a: ASIO FW 05 & 06)*
*(The FW Outputs will be identified by name, if you have installed the “Yamaha Motif XF Extensions”. If you have not, or if you are using a DAW software other than Cubase, the Outputs will be identified as “ASIO FW xx” where ‘xx’ represents a number 01-06 corresponding to that output as indicated above). 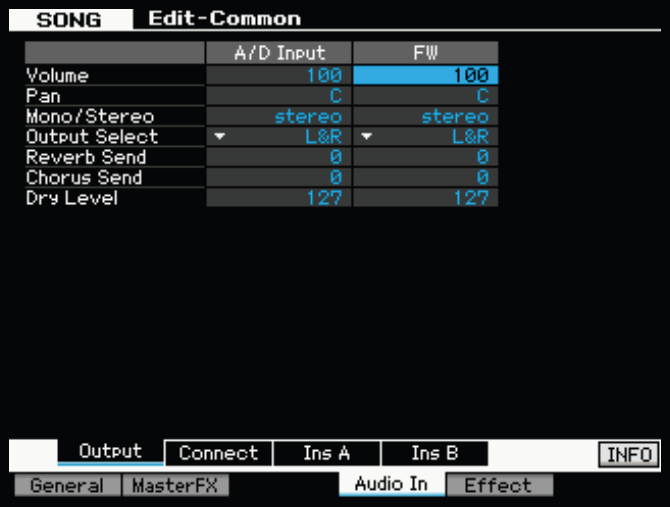 Shown at left, the A/D INPUT and the FW INPUT, mentioned above, arrive in a SONG MIXING setup as [F4] AUDIO IN options. If you set the Cubase Audio track output to “Motif XF FW L” it will arrive as a mono FW Input at the internal XF engine. “Motif XF FW R” will arrive as a mono input. And both, L&R, obviously, will give you stereo. When sampling directly into a Drum Kit you can quickly edit each audio clip as an autonomous entity. Each clip can have it own parameters. As outlined in the “What is a Drum Voice?” article, each KEY in a Drum Kit is a separate instrument and therefore has its own set of Voice parameters.
A common practice is to record or sample audio from a source such as a CD player, microphone, guitar, bass, other keyboard, etc., etc., etc. The only things you really need to know here is you must setup the Motif XF AD INPUT to match the level of the signal source. There is an analog GAIN control on the back panel of the XF (right next to the AD INPUTS). This works in conjunction with the MIC/LINE setting in UTILITY mode. Microphone inputs are weak and need boosting. Audio sources like CD players or other synthesizers are strong and are considered Line level inputs. Guitars and basses are often in the middle remember the difference between the magnet in a dynamic microphone and the magnets in guitar pickups is not that much (guitar magnets are noisier) ? I will not repeat here the setup for microphone, please see the article: “Setting up a Microphone Motif XF A/D Input”.
Each Motif XF KEYBANK can hold a maximum of 256 mono samples, (128 stereo samples) – you will not do this but that is the theoretical ceiling. If you know where the walls and the ceiling are you can run around and enjoy yourself without banging your head. It is when you don’t know your limitations that frustration begins. If you want to sample your own snare drum and make it a four-way or five-way velocity swap as many of the preset snare drums are… what you would need to do is simply sample each snare hit as a separate Waveform, initially. In the [INTEGRATED SAMPLING] > [JOB] area you will find at [F1] KEYBANK a list of functions that will allow you to manipulate your data. You can COPY Keybanks, and/or you can MOVE them. Say you sample five hits of an acoustic snare drum to Waveforms 021, 022, 023, 024 and 025 each sampled to the default “C3”. You could move all five samples to the same KEYBANK as follows:
• Press [INTEGRATED SAMPLING]
• Press [JOB]
• Press [F1] KEYBANK
• Select JOB 03: MOVE
• Press [ENTER]
• Setup the dialog box so that you are set to MOVE: KEYBANK Waveform 0025 to 0021
• Repeat for Waveform 024 to 021
• Repeat for Waveform 023 to 021
• Repeat for Waveform 022 to 021
All five waveforms are now stacked in the same KEYBANK. As we have learned you can navigate to the KEYBANK view from the SAMPLE SELECT screen. Select a sample to Edit. Go to EDIT and give it a Velocity Range. Set them each so there are no gaps for example: 1-50, 51-70, 71-90, 91-120, 121-127. Rinse and repeat.
The screen shot below shows the sample SOURCE/DESTINATION setup for directing a sample into an initialized Drum Kit, targeting Drum Key C1. 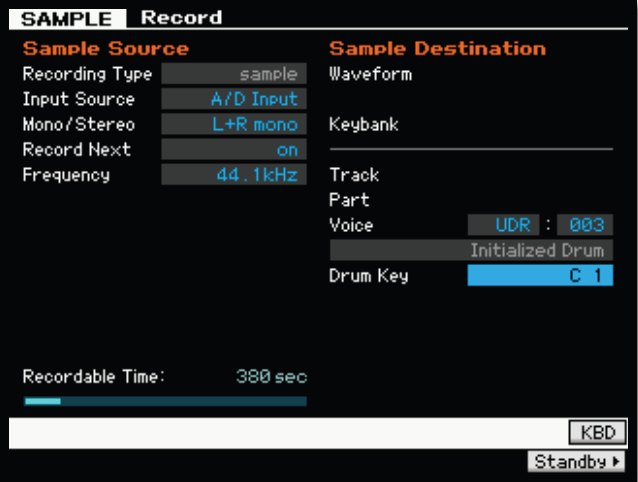 We have not mentioned this yet but in the lower left area of the screen you see the “Recordable Time” parameter. 380 seconds is 6 minutes and 20 seconds and represents the longest audio clip you can record.
The bar graph below it shows you how much of your total memory you have used. This is to give you a running status of how much record time, total; you have remaining of the 128MB of USER Sample memory (SDRAM), which is pre-installed.
A final word on Trigger Mode…
You have a choice of triggering sampling manually, or you have the sampling begin when audio passes beyond a preset level. Measure (punch in/out) is not available when sampling into a VOICE. We mentioned earlier that “LEVEL” is probably preferred when working with a fixed source like a CD that can be cued up to a specific location and then started. Your mileage will vary. However, with practice the EDIT and TRIM tools will quickly allow you work out your troubles. Also (but the subject for another article) you have the option of exporting your audio clip to full Wave Editor for processing. The wonderful thing about digital data is that it is so transportable.
SUMMARY: Hopefully this article will serve to open your thinking about samplers and sampling. There are really no limits to the kinds of things you can sample. The concept is that you can place audio onto separate KEYS of a Drum Kit Voice and trigger them whenever you need the audio to play. You can Resample internal sequence data to save polyphony hungry parts from stifling your music creativity. We have only shown you the tip of the iceberg, so to speak, as to what is possible. With my trusty hand-held Yamaha PockeTrak recorder I can go virtually anywhere, record audio at 44.1kHz CD-quality and within minutes of returning to my studio, transfer that audio into a musical composition. I recently was working on a piece where I needed sounds of the city and was absolutely blown away with the quality of audio I was able to capture and place into my musical composition. The PockeTrak is a USB device and I was able to import the sample directly into my Motif XF by simply plugging it directly into the USB port. And beyond that I was able to flexibly assign the audio to a KIT and trigger it where and whenever I required it within the piece.
The Additional included data
In the included ZIP file, find a folder (“XFwav”) containing various audio loops that you can load into your Motif XF. You must unzip the FILE in order for the Motif XF to be able to read any of the data (Zip is used just to reduce the size of the file over the Internet). Unzip the contents on your computer then copy the FOLDER “XFwav”, to a USB stick you use with your Motif XF.
The provided audio loops were originally created in the legendary legacy Yamaha RY30 Drum machine. Use this data to practice your skills with loading samples to Drum Kits. You can also use these to practice your SLICE and REMIX skills… these can be loaded and sliced and tempo adjusted as required, then remixed beyond imagination! In future articles we will have more things to try using this same data. But don’t be afraid to break out a microphone or your trusty Yamaha PockeTrak handheld recorder and sample the real world. “Found object” sounds can be very interesting when used in your musical compositions. Importing/loading sample data into the Motif XF is quick and easy. Learning to navigate the sampler in the XF will be well worth the effort. One word of caution, when sampling pre-existing audio data, be careful that you have not crossed the line into the realm of copyright infringement. But have fun that is what this is all about! Enjoy!