REAL TIME LOOP REMIX – Applied to AUDIO SLICE & MIDI Phrase

Tagged Under
REAL TIME LOOP REMIX – Applied to AUDIO SLICE & MIDI Phrases
The Real Time Loop Remix takes the controlling MIDI phrase and like a magical musical Cuisinarttm, spins the data into a new phrase, which has the effect of rearranging the audio clip. Since the Real Time Loop Remix is rearranging the MIDI data it will work on any Pattern Phrase. The possibilities are truly endless. You can remix the remixed phrase, and then remix it again. If you have ever attempted, manually, what this does automatically (you will want to sue somebody to get those days back) you will appreciate how fast and easy this function makes manipulating audio data. Manually cutting samples into slices can be hours, days, even weeks of work …and then rearranging them into some kind of musical meaningful phrase… Yikes!!! The Motif XS/XF does this in real time!!! It was designed to work on audio drum loops, but as you will quickly see, it can be used on any MIDI Pattern Phrase with unbelievably great results. This is probably one of the most compelling tools for creating “new” from “old”, “cool” from “lame”, “awesome” from the “mediocre”. Does it always come up with something useable? – well, no! That’s your job to tell it when it has and when it hasn’t – you play producer.
Included with this article is a simple drum loop to experiment with… Slice it and then Real Time Loop Remix it. Have fun!
Download link: Real Time Loop Remix
In order to import the wave data and work with the audio SLICE function you will need to add DIMMs expansion RAM to your Motif XS (see page 295 of the XS Owner’s Manual for details). The Motif XF can use its 128MB of built-in SDRAM. Although, as the article mentions, you can use Real Time Loop Remix on MIDI data only, but to appreciate its full effect sampled audio loops are necessary. If you don’t have DIMMs there also is a section for working with Real Time Loop Remix on MIDI data (provided in the included .X0P file) and it is described at the end of the article.
Real Time Loop Remix
This function gives you a variety of semi-random presets for dividing the MIDI sequence data and altering the note positions and note lengths, letting you create completely new variations of a Pattern. This function is particularly effective when applied to a track that contains a sample voice created by using the Sampling Slice feature; i.e., with the SLICE+SEQ sample type or samples processed using the Sample SLICE Job. But can be applied to any MIDI phrase whether or not it is a user sliced sample.
Set up the parameters (outlined below), and then press the [SF5] APPLY button to execute the Remix operation. You can do this while the sequencer is stopped or while it is playing. You will instantly hear the results of the Remix. If you’re not satisfied with the results, try another Type/Variation and press [SF5]. If you want to keep the changes, press [ENTER]. (Undo cannot be used with Remix: User Phrases are added to your library for the current Pattern Style. Up to 256 User Phrase can exist per Pattern Style. You can simply delete phrases as necessary.) To return to the original display without altering the data, press the [SF4] CANCEL button.
Since the remixed data is stored as a new phrase and assigned (“patched”) to the current track, the original phrase data remains as an unassigned phrase. For example, if you record a simple drum groove in Phrase 001, if you press [SF5] APPLY to REMIX the phrase and then press [ENTER], the Remix will create a new user Phrase in the lowest numbered empty user Phrase location – i.e., 002. It will automatically “Patch” this new Phrase into the Section, leaving the original Phrase (001) unassigned but available if you need to recall it. Real Time Loop Remix does not delete your data – it only creates new data. Each new Phrase that you CREATE is added to your library of Phrases. You can have a maximum of 256 User Phrases per Pattern.
Type Determines how the data in the selected track will be divided and rearranged. The division and rearrangement rules are different for each remix type. The type is also shown graphically in the display and gives a general idea of where the activity is concentrated. Settings: 1~16
Variation Determines how the original MIDI sequence data will be modified.
Settings: Normal 1~16, Reverse 1~16, Break 1~16, Pitch 1~16, Roll 1~16, and Fill-in 1~48
_ • Normal 1~16…. The original data is only divided and rearranged. 16 variations are provided.
_ • Reverse 1~16 …In addition to division and rearrangement, some portions of the data may be played in reverse (if, and only if applied to a “sliced” user sample phrase). 16 variations are provided.
_ • Break 1~16 …In addition to division and rearrangement, some portions of the data may be deleted to create breaks (gated effect). 16 variations are provided.
_ • Pitch 1~16…In addition to division and rearrangement, some portions of the data may be pitch-shifted (if, and only if applied to a sliced user sample phrase). 16 variations are provided.
_ • Roll 1~16……….In addition to division and rearrangement, some portions of the data may be played with a roll effect. 16 variations are provided.
_ • Fill-in 1~48… Some portions of the data will be arranged to create a fill-in type effect. 48 variations are provided
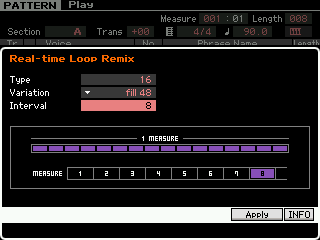 Each combination of TYPE and VARIATION will give a consistent result when applied to the same data. In other words, if you apply TYPE 1, VARIATION NORMAL 1 to the exact same phrase – the result will be exactly the same each time. Therefore, you can count on the results if ever you need to return. Applied to different data, of course, the results will be different – like when applied to a variation of the original phrase – but each time applied to the same data, the results will be predictable.
Interval: The Interval parameter determines at which measure the remix will occur. A setting of 1 would mean that each measure would be remixed. A setting of 2 would remix every other measure and so on, through to once every 8 measures. This is useful, for example, when you want to take the eighth measure of a Phrase and make it a transition to a new Section.
Reverse and Pitch Variations apply specifically to sliced sample segments. When these are applied to regular MIDI phrases, do not expect to hear reverse or pitch changes (that is reserved for phrase data controlling sliced audio only). You will hear different timing and note length changes, however.
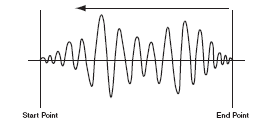
When you apply the Reverse or Pitch variations to a sliced phrase, it will actually alter the sample waveform by either reversing playback of certain segments (Reverse is actually the instrument reading the wave from End Point to Start Point rather than the normal way) or offsetting the original tuning of certain audio contained in the segment. These are destructive edits. You can go to [INTEGRATED SAMPLING] > [EDIT] > [F2] PARAM and view each individual segment of the audio phrase and tweak each one, as necessary …even manually edit the pitch with the Coarse Tune/Fine Tune parameters or you can change how the segment plays with the Play Mode parameter (Play Mode determines direction: one shot, reverse, loop)…
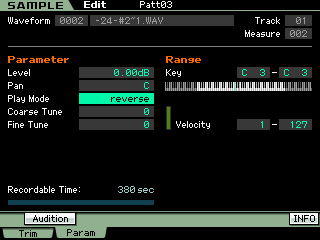
This is useful because every now and then you REMIX a phrase and it gets really, really close to the ‘perfect’ phrase but you want to change just a few of the events. Knowing how the Reverse and Pitch work on samples can be a valuable tool. See the section on “Things to Try” later in this article for more details on editing individual slices.
Although primarily developed for sliced rhythm loops this REMIX function can be used to great advantage with absolutely any type of phrase data. To understand this point it is important to know it is the MIDI data that is being shifted/remixed – it simply is triggering the audio (ROM or RAM). For example, you can use the Motif XS/XF arpeggiator to “paint” a track with a Phrase, perhaps a bass line (recording it to a Pattern Track), then send that Phrase into the REAL TIME LOOP REMIX algorithm and twist it into half a dozen variations. It will use the notes of the Phrase but change their timing and position, making a related phrase that can be auditioned against the rest of the tracks. Once a new Phrase is created it, in turn, can be REMIXED again and again – there is no limit to the number of times you can alter the notes. All this can happen in real time, making what we call the ‘Phrase Factory’ concept a fabulous tool for creating new Tracks.
Import and Slice an audio loop:
Go to [PATTERN] mode. Load the drum loop wave called “-24-#2~1.wav” to track 1 of an empty pattern.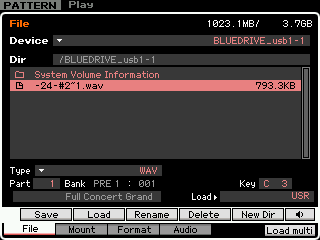 • Press [FILE]
• Select TYPE = “Wav”
• Highlight the “-24-#2~1.wav” and point it to PART 1, KEY C3
• Press [SF2] LOAD
• Press [INC/YES] to execute
Press “C3” and listen to the audio of this loop. This imports the wave to the Track – but it has no MIDI data to trigger it, yet. Like any VOICE assigned to a Track, you must create Note data to trigger its playback. there is no note data yet, to make this sample Voice playback.
When you import a sample or create an original sample in a SONG or a PATTERN the Motif XS/XF will place this audio into a specia VOICE bank 63/50. (SP) is shoft for “Sample”. A trigger event must be made. We will use the sample SLICE function to create note data that will trigger this Voice.
What you need to tell the sequencer, since it can’t “know”, is how many measures this audio phrase is, and in what time signature is it counted. Once it “knows” that, it can divide it into musically relevant segments.
Let’s SLICE it – this will create the MIDI dta to trigger the sample.
• Press [INTEGRATED SAMPLING]
This will take you to the SAMPLE EDIT screen. Make sure that your imported sample is the currently selected WAVEFROM. You can use the [SF1] AUDITION button or press the “C3” key. The only parameter on this screen is the WAVEFORM Number. Once you have ensured you have the correct Waveform:
• Press [JOB]
• Press [F1] KEYBANK
• Select JOB 11: SLICE
• Press [ENTER]
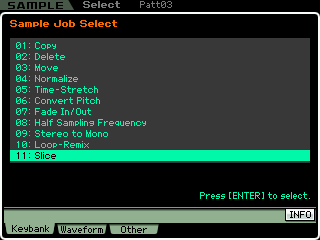
Set the parameters as follows:
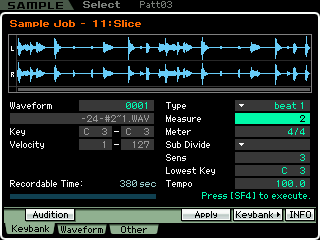
• Press [SF4] APPLY to execute It will take a few seconds to analyze the waveform. By selecting the Type BEAT 1 we have asked the technology to analyze where there are peaks of audio and to create a sliced segment based on the Sensitivity (Sens) setting (3). Sensitivity affects how many slices it makes. Each audio segment (slice) will be triggered by a precisely placed MIDI event that will be inserted on the track.
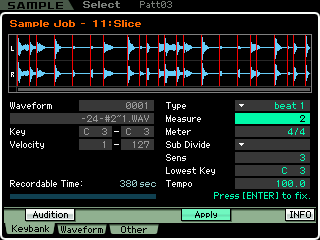
Before you accept the results, you can AUDITION it by holding down [SF1] or by playing each sliced note on the keyboard. Hold down the AUDITION button and try it at various tempos. The Slice function has created a chromatic scale of notes that it ‘plays’ to reassemble the waveform. This is why you can adjust the tempo without the “pitch change” penalty and without generating a lot of annoying artifacts (over an amazing range of tempos). However, just because it is working from the AUDITION button does not mean you want to keep it. Also verify each slice by playing each note going up the keyboard starting at the “Lowest Key”, note C3. Here you will find out if it actually created too many slices or too few slices. Too many slices would sound like a kick or snare hit was divided to two keys. It is important to understand that when it does this, you need to set the SENSITIVITY lower (for less slices). You want a clean hit on each key, ideally. It is important to test your results with both available methods.
Press [ENTER] to keep the results or press [SF4] to discard the results and try a new Sensitivity setting. The higher the sensitivity value – the more slices it creates, the lower the sensitivity the fewer slices it creates. When you accept the results the SLICE function will create a new waveform (0002).
It also creates a Phrase – precisely timed chromatic events to reconstruct the audio phrase:

It will “PATCH” this Phrase into the Section grid.
• Press [PATTERN] to return to the main Pattern screen.
• Press [F4] to view the PATCH setup
Your new Phrase 001 is placed on Track 1
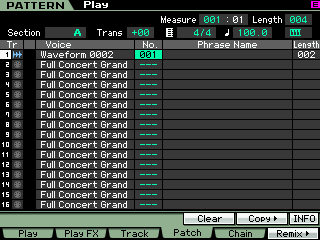
• Move the cursor to the right: “Phrase Name”
Name it “Sliced Loop” or something appropriate. Also notice that the phrase length is also shown” Track 1, Waveform 0002 ” Sliced Loop”, 002 Measures in length.
Now that we have an audio drum loop that is sliced properly and we have a named MIDI phrase to play it back patched to the Section, let’s create some variations using the REAL TIME LOOP REMIX function.
• Return to the main Pattern screen
• Press PLAY [>]. You can adjust the tempo now without the pitch change penalty. Literally, any tempo will work. Try 100.0 BPM
• Press [F6] REMIX
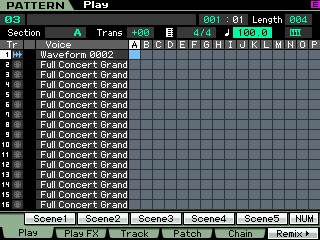
How the remix works: Each time you select a TYPE, VARIATION and INTERNAL then press [SF5] APPLY, the REAL TIME LOOP REMIX function will alter the data.
[SF4] CANCEL and [SF5] APPLY allow you to reset and try new variations. Press [ENTER] to accept (fix) the results. If you accept, a new phrase is created and will be “patched” to the Section grid. If you “Cancel” the original data returns and the Patch remains the same. No data is overwritten – when you accept – a new phrase is simply “patched” to the Section’s [F4] PATCH grid, while the original remains in memory – you can recall it by simply setting the Phrase number to 001.
TYPE: 1-16; the higher the number the more complex the remix.
VARIATION: Normal, Reverse, Break, Pitch, Roll and Fill
_ • Normal refers to play direction of the audio sample
_ • *Reverse will play certain of the sliced audio segments backwards by flipping the waveform around
_ • Break will gate certain of the segments by making the MIDI event a staccato note.
_ • *Pitch will alter the Original Key parameter of certain keybanks (slices) so that it will sound at an altered tone.
_ • Roll will play certain of the segments in a drum roll fashion.
_ • Fill will create transition type alterations.
*The Reverse and Pitch Variations will only be fully affective on sampled audio – if applied to normal MIDI event phrases although the timing and position of events will change you will not (strictly speaking) hear reverse notes or pitch changes. Reverse and Pitch edit the user sample waveform directly.
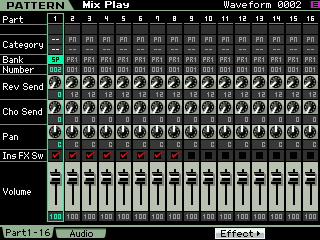
Things to try
Use the technique of transferring arpeggio patterns to Pattern Phrases and try applying the REMIX to them. With over 6600 arpeggios in the XS and over 7800 in the XF and an unlimited number of remix variations, you will never run out of things to try.
Try applying any of the TYPE/VARIATIONS to them. If you get something that you like, “create” it as a Phrase by pressing [ENTER] to fix. In this manner you can create your own drum fills, breaks, etc. Do not be aftraid to try it on any kind of MIDI data, although originally conceived for use with audio sampled drum loops, you will find it very affective on everything from bass lines to horn riffs to clavinet parts. Remember it use the notes that YOU have played so it will always be in key. The MIDI phrase that it creates can be used as is, or you can further edit, append, split, copy and/or paste them, as necessary.
Because the Variation parameters are well thought out and are what we call “semi-random”, they are repeatable templates… therefore if you find a rhythmic pattern that works for your drums try applying that same Type/Variation/Interval setting to your bass line. This can have an awesome affect marrying the bass line to the kick drum. The main thing is to real ize that the particular settings do specific things and can be repeated – there is a lot of intelligence and musical though that went into making these remix templates. Yes, there is a lot of trial-and-error here and patience is a big asset in working with Real Time Loop Remix. Much like mining for gold you have to have an idea of what you want to accomplish, and pick an area to prospect and work with it. When you find a gem you will know because you get to hear it immediately. It is real time because you can do it as it plays.
Editing the individual Slices: Once an audio waveform has been sliced, it is divided into several time segments and a MIDI note based on when that segment occurs is placed in a MIDI Phrase. Actually a new waveform is created – so your original data is still there, in tact. Below is a series of screens shots showing our audio wave after it has been sliced. A new Waveform 0002 has been created and mapped chromatically from C3. The first segment is shown selected below. It is mapped to key C3:
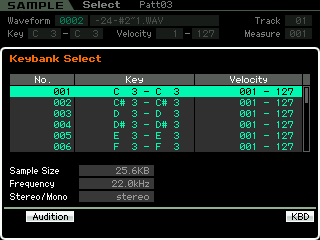
By holding the [SF6] button (labeled “KBD” in the right corner of the screen) and touching note C#3 you can recall the next slice in the chromatic map.
Once a KEY has been selected its data will fill the screen when you press the [EDIT] button.
As each Keybank is selected and recalled via this method, you can view its data. Below the slice occupying D#3 has been selected and is shown.
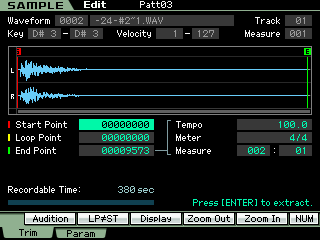
At [F1] TRIM the Start Point, Loop Point and End Point can be edited as required. It is possible to have use the Real Time Loop Remix function to construct a drum kit. Here how that concept works:
Say you have an audio drum loop and you like the sounds. If you setup to slice it and get the Sensitivity set so you can get a clean drum hit on each KEY, you can then manually play these as a drum kit. The Kick will be isolated to a single Key, the Snare will be isolated on a separate Key, and so on. Now you can record yourself playing this sliced Drum set using the sounds you found in your sample.
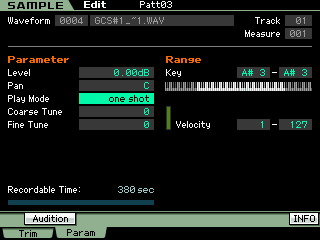
At [F2] PARAM (shown above) you can edit the particulars about the individual sliced audio segment. It is here where the Remix changes Coarse and Fine Tuning (Pitch Variation) and Play Mode direction (Reverse Variation).
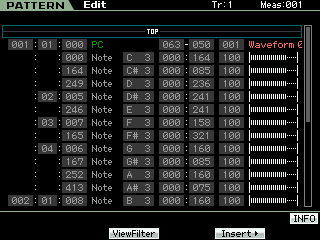
Quantize… resist the urge to quantize the results. The Remix function analyzed where the audio peaks actually occurred, thus it automatically preserves the original feel of the audio clip. If you quantize the data you may get bogus results. Your mileage will vary. But recognize that each MIDI event is placed perfectly so that the audio is reassembled in a seamless (sample accurate) manner. Quantizing the data will only cause gaps and/or overlaps. It is the note data recorded to the track that you can REMIX – each note triggers a different portion of the audio so by rearranging where and how often these MIDI notes occur Real Time Loop Remix, remixes the phrase. When REVERSE or PITCH is the selected Variation, the function will actually edit the individual Slice attributes. Also BREAK will adjust the “gate” time or duration of the MIDI note event.
The Other SLICE TYPES
While developed with drums in mind, the Real Time Loop Remix and Slice functions can be used on any type of data – musical instrument tracks, vocals, etc., use your imagination. The SLICE TYPES each has a purpose that can really expand this function. The BEAT 1, 2 and 3 Types are obviously designed for percussive audio data – where there is a defined rhythmic quality to the audio clip. With drums and percussive audio it is quite easy to find space between the audio events. This is particularly true with the high sample rate – remember at a tempo of 120BPM there is a full second between beat 2 and beat 4. The PHRASE 1, 2, 3 and 4 Slice TYPES are used when you are slicing an audio clip where there is less rhythmic quality and more legato phrasing or long decay times.
The Phrase Types actually create new data so that each sliced segment has audio added to the front and to the end of the division. This way as you adjust the tempo of playback you are less likely to get gaps and artifacts. This is a brilliant innovation – how it accomplishes this is to play some of the individual sample data near the slice point forward and some of the samples backward. In this manner it pads the audio – but your ear cannot detect a single sample @ 44,100 cycles per second that is reversed. As you might imagine this actually increases the size of the sample because it is adding new data before the sliced segment and after the sliced segment. It does this again, because as the tempo slows each segment will have to be longer so that it does not leave an audio gap.
Motif XS Owners: See the Owner’s Manual page 250 “Tips for using the SLICE TYPES”.
Motif XF Owners: See the Reference Manual page 210 “Tips for using the SLICE TYPES”.
The PHRASE 1 Type creates the most additional data. BEAT 3 and all four of the PHRASE TYPES add a SUB-DIVIDE parameter. These Slice Types with high Sensitivity will give the most data. When you select any of the Phrase Types you can set a musical Sub Divide value – this is useful in determining where the function looks to make subdivision in addition to the audio peak activity. Remember by telling it the length of the phrase in measures, the Start and End Points, it then knows where the musical values should occur. If, for example, you take a musical passage which has a decidedly triplet feel and set the Sub-Divide to 16th note triplets with a high Sensitivity you will get 48 slices for the 2 measure phrase.
MIDI Data (only): Remixing COOL FUNK
Provided with this tutorial is an XS/XF PATTERN file on which you can experiment. Load the“CoolFunk.X0P” file to a blank Pattern in the XS/XF.
Select Track 1 and experiment remixing the drum MIDI data in context of a music track.
Press [F6] REMIX
Set the dialog box as follows:
• Type = 1
• Variation = Fill 37
• Interval = 4
Press [SF4] to APPLY
Keep increasing the TYPE value to hear more and more complex FILLS. The interval at 4 measures means the fill-in will occur every 4th measure.
Press [SF3] CANCEL to return the original phrase.
Select Track 2 and Remix the Latin Percussion.
Try Interval = 1 so that each measure is remixed.
• Type = 2
• Variation = Roll 04
• Interval = 1
Select Track 3 and Remix the Bass line.
• Type 4
• Variation = Normal 01
• Interval = 1
Select Track 4 and Remix the Electric Piano track.
Set the parameters as follows:
• Type = 2
• Variation = Break 01
• Interval = 1
Experiment – you will have to decide what sounds and feels good. The higher the number for TYPE and VARIATION the more wacky they become… Remember while MIDI data cannot REVERSE or change PITCH – those Variations will still rearrange the data’s timing.
Try the Electric Piano Track 4 with:
• Type = 3
• Variation = Pitch 03
• Interval = 1
Or
• Type = 4
• Variation = Reverse 08
• Interval = 1
You can press [EXIT] to exit from the Remix function – change tracks and then press [F6] REMIX to continue – all without pressing the STOP button… Work with this and get into a flow. The more you play with it the more you learn about how it works. Enjoy!
Keep Reading
© 2025 Yamaha Corporation of America and Yamaha Corporation. All rights reserved. Terms of Use | Privacy Policy | Contact Us