

Tagged Under
Working with external modules while using the Motif XS/XF sequencer requires an understanding that primarily it is designed to record data for its own tone generator and that when in SONG/PATTERN mode you are transmitting from the KEYBOARD through the SEQUENCER TRACK to the TONE GENERATOR. Each of the sixteen PARTS is assigned to successively higher MIDI Receive Channel – PART 1 is assigned to Track 1 on Channel 1, PART 2 is assigned to Track 2 on Channel 2, and so on. This means that when attempting to play on one of the sixteen MIDI channels available, an internal Motif-series sound will automatically occupy the channel. We will learn how to, first, silence (MUTE) this internal sound while we allow the reface CP/CS/DX/YC sound in its place, and then how to permanently replace (Store) the external device in the place of the internal Motif XF PART.
The Motif XS/XF sequencer allows you route any of its tracks either to the internal tone generator or OUT via MIDI, both or neither.
CONNECTIONS & SETTINGS:
_ Connect the reface instrument to your Motif via the supplied MIDI breakout cable. Connect the MIDI OUT of the Motif XS/XF to the MIDI IN, and the MIDI OUT of the reface to MIDI IN of the Motif XS/XF using standard 5-pin MIDI cables.
_ Connect the audio L/R Output of your reface to the A/D INPUT on the back panel of the Motif XS/XF. You treat the reface input as a LINE level Stereo input. This will allow you to hear the reface through the same sound system as the Motif and will allow you to record (sample) audio, if you so desire. The reface will become the AD INPUT Part on the mixer with its own Dual Insertion Effect and access to the System Effects via Rev Send and Chorus Send parameters.
[UTILITY] > [F5] CONTROL > [SF2] MIDI
Make sure your Motif XS/XF is set to use MIDI IN/OUT = MIDI.
Make sure your reface is set for MIDI CONTROL = ON; LOCAL CONTROL = OFF; and SPEAKERS = OFF (see page 41 of the reface Owner’s Manual or separate reface articles for details).
Important Note: The reface CP/CS/DX/YC default to OMNI MODE ON… meaning they will attempt to play all data coming in the standard MIDI cable no matter what the channel of that data. You will be able to place a message in your track data that will turn OMNI MODE OFF, (doing so will automatically set the reface to MIDI RECEIVE CHANNEL 1. If necessary, you can select any appropriate MIDI Channel for the reface (covered in separate reface articles).
OMNI MODE OFF
Call up a blank SONG or PATTERN, whichever you choose to use
Select Track [1]
Press [EDIT]
Press [F5] INSERT>
Select EVENT TYPE = CHANNEL MODE MESSAGE
Set the CTRL NO = 124 [OMNI OFF]
Press [ENTER] to enter the cc124 OMNI OFF message.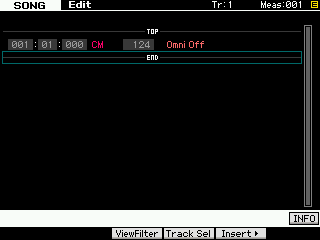 This message, shown inserted at Measure 001, Beat 01, Clock 000, will set the receiving reface unit so that it can receive on a single MIDI channel (instead of “ALL” MIDI channels) and it will default it to MIDI Receive Channel 1. (*The reface DX can be set via the front panel [FUNCTION] button.)
If you require a different MIDI channel, other than 1, you have two options (one easy, one requires a System Exclusive message)
1) EASY: You can use the Motif XS/XF’s TRACK JOB: EXCHANGE TRACK to swap whatever you have on Track 1 with an empty track
2) SYSEX: You can select a specific MIDI channel, 2-16, via Parameter Change (System Exclusive) message. (please see the reface article MIDI PRIMER for your particular reface instrument model).
Motif XS/XF Sequencer Setup
In order to record to the Motif XS/XF sequencer you want to select Sequencer Quick Setup #1: “Using internal sequencer”
• Press [SONG] or [PATTERN] mode to enter the sequencer (whichever you prefer).
• Press [SEQ SETUP]
• Press [F3] QUICK
• Select SETUP NUMBER #1 “Using internal sequencer”
• Press [ENTER]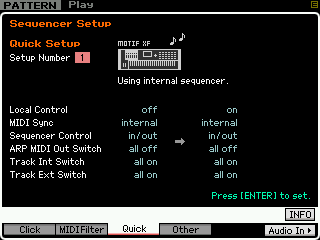
This is the default setup when playing your Motif XS/XF as a stand alone instrument (sans computer). It sets the Local Control to ON. This is a requirement when recording to the internal sequencer from the XS/XF key bed. When using the internal sequencer, the keyboard and its controllers (MW, PB Wheel, FC, etc.) transmit data to the tone generator via a sequencer track. The SEQUENCER is located physically between the Keyboard and the Tone Generator. This routing is important to understand. It is the same when working with any type of sequencer, be it the internal sequencer or a computer DAW program – the keyboard does not trigger the tone engine directly, rather key presses, which generate MIDI messages, travel to the sequencer’s currently active Track which receives the data and routes it on a specific MIDI channel thru to the tone generator. If you are going to use an external module, you will need to still use this routing scenario. Therefore, both the internal XS/XF and your external reface module assigned to the MIDI Channel will initially respond together. We will simply MUTE the internal PART during the record process. Then when finished recording, we will make a permanent routing assignment that selects the (external) reface, turns the internal PART Off and STOREs that into memory. (The tricky part is that the internal sound must be active during the record process and permanently silenced during playback… here’s how…)
HOW THE XS/XF MUTE FUNCTIONS WORK
The Motif XS/XF has two MUTE functions: MUTE TRACK and MUTE PART. If you have not appreciated the difference thus far, this operation will make the difference in their functions very clear. One is a function of TRANSMIT and the other RECEIVE. A Track will Transmit data to a Tone Generator PART which Receives the data.
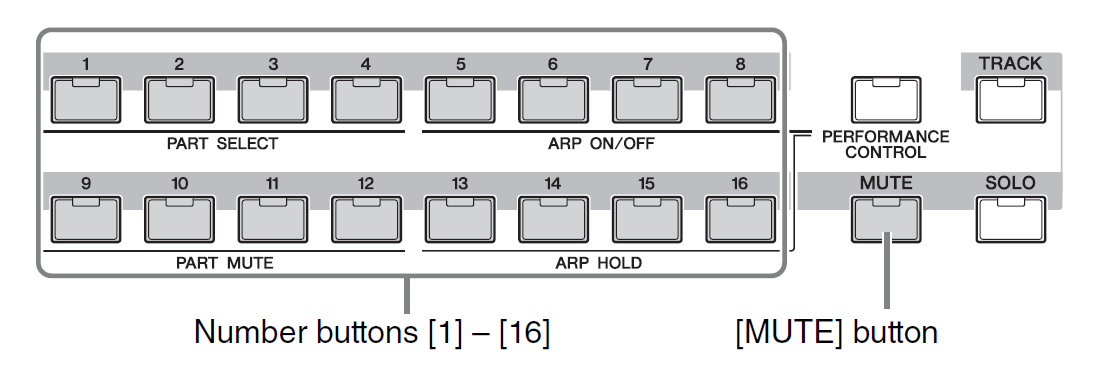
You access the TRACK MUTE when you are in either [SONG] mode or [PATTERN] mode, pressing the [MUTE] button will light all buttons 1-16 to indicate the TRACK is “transmitting” data.
You access the PART MUTE when you additionally light the [MIXING] button. MIXING gives you access to the internal XF tone generator and the instrument assigned to “receive” from a track. When the [MIXING] button is additionally lit, the number buttons 1-16 now represent the internal tone generator PART and whether they are set to receive data and output sound. Now pressing the [MUTE] button all 16 number buttons light to indicate an internal PART set to output sound.
Muting a sequencer TRACK will prevent all connected devices from responding. (Both the internal PART and the reface will be silenced)
Muting an internal PART will prevent just that one particular internal XF PART from responding. (Only the internal PART will be silenced, the reface will sound).
Therefore, when we MUTE the internal PART, only the external module (reface) will respond…
If, however, you MUTED the TRACK, well, neither the internal nor the external module would be able to respond. Make sense?
We will use the PART MUTE function to silence the internal Motif XS/XF PART. You access the PART MUTES when you have the [MIXING] button lit and you light the [MUTE] button. The 16 numbered LEDs light to indicate they are sounded. Turn OFF the LED to MUTE that particular internal TONE GENERATOR PART.
_ If you want an internal Motif XS/XF sound to play on a particular MIDI channel this can be set per PART in the MIXING EDIT – PART area (discussed below).
_ It is also a requirement to have the TRACK INT SWITCH checked (ON) when recording to the internal sequencer. If the INT SWITCH is not checked MIDI events will not be recorded to the internal sequencer. Very important to know!
Whether or not a TRACK is set to transmit OUT via MIDI can be set on a per track basis by unchecking the INT SWITCH and/or EXT SWITCH (shown below) on an individual track-by-track basis. Here’s how:
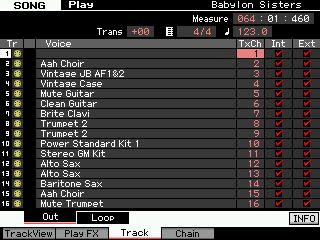 From the main SONG/PATTERN screen press [F3] TRACK > [SF1] OUT; you will see five columns:
Tr – Track, if a 5-pin MIDI jack icon appears in yellow this indicates data MIDI data is recorded to that track. If it is grey the track is empty. (If a blue wave icon appears it will indicate that a USER sample Voice, bank 63/60, is being triggered by that track).
Voice– The internal Motif XS/XF sound set to receive the Track data is shown.
TxCh– Transmit Channel is the current MIDI channel that the track is set to transmit.
Int– Internal indicates the data on this track is going to be routed internally to the Sequencer and on to any Voice set to receive the selected MIDI channel.
Ext– External indicates the recorded Track data is going to be routed externally OUT via MIDI on the MIDI channel indicated in the TxCh column.
In a situation where you want an external device to play a track and not have the internal engine respond, you cannot simply uncheck the INT SWITCH (the INT SWITCH is necessary for key presses to reach and be recorded to the internal sequencer. But what if you do not want the Internal tone engine to sound? You must MUTE the Internal PART.
There are actually two steps you must take to prevent the Motif XS/XF tone engine from responding to track data:
1) Use the [MIXING] > PART MUTE to temporarily silence the internal PART (during record) Part Mutes, are temporary, and cannot be STORED.
2) Then when you want to play it all back: Set the Internal PART’S MIDI RECEIVE Channel to OFF. This will permanently silence the internal PART (after recording is complete). The Receive Channel status can be stored and recalled when you reload.
PRIOR TO RECORD: MIXING Mode PART MUTE
There are two levels of MUTE in the Motif XS/XF sequencer. One is called TRACK MUTE and the other PART MUTE. It is like having two separate products: a sequencer with its own mutes and a tone generator with its own mutes. If you are in SONG or PATTERN mode (LED lights green) the MUTE button will allow you to temporarily stop a sequencer track from transmitting data. Neither the internal tone engine nor the external device will receive any MIDI data. However, if you are in SONG mode or PATTERN mode and additionally press the [MIXING] button (LED lights) you are now working with the internal tone generator PARTS. Now the Track Select MUTE buttons will prevent temporarily the internal tone engine from sounding (the internal tone engine will not receive the track data). We say ‘temporarily’ because this status cannot be stored. We are simply muting the internal PART so that you can hear your external module assigned to the current Track’s MIDI Channel.
AFTER RECORDING: SET RECEIVE CHANNEL OFF
If you have determined that you want a track to be routed OUT via MIDI, only, and do not want the Motif XS/XF to respond to that track’s data, you can simply reassign the MIDI receive channel of that PART to another MIDI channel. (This will layer it with another internal sound). Or you can turn it OFF. From [MIXING] mode: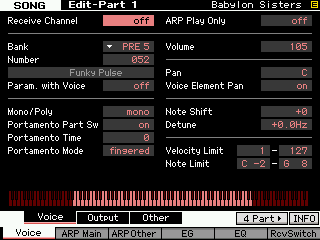 • Press [EDIT]
• Touch the Track Select button [1]-[16] of the PART you wish to permanently remove from the MIX
• Press [F1] VOICE > [SF1] VOICE. Set RECEIVE Channel = OFF
We call this ‘permanent’ because this status will be stored with your Sequencer and Mix information. In the screenshot, the Receive Channel parameter is shown highlighted; use the Data Wheel or the [INC/YES] button to set the Receive Channel = OFF.
Do this for each of the PARTS 1-16 that you do not want to sound internally. When you have assigned all your PARTS appropriately press [STORE] to make the changes to your MIX permanent.
When you return to the main SONG PLAY or PATTERN PLAY “Track View” screen you will see that the listing for the internal VOICE for that track has been replaced with a blank (shown below) area in the VOICE column, indicating the OFF status: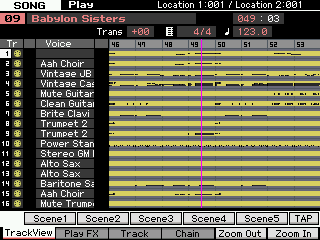
When the PART’s RECEIVE CHANNEL is set to OFF the Track’s data will only transmit OUT via MIDI. No internal PART is set to receive data from this Track. No polyphony will be used in the Motif XS/XF. And this will be the information stored and saved to your FILE.
We should explain that you could, on playback, simply set the INT SWITCH = OFF from TRACKS 1 and this would accomplish the goal of ‘permanently’ defeating the internal PART from responding. We recommend the MIDI Channel assignment = OFF because visually you get notice (on the main mode screen) that the internal Tone Generator is not contributing data on Tracks 1. Both methods can be STORED to your file.
Capturing the reface CP/CS/DX/YC Settings
While the reface DX has the ability to store and easily recall Voices and setup Functions, the rest of them are very much real time – harkening back to a time pre the ability to store and recall programs via Program Changes. Fortunately, the reface units (all of them) can be sent a message called a “Bulk Request” which causes the instrument to send a packet of information that can recall the current settings. Below we’ll give you the information you can insert into the Motif XF sequencer prior to recording the reface to a track guaranteeing that the reface CP/CS/DX/YC will sound exactly as you intend when you restart this sequence.
Type the Bulk Request command in a measure attached to the front of the sequence.
Set the track to OVERDUB Record (this will allow the message to be sent, received by the reface, the bulk information to be returned and recorded to this extra measure.
In lieu of a Program Change, this small packet of coded messages will allow the initial setting for your reface to be documented in the sequence track data.
F0 43 20 “reface Product ID” 0E 0F 00 F7
F0 always denotes the Start of an Exclusive message
43 (four-three) is the Yamaha Manufacturer ID
20 (two-zero) is the Parameter Bulk category
reface Product ID
CS = 7F 1C 03
CP = 7F 1C 04
DX = 7F 1C 05
YC = 7F 1C 06
0E 0F 00 = the bulk request
F7 always is the End of an Exclusive message
Examples:
F0 43 20 7F 1C 03 0E 0F 00 F7 is the message that will cause the reface CS to bulk dump its current setting…
F0 43 20 7F 1C 04 0E 0F 00 F7 is the message that will cause the reface CP to bulk dump its current setting…
F0 43 20 7F 1C 05 0E 0F 00 F7 is the message that will cause the reface DX to bulk dump its current setting…
F0 43 20 7F 1C 06 0E 0F 00 F7 is the message that will cause the reface YC to bulk dump its current setting…
It is possible to additionally create messages that setup the reface for “Auto Power Off”, “Speaker Output” and “MIDI Control”… By placing these messages in a setup measure placed at the top of your sequence you can ensure the reface will faithfully be prepared to playback your sequence as intended. In the screenshot below is an example that would automate the reface CP from FACTORY RESET condition to setting more conducive to sequencing with an external program:
OMNI OFF (default is OMNI ON)
MIDI Receive Channel 2 (default is ALL)
Auto Power Off = Off (default is ON)
Speaker Output = Off (default is ON)
MIDI Control = On (default is OFF)
Send Bulk Request
By using OVERDUB RECORD you can ensure the start condition of your particular reface… Upon receiging the Bulk Request the reface will dump its settings, and you can begin music recording at the top of the next measure- do not attempt to send and receive bulk data during music playback, it can and will adversely affect timing. Bulk Request should always be done prior to the beginning of music playback.
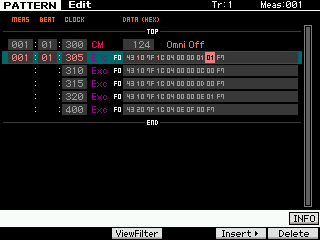 In the example shown here, the reface CP (7F-01-04) is being setup for communication from the Motif XF sequencer on MIDI Channel 2:
001:01:300 OMNI MODE OFF
001:01:305 Receive Channel 2 (cursor highlight)
001:01:310 Auto Power OFF 00-00-0C
001:01:315 Speaker Control OFF 00-00-0D
001:01:320 MIDI CONTROL ON 00-00-0E
001:01:400 Bulk Request and finally a request for the reface CP to return a bulk of the current settings.
reface MIDI Setup Files
It is possible to create messages that setup the reface for “Auto Power Off”, “Speaker Output” and “MIDI Control”… By placing these messages in a setup measure placed at the top of your sequence you can ensure the reface will faithfully be pared to playback your sequence as intended. In the download (below) are setup files that will automate the reface CP/CS/DX/YC from FACTORY RESET condition to setting more conducive to sequencing with an external program:
OMNI OFF (default is OMNI ON)
MIDI Receive Channel 1-16 (default is ALL)
Auto Power Off = Off (default is ON)
Speaker Output = Off (default is ON)
MIDI Control = On (default is OFF)
Send Bulk Request
By using OVERDUB RECORD you can ensure the start condition of your particular reface… Upon receiving the Bulk Request the reface will dump its settings, and you can begin music recording at the top of the next measure (002) – do not attempt to send and receive bulk data during music playback, it can and will adversely affect timing. Bulk Request should always be done prior to the beginning of music playback.
Download the following ZIPPED file. It contains MIDI setup files for the refaceCP/CS/DX/YC. Load this to the Motif XF sequencer _ the file names indicate the reface keyboard and the MIDI Channel to which it will set your instrument. Starting your Motif XF sequence with this packet of information will allow the current setting to be written into the track (be sure to use OVERDUB RECORD to avoid erasing the messages).