Triggering Loops with Velocity Range
Tagged Under
Within a Drum Kit you can get creative:
(Find the download link at the bottom of the article) For example: It is possible to place several sample clips on the same KEYBANK then Edit them so that each triggers at full velocity (VEL SENS = +0) but only at specific Note-On Velocities. Hitting the key at three different Velocities will render three different results. At the end of this article find an ALL data file that includes this drum Kit. Setup to load this Drum Kit to your internal USER DRUM (UDR) Bank as a single VOICE.
_ Press [FILE]
_ Set TYPE = VOICE
_ Move the CURSOR into the DIRECTORY and highlight the FILE named “Velocity3way.n3.X3A”
_ Press [ENTER] to open the file and see the listing of the individual VOICES contained in this FILE _ Notice [USER1] illuminates to indicate you are viewing VOICES in this file’s USER 1 Folder _ all the data is Factory except the Drum Kit for this example: UDR 001: “Velocity 3-way C3”
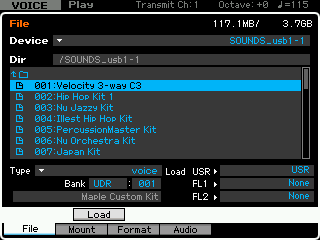 _ Press the [USER DR] button to see a list of the individual Drum Kit Voices in this FILE
_ Highlight the VOICE named: “Velocity 3-way C3”
_ Using the RIGHT CURSOR arrow move to the bottom area of the screen and set the target location you wish to place this Kit.
_ Set the LOAD Options in the lower right corner to target your SDRAM by selecting “USR>USR”
_ Press [SF2] LOAD to execute the function
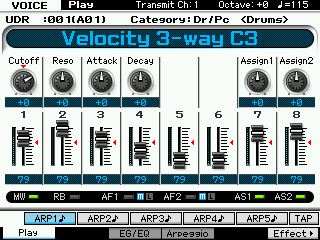 The Velocity mapping is a 3-way switching setup. That is, you could have one groove play when you send in a velocity of 001- 060, an entirely different groove play when you send in velocity 061- 119, and a completely different groove play when you send in velocity 120-127. In this fashion sending a note-on at different key-on strengths will yield a different groove. This is accomplished by MOVING sample waveforms to the same KEYBANK, then editing the velocity range of each to respond to specific velocities.
Press [INTEGRATED SAMPLING]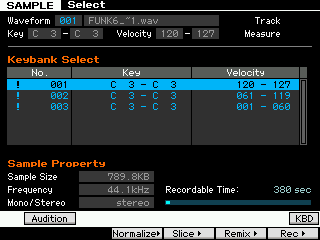 Shown at left are three stereo sample loops set to a single waveform, each is programmed to respond at a different velocity range. Then when placed within a Drum Kit Voice the Amplitude Velocity Sensitivity is set to +0 so each will sound with full volume but only play when its velocity range is triggered. Try it.
Recall the USER DRUM KIT: “Velocity 3-way C3” UDR:001(A01) You can do so by press [EXIT] to leave the Sampel Edit area.
Assigned to middle “C” is a Waveform containing 3 stacked Keybanks, set as shown in the screen shot above. If you touch the key lightly (velocity 001 – 060) you will get the basic groove. Give the key a bit more velocity (061-120) and the same groove will play with a phat synth bass line. Strike the key hard (120-127) you will get the fill-in loop.
The concept here is that you can stack multiple samples in a Keybank. This is done in INTEGRATED SAMPLING – you can copy/move as many as 256 samples to a Waveform (which is 128 Stereo samples). When a stereo sample or more than one is assigned to a KEYBANK the exclamation point “!” appears. On the SAMPLE SELECT screen you can press the DOWN CURSOR arrow to move to the KEYBANK SELECT area of the screen, shown above. You can highlight a sample, and then press [EDIT]. Its information will now be in the Edit Buffer. Set the Parameters for Velocity range on the [F1] TRIM screen.
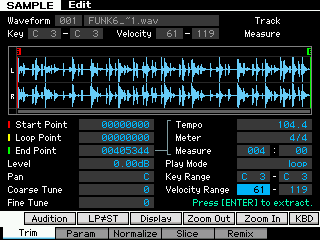 Shown at left is the 002 Keybank, a stereo sample (with Bass line) and how it is programmed to only respond when velocities between 61-119. “Velocity Range” is programmed in the lower right corner of the screen. When stacking samples, as in this example, realize that only two samples can sound simultaneously from a Keybank (only one if it is a stereo sample). But by giving each sample a unique velocity range we can have each sound when the key is struck within that range.
Additionally, in this example Voice, the Mod Wheel has been programmed to both fade out the Loops and to add reverb as it fades out. (Just to give you some idea of how you can get creative).
The note C#3 (bongo) is assigned as a “STOP” Key if you need it… This is just a quick example. You can stack many more on a single key (up to the limit of velocity range) especially if you are going to use the sequencer or arpeggiator to trigger playback – as it is difficult enough to send in precise values by hand. You can create a special arpeggio or sequencer that triggers precise note-on velocities at specific times. And think about it… you have 73 keys in a drum kit Voice!
Expand your XF with 512MB, 1024MB, 1536MB or 2048MB of FLASH. That’s over 200 minutes of stereo audio at the highest resolution. There are 127 useable velocities 001-127 in a VOICE; each audio clip can be from a short percussive hit on out to a 6 minute/20 second long composition. A total of 2,048 Waveforms, 8,192 individual audio samples per FLASH BOARD!!! Explore! And think creatively… you have a very powerful sampler and rather than be limited by what it does not do, revel in what it can do!
In future articles we will show how you can SLICE and create mash-up Waveforms – which can be used to trigger as single events or looped phrases, or one shot phrases, chords, even triggering cycling notes… etc. So far we have looked at using these Sampled audio clips in a Drum Kit Voice, but you can also assign Samples to Normal USER Voices with a different set of features and benefits. Until then explore and enjoy!
Keep Reading
© 2025 Yamaha Corporation of America and Yamaha Corporation. All rights reserved. Terms of Use | Privacy Policy | Contact Us