Cubase Pro 8 External Instrument Setup for Yamaha VST Editor Users
And by way of turning a negative into a positive, you will learn a bit more about how signal flow allows the VSTi Routing to work! The following article will step you through setting up your Yamaha Synth (Motif XF, Motif XS, MOX, MOXF, S90 XS/S70 XS, Motif-Rack XS) that uses the Yamaha Editor VST integration, so that you can take advantage of computer-based Effect processing, “Export Audio Mixdown”, “Freeze” and the “Render In Place” functions of Cubase Pro 8. Additionally, you can manage your hardware with the (Stand Alone) Editors’ graphic user interface.
The External Instrument function is a VST CONNECTIONS feature that allows you to route MIDI tracks played back from Cubase to an external hardware synthesizer, and then create a routing situation so that the returning audio of that external device can be captured in Cubase via the Virtual Studio Technology. (Of course, this all takes place with Cubase’s advanced delay compensation, automatically). The advantage here is that you can process the data with computer-based plug-in Effects, utilize Export Audio Mixdown and use the Freeze functions (same as you would with an soft synth or as you could when using the Editor VST). The External Instrument function is covered in the Steinberg documentation – I have updated it with specifics to help you setup for your current Yamaha Synthesizer. When it was announced that there was a problem with MIDI being OFFSET when using the Yamaha Editors VST, I realized that the EXTERNAL INSTRUMENT setup would be a viable workaround (you may even discover that this is a preferred method of setting up, particularly if you are a Motif-Series user with a FW16E expansion board).
The source MIDI tracks for the External Instrument must be in CUBASE. That is, if you originally recorded the data in the Motif XS/XF or MOX/MOXF sequencer, you will want to transfer that data so that the MIDI tracks are in Cubase. Cubase can import SONG data from within an ALL data file of the Motif XS/XF)… see separate articles (“IMPORT Motif XF SONG”; “IMPORT Motif XS SONG”); If you have a MOX or MOXF sequence, you will need to export the data from that keyboard as a SMF and then use the Cubase IMPORT > MIDI File function to bring your data into Cubase.
EXTERNAL INSTRUMENT
Cubase Pro 8 has the ability to setup your hardware synthesizer as an “EXTERNAL INSTRUMENT”. This is found in DEVICES > VST CONNECTIONS as one of the tabs. Here you can create External Instruments by clicking on the “Add External Instrument” button and configuring the parameters.
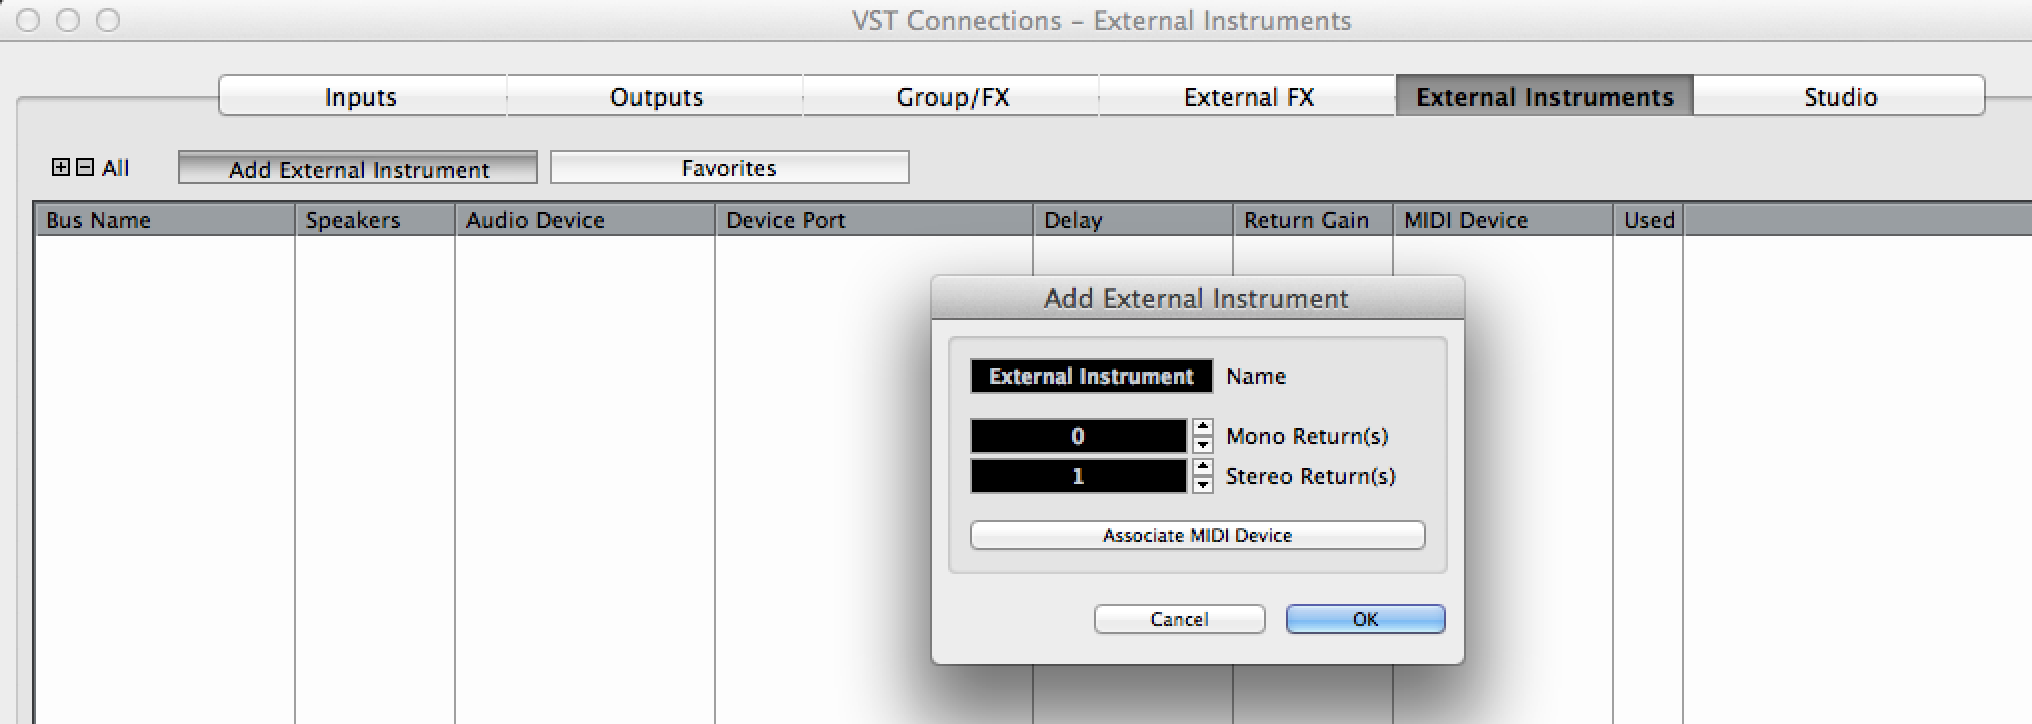
It allows you to create a signal flow pathway in the DAW so that you can address your external hardware with the same ease and flexibility you do any VSTi within the computer environment. Why I, personally, like this External Instrument function, and this will concern the three Motif-Series products that can use the FW option, is when it is combined with the FW16E it gives you the most routing flexibility when it comes to audio recording decisions.
Special note to Motif XS, Motif-Rack XS and Motif XF owners with FW16E (or updated mLAN16E2) installed:
The Yamaha Motif-Series Editors when setup as VSTs allows you to configure the 16 audio bus outputs in eight stereo pairs (only). As you will see in this article, by using the MIDI DEVICE MANAGER, the Yamaha EDITOR running as a Stand Alone, and the EXTERNAL INSTRUMENT function of Cubase, we will be able to route PARTS, not only in the odd/even stereo pairings but also as individual MONO returns when necessary, as well. This will facilitate routing individual drums, for example. If I need to route the kick drum to its own audio track, why route it in stereo? You might want to separate drums in a case where you have additional effects (VST EFFECTS) processing that you might want to do prior to mixing down. While some sounds will actually benefit from being recorded in stereo (those that are originally stereo or use a stereo Insertion Effect), it makes no sense to record some other things in stereo and this External Instrument function will allow you to take advantage of the mono buses where and when you need/want them.
Special note to MOX, MOXF, S90 XS/S70 XS owners:
The Yamaha Editors for these products deal with routing audio signal via a setup of Dual Stereo Output buses. One is the Main Left and Right output, and you can think of the other as for isolating a PART (or PARTS) to record to their own discreet track. Remember, you will be using clock sync so overdubbing and doing transfers of tracks can be done in multiple passes. While you do not have the luxury of the 8 simultaneous stereo buses as with the Motif-series, these products can accomplish multi-tracking isolation by assigning PARTS to the second pair (Assignable L/R) outputs. The MOX and MOXF can act as their own AUDIO and MIDI Interface. The S90 XS and S70 XS will need to rely on an external audio interface. If you wish to use all available outputs, you will need an interface capable of receiving at least four channels IN and stereo OUT (a 4-in/2-out) audio interace. The S-series can communicate MIDI only via USB connection.
SIGNAL FLOW
Basically, MIDI is going to travel from your Cubase MIDI Tracks to the hardware tone generator, the audio created by the hardware in response to this data will be returned to Cubase on multiple VST CONNECTION audio lanes that we will create.
What we’ll setup and Preparation:
_ We’ll need to setup the Synth as an External Instrument Plug-in (VSTi) within Cubase . Translation: We are going to setup the MIDI > Tone Generator > AUDIO routing in the same way it works for any soft synth, even though the Tone Generator is an external device! Usually when you play your synthesizer, it sends audio directly to the main Left and Right outputs (this is referred to as the Direct signal). When you setup for VSTi Routing we are going to create a pathway to RETURN the audio to the DAW (Cubase VST INSTRUMENT audio lane). This additional routing allows you to treat the audio of the external hardware in the same way you treat any softsynth VSTi (housed completely on the computer). We are going to create the RETURN path.
_ While setting up the External Instrument you can associate it with a “MIDI DEVICE”, in this case you can use the MIDI DEVICE MANAGER -Voice List for your particular Yamaha Synth as the target MIDI Device.
To set this up: Go to DEVICES > MIDI DEVICE MANAGER > click on the INSTALL DEVICE > Find on the List your product Yamaha Motif XS, Yamaha Motif-Rack XS, Yamaha Motif XF, Yamaha MOX6/MOXF8, Yamaha MOXF6/MOXF8, Yamaha S90 XS/S70 XS – select it and make the MIDI Port connection for PORT 1 (the Main Port).
_ We will be setting up the Synth as an External VSTi (which creates an “audio lane” for each RETURN you create). When working with any multi-timbral VSTi, you will have a MIDI Track for each PART – it will receive the MIDI data that you perform; that MIDI data triggers the tone engine and you have a VST audio lane for the audio output (called the RETURN) of the VSTi.
_ You will need the Yamaha Editor Standalone/VST for your product. This will work with the following versions of Yamaha Editors:
Yamaha Motif XF Editor Standalone/VST version 1.6.x (or later)
Yamaha MOXF6/MOXF8 Editor Standalone/VST version 1.6.x (or later)
Yamaha Motif-Rack XS Editor Standalone/VST version 1.6.x (or later)
Yamaha Motif XS Editor Standalone/VST version 1.6.x (or later)
Yamaha MOX6/MOX8 Editor Standalone/VST verson 1.6.x (or later)
Yamaha S90 XS/S70 XS Editor Standalone/VST version 1.6.x (or later)
In each case, we will be launching the EDITOR as a STAND ALONE application – (currently the VST version cannot be run inside Cubase Series 8… FIX is coming shortly).
The STEP-BY-STEP Setup
Start with an EMPTY Project. When learning about how to set this up, it is always best to understand the routing thoroughly.
FILE > New Project > EMPTY
Following the detailed descriptions for the External Instrument features in the Cubase documentation PDFs (updated for use with current supported Synths).
Setting up External Instruments
1. Open the “VST Connections” window from the Devices menu.
2. Open the External Instrument tab and click “Add External Instrument”.
3. In the dialog that appears, specify the number of required mono and/or stereo returns. (You need not create a NAME, it will be named automatically – the name will be derived from the associated MIDI DEVICE MANAGER (Voice List XML))
A specific number of mono and/or stereo return channels is required. This will be based on the number of available outputs on your particular model. Those of you working with a FireWire connection (i.e., the Motif-Series) you will have to determine how many mono and/or stereo returns you want to have available from your Synth into the DAW. We refer to these pathways as “buses”. We are creating audio bus routes. You can create a simple stereo bus (Main Left/Right) to carry all Returns or you can get elaborate with the FW16E’s 14 assignables Returns. If you require a mix of stereo and mono RETURNS, you can customize the bus routing, as necessary. This allows you to process each audio path with Cubase automation, and apply VST Effects, etc. You can setup many configurations and save them as your Favorites. See the Cubase Documentation for more details on managing your custom configurations.
Suggested example setups would include the following:
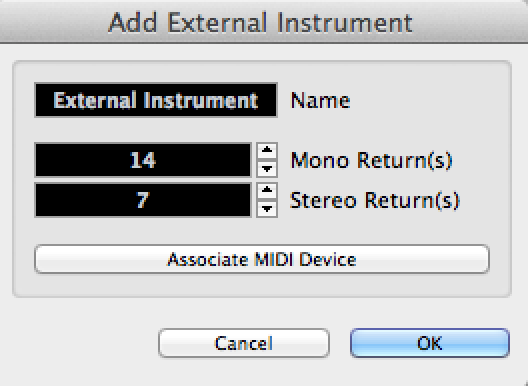 For the MOTIF-SERIES (Motif XS, Motif-Rack XS, Motif XF) equipped with FW option:
You might create as many as 7 Stereo buses and 14 Mono buses…
This would cover just about every assignable output scenario that might be possible… (remember you can customize these, as necessary). You can then choose to use them when necessary. And because you can setup for multiple passes you can build up more than just what you can accomplish in a single pass. Buses “drop off” their passengers and can be used carry new sets of passengers: Audio that is “dropped off” is recorded to proper Cubase Audio Tracks, then you are free to use the buses for new transfers of Parts.
_ Click the “Associate MIDI Device” button
_ Select the MIDI DEVICE option and your particular connected Yamaha product. Because you installed the MIDI DEVICE in the MIDI DEVICE MANAGER it will appear as a connectable (linked) Device.
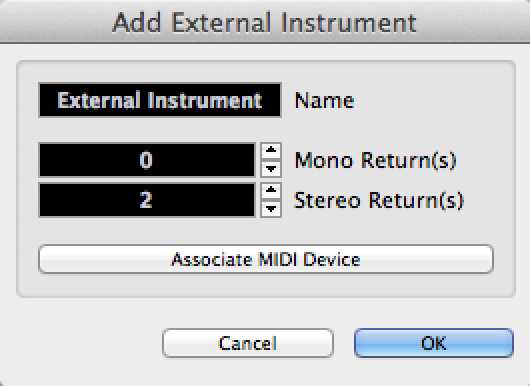 For the MOX6/MOX8, MOXF6/MOXF8, and S90 XS/S70 XS:
You will need to create 2 Stereo Returns.
This will cover all scenarios for these products. The MOX/MOXF have built-in 4-in/2-out audio interface that communicates via USB.
The S-series will require an external audio interface to take full advantage of the AUDIO routing feature.
_ Click the “Associate MIDI Device” button
_ Select the MIDI DEVICE option and your particular connected Yamaha product. This will create a link with your synthesizer.
Here are two example setups – the first one shows the 7 Stereo and 14 mono Input Buses for the Motif-Series External Instruments w/FW (shown is a Motif XF7). The second one shows the MOXF setup as an example of the typical Dual Stereo Return instrument. If you are using the S90 XS or S70 XS, your AUDIO DEVICE will be the Driver for that audio interface, and the DEVICE PORTS will be the two channels you connect your S90 XS/S70 XS to on that audio interface – two Ports, a Left and a Right.
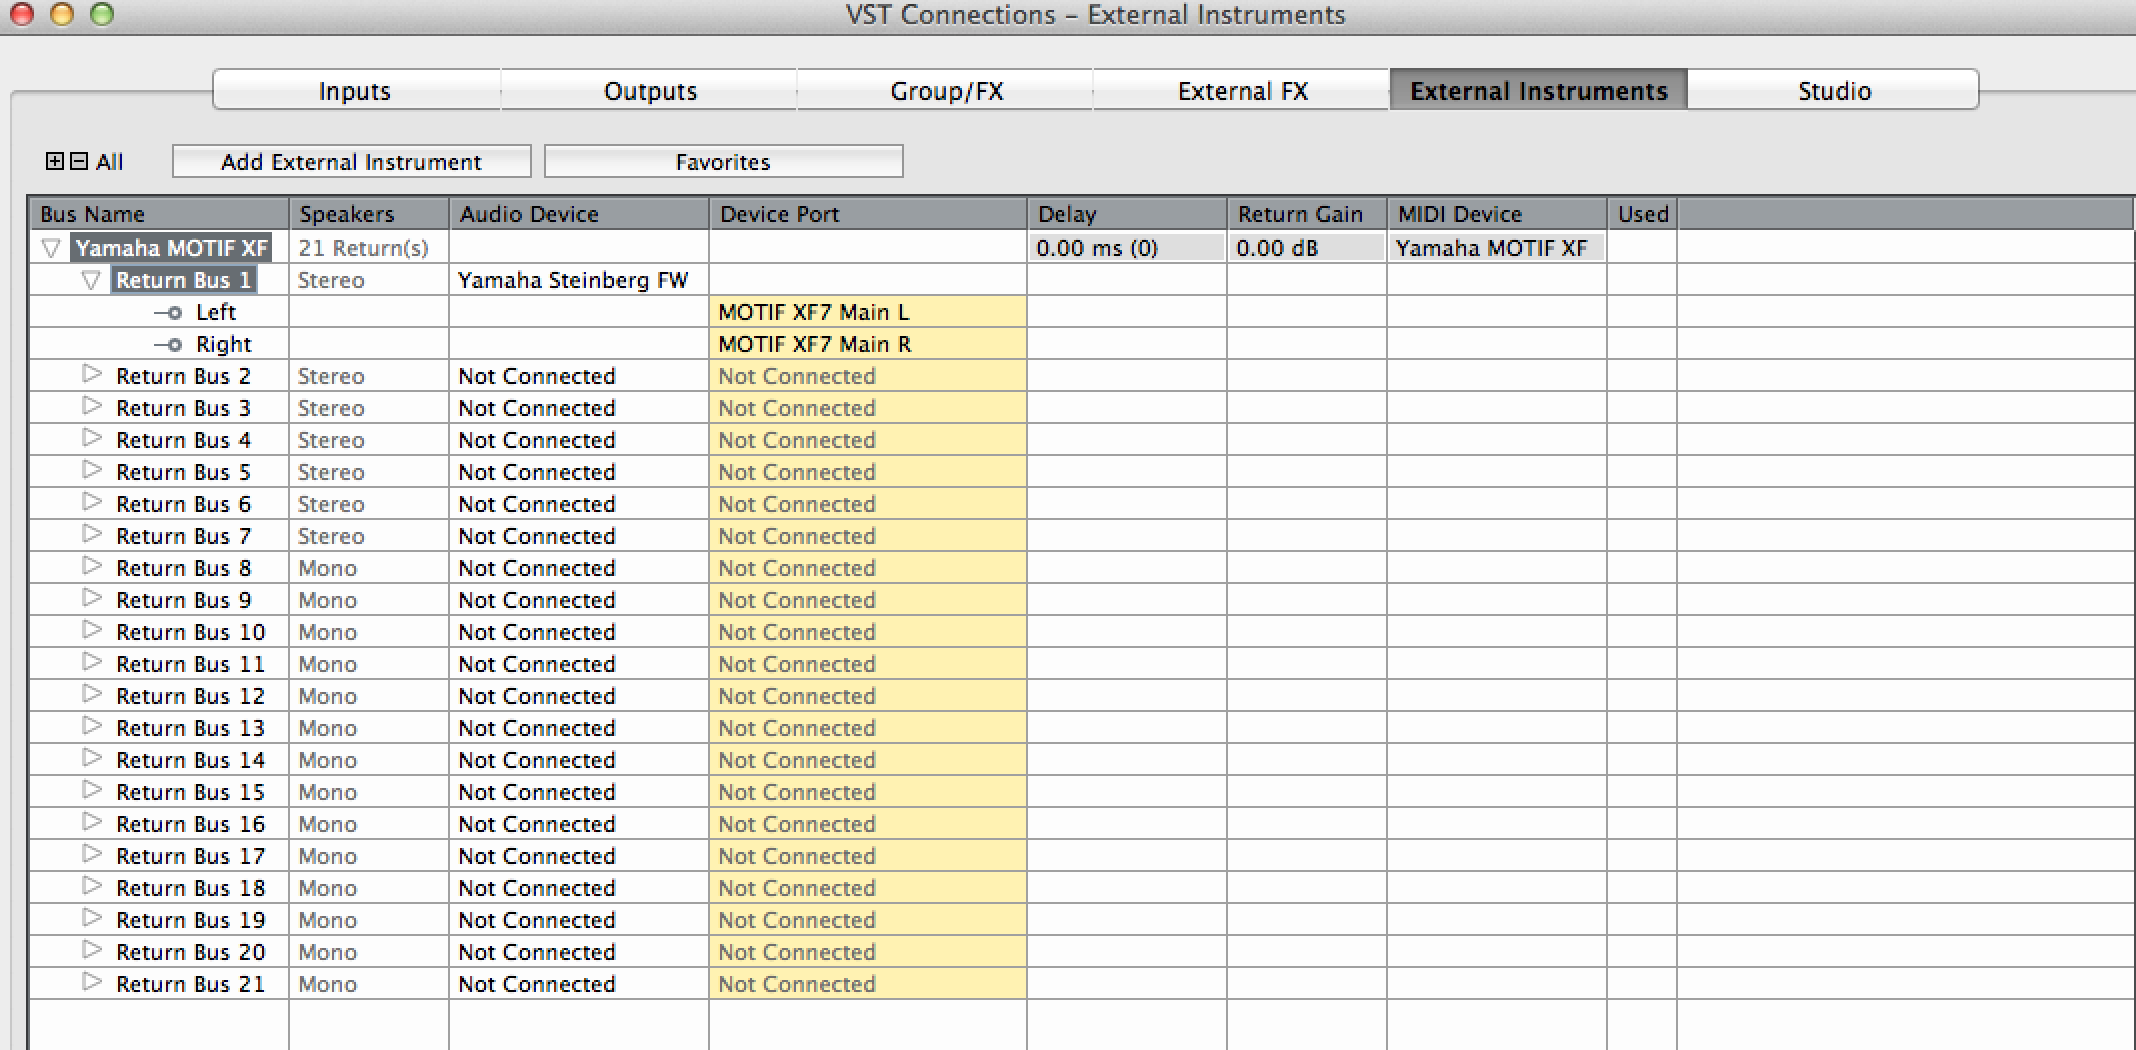

The above must be understood as the AUDIO coming into Cubase – we have secured a pathway for audio from the hardware to be RETURNED to Cubase – the word “return” must be understood here: We Sent MIDI data OUT to the hardware, the hardware is RETURNING audio signal in response.
When you are done, close the VST Connections window.
If a port is unavailable for assignment (that is, it does not appear on your list when you click in the associated box), this is because you are using it somewhere else in your setup. Check the VST CONNECTIONS > INPUTS tab (you access it from the above screen – on the left: Click the INPUTS tab). Here you can release it (i.e., set it to “Not Connected”), when you require it for your External Instrument. This is an important point to understand: If you setup to use a VST INPUT within the External Instrument tab, that INPUT will no longer appear as available on the VST CONNECTIONS INPUT tab, and vice versa. When you setup a VST CONNECTION INPUT on that screen it will be unavailable to the External Instrument. (This is analogous to an INPUT jack being already in use – you would see the cables already inserted into the jacks… same here, once you connect to the INPUTS, they are occupied).
Next we will launch the newly created VSTi.
How to use the External Instrument
Once you have set up the External Instrument in the VST Connections window, you can use it as a VST Instrument (that is, the same as you would any other VSTi). Here’s how: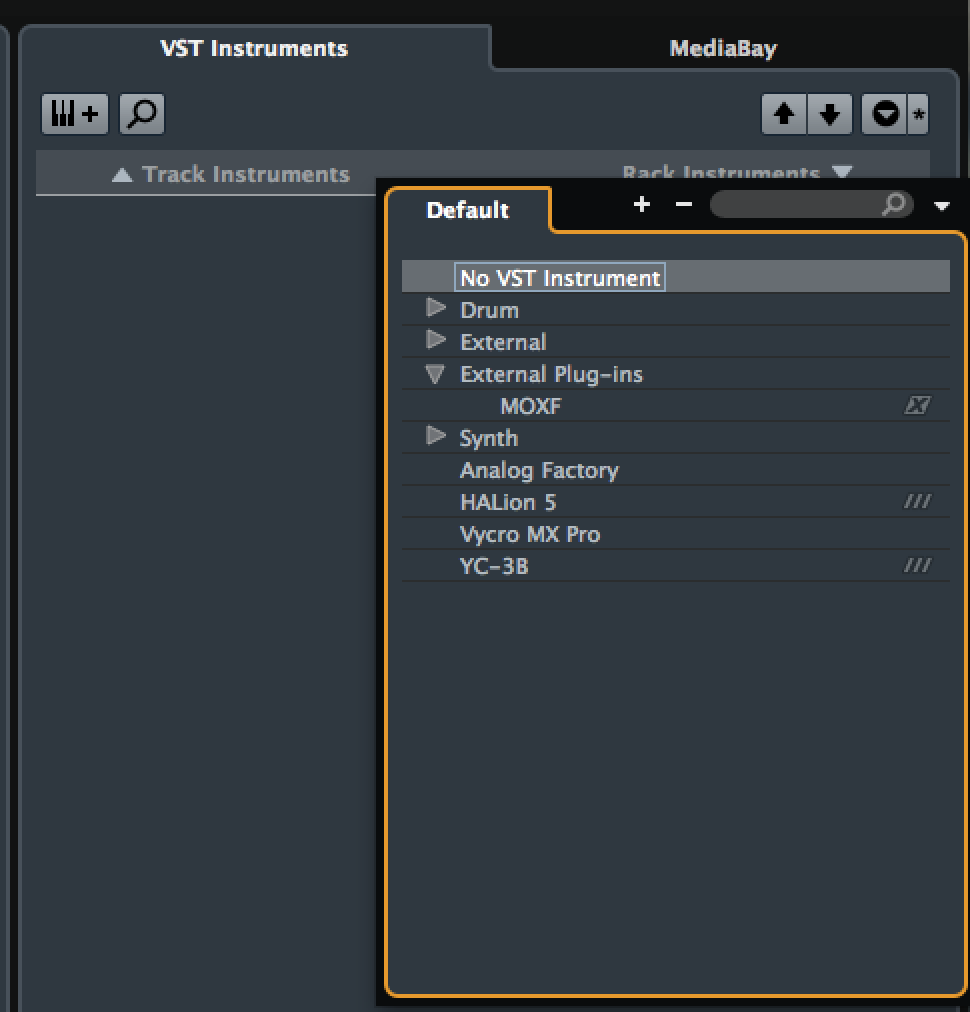 Open the VST Instrument using the RACK INSTRUMENTS option and click on an empty instrument slot.
This is found under DEVICES > VST INSTRUMENT (F11)
or it can be opened on your main Cubase Pro 8 screen.
Use the RACK INSTRUMENTS side (Shown):
In the instrument pop-up menu, your External instrument DEVICE is listed under the External Plug-ins
(this is different from where you were used to selecting the VST)
Sub menu: External Plug-ins
{your product name} [X]
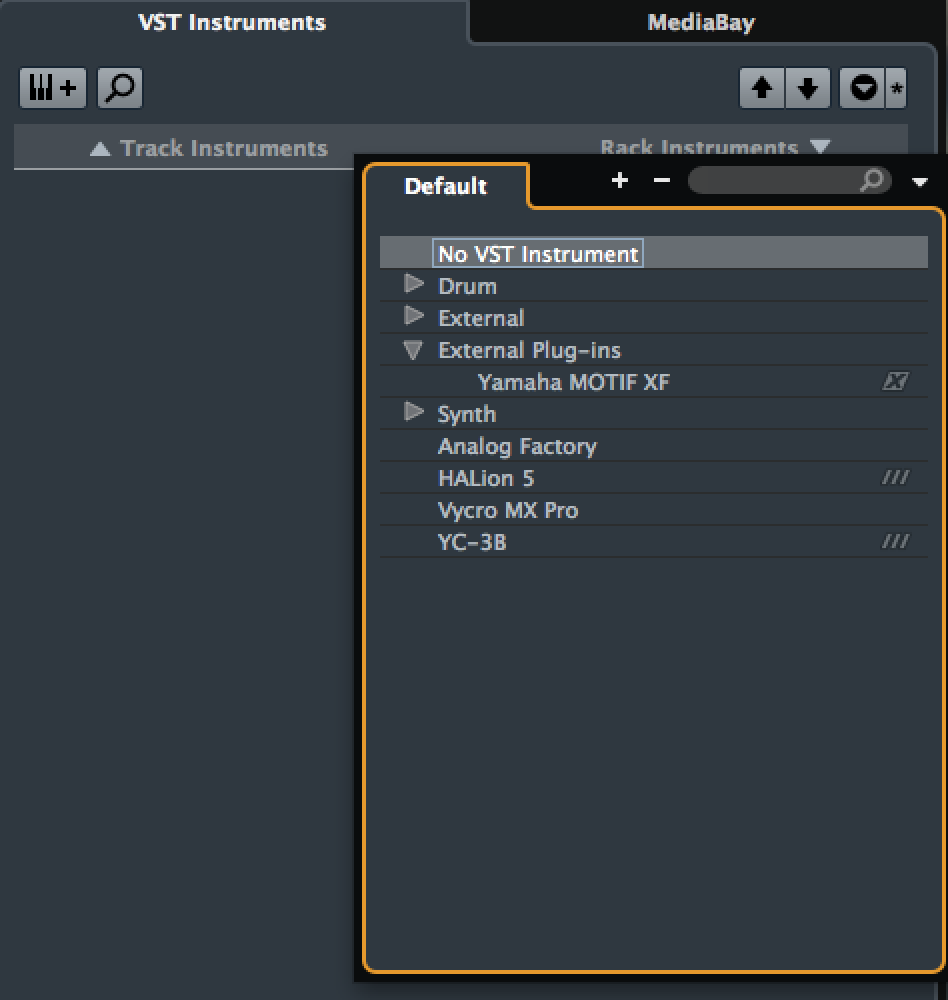 You will be asked if you want to create a MIDI track assigned to the device you are creating.
Create that MIDI track.
The VST INSTRUMENT FOLDER containing your External Instrument VST Folder will appear. It will have a virtual AUDIO LANE. This is where you can monitor the returning signal (if you wish).
Now when you look at that MIDI Track, the Track Inspector will be setup with the normal MIDI IN = “ALL MIDI INPUTS”, but the MIDI OUT will be routed to new MIDI DEVICE you defined for this use, for example “Yamaha Motif XF(Motif XF Main)“ device — which is now listed where your VST instruments would be listed and selected as targets.
Make sure each track you create for this device is assigned MIDI OUT to this new External VSTi listing of the “Motif XF(Motif XF Main)”.
You can now launch the EDITOR in STAND ALONE mode… and the same relationship between TRACK and PART will exist between Cubase software and the Yamaha hardware. As you select a TRACK in Cubase – you will see that same PART selected in the EDITOR… 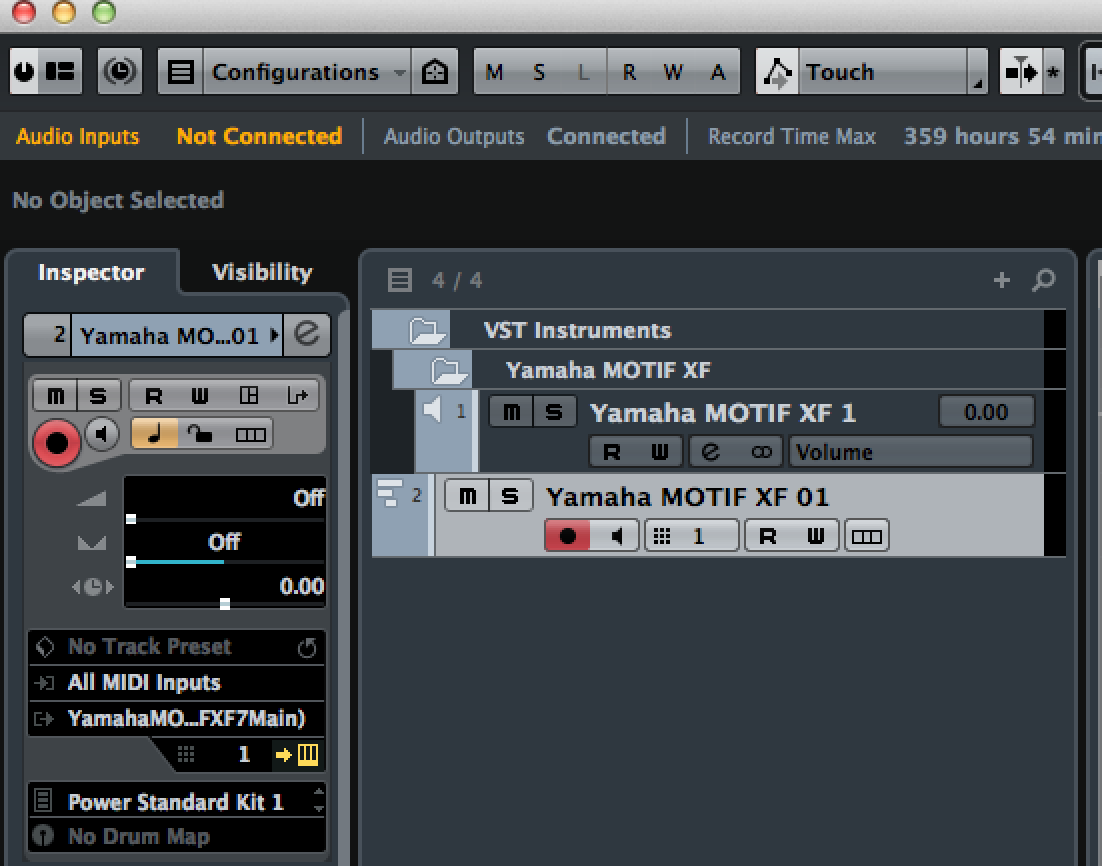 To send MIDI notes to the external instrument, open the Output Routing pop-up menu in the Inspector for the corresponding MIDI track and select the MIDI device to which the external instrument is connected. This ensures use of the delay compensation. The instrument will now play any MIDI notes it receives from this track and return them to Cubase through the return channel(s) you have set up.
The External Instrument will behave like any other VST instrument in Cubase (except that it is external).
Set your Yamaha hardware instrument on a blank SONG or PATTERN, or default MIXING or MULTI. We do this so that when the EDITOR launches it does not change any MIXING or MULTI setup you might want to use. Start on a BLANK (highly recommended).
Launch the Yamaha Editor for your product as a STAND ALONE application. What this means is, literally, you lauch the Editor outside (along side) Cubase. If you’ve previously run the EDITOR as a STAND ALONE on this computer, it should find the ports of your instrument and setup automatically. If not, verify the Editor connections under FILE > SETUP.
Bring the EDITOR – ONLINE.
Recall the MIXING or MULTI if you have one you already prepared for use, and the EDITOR will immediately import that data.
OPERATION:
Operation of the Editor will be very similar to the way the Editor operated as a VST. There are a few minor differences. You may opt to MUTE the virtual AUDIO LANE and monitor yourself via DIRECT monitoring. However, if you are processing with computer-bound Plug-in Effects, then that would be the time to monitor the audio in RETURNED to the AUDIO LANE. Obviously, the EDITOR is not running inside of Cubase so you will need to SAVE your work in a separate Editor File. We highly recommend that you direct the data to the same folder that contains your Cubase Project.
You will not be able to access the Media Bay and Sound Browser from the Editor when running as a Stand Alone, but you will find that most of what you enjoyed using in your Editor VST is available to you.
Any questions or troubles with this Advanced routing situation – please do not hesitate to post your questions in our Forum. This EXTERNAL INSTRUMENT routing scenario, does offer greater flexibility to the Motif-Series users who are working with the 16 bus FireWire routing option. In future articles we will take you through mastering this advanced routing function.
Hope this is helpful.
Look for the updated version of Cubase Pro 8.0.10 … (coming second week of March); as soon as they are ready and tested (and hopefully not a moment before). The Editor VST and Extension apparently work just fine.
Bad Mister.
Keep Reading
© 2025 Yamaha Corporation of America and Yamaha Corporation. All rights reserved. Terms of Use | Privacy Policy | Contact Us