WORKFLOW Sessions: Creating a Default Mix
Tagged Under
Workflow is a term that gets thrown around a lot. It refers to a preferred method of working. This has to be something that is very personal and has to be developed over time as you get used to actually using the gear. That is, you must work with the given tools for a bit before you decide on and lock in your own personal methodology. You can accomplish this in a number of ways, but it is a journey that only you can make and decide upon – because it is a matter of what ‘works for you’. This series of sessions in my blog will deal with presenting some of the concepts and tools that exist in Yamaha’s hardware/software integration initiative so that you can adopt and adapt them for your particular ‘workflow’.
Question: Using the internal sequencer can I start a composition with the default settings the way I like or must I use the setup as it defaults in the INITIALIZE JOB?
Answer: Great question. Yes, you can setup what are called “Mix Templates” and you can store as many as 32 of these in your “SYSTEM” settings on board the Motif XF/MOXF. We highly recommend that you use one of these MIX TEMPLATES as the Default Mix (acting as your customized “starting point”) instead of using the generic Initialize Job. These Templates can be recalled from your instrument’s internal Flash ROM and faithfully restored into any SONG MIXING or PATTERN MIXING location you choose. This article will cover both the Motif XF and the MOXF, as both are similar in this regard.
Customizing the Default Mix
Concept: Very much like a recording engineer “zeroes out the console” at the start of a session, an initialized Mixing setup is used as a default starting point for your Motif XF or MOXF when getting ready to use a Sequencer, whether you are using the on-board sequencer or an external DAW. When in MIXING mode, press [JOB] > [F1] INITIALIZE you can “zero out” the XF mixer – return the settings to a nominal or normal start condition. This returns all Parts to Preset 001(A01) Full Concert Grand, all volumes to 100, pan positions to center, etc., etc.
You can setup your own Default Mix and recall it anytime you start a project. We’ll give you an example and show you how to set it up in the XF (hardware) and then how to make it your default starting point when using Cubase.
When starting a composition, I highly recommend you start with an empty sequencer. If you are going to work on a single composition at a time, then clear both the Song and Pattern memories. Use the entire memory of the sequencer to work out your new composition. It is not necessary to have any other Song or Pattern in memory when you are working on a new composition – unless you are going to be copying or importing data from it. Assembling your finished compositions into convenient ‘sets’, can be done later. In fact, it’s much easier to assemble compositions at a later time. Besides anything else loaded only take up memory you may need…
We all think we are going to get the part right the very first time we play it. Leaving enough memory to keep multiple takes, and leaving enough memory to try out different ideas, is a smart thing to do. Later you can discard the “extra” data and get that memory back. It’s a workflow decision: do you start by erasing the blackboard, giving yourself some space to work or do you want to only use a portion of it while creating this new composition. You clear the sequencer in two separate steps: Clearing the SONG SEQUENCER ([JOB] > [F6] SONG]) is handled by setting the SONG number parameter to “ALL” and then executing the Clear Song JOB. Clearing the PATTERN SEQUENCER is handled by setting the PATTERN number parameter to “ALL” and the SECTION parameter to “ALL”, then execute the Clear Pattern JOB.
Once you learn how you can easily assemble compositions by loading a single Song, and/or a single Pattern, you gain confidence in working with a blank sequencer for each composition. By adopting this workflow, we can show you to keep all the Voices you used and/or customized for each Song or Pattern so that they will automatically be recalled (even if they reference your Flash Boards) when you recall the single Song or single Pattern. Starting with a blank Sequencer gives you the maximum use of the tool. Think of assembling SONGs and PATTERNs as a separate operation, on that you will handle later.
Below we describe the process, step-by-step, first for the Motif XF, followed by the MOXF. The concept and theory of operation is very much the same, due to screen and button layout, the instructions are just a slight bit different.

Creating your Default Mix in the Motif XF Hardware:
It works the same for SONG and PATTERN modes. Press [MIXING]
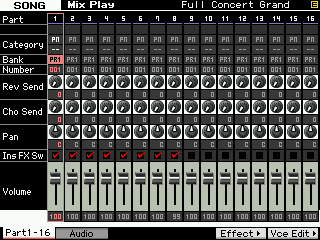
Set the parameters exactly as you would like for your “Default Mix”. Basically, you will use this instead of using the INITIALIZE Job. You can get as creative as you would like in setting the parameters for this Default Mix – and it is easy enough to update later.
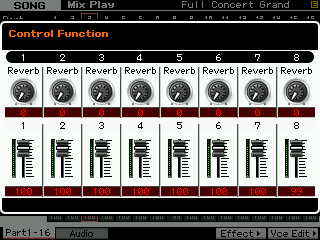
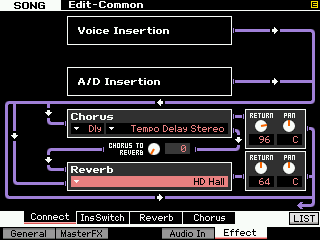
Example: I’ve left all of the Volumes at 100, the Pan to Center, but I have zeroed all Sends to the two auxiliary System Sends (Chorus and Reverb) and have selected “Tempo Delay Stereo” and the new “HD Hall” as my default Types.
 Musically: I left the “Full Concert Grand” assigned for all Parts, and have set all OUTPUT SELECT assignments to the “Main L&R” outputs.
From this starting point I’m comfortable working – I’ve changed the default settings to my liking. This is the concept. You can get as elaborate with your particular Default Mix as you desire. If you always use a certain drum kit, bass and keyboard sound to start, you can customize this as you like… That’s the idea – it’s your starting point. Not to worry, you can always change your mind and update this at any time… (and you have 32 of them that you can keep in memory).
Later we will import this MIXING setup so that the Motif XF VST (inside Cubase) also begins Cubase Projects with your Default Mix Template.
When you have it as you like:
Press [STORE] to write it to internal Flash ROM
“PUT” (store) the Motif XF Mix Template
From [MIXING] mode
Press [JOB]
Press [F5] TEMPLATE
Press [SF1] MIX
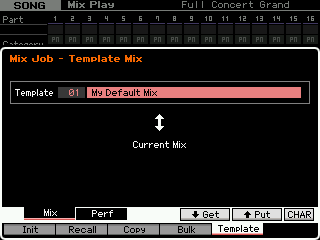
Here you can literally “put” the current MIX into one of 32 MIX TEMPLATE locations. This includes every parameter of the MIXING – MIDI Channel assignments included. As mentioned these Program Templates are stored as a part of your preferences in your XF’s SYSTEM SETTINGS – and are automatically backed up in and restored from every ALL data (.X3A) File that you generate on your Motif XF.
 On the MIX JOB – TEMPLATE MIX screen you can move the cursor to select the Template Number.
Move it to the right and press [SF6] CHAR (character) to give your Template a name (very important). Initially, the 32 locations contain basic ‘placeholder’ Templates; please overwrite these at your leisure.
Press [SF5] PUT
This copies the current MIXING setup to the Template location.
You can recall this for any SONG or any PATTERN location whenever you need it.
“GET” (retrieve) a Motif XF Mix Template
To RECALL a template… Go to any empty SONG or PATTERN
Press [MIXING]
Press [JOB]
Press [F5] TEMPLATE
Press [SF1] MIX
Use the Number parameter to select the Template by Name
This time:
Press [SF4] GET
The “get” function recalls the Template from memory and restores it to the current MIXING location.

Creating your Default Mix in MOXF Hardware:
It works the same for SONG and PATTERN modes in the MOXF, as well.
Press [MIXING]
Set the parameters exactly as you would like for the Default Mix
Example: Starting with the factory INIT settings, I’ve changed only those that I felt necessary. I’ve left all of the Volumes at 100, the Pan to Center,  but I have zeroed all Sends to the two auxiliary System Sends (Chorus and Reverb): All Send amounts start at 0.
I changed the default CHORUS Type = “Tempo Delay Stereo”; and left the REVERB Type = “RevX-Hall”
Musically: I left the “Full Concert Grand” assigned for all Parts;
Audio: I have left all USB audio OUTPUT SELECT assignments to the “USB3&4” outputs.
From this starting point I’m comfortable working – I’ve changed the default settings to my liking. This is the concept. You can get as elaborate with your particular Default Mix as you desire. If you always use a certain drum kit, bass and keyboard sound in certain PARTS to start, you can customize this as you like… That’s the idea – it’s your “starting point” – You will use this instead of the factory INITIALIZE MIXING Job. Not to worry, you can always change your mind and update this at any time… (plus you have 32 of them that you can keep in memory for recall!).
Later we will import this MIXING setup so that the MOXF VST (inside Cubase) also begins Cubase Projects with your Default Mix Template. This means that when you open Cubase to start a Project your MOXF will automatically be setup, just as you like it. It’s these types of things – which include the complex MIDI and AUDIO routing assignments – that make things easier, and help you get down to work quickly. What you want to recognize, and it is a very important point: There is no one single setup that will work for all things you do. You have to think of the tasks that you do in broad terms. If you had to break them down into three major headings you would conclude: You Record, you Playback (Mix), and you Overdub. You will need to have a “quick access” button or a one click selection you make that can switch this for you, when necessary, quickly and efficiently. That is what “Workflow” is about. Here we are developing and expanding a ‘workflow’ for each of these major headings. This Default Mix template will be used for original RECORD.
When you have it as you like:
Press [STORE] to write it to internal Flash ROM
[STORE] the MOXF Mix Template
From [MIXING] mode
Press [STORE]
Press [F2] TEMPLATE
Here you can literally “store” the current MIX into one of 32 MIX TEMPLATE locations. This includes every parameter of the MIXING – MIDI Channel assignments included. As mentioned these Program Templates are stored as a part of your preferences in your MOXF’s SYSTEM SETTINGS – and are automatically backed up in and restored from every ALL data (.X6A) File that you generate on your MOXF.
On the TEMPLATE screen you can move the cursor to select the Template Number or move it to ReName your Template.
Move the Cursor to the Name space and give your Template a name (very important). Initially, the 32 locations contain basic ‘placeholder’ Templates; please overwrite these at your leisure.
Press [ENTER] to execute
This copies the current MIXING setup to the Template location.
You can recall this for any SONG or any PATTERN location whenever you need it.
RECALLING a MOXF Mix Template
To RECALL a template… Go to any empty SONG or PATTERN
Press [MIXING]
Press [F4] TEMPLATE
Press [SF1] MIX Use the Number parameter to select the Template by Name
Press [ENTER] to restore the MIX Template to the currently selected MIX location.
In the next installment we’ll transfer our “starting point” setup to our computer and “teach” Cubase to automatically recall this Default Mix any time we’re set to “Record” a new Project.
Keep Reading
© 2025 Yamaha Corporation of America and Yamaha Corporation. All rights reserved. Terms of Use | Privacy Policy | Contact Us