In the last session we created a MIXING setup that will act as our starting point when we want to begin working on a Song or Pattern. Here we will import this setting to Cubase where we can set it as our default condition whenever we open the Editor VST. This will work for the Motif XS Editor VST, the Motif XF Editor VST, the MOXF6/MOXF8 Editor VST, etc., in fact, you can have a separate starting point (Default Mix) for each VST plug-in you use.
See the previous article: “Workflow Session: Creating a Default Mix” or create the MIXING setup condition you wish to set as the default mix using the hardware or the instrument’s Editor VST software.
Here we will learn what all this routing is about while we import this MIX as our default setup.
Launch the EDITOR VST:
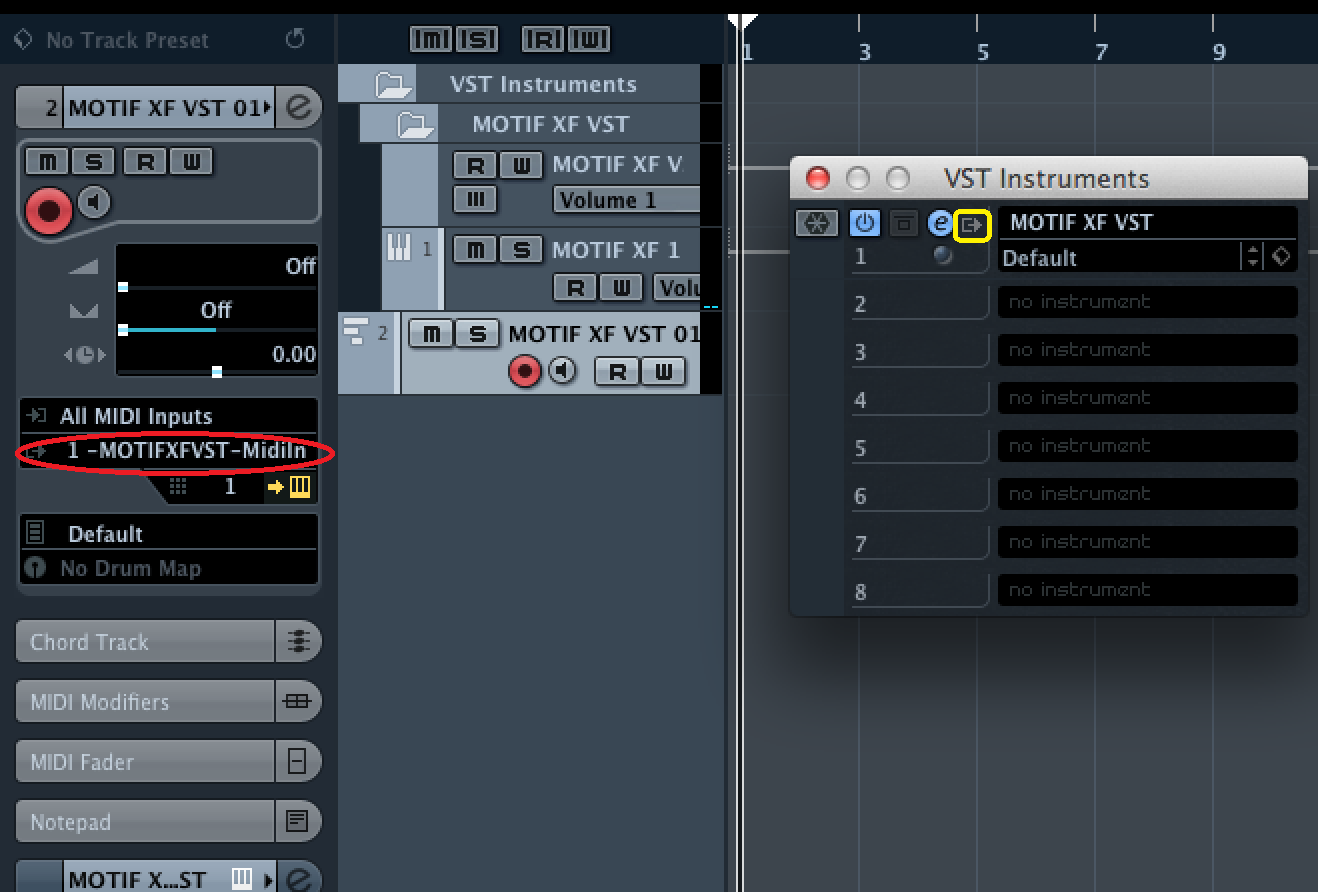
On the Toolbar of Cubase go to DEVICES > VST INSTRUMENTS > EXTERNAL > Select the Editor VST
Cubase creates the VST INSTRUMENT Folder with your Instrument’s VST Sub-Folder containing an AUTOMATION and AUDIO Lane. You are asked if you would like to create a MIDI Track assigned to use this VST INSTRUMENT.
Create that MIDI Track.

This will create a single MIDI Track assigned so that the MIDI IN is assigned “ALL MIDI INPUTS”, the MIDI OUT is assigned to your instrument’s “…VST MIDI In”. This MIDI IN is significant in that it is different from the regular MIDI Port assignment. You see that it specifically is labeled: “Motif XF VST – MIDI In” or “MOXF6/MOXF8 VST – MIDI In”. MIDI data is routed from the MIDI Track through the VST EDITOR before it is routed back to the hardware synthesizer. This is significant.
Any MIDI Track who’s MIDI OUT is set to the “VST MIDI In” will send its data via the Editor’s graphic use interface where you can visually see the graphic keys respond (and it can be routed as we desire; this will allow for Export Audio Mixdown and the audio Freeze functions). If the MIDI Track is set MIDI = “Port 1” or “Main” then it does not travel through the Editor’s graphic interface and will not be able to be routed by the functions within the Editor. Make sense? By routing the MIDI OUT of the track to the Editor VST we can determine what happens with that signal inside the Editor.
The Editor VST allows you to control the hardware and in this case is located between the MIDI OUT of the Tracks of Cubase and the MIDI IN of the Motif XF/MOXF hardware.
Bring the EDITOR ONLINE.
When the Editor is “ONLINE” – any changes made in the hardware are immediately received in the software (Editor VST) and vice versa, any changes made in the software are immediately reflected in the hardware (XF/MOXF).
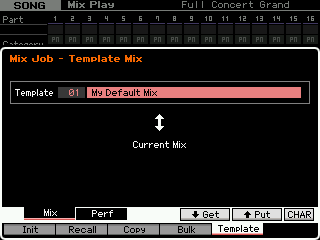
Recall the MIXING TEMPLATE in the hardware.
MOTIF XF: Go to any empty SONG or PATTERN
Press [MIXING]
Press [JOB]
Press [F5] TEMPLATE
Press [SF1] MIX
Use the Number parameter to select the Template by Name
Press [SF4] GET
The “get” function recalls the Template from memory and restores it to the current MIXING location.

MOXF: Go to any empty SONG or PATTERN
Press [MIXING]
Press [F4] TEMPLATE
Press [SF1] MIX
Use the Number parameter to select the Template by Name
Press [ENTER] to restore the MIX Template to the currently selected MIX location.

This action will immediately cause the Editor VST to RECEIVE your Default Mix from the hardware. The transfer should take 2 or 3 seconds.
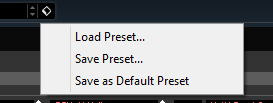
Once imported to the Software you can immediately SAVE this as your personal DEFAULT PRESET:
Click on the Cubase VST SOUND CUBE icon located at the top left of the Editor VST
Select “Save as Default Preset”

This will fix your DEFAULT MIX as the one that automatically gets sent to your XF/MOXF whenever you launch the VST INSTRUMENT function. You can change / update your Default Preset at any time – just this easily. Again, this is a “workflow” item – if you find yourself working a certain way over and over, then you can update this Default Mix as it best serves your particular ‘workflow’.
In our next session we’ll deal with troubleshooting the EDITOR VST setup and explain the routing for the Motif XF and MOXF when using the VST3 Editors. Until next time…
