In the last article (Audio REC on DAW Part 1) we introduced you to the basic Cubase configuration and we learned to follow the routing from the MODX PART (OUTPUT) to the Cubase AUDIO CONNECTIONS > INPUT, and finally assigned that INPUT to an Audio Track. This time we will begin with more details on the MODX OUTPUT assignment side of things and discuss MULTI PART PERFORMANCES.
In our first installment we saw that QUICK SETUP #3: “Audio REC on DAW” template mapped out PART 1 to the “Main L&R”, while PARTS 2-5 were mapped to “USB 1&2”, “USB 3&4”, “USB 5&6” and “USB 7&8” respectively; while all others remain mapped to the “Main L&R”. All are set to stereo pairs. In a situation where you are building a multiple track composition in your DAW, where you are using the MODX as your principal multi-timbral tone engine, you may have different instruments in each PART of your PERFORMANCE. Let’s recall such a PERFORMANCE and take a look at the impact that the template has when applied.
We learned that the only difference between the “Main L&R” pairing and any of the USB numbered pairings is that that “Main L&R” include the shared System and Master Effects, and go through the Master EQ. The numbered USB outputs are discreet and include only that individual PART and the Part’s own Dual Insertion Effects.
If you notice a difference in the sound between when a PART is assigned to the “Main L&R” and when it is reassigned to a numbered pair of USB outputs, it is because of the lack of the shared Effect Blocks. The purpose of the numbered USB outputs is to keep the instrument routed there, isolated and discreet.
You can opt to ‘Bypass’ the shared blocks: System FX, Master FX and/or Master EQ, if you so desire.
In general, only those PARTS that you are going to treat (process) differently in Cubase or that you want to have separate control over, need to be routed to separate Audio Tracks. You can record all PARTS via the “Main L&R” or you can opt to re-route any signal you so desire.
Learning to master the PART OUTPUT assignment will help you whether your record directly to audio tracks or you record MIDI first, and then render audio later. The physical process and decision-making process will be the same.
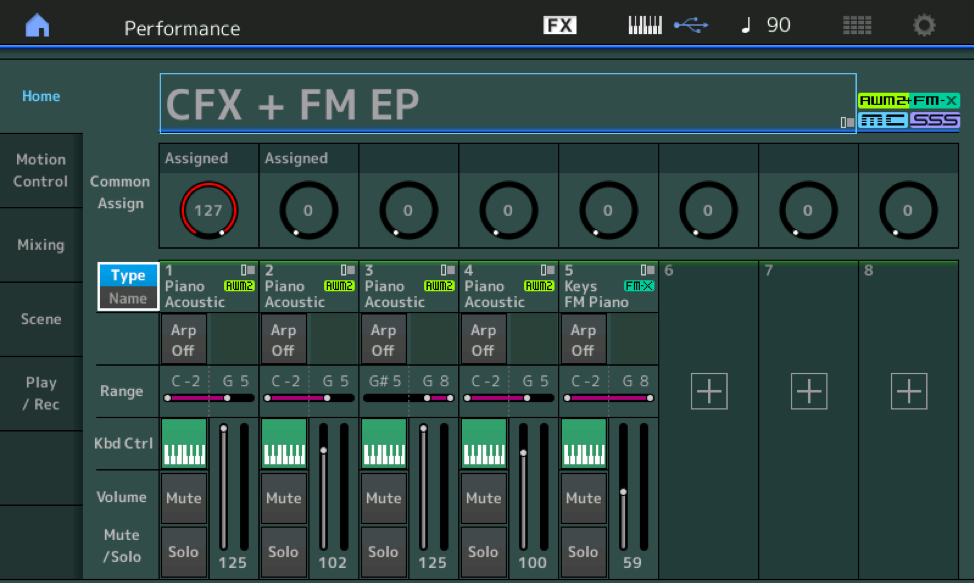
Example: “CFX + FM EP”
This is a 5-PART PERFORMANCE where four of the PARTS make up the (AWM2) Acoustic Piano sound and the fifth PART is the FM-X Electric Piano. Let’s analyze and discuss just what would be the best way to record audio from this PERFORMANCE. The CFX acoustic grand created here actually uses four PART slots to recreate the acoustic piano. There are some 18 Oscillators that go into making this acoustic piano.
Analysis:
- PART 1 and PART 2 cover the acoustic piano from the lowest key up to G5 (the highest note on a piano that has felt dampers) – between these two Parts you have a 9-way velocity switching acoustic piano sound.
- PART 3 covers the acoustic piano from G#5 and above, where the strings are undamped. This PART is an 8-way velocity switching acoustic piano sound for this region of keys only, G#5 and above.
- PART 4 is the KEY-OFF Sound of the hammers falling back and the felts moving off of keys – across all keys.
- PART 5 is the FM-X Electric Piano – which sounds only when the Super Knob is raised. The Super Knob fades out the acoustic piano and fades in the electric piano.
Playing this PERFORMANCE, you can hear that it is a stereo acoustic grand piano and the FM electric piano is using a stereo Chorus effect. Understanding how the default “AUDIO REC on DAW” template works, you quickly realize that it will not work for this PERFORMANCE. There is no reason to separately record the body of piano up to G5 on a separate track from the notes above G#5, and no reason to record the Key Off Sound separately.
The four PARTS making up the acoustic piano belong together – they should ride the same stereo bus to the Audio Track. If we think of these four PARTs as the “passengers”, we can put them all on the same bus to a single stereo Destination. Assigning the first four PARTs to “Main L&R” would allow the them to arrive together at the destination.
And if we wish, we can record the Electric Piano on its own stereo pair, or it can also be placed on the same bus with the four acoustic piano PARTS. It will depend on whether or not you plan to do something special with the FM-X Electric Piano… say you have a plugin Effect you want to apply to this in your DAW (Cubase) – that would be a good reason to record it to its own audio track. If assigned to the same bus, then you will have tricky transition when the two sounds both exist – so you can see it very much depends on what you are attempting to accomplish musically.
But we certainly do not need to record each of the five PARTs to its own stereo audio track – that would make no sense (in this case). Therefore, the AUDIO REC ON DAW Template, which automatically routes the first couple of PARTS to separate OUTPUTS does not really apply here. And that is the “take away” from this: You will need to decide what makes the most sense based on what type of instrument setup you are playing.
When you have a multiple PART PERFORMANCE that is using the multiple Parts as building blocks, you must adjust your thinking about your routing decisions. As ‘Producer’, you must make these production decisions based on the bigger picture… that is your Project as a whole.
Here are some experiments to try with “CFX + FM EP” Performance
Setup and record audio as a basic stereo program – all Parts going through the System Effects and recorded as a single Stereo Track. (Arm a single Audio Track; Record the AUDITION data and play it back).
The ASSIGNMENTS: Navigate to each Part and ensure the “PART OUTPUT” assignments are as follows:
- PART 1 _ Main L&R
- PART 2 _ Main L&R
- PART 3 _ Main L&R
- PART 4 _ Main L&R
- PART 5 _ Main L&R
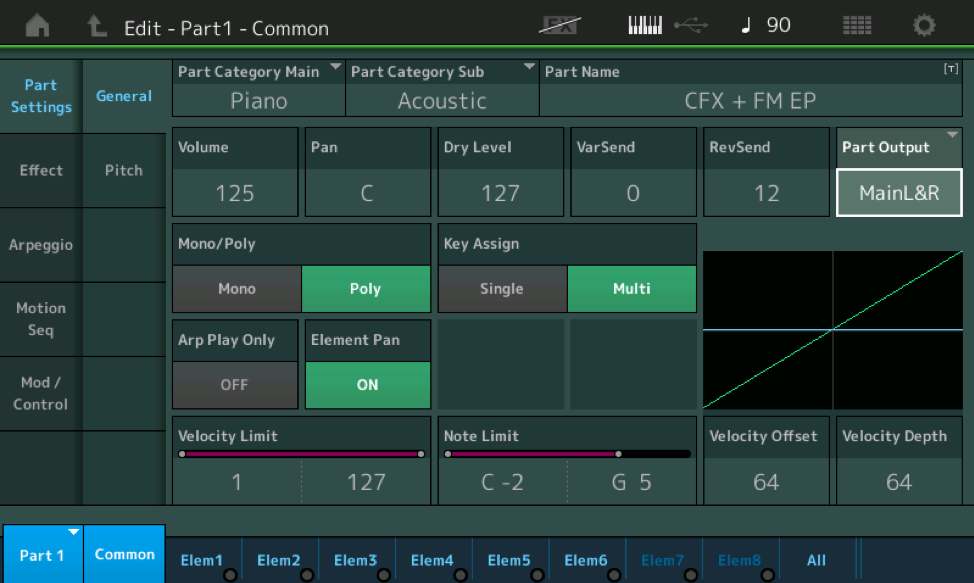
“PART OUTPUT” is always found by editing the PART:
From the HOME screen you can select (touch) “PART 1” to view the pop-in menu, touch “Edit’
Or you can press the [PART SELECT-MUTE/SOLO] button and use the SELECT function to select “PART 1”
Touch “Part Settings” > “General” > find the “PART OUTPUT” = MainL&R:
You can move between PARTs by touching the blue “PART 1” item in the lower left corner of the screen… to view A pop-up menu – for PART Select.
In Cubase, using a single Stereo Bus, record yourself to a single Stereo Track.
Alternative Routing:
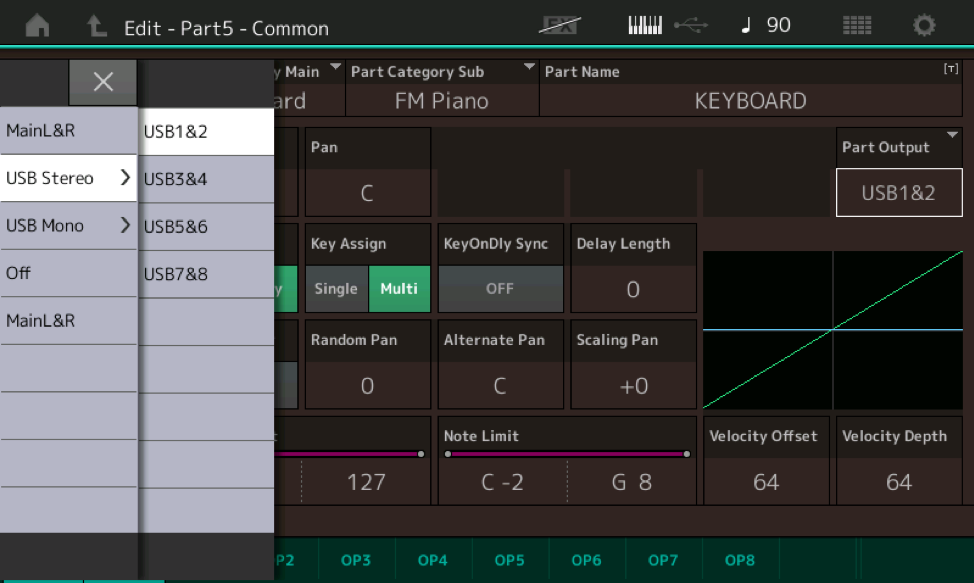
Setup and record with the acoustic piano (Parts 1-4) bused via the “Main L&R” while the FM-X piano is routed to a discreet USB audio pair. (Arm two audio tracks):
- PART 1 _ Main L&R
- PART 2 _ Main L&R
- PART 3 _ Main L&R
- PART 4 _ Main L&R
- PART 5 _ USB 1&2
In Cubase, using two Stereo Buses, record an Acoustic Piano/E. Piano performance recording to two tracks. Use the Super Knob/FC7 Foot Controller 2 to morph the sound between the Acoustic Piano and the FM-X Electric Piano as you record. (You can just press the [AUDITION] button if you want to observe how the audio will be recorded to each Track in Cubase):
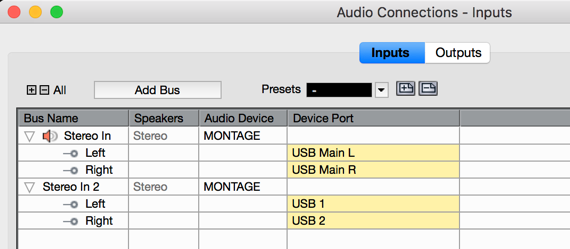
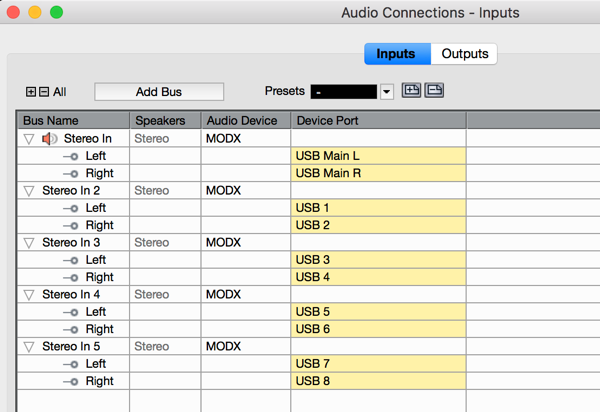
In Cubase, you will go to STUDIO > AUDIO CONNECTIONS > INPUTS and create a second Stereo Bus. The first four PARTS will use the MODX “USB Main L/R” to travel to the computer and the FM-X Part will travel on the second bus (“USB 1/2”) by itself.
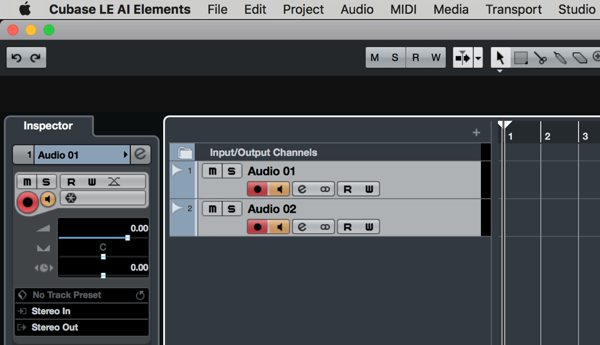
On the Cubase main Track view, you will want to make sure that Audio 01 is set for INPUT = “Stereo In”; while Audio 02 is set for INPUT = “Stereo In 2”
If you think of plugging and instrument into an input on the band’s mixer, this is what we are doing digitally. The instrument is the PART OUTPUT, we create the INPUT, and then we assign the Track to receive data from that INPUT.
You can highlight both tracks – using SHIFT + CLICK:
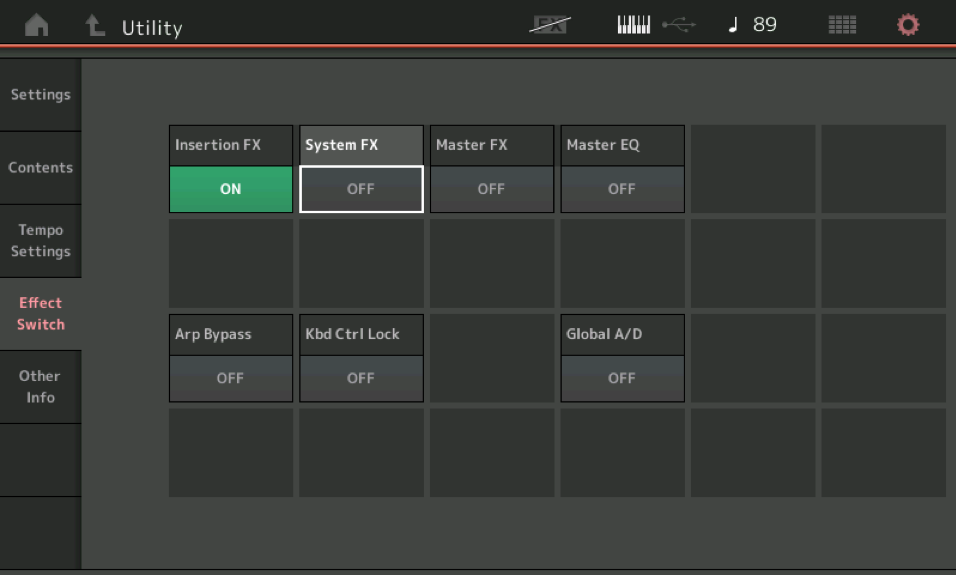
If you opt to ‘Bypass’ the FX (System FX, Master FX and Master EQ) the results will be just the PARTs with their Insertion Effects.
SYSTEM and MASTER EFFECT, to be or not to be?
If you wish to record without the SYSTEM EFFECTS and MASTER EFFECT, you can simply use the “FX” Bypass feature – found on the top line of the screen, touch “FX” and select to turn OFF System Effects, Master Effect and Master EQ (shown below):
The only difference between the “USB 1-8” Assignable Output pairs and the “Main L&R” stereo pair is the SYSTEM EFFECTS, MASTER EFFECTS and MASTER EQ are applied to the “Main L&R” Outputs. By turning the SYSTEM EFFECTS, MASTER EFFECT, and MASTER EQ = OFF: No System Effects are recorded to the DAW – You would use this scenario when you are opting to add a plugin Reverb during mixdown*. (Arm two audio tracks).
*It is often preferred to leave adding Reverb Send amounts until you have assembled all the musical components.
Leaving the INSERTION FX active means that the PARTs with active dual Insertion Effects programmed will be output with those effects, intact.
Again, you can use the [AUDITION] function during these routing experiments to provide music content so that you can concentrate on the signal flow and assignments, rather than splitting concentrating on ‘what to play’ and how to route it. Later, as you become comfortable with routing and assigning, you can play/record something meaningful. Your choice.
Not to repeat myself, but just to stress the fundamental point: Any Template, and specifically this “AUDIO REC on DAW” template, is just a starting point. You will, more often than not, have to make changes in the routing of the PART OUTPUT settings to match what you have selected to record.
Please take the time and get comfortable using the OUTPUT assignment function on the MODX and the INPUT creation in your DAW (Cubase). It’s as easy as 1-2-3:
- Set the MODX instrument “PART OUTPUT” >
- In Cubase go to “AUDIO CONNECTIONS > INPUT” > create an Input Bus, if necessary.
- Assign the Input to an AUDIO TRACK
“The Green Flash” Multi Part Example
Let’s look at one more example, where we actually use the templates default assignments:
- Recall the Performance: “The Green Flash”.
- You can do so by pressing [CATEGORY] and typing the word “green” in the text box.
For this example, let’s BYPASS the SYSTEM FX, the MASTER FX and the MASTER EQ:
- Touch the “FX” that appears on the top line of the screen to open the BYPASS screen.
This is a 5-Part Performance that includes a pulsating pad, a couple of traditional arpeggiated Parts, a Drum kit and an arpeggiated Synth Bass. Use the different (red) SCENE buttons to change the musical sections…
A SCENE can store a myriad of synth and mixer settings for instant recall. It can store Mute status, mix Volume, Pan positions, Effect Send amounts, Arp Selections, Motion Sequence Selections, Swing and Timing offsets, etc., etc. However, in this particular Performance it is changing the current Arp Selection and Motion Sequence Selection.
There are eight SCENES, accessible via the red buttons 1-4 and 5-8 on the left front panel.
RECORD SETUP: Press [SHIFT] + [UTILITY] to access the “Quick Setup” screen
Select “Audio Rec On DAW”
This action will make the following default PART assignments automatically:
Audio
- A/D Input = Line
- Outputs = +0dB
- Direct Monitor = OFF
MIDI
- MIDI In/Out = USB
- MIDI Local Control = ON
- Arp MIDI Out = OFF
- MIDI Sync = MIDI
- Clock Out = ON
- Song Play/Stop Rcv/Transmit = ON
- Controller Reset = Reset
- FS Assign = Arp Sw
- Super Knob CC = 95
- Scene CC = 92
If you had these set differently, please realize that activating a QUICK SETUP template, your Audio I/O and MIDI I/O settings will be changed. It will also set the following PARTs to these OUTPUTS:
- PART 1 will be assigned to Main L&R
- PART 2 will be assigned to USB 1&2
- PART 3 will be assigned to USB 3&4
- PART 4 will be assigned to USB 5&6
- PART 5 will be assigned to USB 7&8
We should mention that the settings made by any of the QUICK SETUP templates is user programmable. We highly recommend you work with the MODX before you attempt to make any changes to the Factory defaults. But you can customize them as a part of your MONTAGE’s system settings. For example, if you always work with a Microphone, you might opt to overwrite the factory default with “A/D Input” = Mic.
Because this Performance features Drums – let’s take a look at how you can have your data line up with Bars and Beats in Cubase. We’ve learned that computers count time like civilians, in minutes and seconds but we can have it count time like a musician would, in bars and beats. This particular Performance is 140 BPM.
Setting the Tempo in Cubase and making it the master clock
In Cubase, go to PROJECT > Tempo Track > set the Tempo to 140.000.
Also, under PROJECT find “Project Setup” > set the “Display Format” = “Bars+Beats”.
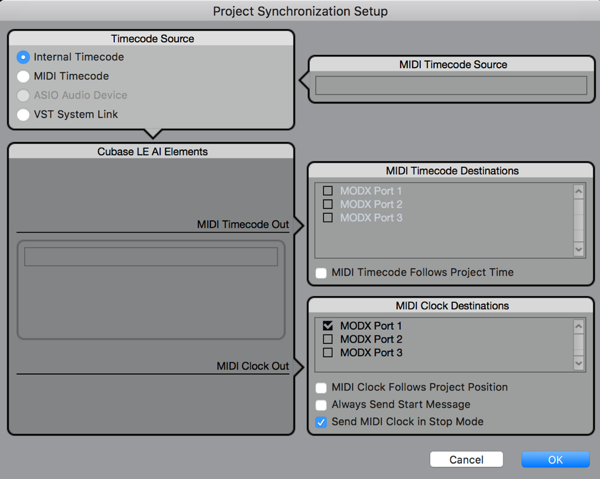
Go to TRANSPORT > PROJECT SYNCHRONIZATION SETUP… > MIDI CLOCK OUT > MIDI Clock Destinations = “MODX Port 1”:
Click “OK”.
When you start Cubase, MODX will take its tempo cues from it.
In this Performance the Arpeggios and the Motion Sequence will follow the Tempo of the Cubase Project.
Go to STUDIO > AUDIO CONNECTIONS > INPUTS > create the Audio Buses to carry the signal. You are typically given the first “Stereo In” assigned to the “Main L&R” – you will need to add four more Stereo Buses:
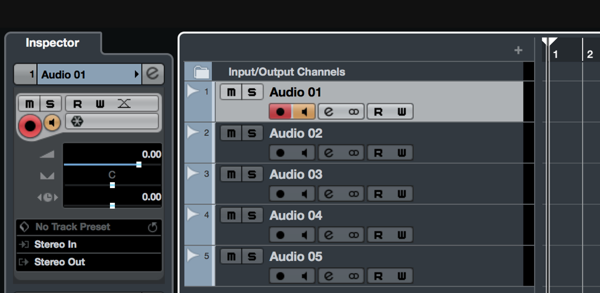
Go to PROJECT > ADD TRACK > AUDIO and add 5 Stereo Audio Tracks:
Your track appears like this:
Select each in turn, and assign the Track INPUT as follows:
- Audio 01 – Stereo In (already assigned)
- Audio 02 – Stereo In 2
- Audio 03 – Stereo In 3
- Audio 04 – Stereo In 4
- Audio 05 – Stereo In 5
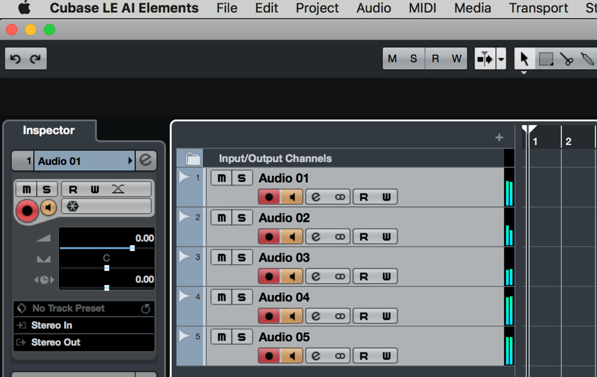
To record all five Tracks simultaneously you can select them all together, Select Track 1, then SHIFT Click Track 5:
Let’s learn something about Level setting. You can, of course, adjust the individual PART Level using the MODX front panel Sliders. However, what we will learn next is that all PARTS of a PERFORMANCE also share a “common” master volume, if you will, that affects the overall MODX output of this Performance. It is the equivalent of raising all 5 Part’s output level with a single parameter. And, no, it is not the main VOLUME SLIDER (as we know this does not affect record level Out via USB). Here’s where to find it:
In the MODX:
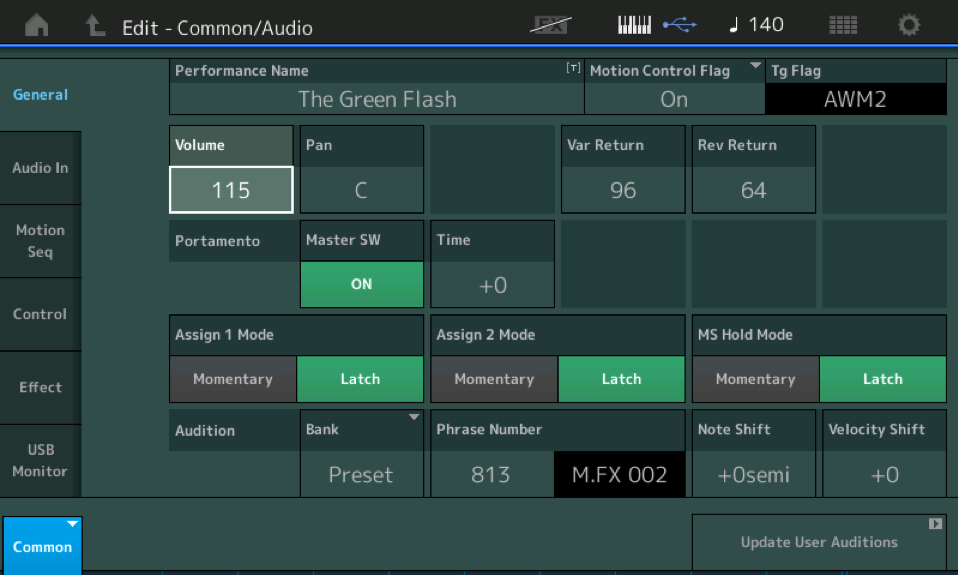
- Press [EDIT] – the word “Common” appears (blue in the lower left corner).
- Touch “General” (shown below).
- Here you can see the Common overall Volume of “The Green Flash” = 65l
- Raise the Volume here to between 110-115. This will raise the output level of all of the PARTS without destroying the original balance between the items. (Common Volume versus Part Volume):
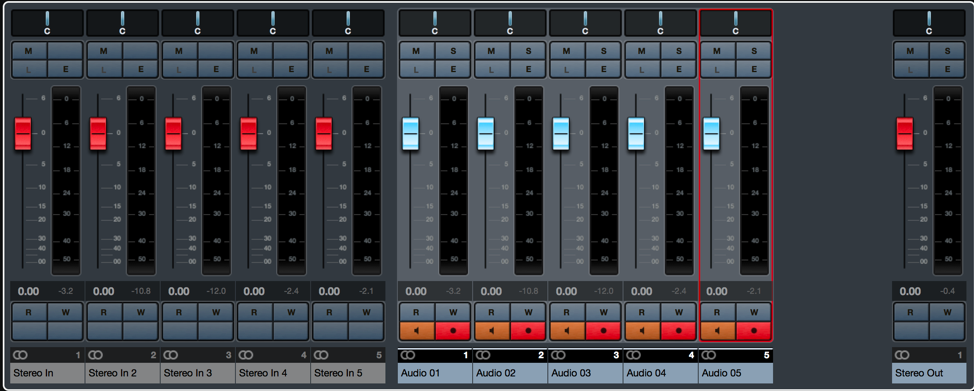
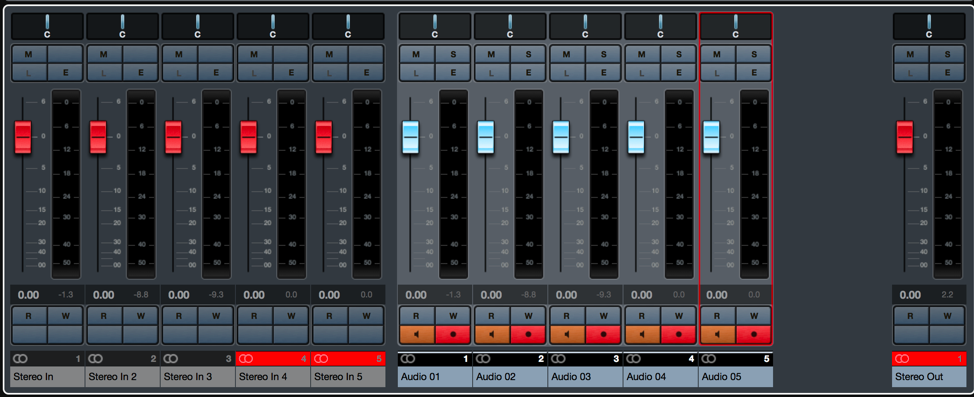
The goal in setting levels is to avoid clips. Clipping is wrong (always). The Meters in Cubase will always tell you the maximum value reached by the audio – so that even if you are not looking at the Meter, when a clip occurs it leaves behind a footprint. In the Cubase meter below:
Shown above are the Meters after a run-through to check levels.
On the left you see the first five channels (with red faders); These are the Audio Connection Inputs.
Next, you see the five Tracks channels (with blue faders); These are the individual Stereo Tracks.
The main Stereo Out is on the far right.
The fader levels are all set for REC: 0.00; In light grey next to that number is the maximum (peak hold) value reached by that channel. After a run-though with the PERFORMANCE Common VOLUME = 115 these are the results:
- Channel 1 -3.2
- Channel 2 -10.8
- Channel 3 -12.0
- Channel 4 -2.4
- Channel 5 -2.1
The main Stereo Out (red fader cap) reached a maximum of -0.4. Therefore, no CLIPS occurred. Had a clip occurred a RED line would appear on the channel – alerting you to reset your levels.
Here is a view of channels that have CLIPPED (bad); you never want to see these red indicators (other than in this article screenshot):
Stereo Out ‘clipped’!
You could adjust the original MODX Part Sliders to create a *new mix* of the PARTS. But recognize that the COMMON VOLUME adjusts all the PARTs in proportion to each other. And depending on the programming in the PERFORMANCE you cannot assume that the programmer left Volume control on the MODX Slider.
The PART Slider may not actually change the Volume of a PART – In the MODX, this is true, particularly when the Volume control has been specifically programmed to respond to another controller.
For example, in “The Green Flash” PART 2 does not respond to the SLIDER – instead the output level has been set under control of PART 2 ASSIGN Knob 2, which has been linked to Super Knob position. This was the original programmer’s choice. As you play with this Performance, you will discover that PART 2 only sounds when you raise the Super Knob. How loud PART 2 gets is a function of the Control Assign RATIO parameter (just FYI).
As you get to know more about controller assignments you will discover that you can customize control over each PART under your KBD CTRL (Keyboard Control).
Things to try
- Play and hold a right-hand Chord while SCENE 1 is selected. Turn the Super Knob from minimum to maximum, you will hear the arpeggiated PART 2 fade in as you increase the Super Knob. In MODX, you can reassign PART VOLUME to a physical controller – because you will be playing with both hands the option to control individual PARTS with alternate controllers is available. Using a Yamaha FC7 sweep pedal (plugged into the Foot Controller 2 jack) lets you move the Super Knob ‘hands-free’.
- In SCENE 2 PART 2 fades in as you raise the Super Knob, and the arpeggiated sound in PART 3 fades out – from that same gesture.
The MODX PART Sliders are not always active as the only Volume control. The architecture is flexible enough to with a single gesture from the Super/AssignKnob matrix, you might change the volumes of each Part in a pre-specified manner. Unlike traditional single channel transmit systems the Motion Control Engine (MONTAGE/MODX) offer real-time control of volumes in totally customizable ways – allowing multiple Parts to simultaneously be changed while each is changed in its own pre-determined manner. You ca program whether they get louder, get softer, remain the same, more a little or a lot, on a per PART basis. More on that in future articles!
For now, the take away is: when a Slider does not affect the PART’s output level, then you can rest assured that it is under a real time physical Controller.
Have questions or comments about this article? Join the conversation on the Forum here.
Need to catch up on the first part of this lesson? Check it out!
And stay tuned: our own “Bad Mister” – Phil Clendeninn – has more in the works for all you MODX fans!

