

Tagged Under
PERFORMANCE 14: Envelope Follower
(The Performances associated with this tutorial series can be found here)
Using the Envelope Follower you can use the output of a Part for modulating selectable parameters of any other part. This way you can transfer the movement or rhythm of a Part to other Parts. This way of shaping the sound works especially well using percussive arpeggios or drum grooves.
In the Controller Assign box you will find the sources named “Envelope Follower, 1 – 16, AD, Master”.
Translation: An Envelope is used to describe a shape. In synthesizers, we talk about three main components: Pitch (oscillator), Timbre (filter), and Loudness (amplitude). There are Pitch Envelopes, Filter Envelopes and Amplitude Envelopes. And what we mean by “shape” is, we need a way to describe how they behave over time. How they start, what they do while they are happening and how they disappear. In the case of this Envelope Follower we are using the Loudness (Amplitude Envelope) shape of one PART’s sound to create an attack-decay-sustain-release shape for another Part to follow. Envelope Follower – the Source PART creates the envelope, the Destination PART follows that shape.
We saw an example of how the Side Chain Compression uses one sound to replace or “duck” the volume of another, here the one sound will follow the shape of the other. A drum groove’s pulsing nature can cause the affected sound to follow exactly the rhythmic movement. You could take a phat synth bass and marry it to the shape of the kick drum pattern, so that whenever the kick drum occurred the synth bass sound would strike.
In this example, a Synth Comping sound in PART 2 is used to influence a Synth Pad sound in PART 1. The Synth Comping sound is under control of an ARP, its pulsing techno groove triggers the Synth Pad to increase in volume. (Please note: The Live Set that is used in the Mastering MODX series is located here).
For using the Envelope Follower you simply have to make one control assignment for the Part, which receives the modulation:
This assignment is found in the MODX by editing the PART Controllers.
From the main Performance (Home) screen:
- Press [EDIT]
- Select Part 1 (touch the blue box in lower left corner and select “Part 1”)
- Touch “MOD/CONTROL”.
- Touch “CONTROL ASSIGN”.
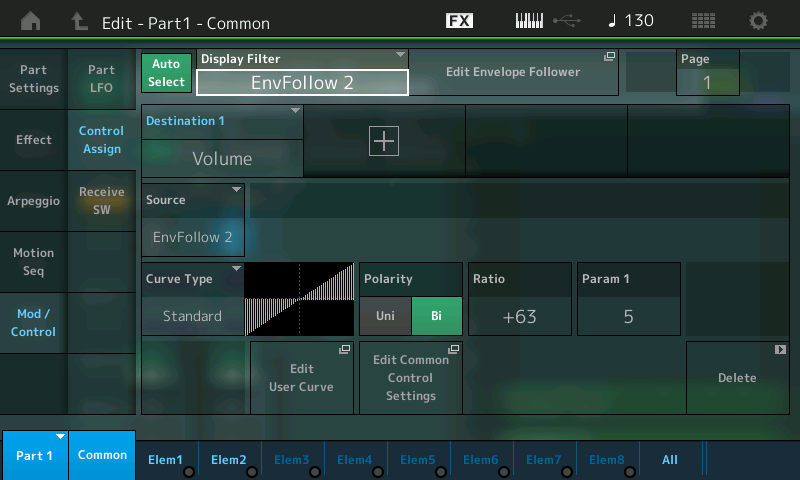
- Touch the “DISPLAY FILTER” box to open the LIST VIEW.
- Use the DATA WHEEL to scroll to “EnvFollow 2” (which means that PART 2 will be referenced as the SOURCE).
Here you can see how the VOLUME is being controlled:
In this example, the Dance pad is shaped by the rhythm of the synth arpeggio of Part 2.
Selecting the Source “Envelope Follower 2” and the Destination common “Volume” means, that the output of Part 2 modulates the Volume of Part 1. You can really intensify what this means by disconnecting Part 2 from the audio output. Here’s how:
- Select Part 2 (blue box, lower left corner, select “Part 2”)
- Touch “Part Settings” > “General”
- Set the “Part Output” = Off
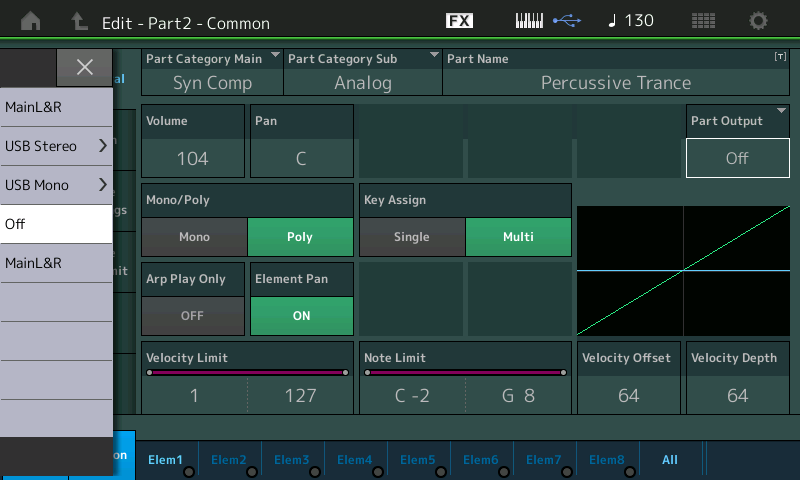
What this does is allow just the amplitude of the arpeggiated Part 2 to manifest itself through the Dance Pad in Part 1. You are no longer hearing Part 2 directly. So you hear the dancing pattern of the arp, only as it triggers the volume of the pad sound…. Return to PART 1:
- Part 1 > “Mod/Control” > “Control Assign”:
Temporarily reduce the Ratio to +0. This will remove the influence of Part 2 on Part 1 – you will hear the normal steady sound of the pad sound. As you increase the Ratio toward +63, you hear the increased influence of Part 2 on Part 1.
Helpful to understand the routing will be to navigate to the EFFECT itself. In the screenshot above you can see a box next to the “DISPLAY FILTER” > EnvFollow 2 that is a shortcut box “Edit Envelope Follower” – touch this to be taken directly to the Envelope Follower:
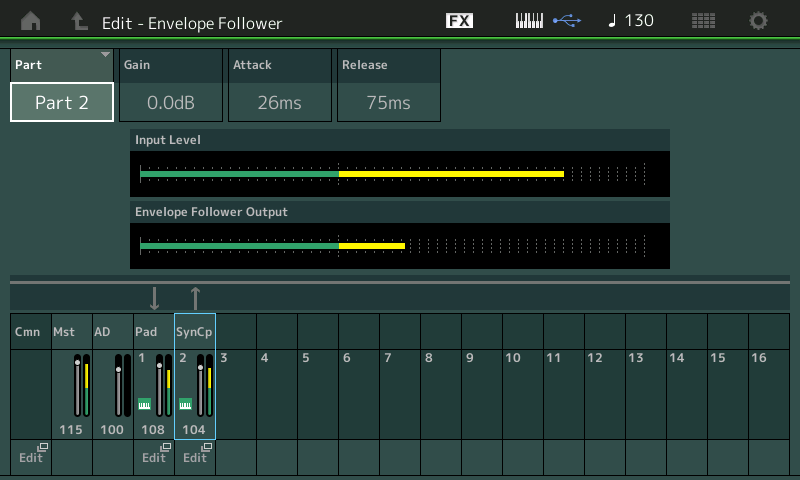
In the screenshot above: PART 2 is selected. It is identified as the SOURCE; the bottom of the screen shows which Parts are feeding into the Envelope Follower as SOURCES to create the “envelope” and which are set to “follow”.
From this it is clear that Part 2 “SynCp”, is the source (arrow pointing up), and Part 1 “Pad” is the “follower” (arrow point down). You have GAIN, ATTACK and RELEASE – to help “shape” the envelope. Experiment by changing the Attack and Release to hear the effect on the results. Gain simply increases the audio output of the source energy.
Set the Attack to 1ms and the Release to 15ms
Important Note: It should be mentioned here that the screenshot above allows you to Edit the GAIN, ATTACK and RELEASE of the item that you have selected as the ENV FOLLOWER source. You do not *select* the SOURCE on this screen. The SOURCE is selected back on the PART CONTROL ASSIGN screen. When you change the “PART” on this screen, you are simply looking at (viewing) this PART’s meter – its contribution to the mix. Above, we are looking at the INPUT LEVEL of PART 2, we are also looking at the Envelope Follower Output Level; Changing the GAIN, ATTACK and RELEASE of PART 2 will influence the sonic result.
An important chance for changing the character of the modulation further, exist by using the filter envelope of Part 2 (Element 1). Especially the short filter decay (Decay1Time) is very important for the conciseness for the shape of the modulated Pad sound. If you increase the Decay Time the intensity rhythmic modulation will be reduced more and more.
The Envelope Follower’s impact can be easily demonstrated in this example by navigating to the Filter EG:
From the main PERFORMANCE (Home) screen.
- Press [EDIT].
- Select Part 2 to view PART 2 parameters.
- Touch “Elem1” on the bottom line of the screen to view Element 1 settings.
- Touch “Filter”.
- Touch “Filter EG”.
- You can see you are editing “Part2 – Element1”.
Highlight the TIME parameter “Decay1” in the screen (shown):

Increase the value above 42; then decrease it again to hear what the Envelope Follower is doing. It allows you to shape the overall sound.
The same chance for changing the character of the sound exist in the Amplitude Envelope Generator of PART 2 (Element 1). Both the Filter EG and Amplitude EG must be seen as influencing the sound output over time. Filter EG often depends on the Amplitude EG, because if the AEG does not allow for sound to happen, movement in the filter is meaningless. Therefore, if the AEG is not allowing any sound to occur, you will not be able to tell what the Filter is doing – they work together! (Plain Talk: the AEG allows for volume change, if there is no volume allowed, you will not be able to hear filter movement. Simple as that!)
Of course, the sound and/or device you choose to generate the source signal will have a great deal of influence of the result.
Extra Credit
Volume (amplitude) is a very typical use for the Envelope Follower, because we are using the loudness of the source to control the loudness of the target; but do not limit your thinking to the obvious or typical. This happens to be the best way to understand what this tool does, but be sure to use your imagination and do not be afraid to ask “I wonder what will happen…” This is part of the joy of synthesis.
Try “Element Pan” instead of VOLUME as a destination for the Envelope Follower. Now instead of changing the volume of the target you can have that audio burst create a movement in position in the mix – get out your headphones as you can send sounds swirling off into the atmosphere. As we dive deeper you will have more of the MODX tools under your belt and with knowledge of what they can do, you will find an endless source of inspiration and things to try.
Things do not all have to happen in a typical pulsating rhythmic way, you can create your own custom CONTROL motions over entire sections of music. You can offset the timing, extend when and where and how things occur. We can only open the door, let you peek down the long infinite hallway – it is for you to explore and create the music.
If you have any questions or comments about this article, please join us to discuss them on the Forum here.
Catch up on the previous article in the series – “Mastering MODX: Side Chain Modulation” here.
Next article now available: “Mastering MODX: Motion Sequences” here.