Mastering MODX: Navigation Tips

On the MODX, there are often more ways than one to go from here to there when navigating the operating system. We will give you some tips and shortcuts that you may not be aware of that will help you in developing your own workflow.
We only offer these tips as suggested methods, you will need to decide for yourself the “best way” to navigate in each situation. Feel free to mix and match techniques to move from place to place. Highly recommended is a read through the QUICK GUIDE section of the Owner’s Manual, download the Reference Manual, the Data List booklet and the Synthesizer Parameter Manual here.
PERFORMANCE (HOME)
Repeated presses of the [PERFORMANCE (HOME)] button will toggle between the main “Home” screen (top screenshot below), and the informative “View” [HOME] screen (second screenshot below).
The main HOME screen:
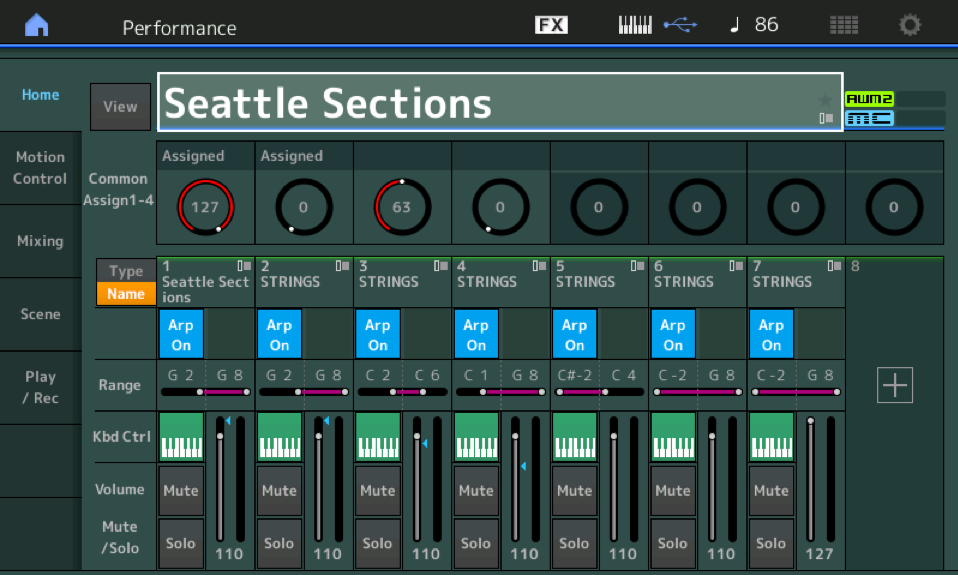
Here you can see eight of the sixteen Parts slots along with the positions of the eight Knobs (in two sets of four, 1-4 and 5-8); Each of the first seven slots (above) contain a synth program, PART 8 is a blank slot. The “+” icon, in PART 8, invites you to ADD a new program to the existing PART, if you so desire. Below the Knob indicators are the numbered PART slots: an ARP On/Off button; the Key Range; the KBD CTRL icon that indicates simultaneous access via the keyboard; a MUTE and a SOLO button; a Part Volume slider; and, an audio activity level meter to show each PART’s contribution.
The VIEW HOME screen:
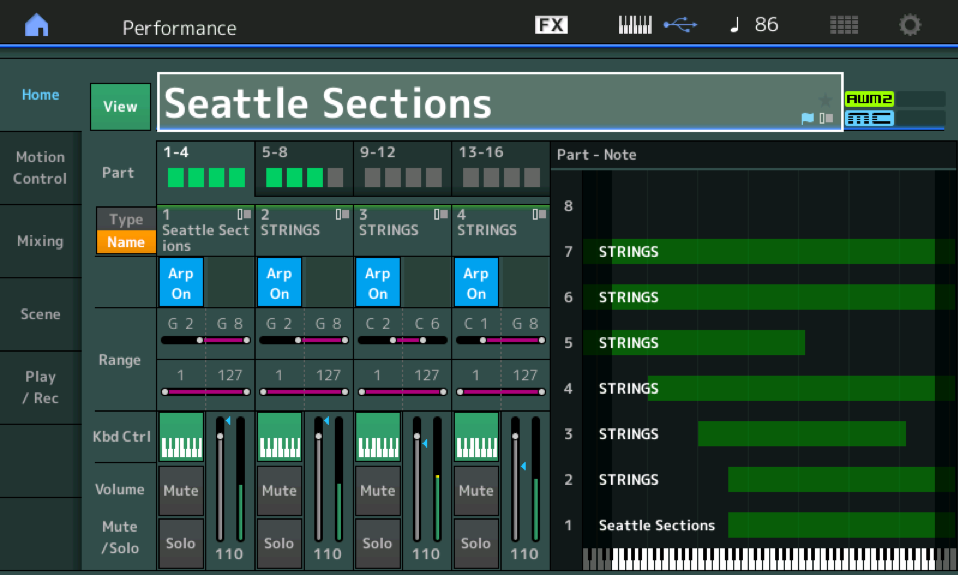
Here you see detailed information concerning the makeup and layout of the currently selected PERFORMANCE- including a split screen that can show Key mapping, a keyboard icon for setting help in setting split points. It can also show velocity and oscillator activity monitor, etc. depending on where you place your cursor highlight
The VIEW option: Activating the VIEW box (green), just to the left of the Performance Name in the screen, is the same as physically toggling the [PERFORMANCE (HOME)] button.
When the “View” screen has the cursor highlight outlining the PERFORMANCE NAME (as shown above), the 16 PARTS of the PERFORMANCE are laid out in four sets of four: 1-4, 5-8, 9-12, and 13-16. Active Parts will have a corresponding green ‘active box’ directly below the Performance name and Part indicator. You can see four green boxes under ‘1-4″ and three green boxes under “5-8”, indicating that “Seattle Sections” has seven PARTS active. The Parts under “KBD CTRL” (Keyboard Control) will be shown on the right half of the screen showing their “Type/Name” and their relative Note regions mapped across the keys. The small keyboard icon across the bottom, will indicate the triggered note when setting a KEY RANGE.
As you move cursor down within a selected PART slot, initially you will see the display change to show activity of Elements, their Volume settings (AWM2), if FM-X you will see the Algorithm (arrangement of Operators) and Feedback Level. Cursor down again to highlight the Note and Velocity Range:
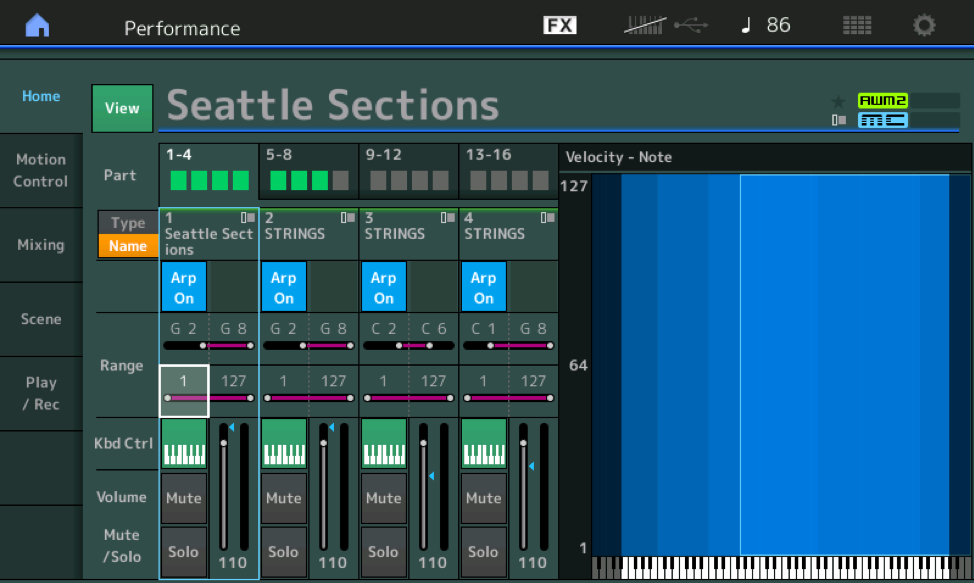
You will see a graphic appear on the right side that monitors and reports on the key velocity and where across the keyboard you are triggering – you use these to assist you when you create splits and layers, both horizontally and vertically. It is possible to create Splits and Layers without ever having to drop into [EDIT], it can be accomplished right here on the HOME screen.
The small blue arrow next to the PART Volume indicator, shows where your physical Slider is in relationship to the stored PART Volume – when it turns white, the value is equal to the stored value, and at that time it “engages” control over the Part Volume.
NOTE: There may be sounds where changing the Volume Slider has no effect on the output level. This will occur when the control over this PART’s Volume has been purposefully assigned to another means of control – could be the Super Knob, or the Ribbon Controller, or under control of some performing controller.
Working the [ASSIGN] and QUICK EDIT Knobs
There are just four physical Knobs so you use the [ASSIGN] button, located just to the left of the four Rotary Encoders, to toggle access to “Assign 1-4” or “Assign 5-8”.
When on the main HOME screen, you will see the eight “Common Assign” knobs. (Common Assign Knobs are the ones that are linked to the Super Knob movement); When you select an individual PART slot, you would be viewing the eight Assign Knobs for that Part.
Additionally, you might see the positions of the 8 knob functions of the “Quick Edit” area: Located on the left front panel, just above the [ASSIGN] button, you have a button that toggles four rows of “Quick Edit” parameters: “Common Tone”, “Common EG/FX”, “COMMON EQ” or “Common ARP/MS” depending on which of the four rows is selected: [TONE], [EG/FX], [EQ] or [ARP/MS].
This is an important thing to know. From the Main HOME screen, you can examine other specific areas of the Synth engine. The Knob Functions that appear when a PERFORMANCE is initially recalled will be either the “Common Assign” Knobs, or one of the four QUICK EDIT area functions: “Common Tone”, “Common EG/FX”, “Common EQ” or “Common ARP/MS”; you can STORE your version of the PERFORMANCE with those items on the Knobs that you feel you will use.
If you want to access a particular PART’s ASSIGN KNOBs, you simply need to select that PART via the [PART SELECT] routine.
The info shown for the eight screen Knobs changes depending on the current context. We can see that when the [PERFORMANCE (HOME)] option is selected, most often on the Factory PRESETS the “COMMON ASSIGN” functions for the eight Knobs are shown, but this is customizable.
Selecting a PART and using the MUTE and SOLO function
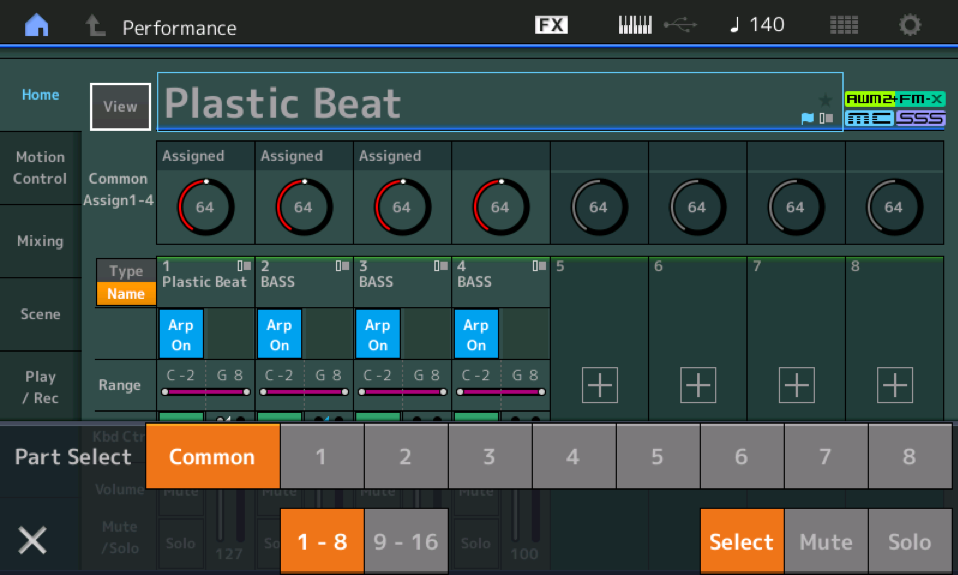
Press the dedicated [PART SELECT-MUTE/SOLO] button found on the right front panel.
A screen overlay appears across the lower portion of the screen – what it offers you are methods to *select* either Common, or individual Parts 1-8 or Parts 9-16; you can also opt to *mute/solo* the selected Part:
Controllers and Quick Edit
If you select PART [1], the screen will show you Part 1’s eight Assign Knobs.
When you select a PART, its controllers are active. This is true for all sixteen Parts. And you can understand that you can customize for each of the sixteen Parts which 8 parameters are shown when that PART is selected.
This allows you to have the knobs one way for a LEAD SYNTH sound and an entirely different set of parameters for controlling your E.Piano sound – even if they are in the same PERFORMANCE. The Assign Knobs allow you to have what you need available when you access that PART. “Assignable” means customizable to your needs – whatever you need when you select the that PART!
When you have selected a Part, 1-16, you can then use the [TONE], [EG/FX], [EQ], [ARP/MS] functions, located on the upper left front panel. These are parameters that are used to apply overall offsets to the selected Part’s stored programming. As you select a particular row, the parameters are accessible via the physical Knob directly below it.
You have a way to apply an offset that would apply to all Filter Cutoff settings within the Part. Remember, a Part can have multiple filters, for example, each AWM2 Element each could have its own separate filter and filter settings. Changing the CUTOFF Knob for Part 1 would tell all filters of this Part to open or close from their current stored position. You are literally applying an offset that raises the cutoff frequency or lowers the cutoff frequency proportionally for each filter.
Some of these Quick Edit functions can be viewed directly by touching “Motion Control” on the HOME screen, then touching “Quick Edit”. Shown below PART is “COMMON”:

Moving the CUTOFF KNOB here would affect all PARTS in common. If you select an individual PART, however, the parameters are going to address just that one PART.
By selecting the [TONE] row you have access to: Cutoff, Resonance, Pan, and Portamento:
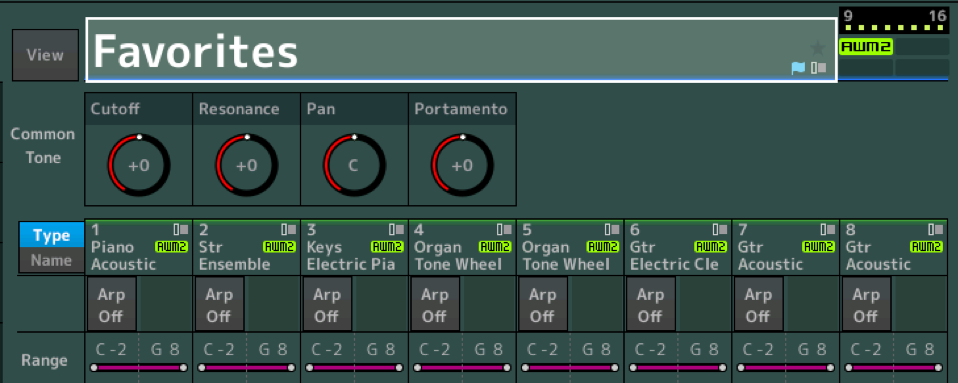
- If you select the [EG/FX] row: Attack, Decay, Release, Rev Return.
- If you select the [EQ] row from the HOME screen the Knobs will indicate: Low Gain, Mid Freq, Mid Gain, High Gain.
- If you select the [ARP/MS] row will show the ARP Play FX Offsets: Swing, Gate Time; and the Motion Sequence Offsets: Amplitude, Shape.
Extra Credit
When assigning sounds to a PERFORMANCE – each PART could have its own custom arrangement of 8 parameters assigned to its PART Assign Knobs. For example, in my custom Performance shown above (called “Favorites”), I have an Acoustic Piano in PART 1, a String Ensemble in PART 2, an Electric Piano in PART 3, a Tone Wheel Organ sound in PART 4 and so on… each setup as an individually selectable program. Instead of linking multiple instruments to play simultaneously, this Performance is an example of using the one PERFORMANCE program to assemble those sounds I need extremely rapid access to while on stage. You can switch without any interruption in the sound when the instruments are contained within the same Performance program. Smooth, seamless transitions within the PERFORMANCE environment is one of the things Motion Control does for you.
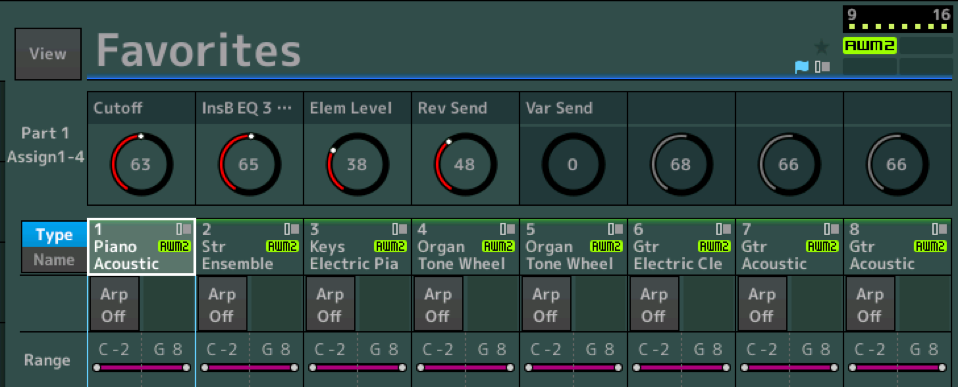
PART 1 (Acoustic Piano) When PART 1 is *selected* playing the keyboard will sound as an acoustic piano. It happens that I have selected the following parameters for real time access: “Cutoff”, “InsB EQ 3 Gain” (Mid-Range on Insert EQ), “Element Level” (KeyOff Sound), “Reverb Send”, and “Variation Send”.
“Cutoff” and the Mid-Range EQ Gain allow me enough room to tweak this piano for use in the band and as a solo piano – the Element Level can bring up and down the amount of ‘hammer noise’ – Reverb and Variation Effect Send levels.
Shown below PART SELECT 1 is activated. The first five PART 1 Assign Knobs are ready for real-time manipulation:
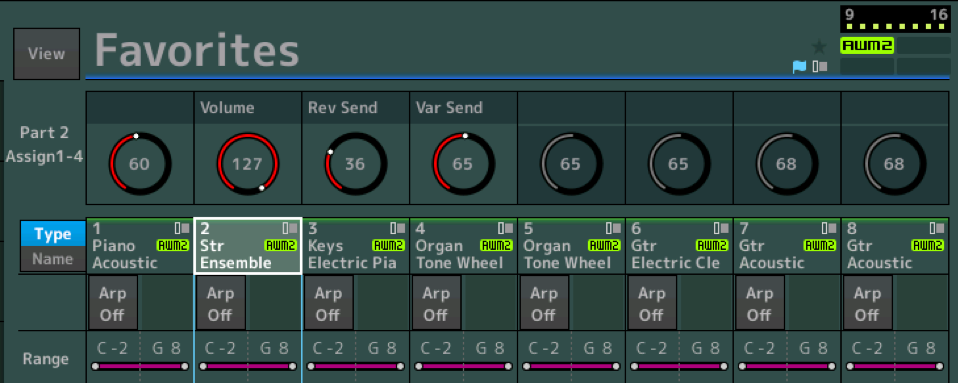
PART 2 (String Ensemble) when I *select* PART 2, which can be done by using the [RIGHT CURSOR] button, I decided that for the Assign Knobs I needed just “Volume”, “Reverb Send” and “Variation Send”. PART Selection can be done by accessing the dedicated [PART SELECT-Mute/Solo] button as described above, or you can simply CURSOR RIGHT to move the highlight to PART 2:
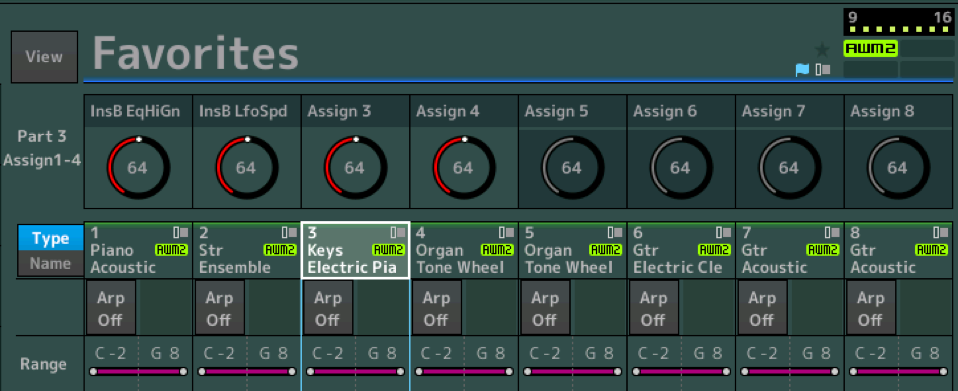
PART 3 (Electric Piano) it happens I’ve opted to just control the High Gain of the EQ and the LFO Speed of the Auto Pan in Insert B. The MW happens to control the Auto Pan Depth, but Speed (InsB LfoSpd) is assigned to PART 3’s Assign Knob 2:
PART 4 (Tone Wheel Organ) here I have decided to access “InsA Rotar/Horn balance”, “Element Level” (leakage noise), “InsB Dist Drv” (overdrive), “Coarse” tuning (Turning up this knob creates pitch and volume drop; emulates powering down the mighty B3), “Rev Send”, “Var Send”, and “InsA Rotary Speaker Speed Control”:
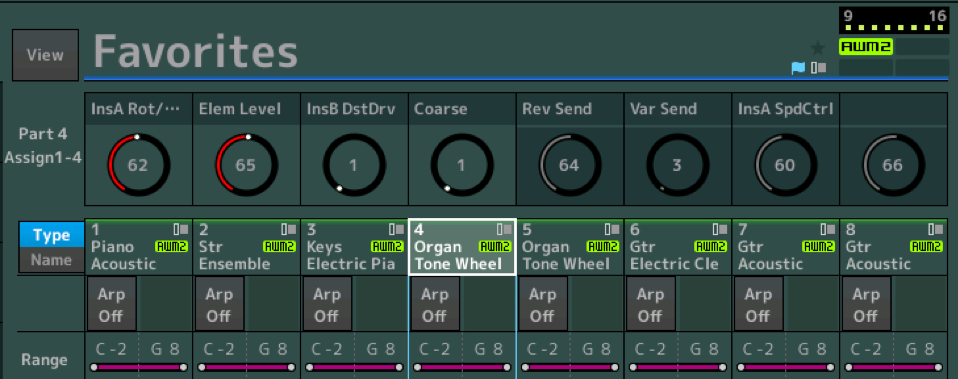
Point being that when recalling a sound by selecting a PART you can customize what Assign Knobs are available for that PART on an individual basis – it is entirely up to you on each PERFORMANCE. You would base your selection of parameters on what you require from this sound at the time. Rather than hunting through the architecture every time, if you know you want to adjust certain parameters in real time, simply make sure you customize the PART’s “Mod/Control” > “Control Assign” screen to serve your needs – within the PERFORMANCE PART.
You can create custom “NICKNAMES” (Display names) for the PART Assign Knobs, this way you do not have to guess at what a Knob is controlling when you select that PART. In the Tone Wheel organ sound in PART 4 (shown above), at the end of the organ solo, I need the sound effect of turning the B3 OFF – it dies in both pitch and volume simultaneously. This is accomplished by assigning a single PART Assign Knob to do both COARSE tuning (with a negative curve) and Part VOLUME (with a negative curve) – as the Assign knob is turned up, the pitch and volume will dramatically decrease. By adjusting the Curves, I can get just the right feel for the simultaneous pitch and volume fade.
Important Tip: The Super Knob and its COMMON ASSIGN Knobs are always available for control via the movement of the Super Knob (or your FC7 set to control it). That means, no specific front panel button needs to be selected, nor does any special lighted button need to be illuminated for the Super Knob assigned parameters to be engaged. This allows you to be viewing and engaging other functions assigned to the individual PART Assign Knobs while you can continue to control those linked to Super Knob position via its movement. Understand that if you want to set physical Knob #1 to be available as a real time PART control, yet still use the Super Knob to do what is assigned to it, that is possible!
The [ASSIGN] button located to the left of the Assign Knobs determines if turning the knob directly will apply. It is totally possible to have the physical knobs doing [TONE] row control functions for a specific PART, while movement of the Super Knob parameters is taking place as normal – when the FC7 or Super Knob is moved. Remember, the Super Knob can be addressing multiple PARTS while you can have the physical knobs set to control a specific individual PART.
This makes for the utmost flexibility while performing. You can be directly controlling a set of parameters on your lead sound, while simultaneously morphing the backing Arps, pads, and motion sequences being applied to other PARTs via the movement of the Super Knob. One of the ‘super’ powers of being a ‘Super Knob’ is you can be everywhere simultaneously – and you can continue to work behind the scenes even though the screen currently is not showing what you are doing.
Conveniently, a drop-down item will appear in the screen indicating what the ASSIGN KNOB is controlling (either “Common Assigned” or “Part x Assigned”) and it will show the current value 0-127.
Translation: You do not have “see” what parameters are assigned to control them when it concerns the Super Knob. They work without having to select any button. (Simple explanation: just as you don’t need to be looking at the Volume parameter for the Foot Pedal to control volume, you don’t have to be looking at the Modulation screen for the MW to work, likewise you do not have to be in any special place or have any special button active in order for the Super Knob to do what it is assigned to do.)
You can be assured that when you move the Super Knob it then in turn moves the eight Common Assign Knob functions that are linked to it – and this happens regardless of what’s in the screen, what’s showing on the Knob LEDs, or what buttons are pressed! However, when you want to work with an individual PART’s Assign Knob directly, you need to *select* that PART and make sure the [ASSIGN] button is illuminated. The PART Assign Knobs are only ‘super’ within the PART they are programmed in.
The “QUICK EDIT to FULL EDIT” Wormhole
You can move between the QUICK EDIT screen and several of the actual parameter areas using the SHORTCUT boxes that appear near the top right of the QUICK EDIT screen. This “QUICK EDIT” overview is not a traditional EDIT screen. It is a way to apply “offsets” to the deeper levels of the architecture.
From the HOME screen by touching “MOTION CONTROL” > “QUICK EDIT”: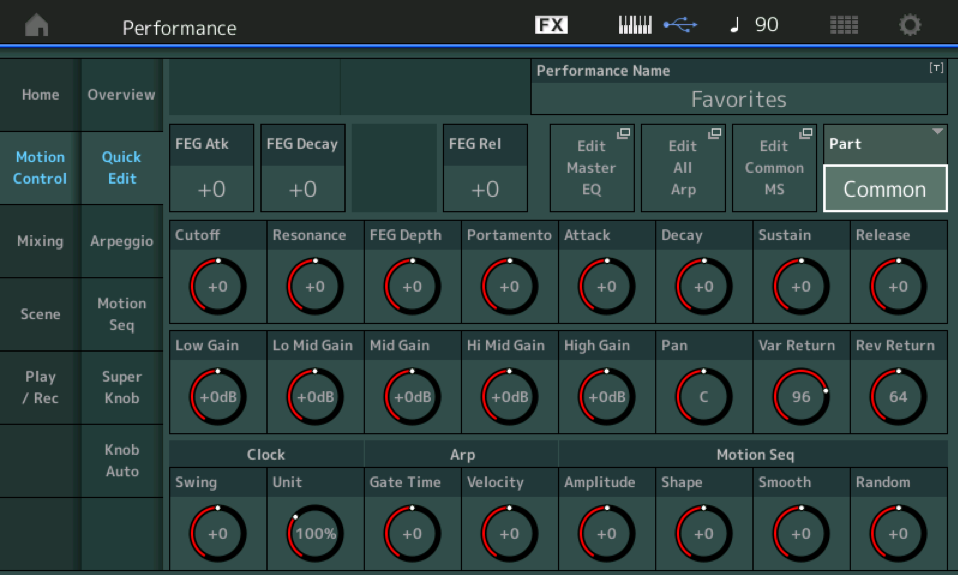
You have three ‘shortcut’ boxes shown when “COMMON” is selected: “Edit Master EQ”, “Edit All Arp” and “Edit Common MS”.
Again, COMMON is when you are addressing everything (all Parts) together. So certainly, the MASTER EQ would make sense because it is the EQ that everything runs through. The “Edit All Arp” view takes you to the screen where you can review all PARTs, eight at a time, 1-8, or 9-16; what Arpeggio Phrases are assigned for each of the eight Arp Selects. “Edit Common MS” – will take you to the COMMON (AUTO KNOB) Motion Sequencer where you can create or tweak your MS. Touching a Shortcut box takes you directly to the deeper Edit screen, and pressing [EXIT] will bring back to this QUICK EDIT screen – avoiding several steps to get from here to there and back.
If on the QUICK EDIT screen you select an individual PART, or an individual PART is already selected when you arrive on the QUICK EDIT screen, your options will concern the selected PART: “Edit Part x EQ”(this will take you to the 3-Band EQ just pre the INSERTION EFFECT block), “Edit Part x Arp” (this will take you to the Arpeggio edit area for just this one PART), and “Edit Part x MS” (this will take you to the Motion Sequence setup page for this PART). This is very convenient when tweaking existing parameters as well as when you are about programming your own setups.
QUICK EDIT are those for quick tweaks, the shortcut takes you to the deeper area where you can get at all the details. Shown below when “Part 1” is shown as ‘selected’ the options for the shortcuts appear just to its left: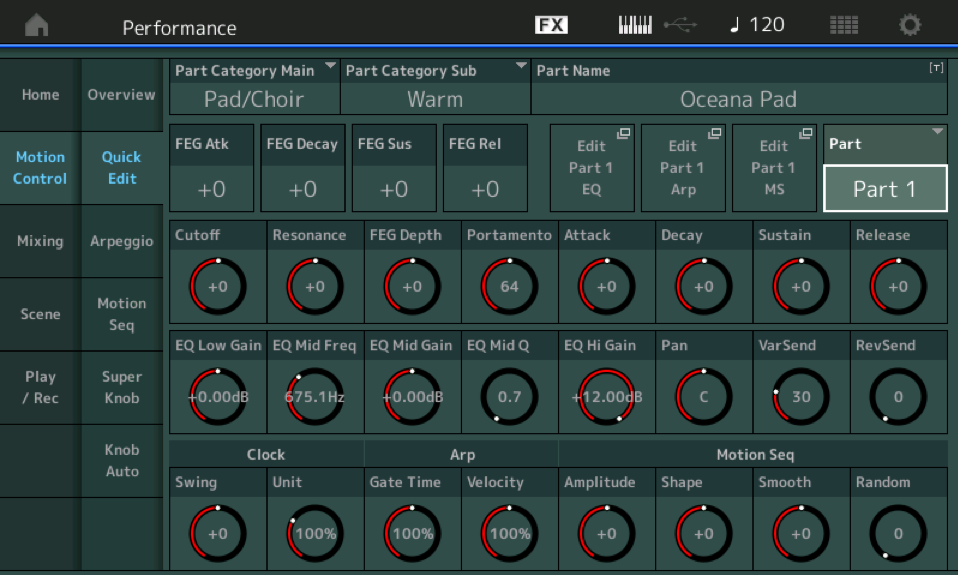
Touching the box that is labeled “Edit Part 1 MS” would take you directly to the screen where you could edit or create a MOTION SEQUENCE for Part 1. Motion Sequences are automated changes in parameters. If you think of Arpeggios as NOTE phrases, think of Motion Sequences as Parameter Change phrases – automating the opening of a Filter, or the Panning of an Element or any of some 250 parameters in the synth engine:
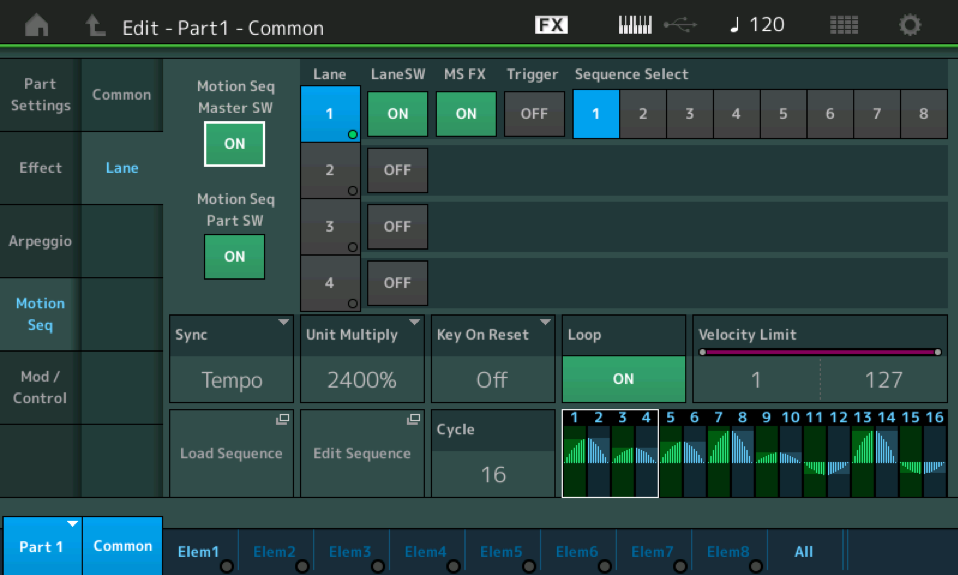
Pressing the [EXIT] button will take you right back to where you were, (the QUICK EDIT screen). The usefulness of this quickly becomes apparent as you can imagine applying timing offsets to the Motion Sequence playback, then jumping to tweak the Motion Sequence parameters in depth, then returning to where you can apply offsets to timing, shape, etc. Or when working with the “feel” of an arpeggio, you may want to drop down into edit or try out a different one. This “wormhole” quickly lets you toggle between the two screens you want to work with. (Wormhole being a theoretical direct connection between dimensions in deep space – between what we know as the known universe and the ‘beyond’.) Here, you are dropping from a general overall offset to the deeper level of the architecture where the actual parameter lives.
On stage you may not want to deconstruct the deeper level, so you program the engine so a particular parameter you wish to manipulate in real time is available for quick access.
LIVE SET
Repeated presses of this button will efficiently take you through your Live Set Banks. We use the word “efficiently”, because this shortcut will advance you, on each press, to the first PAGE of each Bank – Preset 1 > User 1 > then the first Page of each of your installed Library Live Sets. This is an improvement over scrolling through potentially empty User locations before reaching your Libraries.
There are 8 “Live Set” USER BANKS, each with 16 PAGES, each Page with 16 slots. Once you know about this Live Set shortcut, you can move through your data quickly and yes, more efficiently. Many of you will discover there are many more locations than you first thought. The Bank “User 1” has 256 Live Set slots; “User 2” has 256 Live Set slots, and so on through to “User 8” (that’s some 2,048 User Live Set slots; and when you multiply that by the 8 Libraries… that means 16,384 Library Live Set slots).
Since you can create Live Sets and install them in your Library (ROM) area, you can amass quite a collection. Repeatedly press the hardware [LIVE SET] button to quickly define the Bank, then use the Cursor arrows in the screen to select a PAGE. If a Library has data but there are no LIVE SETs stored in that Library, it will not be selected via this toggle method (blank Banks are skipped).
Performing Tip: Navigating while using [LIVE SET+] “live”
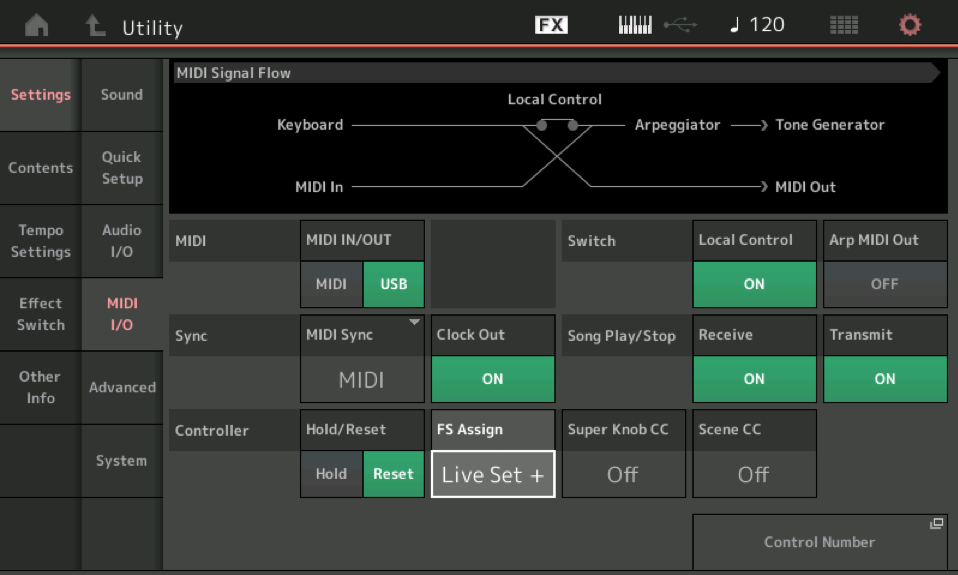
This tip is more of a “Did you know…?” You can advance through your LIVE SET list with a FS (FC4/5 type momentary pedal connected to the Assignable Foot Switch jack) assigned to “Live Set+.
- Press [UTILITY] > “Settings” > “MIDI I/O”.
- Set “FS Assign = Live Set+”:
- Press [LIVE SET] and select the first slot in the LIVE SET grid.
You can now be on any screen of this Program when stepping on the FS to advance to the next Program in your current LIVE SET. As long as you do not manually change Performances you can use the FS to advance, it will matter not whether you are Editing the sound – whether you are deep into real time manipulation of the Motion Sequencer, or tweaking the Filters, you can advance to the next Program in the current active “Live Set” at any time by stepping on the pedal.
You would only need to view the Live Set (Home) screen grid if you need to see what’s coming next in your set… once you realize you are not locked into looking at the names of 16 Programs, it really frees you to be anywhere. The better you get to know your way around MODX, the bigger a feature “Live Set+” via FS Assign becomes. When manipulating Motion Sequence Lanes in real time on your first LIVE SET program, you can advance to the next set by simply stepping on the pedal – and without leaving the ‘Edit Sequence’ screen you can advance to the similar screen in your next program. Very cool!
CATEGORY
Repeated presses of this button when used to search for a Performance or for a Part (or Parts), will toggle you through the “Banks” available on your MODX- “All” > “Favorite” > “Preset” > “User” > “Library1” > “Library2” > “Library3” – and so on, then back around to “All”. If you simply press and hold this button it will return to showing “All” selectable items.
This can help you quickly define your search area. It is highly recommended that you use the “Bank” and “Attribute” functions whenever searching – in addition the Main and Sub Category refinements make it possible to zero in on just what you need. You can use the TEXT box (under the magnifying glass) – type in the name or any portion of the name to see results.
MULTI/GM
Say you are using your favorite DAW software and you want create a 16-Part setup to begin your Project:
- Press [CATEGORY SEARCH]
- Touch “Init” > “Multi/GM”
This creates a 16-Part Mixing Setup, where you can substitute the instrument you wish in each Part.
You will want to set the MODX to MIDI I/O Mode = MULTI so that the Tone Engine can Receive MIDI on multiple Channels simultaneously and the Keyboard will be able to transmit out on any channel you require:
- Press [UTILITY] > touch “Settings” > “Advanced” > Set MIDI I/O Mode = MULTI.
- Recall the HOME screen of “MULTI/GM”.
- Start by pressing [PART SELECT-Mute/Solo] and selecting PART 1.
- Then using [SHIFT] + [CATEGORY] you can enter PART search.
- Set the BANK you wish to search; Set the ATTRIBUTE to “Single”.
Because you entered “Part Category Search” from the INIT “MULTI/GM”, where you are substituting for the default data in the slot, you will be shown only those Single Part programs that are complete playable instruments on their own. Therefore, you will see all complete Single Part instruments created for MODX. Once you have defined the BANK and ATTRIBUTE settings, use the Main Category and Sub Category boxes to narrow the search further. Rinse and repeat.
SLIDER FUNCTIONS
You can STORE a Performance with either the SLIDERS acting as individual PART VOLUMES or you can have them function as ELEMENT/OPERATOR Level controls. Here’s how to set that up and see how a Performance is setup.
When you STORE a PERFORMANCE with “PART CONTROL” active the Sliders will be individual Volumes for each PART – each PART can be on a separate MIDI channel so the Sliders will send and respond to cc007.
When you STORE a PERFORMNCE with “ELEM/OP CONTROL” active the Slider will be individual Levels for each AWM2 Element or each FM-X Operator, allow you to address components within the sound (drawbars, would be an example).
There are two methods to switch the role of the Slider:
- Use the dedicated [PART]/[ELEMENT/OPERATOR] button on the left front panel just to the left of the Sliders
- Press [SHIFT] + [HOME] to view the Motion Control “OVERVIEW” screen; here you see the two options on the right side (top) of the screen:
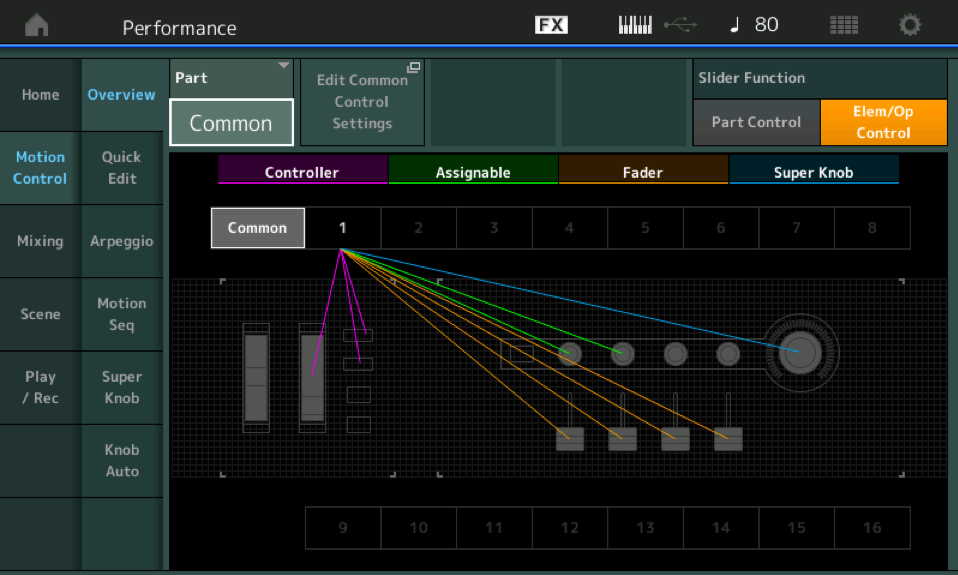
Above you can see that ELEM/OP CONTROL is selected. This Single PART Performance when recalled has the four SLIDERs acting as individual Element Level controls – Each could represent a “drawbar” when the Elements are mapped as individual Footages.
Storing the PERFORMANCE with “Elem/Op Control” active will mean that this is how the Sliders will be set when you recall the Performance.
Want to share your own tips, comment or ask questions? Join the conversation on the Forum here!
Keep Reading
© 2025 Yamaha Corporation of America and Yamaha Corporation. All rights reserved. Terms of Use | Privacy Policy | Contact Us