The Rhythm Pattern feature introduced in MODX is useful for practice and production. This article will show you how to use this cool feature in these two use cases.
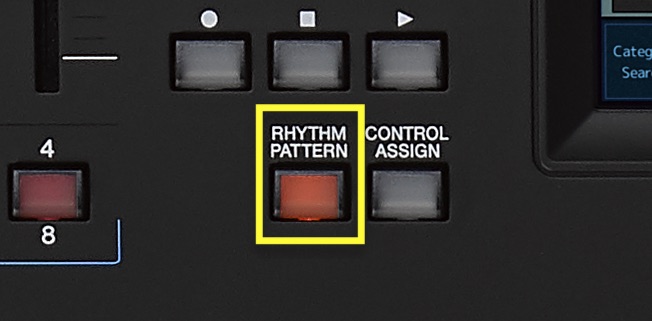
You can add a Rhythm Pattern to any Performance by pressing the [RHYTHYM PATTERN] button located at the bottom left of the Touchscreen adjacent to the [CONTROL ASSIGN] button. It illuminates automatically when you have selected a Performance.
It is really easy to add a Rhythm Pattern to an existing Performance. First, select the Performance “CFX Concert” (Press [CATEGORY SEARCH] and type in “CFX Concert” in the upper right of the Performance Category Search Screen):

Press [PERFORMANCE (HOME)] to call up the main Performance play screen and the dynamic CFX Concert Grand Piano Performance is active. To add a drum groove, press the [RHYTHM PATTERN] button and the Drum Kit select screen appears:
 Each of the drum kits listed above is programmed with a minimum of 5 Arpeggios. Touch on the first kit in the list, “Real Drums Kit”, and that kit along with its 8 corresponding drum Arpeggios appears in Part 5. As soon as you touch a key on the keyboard the drum Arpeggio will start playing:
 To stop Arpeggio playback either press the Transport [STOP] button located directly above the [RHYTHM PATTERN] or touch the [ARP ON/OFF] button on the far left side of the keyboard.
Selecting any of the other kits changes the Arpeggio set as well in a musical genre that works with the selected kit. For example, when you select a kit like “T’s Hip Hop Kit” the drum Arpeggios that are recalled are in the Hip Hop/R&B genre:
 Touching on the “Category/Sub Category/Name” area in the screen brings up a crawl on the left. Here you can drop into Arpeggio Category Search or you can select an Arpeggio Phrase by number from the MODX Data List on Pages 85-143 (this lists all 10239 Preset Arpeggios):
 The Arpeggio Category Search works in a similar way as the Performance Category Search. You can search by instrument type in the “Main” section and by musical genre in the “Sub” section. You can even set your own favorite Arpeggios for instant recall:

 Experiment with various Performances and the Rhythm Pattern feature. Below are two ways you might find it useful
Practice: The Hip Metronome
Practicing with a metronome is a great way to improve time feel and your ability to play with other musicians, especially drummers. Because there are literally thousands of high-quality drum arpeggios in MODX you can use the Rhythm Pattern feature to play to a very hip metronome!
Say you want to practice playing rhythm changes at 180 beats per minute (“rhythm changes” refers to the chord progression of George Gershwin’s “I Got Rhythm”, an essential 32 measure song form in the jazz idiom and the basis of hundreds of different jazz compositions). You could always set a metronome to 180 bpm and go practice. But with the MODX playing to a hip metronome is as easy as 1-2-3:
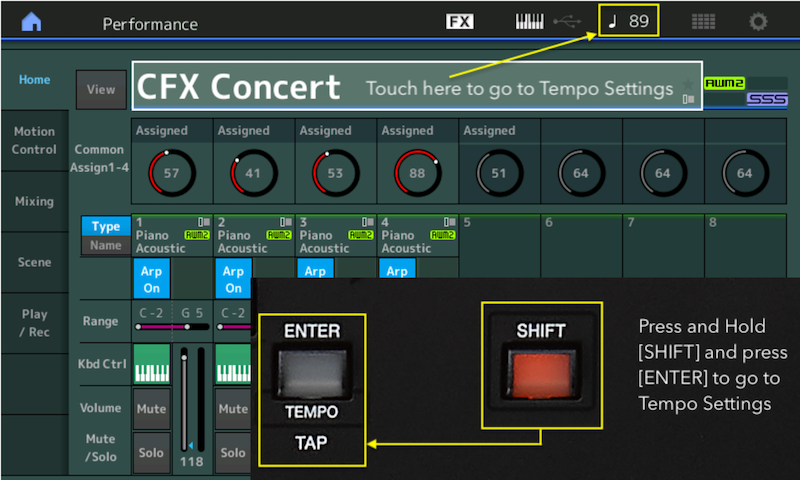
1. Set the tempo. In the very top left of the Performance (Home) screen is the tempo indicator. You can touch that icon, OR you can press and hold [SHIFT] and touch the [ENTER] button (which also serves as the shift shortcut to the tempo) to go to the Tempo Settings screen in Utility:
 2. Press the Rhythm Pattern button:

3. Select a jazz drum kit to play to a swinging drum Arpeggio.
 Production: Adding a Drum Groove to Arpeggio Performances.
There are many Arpeggio Performances in MODX that have no drum groove and the Rhythm Pattern feature is a great way to add them. For this example, I have selected the Performance “Motion Pad”, A 5-Part Performance with no drum part. Take a moment and check out this Performance: It has some great movement and textures.
Touch the [RHYTHM PATTERN] button and select the drum kit “T’s EDM Kit 2”. Once selected as soon as you touch a key the Drum Arp will play along with the rest of the Arpeggio Parts. To exit press the [PERFORMANCE (HOME)] button.
A few tips for musical experimentation:
1. Use the Cutoff and Resonance knobs to adjust the filter for different variations and touch the Knob Function button to adjust the gate time of the Arpeggios. To adjust all the Part of the Performance simultaneously touch the [PERFORMANCE (HOME)]; to adjust Parts individually, touch the [PART SELECT MUTE/SOLO] button and touch individual Parts).
2. Keep pressing the Knob Function button to access each level (TONE, EG/FX, EQ and ARP/MS). Use these other mixing features to further change the overall sound.
3. Adjust SWING and ARP GATE TIME to change the feel and gate rate of the Arpeggios. Again: To adjust all the Part of the Performance simultaneously touch the [PERFORMANCE (HOME)]; to adjust Parts individually, touch the [PART SELECT MUTE/SOLO] button and touch individual Parts).
 4. Many of the Arpeggio Performances are optimally mixed and the existing Parts may need to brought down in volume to balance with the drum Part. To do this, press the [PERFORMANCE (HOME)] button so you have selected the entire Performance and use the faders to mix each Part to taste. Hint: It’s much easier to first bring the Parts down in volume and them mix them together:

 You may have noticed the shortcut to the Envelope Follower in the Rhythm Pattern screen. More on that in the next article!
Have questions or want to share your thoughts? Join the conversation on the Forum here.


 Press [PERFORMANCE (HOME)] to call up the main Performance play screen and the dynamic CFX Concert Grand Piano Performance is active. To add a drum groove, press the [RHYTHM PATTERN] button and the Drum Kit select screen appears:
 Each of the drum kits listed above is programmed with a minimum of 5 Arpeggios. Touch on the first kit in the list, “Real Drums Kit”, and that kit along with its 8 corresponding drum Arpeggios appears in Part 5. As soon as you touch a key on the keyboard the drum Arpeggio will start playing:
 Touching on the “Category/Sub Category/Name” area in the screen brings up a crawl on the left. Here you can drop into Arpeggio Category Search or you can select an Arpeggio Phrase by number from the
  The Arpeggio Category Search works in a similar way as the Performance Category Search. You can search by instrument type in the “Main” section and by musical genre in the “Sub” section. You can even set your own favorite Arpeggios for instant recall:
 Experiment with various Performances and the Rhythm Pattern feature. Below are two ways you might find it useful
 2. Press the Rhythm Pattern button:

 4. Many of the Arpeggio Performances are optimally mixed and the existing Parts may need to brought down in volume to balance with the drum Part. To do this, press the [PERFORMANCE (HOME)] button so you have selected the entire Performance and use the faders to mix each Part to taste. Hint: It’s much easier to first bring the Parts down in volume and them mix them together:
 You may have noticed the shortcut to the Envelope Follower in the Rhythm Pattern screen. More on that in the next article!