E.S.P. v2.0

The Expanded Softsynth Plugin (E.S.P.) v2.0 for MONTAGE M has arrived! Go here for instructions on how to update and install!
System Requirements and Drivers
It is important to understand E.S.P. for MONTAGE M system requirements.
Windows
- OS Version: Windows 11 (64-bit), Windows 10 (64-bit)
- Plugin Format: VST 3
- Minimum CPU: Intel® Core™ i5 (8th Generation)
- Minimum Memory Required: 8 GB RAM or more
- Minimum HD Space Required: 10 GB free space
- Display Resolution: 1000 × 640 display resolution at least (1440 × 870 recommended)
Mac
- OS Version: MacOS 14.x, MacOS 13.x
- Plugin Format: VST 3, AU v2
- Minimum CPU: Intel® Core™ i5 (mid 2017 or later), AVX2 CPU support required (“Haswell” generation) or Apple Silicon (M Series)
- Minimum Memory Required: 8 GB RAM or more
- Minimum HD Space Required: 10 GB free space
- Display Resolution: 1000 × 640 display resolution at least (1440 × 870 recommended)
Note: E.S.P. is not compatible with multi touch display operation
Software
Yamaha Steinberg USB Driver: You’ll need the Yamaha Steinberg USB Driver to connect your MONTAGE M to your computer.
Download for Windows or Mac OS.
MONTAGE OS v2.0: E.S.P. v2.0 requires MONTAGE M OS v2.0. This latest OS version adds additional integration components for seamless connection between MONTAGE M and E.S.P.
Download MONTAGE M OS v2.0 here. Please see “Blake’s Take: MONTAGE M OS v2.0” and the READ ME file included with the download package for more information.
E.S.P. and Cubase AI Download and Installation
The download and installation process for E.S.P. is covered HERE. This guide takes your through the entire process. Here’s what to be aware of:
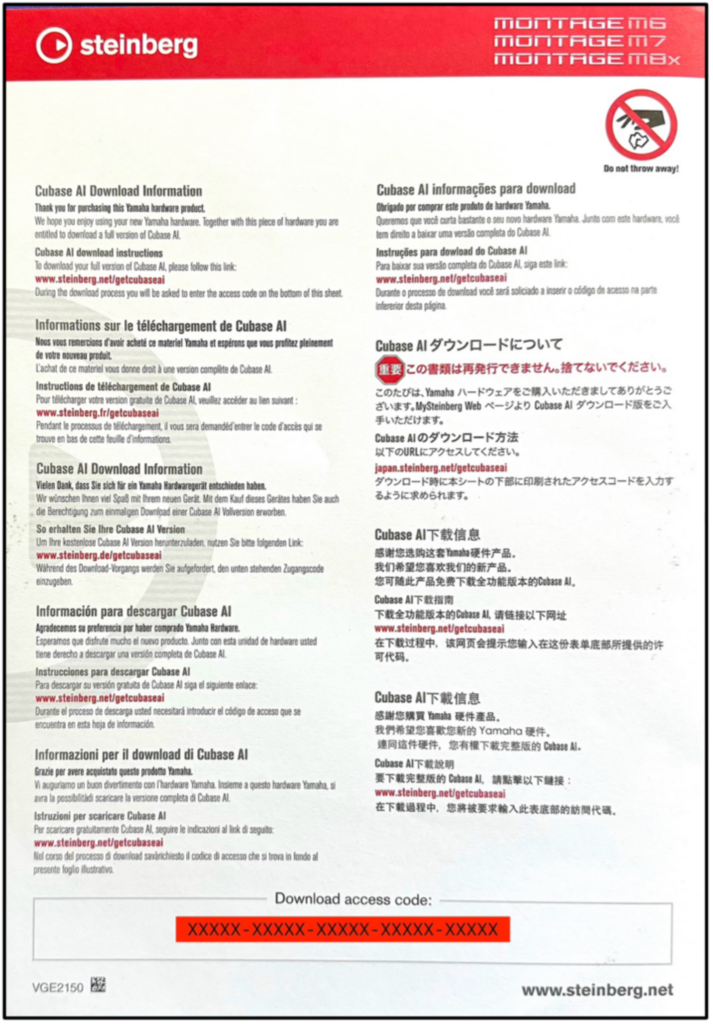
- The Download Access Code: In the box with your MONTAGE M is the Download Information sheet for the Expanded Softsynth Plugin for MONTAGE M. It looks like this:
The My Steinberg Account: E.S.P. uses the Steinberg licensing system. This link takes you through the download, installation and activation process. There are two Steinberg licensing installation and activation apps involved:
- The Steinberg Download Assistant: This is where you enter your Download Access Code and download the app installer
- The Steinberg Activation Manager: This is how you authorize downloaded apps for your computer.
At the bottom of that sheet is the Download Access Code. This is the code used to authorize E.S.P. for use with your system. This is where the Steinberg Download Assistant and Activation Manager come into play. Here is how you download and activate E.S.P. in three easy steps:
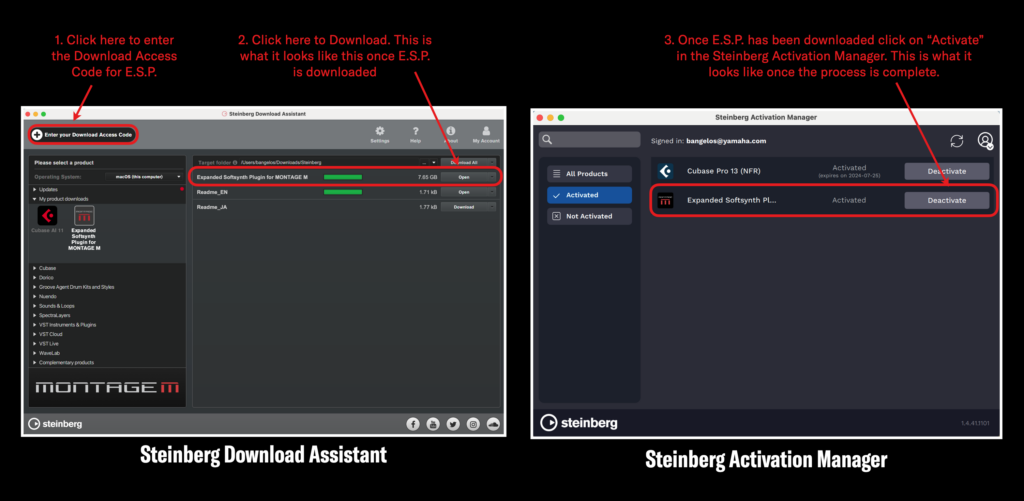
As with many Steinberg products you are allowed to activate E.S.P. on a maximum of three different computer systems.
Cubase AI: You may already use a DAW like Cubase, Logic Pro, Live, etc., that supports VST3 or AU v2 plugin formats. MONTAGE M owners get a free download of Cubase AI if you need a DAW or are interested in checking it out. Along with the E.S.P. Download Information sheet is the Cubase AI Download Information sheet with another access code. It looks like this:
The download, installation and activation process is the same for both E.S.P. and Cubase AI.
- Enter the download access code in Steinberg Download Assistant
- Click “Download” to get Cubase AI.
- Open the Steinberg Application Manager and click “Activate” to authorize Cubase AI for your computer.
Exploring the Expanded Softsynth Plug in for MONTAGE M v2.0
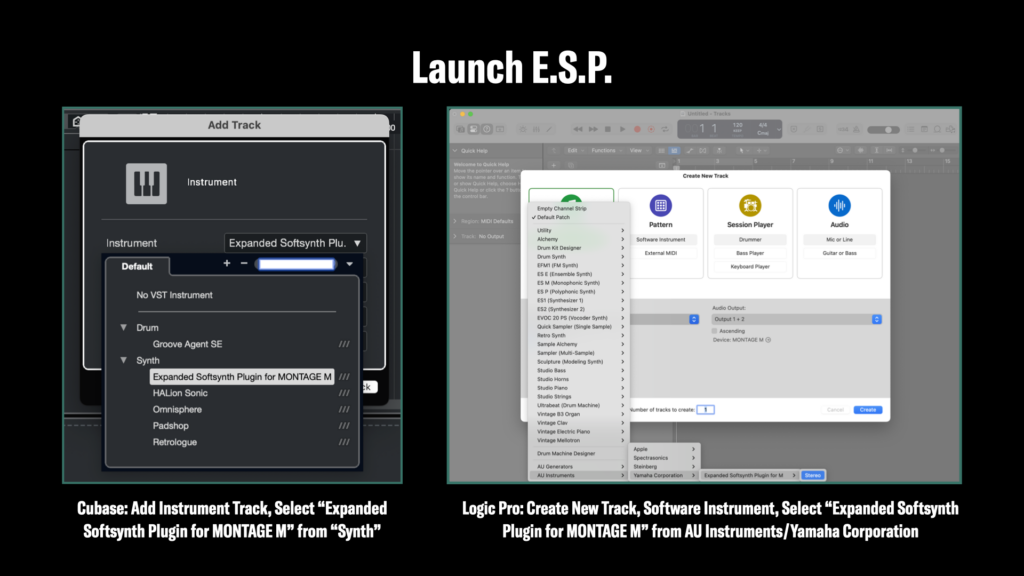
Add E.S.P. as an Instrument: Open your DAW and open E.S.P. as a new virtual instrument. DAWs handle this differently. Here’s how to do this in Cubase and Logic:
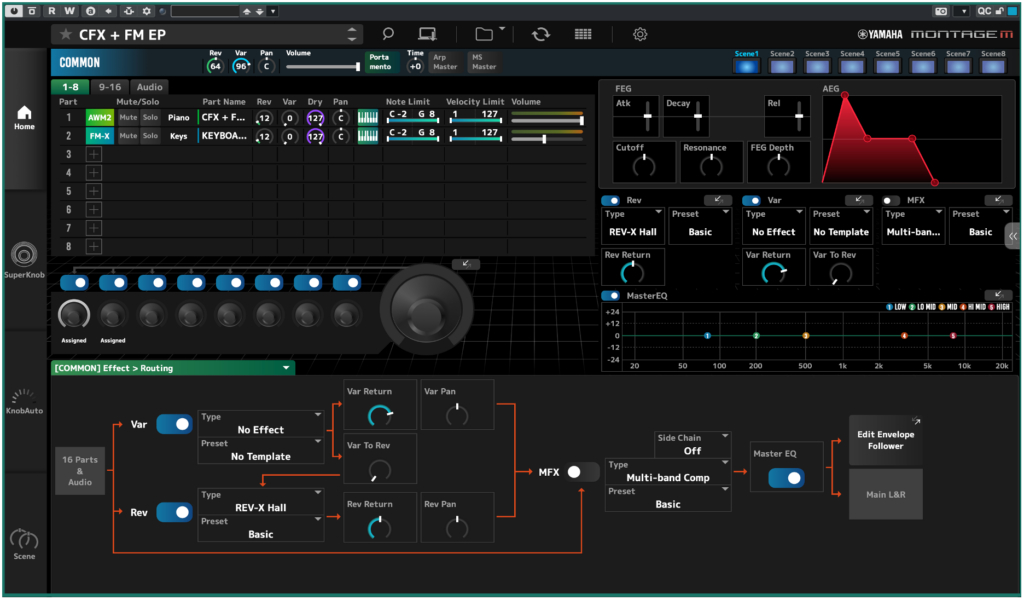
When you open E.S.P. you’ll see the Main Performance Window:
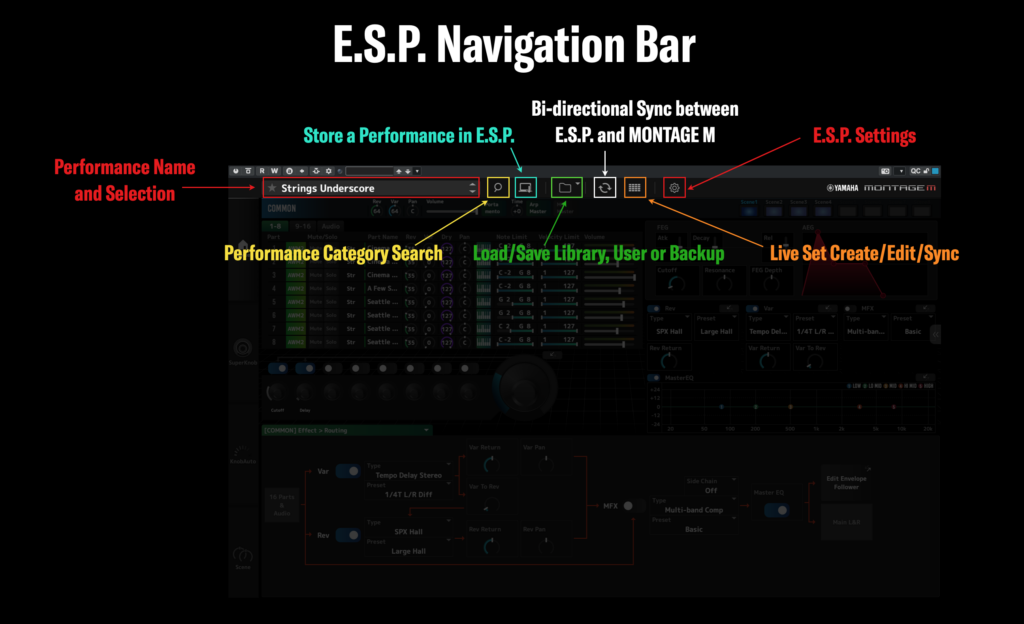
E.S.P. Navigation Bar: Across the top of the window is the Navigation Bar. This show the Performance Name and offers quick access to functions like Category Search, Store, Load/Save, Sync and more:
E.S.P. Category Search: E.S.P. features the same Category Search UI as MONTAGE M. Click on the magnifying glass icon (highlighted in Yellow above) to access E.S.P. Category Search. You’ll find all the MONTAGE M Presets here:
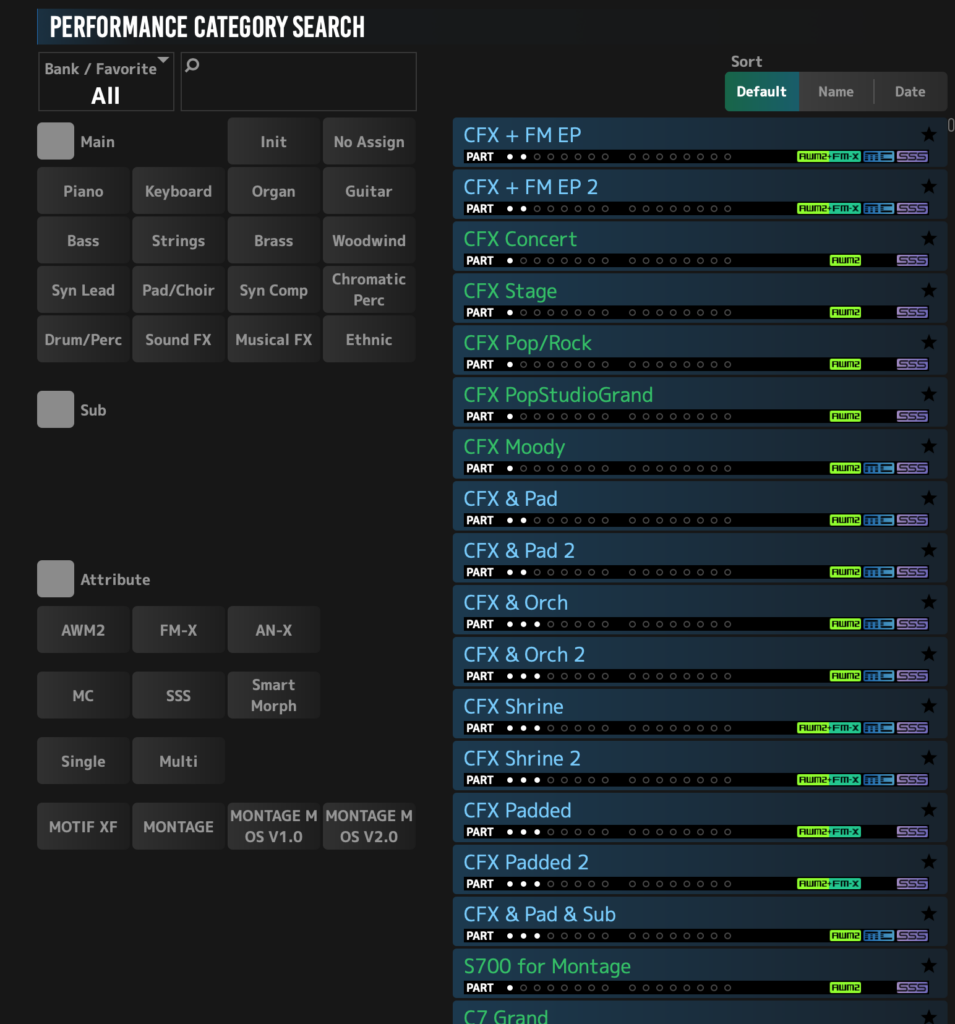
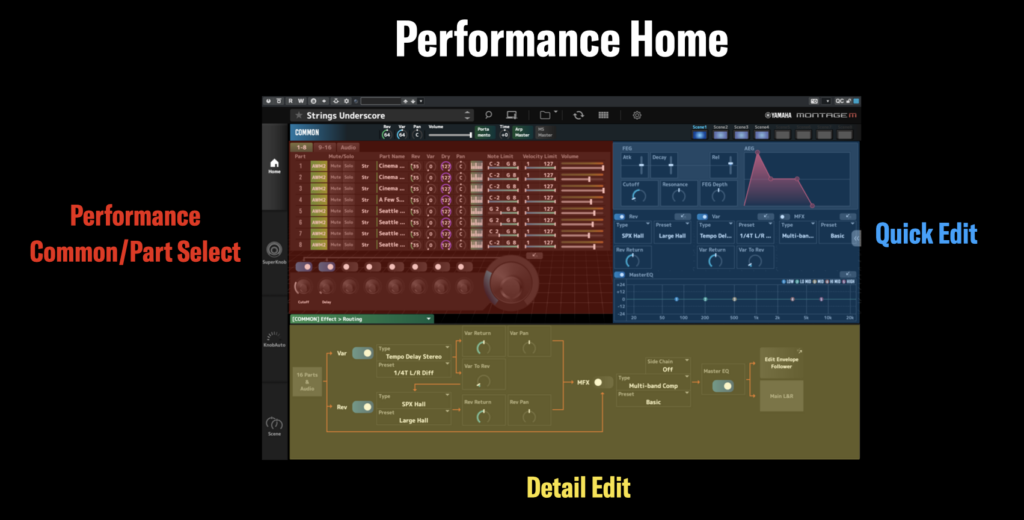
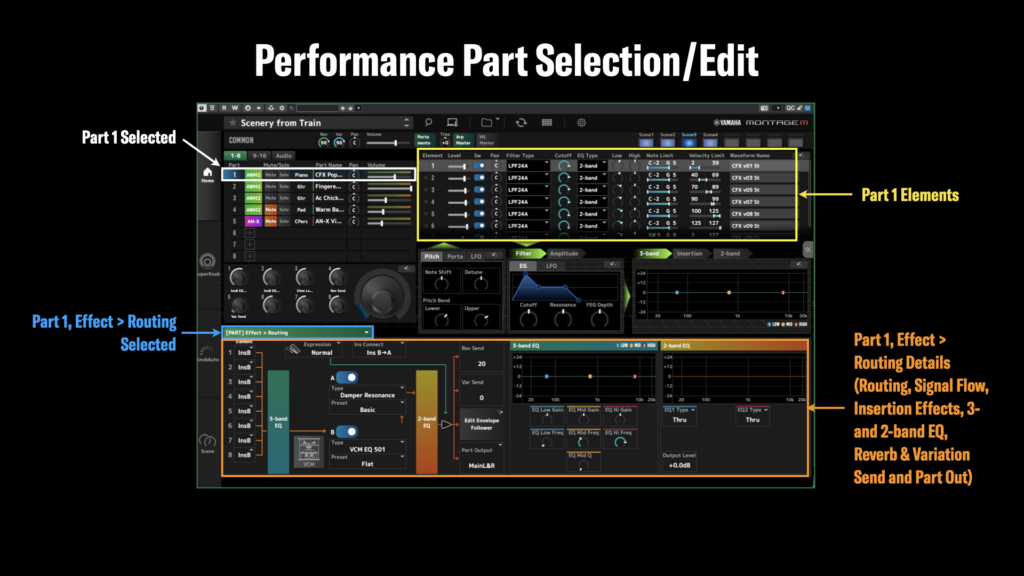
Performance Home: You can see that this is very similar to MONTAGE M Category Search, with Main, Sub, Attribute, Bank/Favorite and Text based search. Now let’s look at Performances in E.S.P. v2.0. I chose the Multipart Performance “Strings Underscore” and highlighted three sections in the image below. Performance Common/Part Select (in red below) and Quick Edit (in blue) was available in the first launch of E.S.P. What’s new v2.0 in the Performance Home view is Detail Edit (in yellow):
Performance Common Edit: The Detail Edit area gives you all the deeper Performance Common editing (the level that effects all Parts) and Part Common. When you select the Part Common level you can edit components of the Part by engine type: AWM2 Element, AN-X Oscillator and FM-X Operator. Below is the Performance Common Edit screen for the Performance “Scenery from Train”:

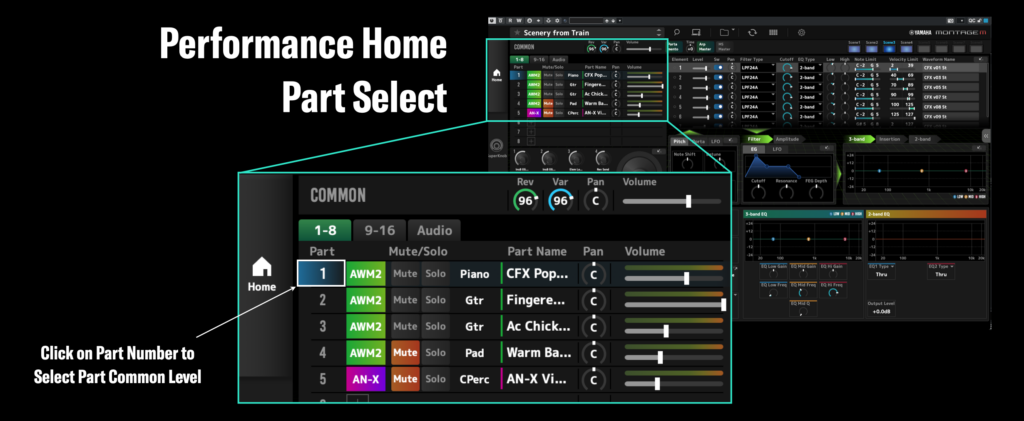
Performance Part Edit: To edit a Part in a Performance just click on a Part number. Below is the same Performance, “Scenery from Train”, with Part One selected. Note that the blue highlight surrounds the selected Part:
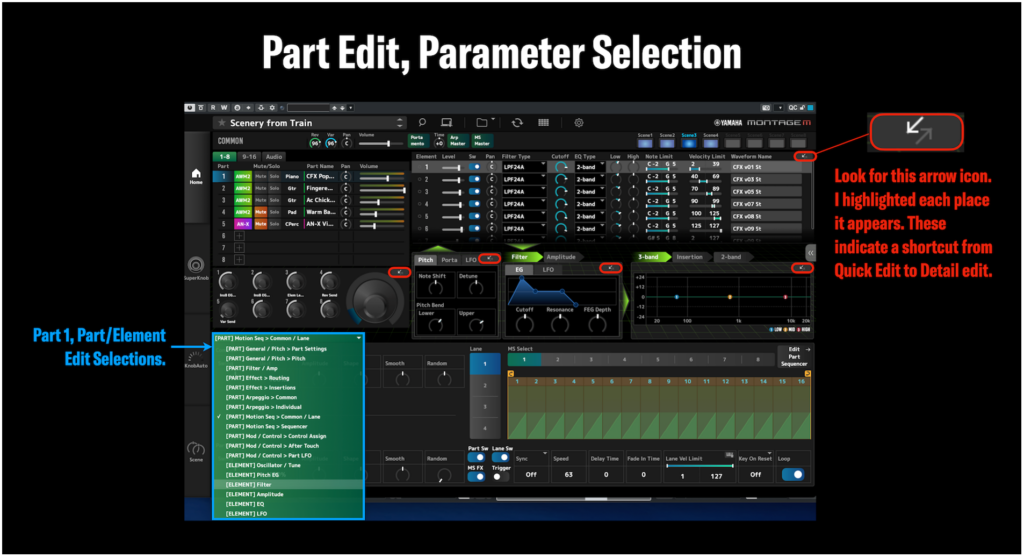
At this level the Parameters in Detail Edit now show both Part and Element/Oscillator/Operator selections. The image below shows the Part Common level Motion Sequence edit window ([PART] Motion Seq > Common/Lane):
Edit levels appear like this:
- [COMMON]: Performance Common edit level, affects all Parts.
- [PART]: Part Common edit level, affects Elements, Operators or Oscillators.
- [ELEMENT]: Individual Element edit level
- [OPERATOR]: Individual FM-X Operator edit level
- [OSCILLATOR]: Individual AN-X Oscillator edit level.
Editable parameters appear as all caps in brackets followed by a top-level item, then secondary item. For example, if you wanted to edit the Insertion Effects for a Part, you would select the Part and in the edit menu you’d select “[PART] Effect > Insertion”. Or if you wanted to edit Common effects like Reverb or Variation, you’d click on “COMMON” then select [COMMON] Effect > Reverb/Variation.
Part Parameter Selection and Shortcut: Something to be aware of are the shortcut icons located in the Quick Edit area. These work like the [PAGE JUMP] button on MONTAGE M I circled the icons in red below. Check it out:
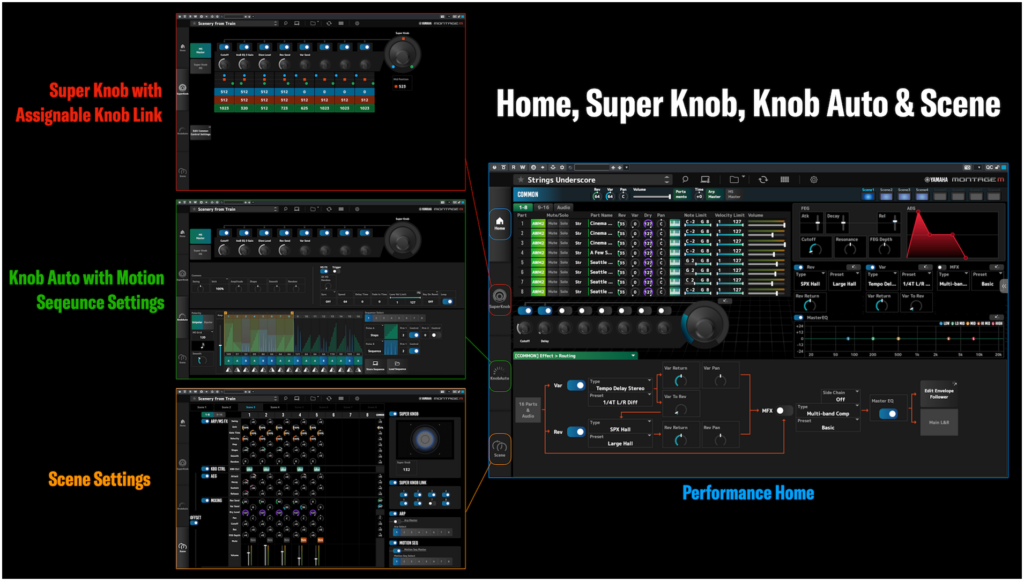
Home, Super Knob, Knob Auto and Scenes: On the left side of the main E.S.P. window, you’ll see Icons for Home, Super Knob, Knob Auto and Scenes. Clicking on any these Icon takes you to the corresponding feature. Check it out:
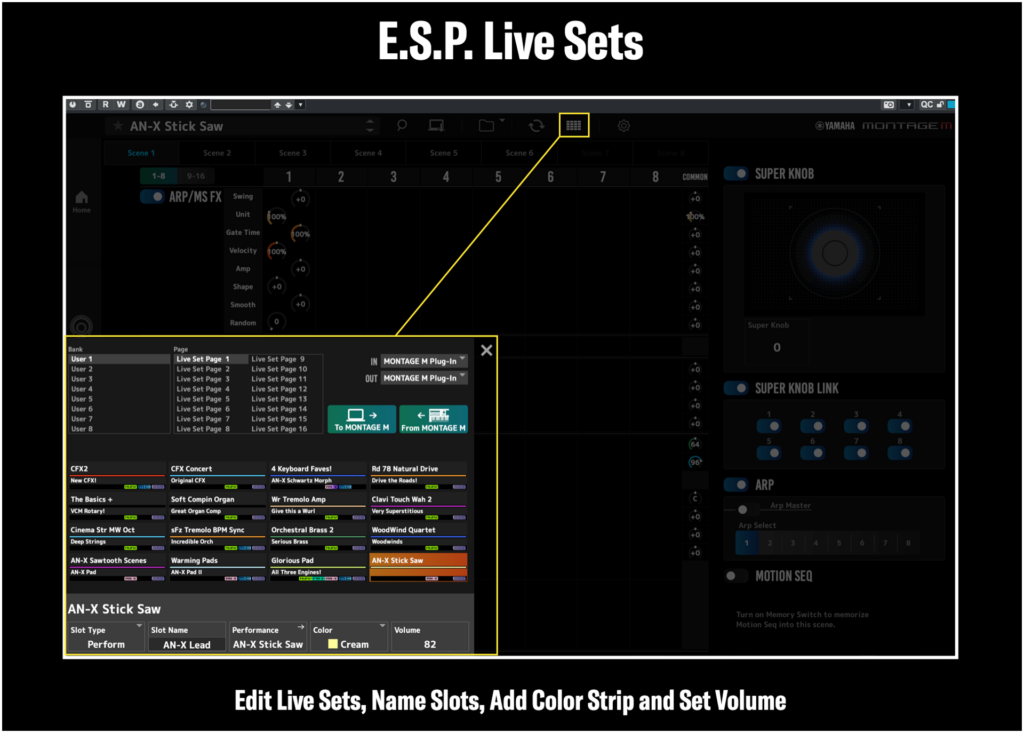
Live Set: You can edit Live Sets, Store them in E.S.P. and transfer them back to MONTAGE M. Some features on not available in MONTAGE M, like moving Performances into different Live Set Slots. You can easily change the slot name, the color strip and the volume:
Data Synchronization with MONTAGE M
E.S.P. V2.0 and MONTAGE M OS v2.0 feature additional bidirectional synchronization options beyond sharing Performances back and forth via the USB To Host Port. In addition to a single Performance, you can now send User, Libraries and Backup files between E.S.P. and MONTAGE M. Take a look:
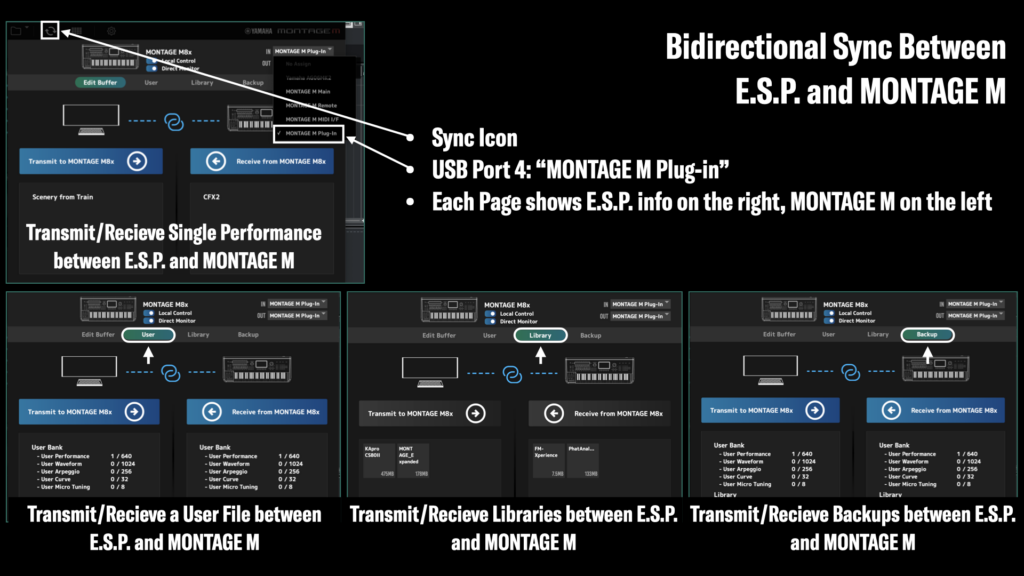
The MONTAGE M USB TO HOST connection sends and receives data on four separate ports. You’ll notice that these ports appear based on the data type. For synchronization Port 4 is used (MONTAGE M Plug In). The ports are designated as follows:
- MONTAGE M Main: Dedicated MIDI I/O for the MONTAGE M Tone Generator.
- MONTAGE M Remote: Dedicated DAW Remote Port.
- MONTAGE M MIDI I/F: MIDI information received is transmitted to the physical MIDI I/O on MONTAGE M. A good use case would be connecting an older rackmount tone generator to MONTAGE M MIDI I/O.
- MONTAGE M Plug In: Dedicated to E.S.P. control and synchronization.
The MONTAGE M/E.S.P. System
The E.S.P. v2.0 is a powerful addition to your MONTAGE M Music Synthesizer. If you have a computer that meets the system requirements, then you have all you need to get started. With MONTAGE M you get a free copy of Cubase AI and a virtual version of your awesome synthesizer. E.S.P. gives you so many cool use cases:
- MONTAGE M on the go: With E.S.P. you can connect a keyboard controller to your computer and have MONTAGE M sound anywhere. It’s a great to have while traveling. I’ve connected my CK61 to my laptop and played E.S.P. outdoors, monitoring the sound through the CK onboard stereo speakers.
- Double, triple, quadruple your music production power: Need more MONTAGE M sound? Open a MONTAGE M instrument track in your DAW. Need more? Open another! This is one of the great benefits of E.S.P. for MONTAGE M.
- Great addition to a live keyboard rig: MONTAGE M8x is a great home studio centerpiece. If you want to keep it connected to your home set up, you can still have MONTAGE M sound for live gigs with E.S.P. YC73 is a great keyboard for this purpose: It weighs just under 30 lbs., has weighted action and USB MIDI and audio connectivity.
- Stay in sync: The ability to transfer a single Performance, User file, Library and Backup files between MONTAGE M and E.S.P. streamlines file management and organization. Edit sounds in MONTAGE M and transfer to E.S.P. or vice versa. The workflow is great!


