

Tagged Under
The video below is a great accompaniment to this article. Check it out:
In the previous installment we covered the basic setup for recording MIDI Tracks in a Cycle (loop) to Cubase using the QUICK SETUP = “MIDI REC on DAW“. This time we’ll pick up with overdubbing a Part that is controlled by an Arpeggio… Using the QUICK SETUP =“ARP REC on DAW”.
This setup template places the Arpeggiator block prior to the USB-MIDI output, so those PARTs set to utilize an Arpeggiator will output the MIDI data of the Arpeggio as opposed to the Notes you use to trigger them directly. One of the important things to realize when you are triggering an arpeggio phrase, the notes you use to trigger them are usually not what you want to record to your MIDI Track, you want the phrase data (the note data) of the Arpeggio.
Selecting this template will automatically set the MIDI OUT of the active arpeggiators so that its data is sent to the DAW while the trigger notes are blocked.
Press [UTILITY]
Touch “Settings” > “Quick Setup”
Touch “ARP REC on DAW”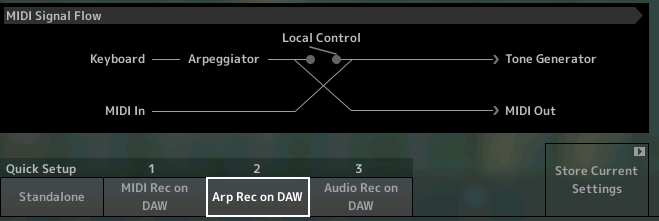
In the previous article we setup to record Drums, Bass and Clavi, using the “MIDI REC on DAW” template – which allows us to record our keyboard playing directly as normal MIDI data. Now let’s setup the “Mega 60s Clean” Guitar in Part 4 to use an appropriate arpeggio phrase.
When you select an Arpeggiator for a PART, it will automatically reference the tempo as currently set for the PERFORMANCE or for the Montage as a whole (if you are using external clock).
Here is our setup thus far:
Part 1 – Drums (recorded as MIDI)
Part 2 – Bass (recorded as MIDI)
Part 3 – Clavi (recorded as MIDI)
Part 4 – Guitar* w/Arp – which we will setup and record as MIDI.
* Press [EDIT]
Press [PART SELECT 4]
Press the lower [COMMON] button or the “Common” spot in the lower left corner of the screen
Touch “Arpeggio” > “Individual”
Touch the Name of the ARP in the first slot to engage the pop-in ARP SEARCH function… we are looking for the following ARP Phrase:
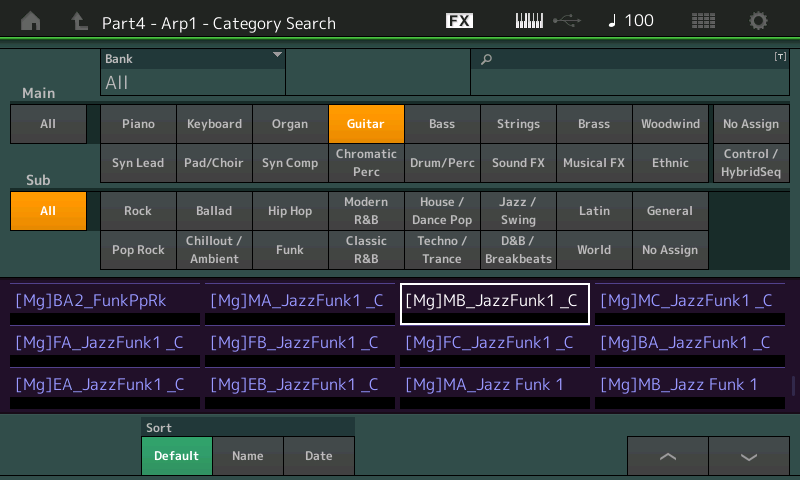
You can type in “JazzFunk” into the portion of the screen with the magnifying glass to initiate a text search…
We want to assign Arpeggio “[Mg]MB_JazzFunk1_C” to slot 1
Press [ENTER]
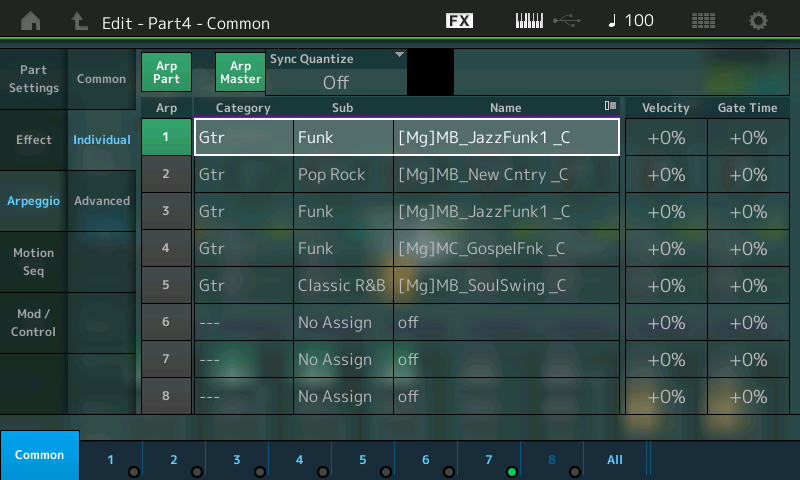
In the screenshot above you can see the 8 ARP SELECT locations… (only 5 are currently filled)…
As is true throughout MONTAGE – the important functions that you need to access are repeated on the related screens to give you convenient access. The PART ARP SWITCH “Arp Part” and the MASTER ARP SWITCH “Arp Master” both appear here at the top of the screen. Both need to be activated. The MASTER ARP SWITCH must be ON for any of the ARPEGGIATORS to work and obviously each individual PART has its own switch which must also be activated. Remember, an ARP does not start simply by turning the ARP SWITCH ON. You must also meet the requirements setup for that ARP to play. To see these requirements:
Touch “Common” in the second column to see the requirement and settings that define the arpeggio.
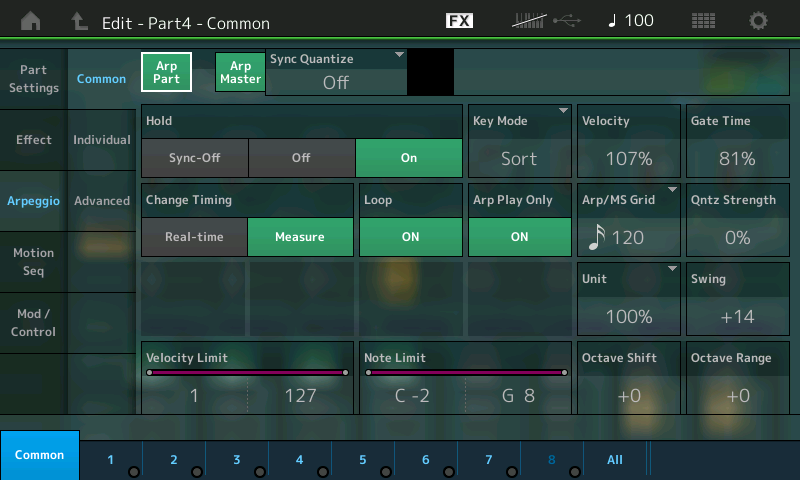
On the PART > “Argeggio” > “Common” screen you can see how this arpeggio has been set to respond.
ARP SYNC QUANTIZE – Sets a value for the accuracy of feeding chord intelligent information to the ARPEGGIATOR. If set to a value like 240 clock pulses (an eighth note, to you and me) then you need only be within an eighth note of the downbeat to correctly have the arpeggio change at the top of the next measure. With computer-based/chip-based artificial intelligence, you can be ANY THING BUT LATE. It is better to feed the information to the technology prior to the downbeat. If you are late (musically, late) you will hear the error as the technology tries to accommodate you. If however, you feed the F7#9 chord within an eight note of when you wish to hear it, the 240 setting will make you sound great, immediately! It QUANTIZES only the start of the ARPEGGIO PHRASE – it does NOT, change the timing of the phrase itself, just the “START” of the phrase. This means if you are late by an eighth note, the phrase will remain clock shifted exactly 240 clock ticks behind the beat!
HOLD – determines how it responds to your key presses. ON means you do not have to hold the keys for it to continue. OFF means you do have to hold the keys for it to continue. SYNC-OFF means you do not have to hold the keys and the arp runs freely in the background, maintaining tempo and positition within its phrasing.
KEY MODE – has to do with how the arpeggiator deals with the phrase data. Currently your Key presses are being sorted by the specific arp phrase. If set to DIRECT, your trigger notes are heard.
CHANGE TIMING – Set to change at the top of the measure. This forces the Arp phrase to always be posititioned properly within the measure count.
Velocity, Gate Time, Arp/MS Grid, Quantize Strength, Unit Multiply, and Swing are a part of the Arpeggio Play Effect and can alter the timing and feel of the arpeggio phrase. (More in a future article)
VELOCITY LIMIT / NOTE LIMIT – These define which KEYS on your keyboard will control the arpegggio phrase for this PART and at what play strength is required to control it. Phrases can be set to start by triggering specific keys at specific velocities.
OCTAVE SHIFT – will increase or decrease the octave that the phrase is set to play
OCTAVE RANGE – will allow each successive phrase to transpose up and octave. First time through origianl Octave, next time through the Octave will be offset by the value set here.
In Cubase, if you have Dissolved Parts, or you elect to always record to separate tracks, you can setup to record the Guitar ARP to its own MIDI track. But it is totally possible to continue to use a single MIDI RECORD TRACK in Cubase (Channel = ANY) as MIDI does allow data to remain discreet by Channel alone.
If you create a separate MIDI Track set the Channel to “4” to match the Channel of the MONTAGE; PART 4 is set to transmit on MIDI Channel 4.
You will want to turn the CYCLE RECORD function OFF. When recording arpeggios, you want to record through once, start-to-end, to avoid doubling when it loops around. If you think that you are fast enough to stop it before it begins again, you are not!
Use the Cubase Click and Count-in, because your main job is to trigger that arpeggio chord on the downbeat so that the phrase sits in time with the track.
After recording ARPEGGIO data to an external DAW, you must ensure that on playback you are not triggering the ARPEGGIATORS. Understanding the MIDI signal flow chart will help here. When you setup for “ARP REC on DAW” the routing places the Arpeggiators just after the keyboard and just prior to the MIDI OUT (shown below) so that it is able to filter out your control notes and output the arpeggio phrase data instead.
KEYBOARD > ARPEGGIATOR > MIDI OUT
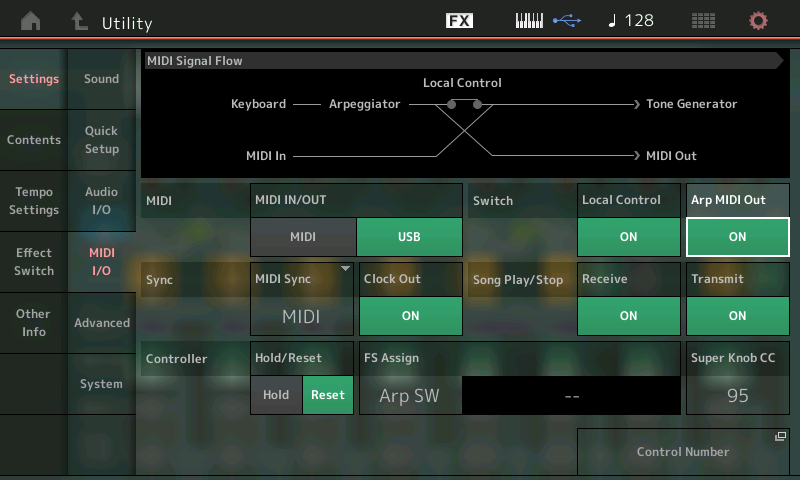
When the data returns (echoes back) from the DAW it arrives via MIDI IN and triggers the TONE GENERATOR.
Whenever you are going to playback data, so as not to have the incoming MIDI data trigger the arpeggiator, it must be in the condition you see above. The MIDI In does not travel through the arpeggiator. If ever you are playing back data and it is retriggering the ARPS it will behave strangely – the arpeggio generated data is not acting to retrigger the arp phrase – this is not good. Once you have completed recording arp, you will want to make sure the ARP MIDI OUT = ON. This places the ARPEGGIATOR out of the way of returning MIDI IN data.
In the screen above (Settings > MIDI I/O) toggle the ARP MIDI OUT parameter ON and OFF and notice the MIDI Signal Flow diagram. What this switch does is move the location of the ARPEGGIATOR. All signals travel left to right.
ARP MIDI OUT = OFF: KEYBOARD > MIDI OUT > DAW (Cubase) > MIDI IN > ARPEGGIATOR > TONE GENERATOR
MULTI PART RECORDING – with MULTIPLE ARPEGGIATORS
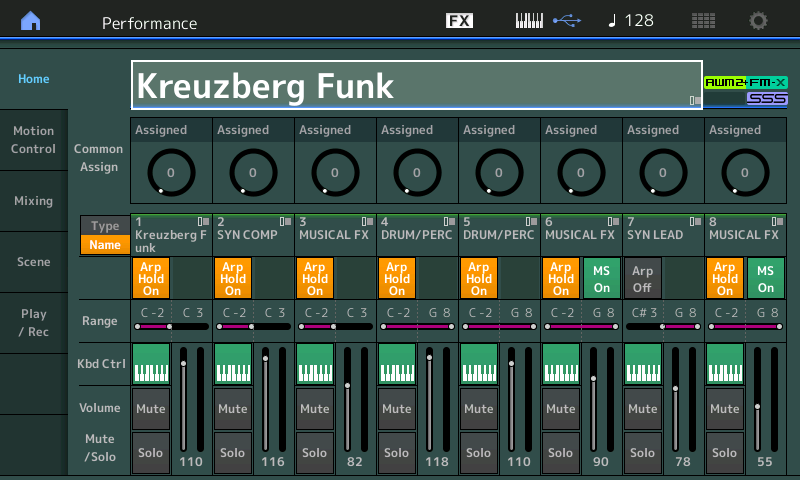
Any time you have multiple Parts and multiple arpeggiators, it works the same as recording one. Use the QUICK SETUP #2: ARP REC on DAW. This sets the ARP MIDI OUT parameter to ON, and allows those PARTS with ARPEGGIOS to be documented as MIDI data, yet those PARTs you are playing directly are recorded normally. Try a quick experiment using the “Kreuzberg Funk” Performance. This 8 PART Performance includes 7 Arp PARTS controlled in a left hand split, and has a synth lead sound C#3 and above.
_ MONTAGE is set to MIDI I/O mode = Multi – meaning you are set to transmit on multiple MIDI channels simultaneously. UTILITY > “Settings” > “Advanced” > MIDI I/O mode = Multi
_ Create a single MIDI track in Cubase with the MIDI OUT channel set to “ANY” – allowing each recorded channel to be echoed back OUT on the channel on which it arrives – “Dissolve Parts” later.
_ Set Cubase to transmit MIDI Clock Out to MONTAGE Port 1. Go to TRANSPORT > PROJECT SYNCHRONIZATION SETUP > MIDI CLOCK OUT > DESTINATION > Montage Port 1
_ Use the “ARP REC on DAW” template to record and to playback what you’ve recorded. This automatically sets the MIDI SYNC = MIDI and sets ARP MIDI OUT = ON
_ Because the MIDI data recorded may contain SCENE change, and therefore ARP commands, ensure that ARP MIDI OUT = ON is selected when playing back your MIDI data
_ [SHIFT] + [ARP ON/OFF] is the shortcut to ARPEGGIO BYPASS. This function (added with firmware 1.20.x) causes the main [ARP ON/OFF] button to flash, as it bypasses all ARPEGGIO Functions. This can be useful when you want to playback data from a DAW and not have that data trigger the internal ARPEGGIOS… chaos will always follow if you let MIDI data playback and trigger the Arpeggiator (again). You must defeat input to the arpeggiator during playback! ARPEGGIO BYPASS accomplishes this!
Join the conversation about this article on our Forum here.
And check out the next article in the mini-series: “CUBASE SETUP GUIDE WORKFLOW 2: AUDIO REC on DAW” – now available here – and learn how to make the most of your MONTAGE!